
The ![]() Worldsend Cavern is a cave system in
Worldsend Cavern is a cave system in ![]() Dragon’s Dogma 2 that you can explore for equipment and items such as the
Dragon’s Dogma 2 that you can explore for equipment and items such as the ![]() Ring of Grit and
Ring of Grit and ![]() Seeker’s Tokens. Situated west of
Seeker’s Tokens. Situated west of ![]() Sacred Arbor, this cavern can only be accessed through the
Sacred Arbor, this cavern can only be accessed through the ![]() Ancient Battleground, another large cave, which can be found just below it. Read on to find out how to get to the Worldsend Cavern and where to find every piece of loot.
Ancient Battleground, another large cave, which can be found just below it. Read on to find out how to get to the Worldsend Cavern and where to find every piece of loot.
The Worldsend Cavern is a hidden cave system in Dragon’s Dogma 2.
Worldsend Cavern Location
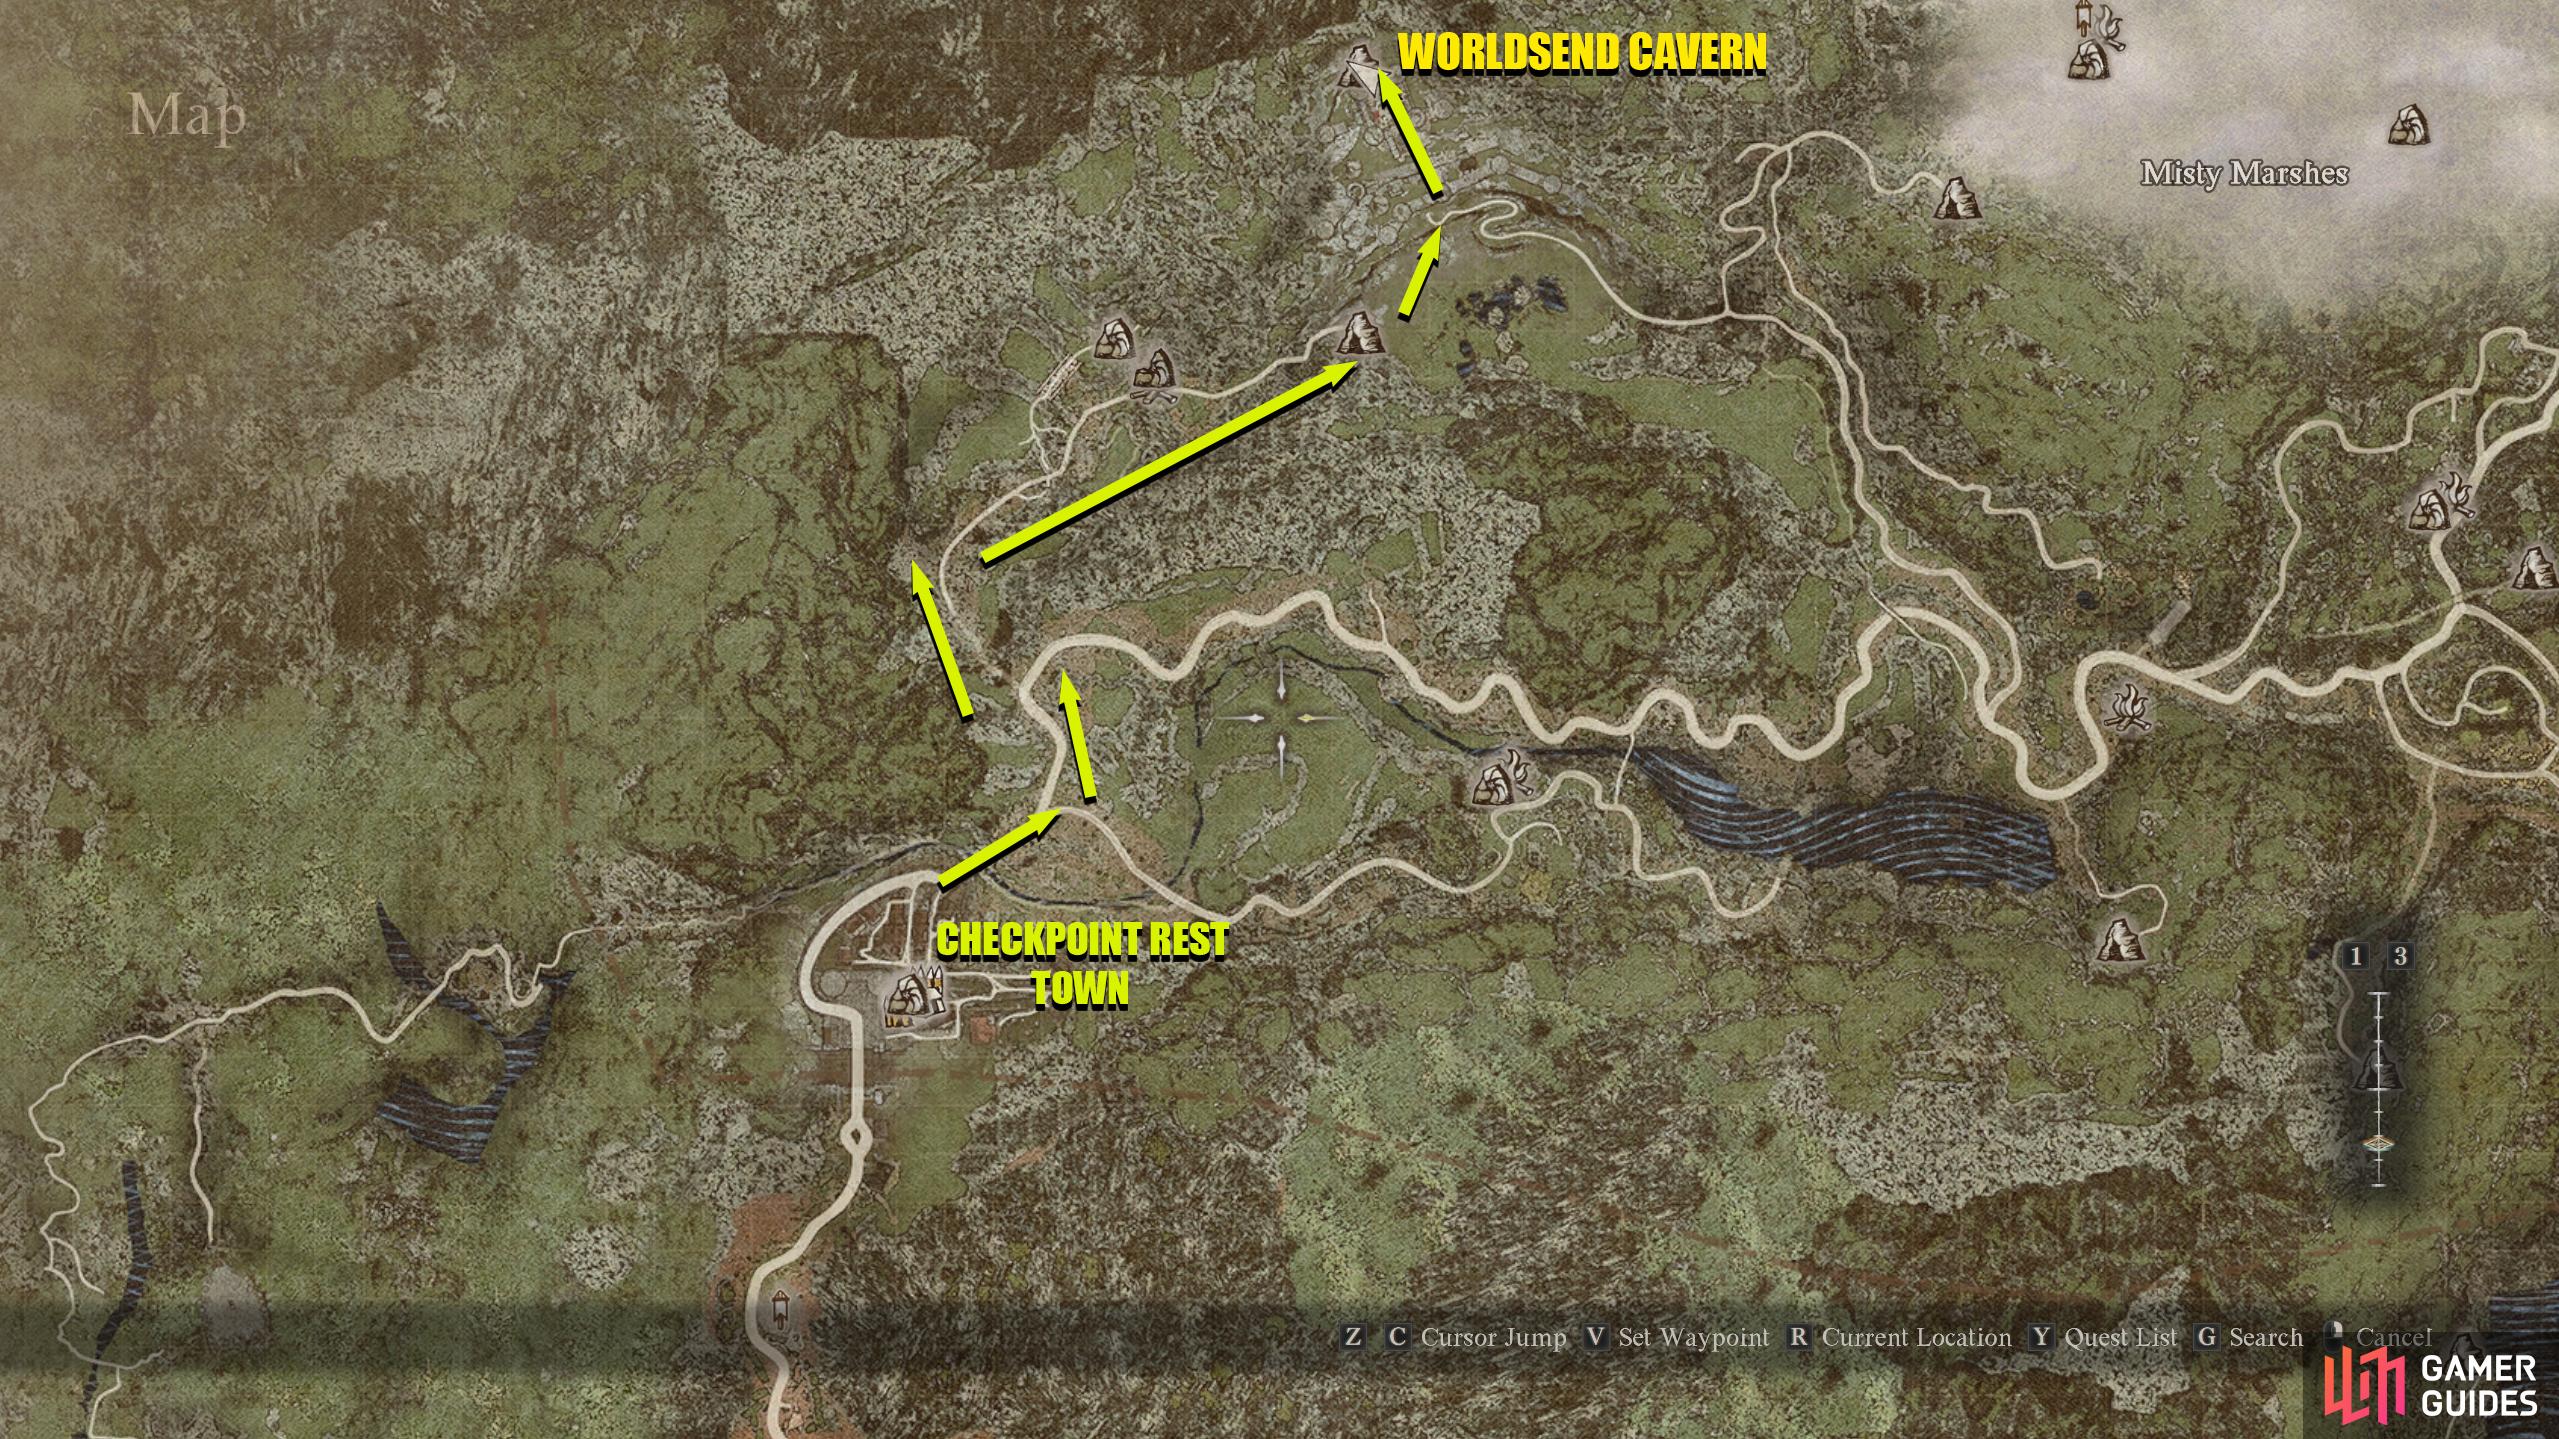
You can find the Worldsend Cavern northeast of the ![]() Checkpoint Rest Town, and that’ll be your quickest method of reaching it unless you want to head through the Misty Marshes, and no one wants to go through there. Take an Oxcart to Checkpoint Rest Town if you’re not already there, and then exit the town via the northern exit. Follow the road north/northeast until you reach an intersection with a path leading east and another north. Take the northern path down the slope, and you’ll find yourself in an area with numerous movable boulders. Use these to take out the
Checkpoint Rest Town, and that’ll be your quickest method of reaching it unless you want to head through the Misty Marshes, and no one wants to go through there. Take an Oxcart to Checkpoint Rest Town if you’re not already there, and then exit the town via the northern exit. Follow the road north/northeast until you reach an intersection with a path leading east and another north. Take the northern path down the slope, and you’ll find yourself in an area with numerous movable boulders. Use these to take out the ![]() Rattlers if you want, and continue along the path until you reach a dilapidated bridge.
Rattlers if you want, and continue along the path until you reach a dilapidated bridge.
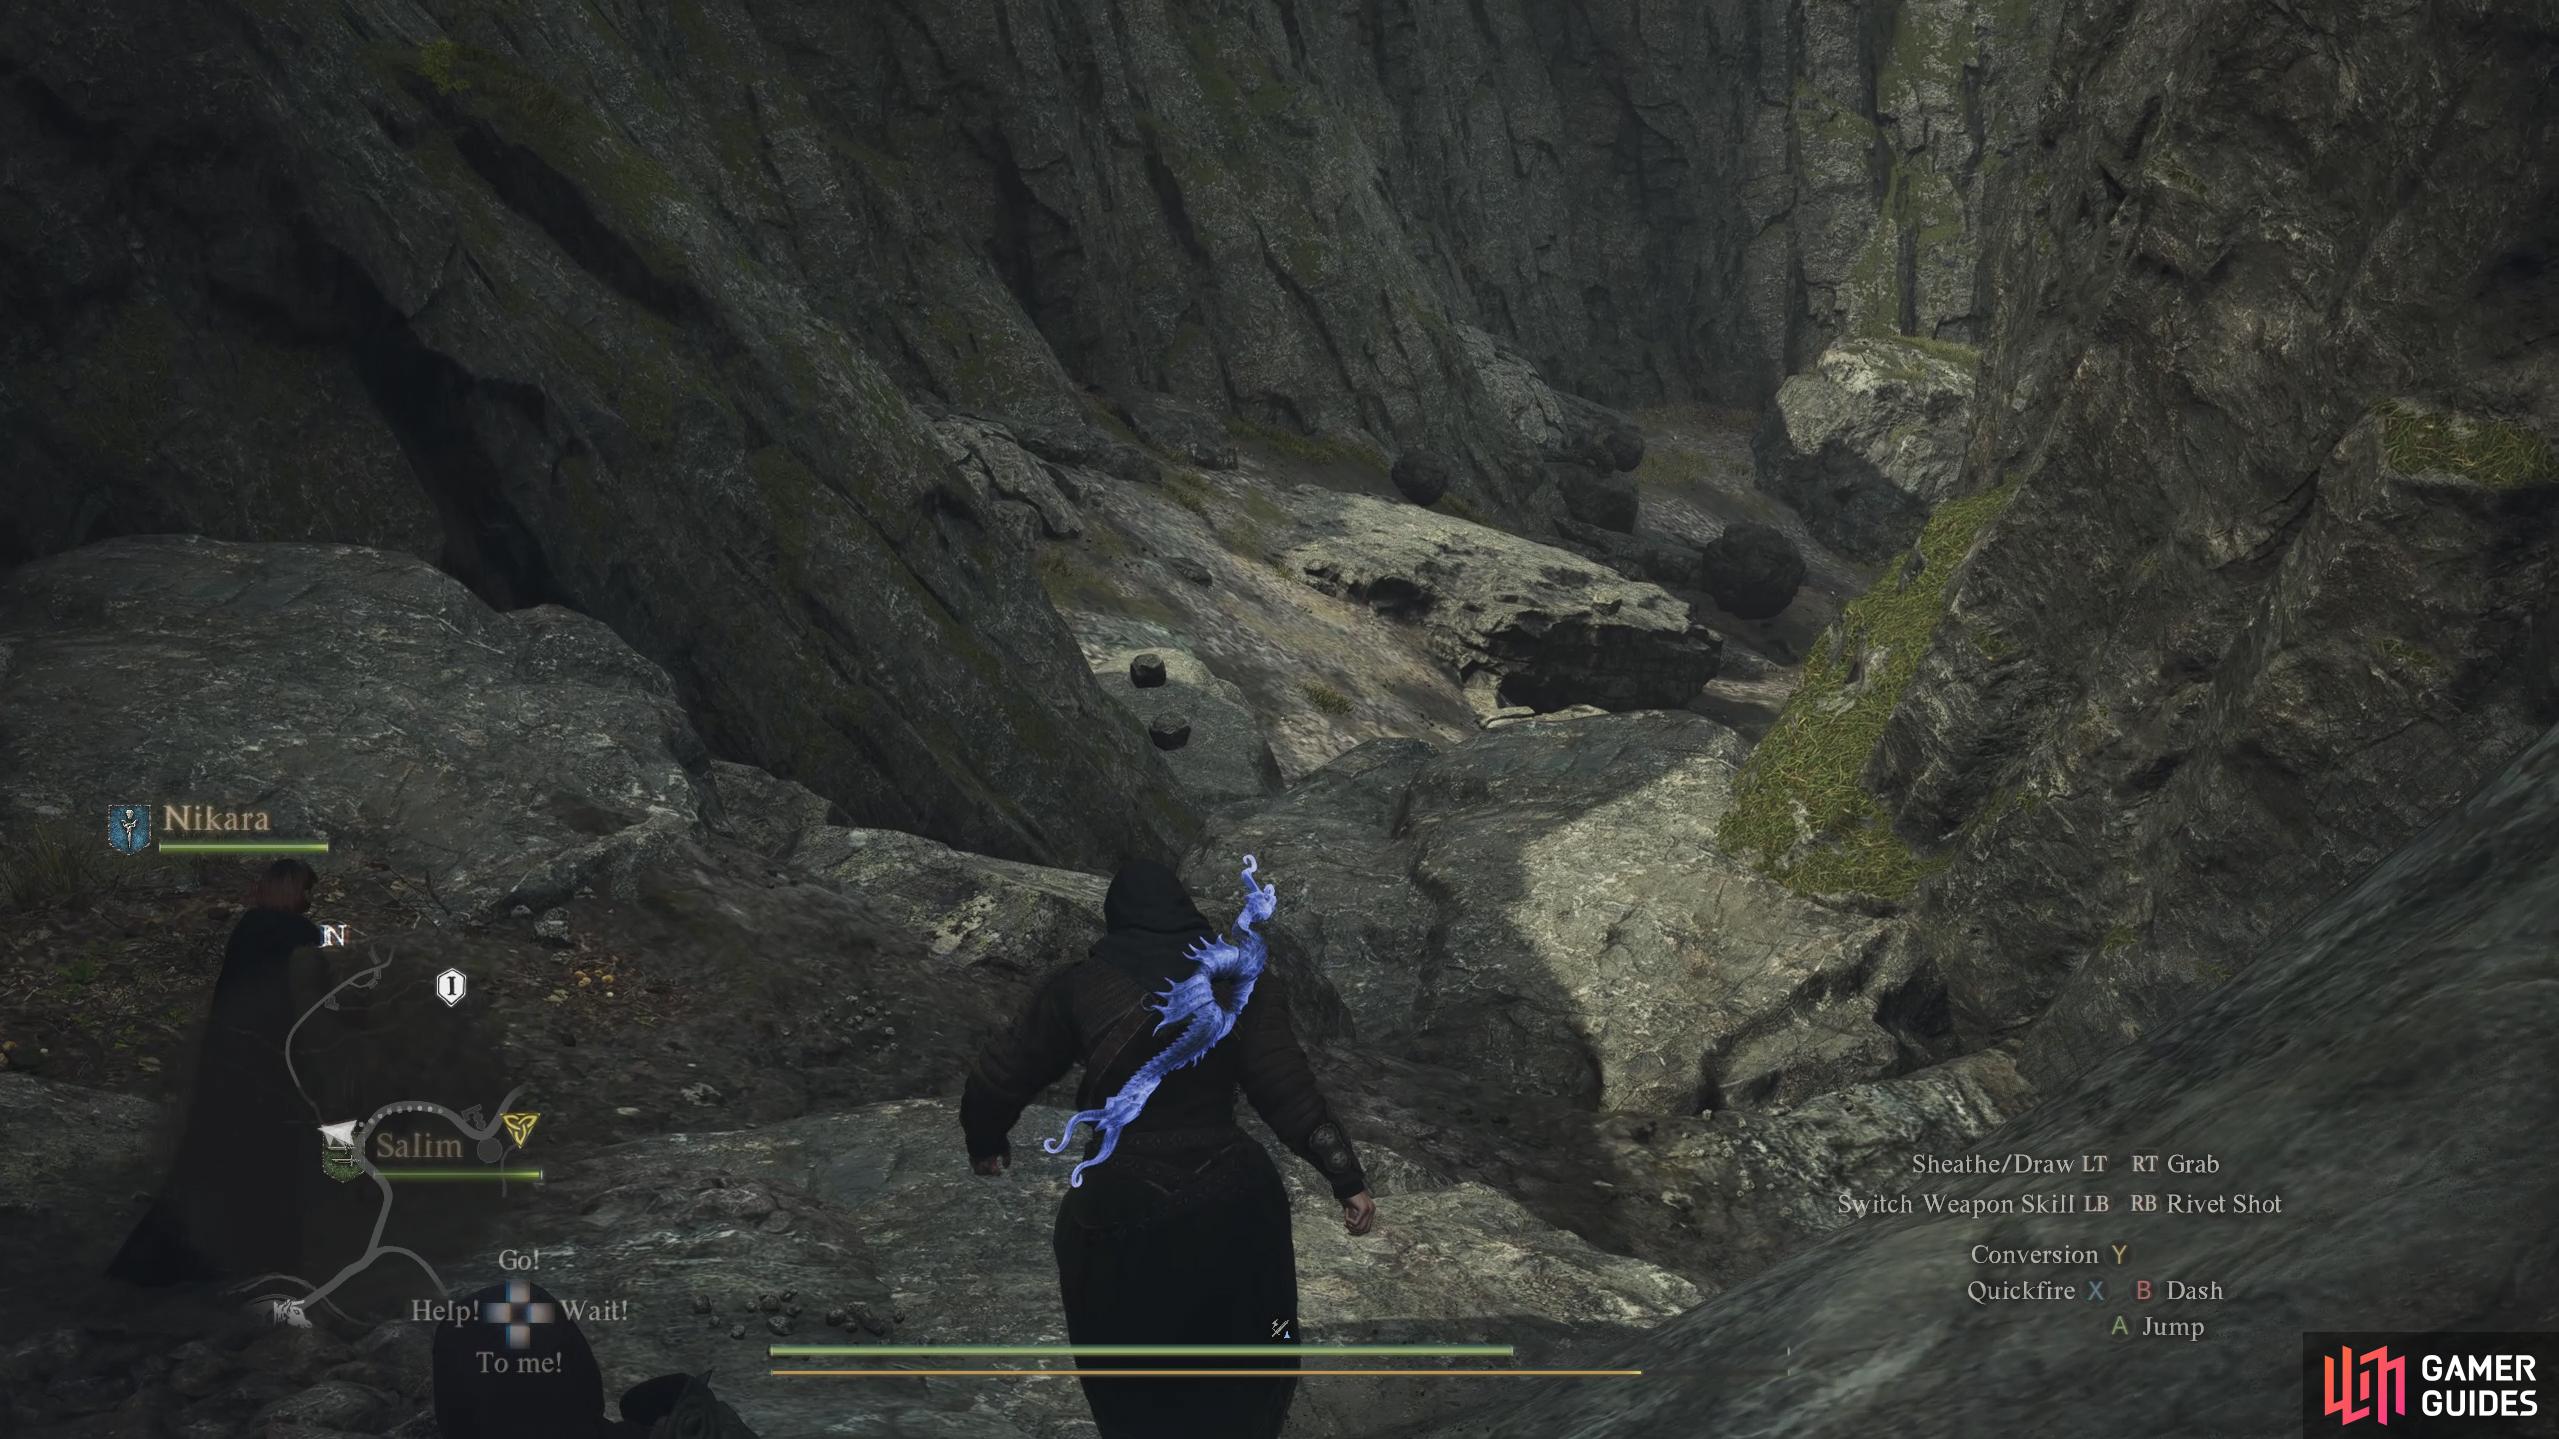
Continue east under the bridge, where you’ll find a small wooded area with a Riftstone and a Campfire. Heal up at the campfire if you need to before you decide on whether you want to fight the upcoming ![]() Drake and
Drake and ![]() Cyclops in the next area, although you can ignore them if you want as you don’t need to go past them. Continue east along the path until you reach the stairs leading down with the ballista. If you go forward, you’ll find the Drake and Cyclops, however, if you climb up the grassy ledge to your left, you’ll end up in the Ancient Battleground, which is where you want to go. Follow the grassy path east until you reach a pile of rubble, and then head into the Ancient Battleground to your left.
Cyclops in the next area, although you can ignore them if you want as you don’t need to go past them. Continue east along the path until you reach the stairs leading down with the ballista. If you go forward, you’ll find the Drake and Cyclops, however, if you climb up the grassy ledge to your left, you’ll end up in the Ancient Battleground, which is where you want to go. Follow the grassy path east until you reach a pile of rubble, and then head into the Ancient Battleground to your left.
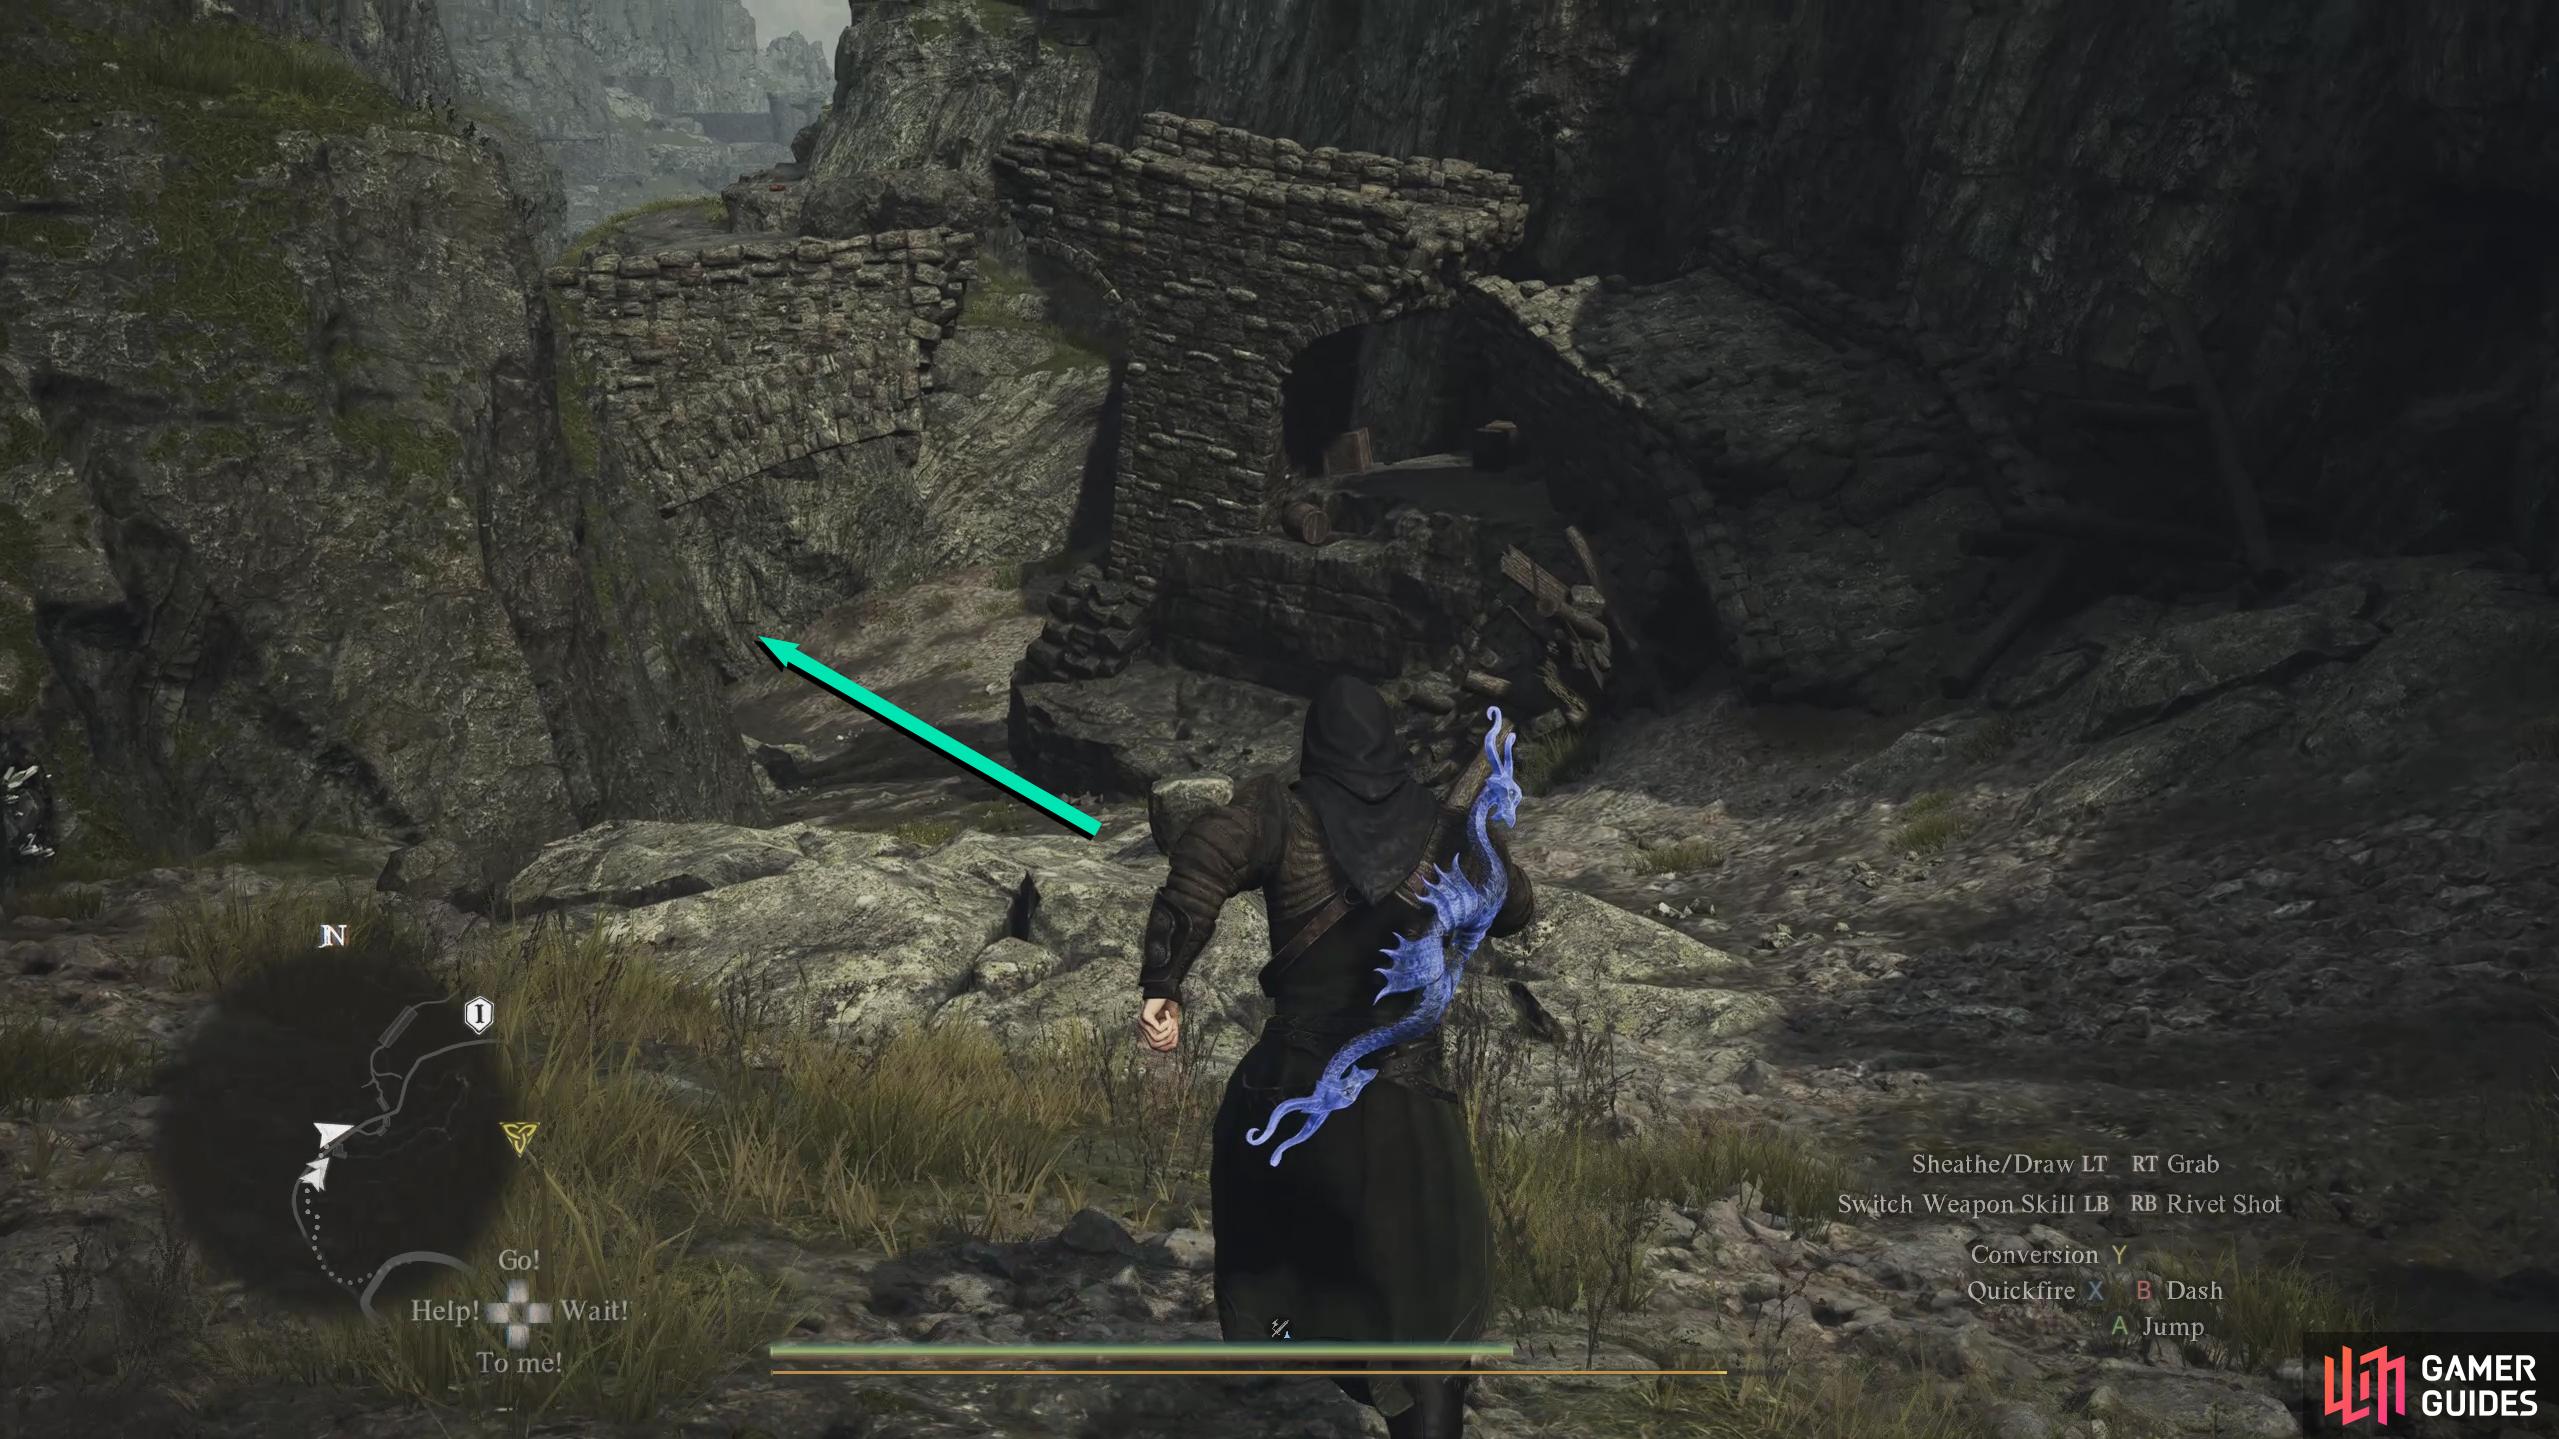


This is a dungeon in its own right, so we’ll just give you directions to reach the Worldsend Cavern, but be aware there is numerous loot and enemies to defeat (mainly undead) along the way, so make sure you explore it if you haven’t been here before. Inside the Ancient Battleground, head through the door to your left as soon as you enter, climb the tower, and then the ladder. This will place you atop the tower, where you’ll find a destroyed wall you can pass through. Use this convenient path to head east onto the path with the blue lantern on the floor. To your north, you’ll find scaffolding you can climb with a ladder above. Climb the scaffolding and go up the ladder, and then continue north up the stony stairs, where you’ll find a Cyclops nearby. Defeat the Cyclops and climb the ladder behind it to the west. Atop the ladder, head north over the crumbled wall, and you’ll find the Worldsend Cavern.


(1 of 4) Follow the path from the top of the tower east, and then climb the scaffolding as well as the following ladder.
Worldsend Cavern Guide
Head into the ominous opening and follow the muddy slope north until you reach an open room. Here, you’ll find a group of Bandits to take care of. Defeat them, pick up the ![]() Grass-Patterned Camping Kit in the northwest corner and rest at the campfire if you need to heal. This room doesn’t have a lot of loot but there are numerous pieces of ore scattered around the floor and a
Grass-Patterned Camping Kit in the northwest corner and rest at the campfire if you need to heal. This room doesn’t have a lot of loot but there are numerous pieces of ore scattered around the floor and a ![]() Fruit Roborant on the ledge in the southeast corner. When you’re done looting, head through the eastern tunnel defeating the
Fruit Roborant on the ledge in the southeast corner. When you’re done looting, head through the eastern tunnel defeating the ![]() Bats while doing so, and follow the path into the room with the large hole in the center. Take the path north first, and head down the makeshift stairs to the lower floor.
Bats while doing so, and follow the path into the room with the large hole in the center. Take the path north first, and head down the makeshift stairs to the lower floor.


(1 of 2) The Grass-Patterned Camping Kit can be found on the ledge opposite the campfire.
The Grass-Patterned Camping Kit can be found on the ledge opposite the campfire. (left), At the intersection, head down the stairs north to find the Whitecobble deposits. (right)
Here, you’ll find numerous deposits of predominantly ![]() Whitecobble, which is quite rare outside this cave. Now head back up, and turn to the southeast corner of the room to find an ominous boulder. Attack the boulder to unveil a new path and take it into the following room where you’ll get ambushed by some
Whitecobble, which is quite rare outside this cave. Now head back up, and turn to the southeast corner of the room to find an ominous boulder. Attack the boulder to unveil a new path and take it into the following room where you’ll get ambushed by some ![]() Phantoms. Take them out with magick attacks (or magick-imbued weapons), and open the chest on the small ledge in the southwest corner for 2x
Phantoms. Take them out with magick attacks (or magick-imbued weapons), and open the chest on the small ledge in the southwest corner for 2x ![]() Onyx. When you open the chest, another Phantom will spring out of the chest, so defeat it and then follow the wall north where you’ll find another small ledge with a Seeker’s Token on it.
Onyx. When you open the chest, another Phantom will spring out of the chest, so defeat it and then follow the wall north where you’ll find another small ledge with a Seeker’s Token on it.


(1 of 3) Destroy the boulder to unveil a new path.
Exit the room and head through the eastern tunnel until you reach an intersection. Follow the eastern path to another open room with some more Phantoms. Deal with the Phantoms and then open the nearby chest behind the fallen pillar for 2x ![]() Jasper, and then open the chest in the south corner of the room near the southern tunnel, next to the standing pillar for 5,000G (this becomes 50,000G in NG+). Once again, Phantoms will fly out of the chests when opened, so be careful when opening them. In the north of the room, you’ll find an item glowing atop the small pedestal which contains the Ring of Grit. Just as you go to pick it up, guess what happens? That’s right, another Phantom will attack you. Dispatch the Phantom, pick up the ring, and head into the southern tunnel to find a Whitecobble deposit and some
Jasper, and then open the chest in the south corner of the room near the southern tunnel, next to the standing pillar for 5,000G (this becomes 50,000G in NG+). Once again, Phantoms will fly out of the chests when opened, so be careful when opening them. In the north of the room, you’ll find an item glowing atop the small pedestal which contains the Ring of Grit. Just as you go to pick it up, guess what happens? That’s right, another Phantom will attack you. Dispatch the Phantom, pick up the ring, and head into the southern tunnel to find a Whitecobble deposit and some ![]() Miasmite on the floor.
Miasmite on the floor.


(1 of 3) This chest is 50,000 G on new game plus while only being 5,000 G on a normal playthrough.
Go back to the previous room and take the eastern tunnel up the slope. This leaves the Worldsend Cavern, taking you to the ![]() Mountain Shrine, and then eventually to the
Mountain Shrine, and then eventually to the ![]() Sphinx, which has one of the more difficult quests in the game. Visit the following link to find out what you need to do for it: Sphinx Locations and Riddle Solutions. If you have a spare
Sphinx, which has one of the more difficult quests in the game. Visit the following link to find out what you need to do for it: Sphinx Locations and Riddle Solutions. If you have a spare ![]() Portcrystal, we recommend placing one around here for later as you’ll need to come back here a fair bit for the Sphinx Quest. That’s it for the Worldsend Cavern. Not too much here, but the Ring of Grit is a great accessory for a
Portcrystal, we recommend placing one around here for later as you’ll need to come back here a fair bit for the Sphinx Quest. That’s it for the Worldsend Cavern. Not too much here, but the Ring of Grit is a great accessory for a ![]() Fighter, and Whitecobble is fairly rare, and the 50,000 G is nice if you come here during new game plus.
Fighter, and Whitecobble is fairly rare, and the 50,000 G is nice if you come here during new game plus.
More Dragon’s Dogma 2 Cave Guides
If you’re looking for other caves to explore in Dragon’s Dogma 2, check out our Cave Guides below!

 Sign up
No Comments