


| Bestiary |
|---|
| Abysteel • Ahriman (Boss) • Alraune King (Boss) • Cubus (Rare Game) • Focalor • Gorgimera • Imp • Mandragora Prince (Boss) • Onion Queen (Boss) • Pit Fiend • Pumpkin Star (Boss) • Striker • Topstalk (Boss) • Wendigo • Zombie Knight • Zombie Warlock. |
| Items In This Area |
|---|
| 1000 Needles • Demon Shield (Steal from Abysteel) • Gokuu Pole (Drop from Wendigo) • Hammerhead (Steal from Gorgimera) • Hypnocrown (Drop from Zombie Knight) • Kagenui (Drop from Striker) • Maduin Gear (Poach from Imp) • Maduin Gear (Steal from Ahriman) • Power Rod (Drop from Focalor) • Sakura-saezuri. |
Doubt Abandoned
As the first area of Sochen Cave Palace, you won’t find much in terms of treasures, but will find a few different new enemies ready to knock you out. You will want to be careful around the Zombie Knights, as they can apply a few status ailments. There are a few traps here and there, but nothing too tight that you have to be careful about moving past and worrying your AI members triggering them. At the north end of the area will be a door, which is locked. This door requires the Soul Ward Key, which was gotten from the Archadian Wayfarer in The Nameless Spring of Tchita Uplands. This was the guy who gave you the unofficial hunt and you can’t properly enter Sochen Cave Palace without the key. Use the key on the door to enter the Hall of Lambent Darkness, where you will face off against a boss…
Zombie Knight:
Most Zombie Knights will be walking around, like normal mobs, but others will also spawn out of the ground when you get close enough. They can be a little annoying, as they have access to quite a few status ailments from Cloying Breath and Bad Breath. Besides that, there is also Silence, Confuse and Bleed, as well as Scream (Silence or Blind). They can drop Dark Magicite, Maggoty Flesh, a Hypnocrown , or a Capricorn Gem, while stealing can net you a Maggoty Flesh, 80 gil or a Vanishga Mote. Poaching will get you either some Maggoty Flesh or a Capricorn Gem. They are weak to holy and absorb dark.
Gorgimera :
A stronger version of the Cockatrices you’ve been fighting, Gorgimeras tend to be found in packs and are still fairly easy. Keep some Gold Needles on hand for Stone Gaze, which is the only ailment it can inflict, as almost all other attacks (Sonic Spin and Poke) are physical, except for Ember Breath which is fire. They drop Bundles of Feathers, Fire Magicite, Teleport Stones or Taurus Gems, plus you can steal a Fire Magicite, Gold Needle or a Hammerhead . Poaching them will yield either a Bundle of Feathers or a Taurus Gem. They are weak to water.
Imp :
These little flying creatures can be a bit of a nuisance, only because they usually come in groups. They have two skills that can hit multiple characters, which are Shock Wave (physical) and Thundara (magick). They also have Leech, which as you know by now seems to ignore defense, and Jump, another physical attack. They drop a Storm Magicite, Rime Fang, Demon Feather or Scorpio Gem and you can steal an Antidote, 130 gil or Storm Crystal from them. Poaching can yield either a Demon Feather or Maduin Gear . They are weak to ice.
Boss - The Mandragora Family
Despite their comical entrance, the Mandragora Quintet can be rather annoying to fight. They all start with Haste and tend to run all over the place, making them a bit hard to hit. Once they gather in one of the corners, they will then storm towards you, try to cast some status ailments, then repeat the process. Each of them has an exclusive item that is an uncommon steal, although you will be able to fight them later on in the game. The only real noteworthy one is the Onion from the Onion Queen, as it can be used to unlock the Megalixir Bazaar bundle (it requires three, though, so it may not even be worth it).
As far as the battle goes, Topstalk and Pumpkin Star pretty much have the same abilities. The former can inflict Disable with its normal attacks, while the latter can inflict Confuse. Both have access to Toxify (Poison), Bleed (Sap), Scream (Blind or Silence) and the Blind, Silence and Sleep magicks. They also have access to a skill called Mystery Waltz, although they don’t seem to use at all in this battle - if it’s used, though, it will increase their levels, making them stronger. Mandragora Prince, Onion Queen and Alraune King all have Pollen as a skill, which will inflict Sleep, Slow and Poison on multiple characters in range. Onion Queen can inflict Silence with her normal attacks, and has access to Curaga, Haste, Protect, Shell and Vespersong. Mandragora Prince can inflict Sleep with normal attacks, and can use Cura, Esuna and Warsong. Alraune King can inflict Sap with normal attacks and that’s about all he has.
Each of them is weak to a different element, although none of them block any of the other elements, so you are free to choose whatever AoE magicks you have. They also each have a vulnerability to a specific ailment, with immunity to every other one. Topstalk is weak to water and susceptible to Blind, Pumpkin Star is weak to ice and vulnerable to Sleep, Mandragora Prince is weak to fire and susceptible to both Stop and Blind, Onion Queen is weak to earth and vulnerable to Silence, and Alraune King is weak to wind and susceptible to Oil.
In terms of danger, Pumpkin Star should be dealt with first, because it can confuse party members, then Topstalk should be second because of Disable. Alraune King is probably the least threatening, considering it only really has Pollen and Sap isn’t too bad of an ailment. Dealing with the ailments will be the biggest problem, especially since most will always hit you. Make sure you have gambits to deal with both Silence and Sleep, as they are the most common, although don’t forget about Confuse and Disable, too. The Mandragoras don’t have a whole lot of health, so they should go down relatively quickly once you are able to hit them. Once they have been beaten, watch their souls fly off and rejoice in the victory celebration.
Both doors on either side of the arena will lead you to The Acolyte’s Burden, but there is a one-time chest in the eastern corridor, so take that route.
The Acolytes Burden
If you took the eastern door in the previous area, head south to find a chest behind a trap, which turns out to be one of the nice traps that heals you. The chest contains a whopping 4,936 gil, although at this point, that’s probably measly chump change. Continue north and before stepping into the open area, look in the little alcove to spot another chest, this one coughing up a Hastega Mote. Both of these chests don’t respawn, so you won’t be able to farm them for their goodies. Venture north now and you should see a nice Save Crystal waiting for you - only, it’s not a Save Crystal, but a Crystalbug! The Crystalbug has access to all mid-tier magicks (Fira, Thundara, Blizzara, Aquara and Aerora), plus it can use Restore to replenish its health. It ignores Reflect and all of its magicks don’t have to worry about the ATB gauge filling up. It halves all elements, so use physical attacks on it, plus you can steal either a Feystone or an Ether. A real Save Crystal takes it place once defeated, so heal up and save, then exit to the east to reach Mirror of the Soul.
Mirror of the Soul
When you first enter here, open the door to your east to find some Zombie Knights, then continue north to a cave-like system, where you’ll encounter some more Imps and even a new enemy, Pit Fiends. On the eastern side are a few Gorgimeras, as well as some Zombie Knights that pop out of the ground on the western side. There’s a door in the center of the area, called the Pilgrim’s Door, which requires you to solve a bit of a puzzle in order to open it. It will involve this area, Falls of Time and Destiny’s March, so ignore it for now and continue to explore the place. You will find multiple exits here, all leading to Falls of Time, so there is no real reason to pick a specific one.
For now, look at your map and you should see a large hole just north of where you first entered the cave portion. On the northern side of this hole on your map should be a treasure that contains a Shock Mote (one-time only). Keep moving to the east until you come to a fork, leading to two exits. Ignore the western of the two and take the eastern path, stopping to open the green urn in the alcove, containing the map to Sochen Cave Palace. Since nothing else is important here, use the exit north of the map urn to arrive in Falls of Time.
Pit Fiend :
Cousins to the Imp, Pit Fiends can be a lot worse than their counterpart, as they have access to more dangerous skills. They have the typical Leech and Gnaw, but other skills include Aerora, Sleep and Drain, the last one healing the Pit Fiend while damaging you. There is also Toxify, which can poison your characters. By far, the most annoying skill they have is called Fear, which can drain a massive amount of MP from a single character - that can be a huge problem if it’s your White Mage or character with healing magicks. Drops include Wind Magicite, Remedies, Demon Feathers and Scorpio Gems, while stealing will net you some Eye Drops, a Rime Fang or a Scorpio Gem. Poaching will yield either a Demon Feather or Demon Tail.
Falls of Time
Go north and then west to encounter another new enemy, the Striker, and if you look to your south, there will be another foe called a Focalor, although this one is docile. There isn’t much you can do here right now, or at least from this section, as the path to your west is blocked by an impassable waterfall. So, return to Mirror of the Soul and run all the way over to the western side, taking either of the transitions here to return to Falls of Time. You’ll encounter more Strikers and Focalors on this side, and find out another waterfall prevents you from getting to the central piece of land, which is where the only two worthwhile treasures are located in Falls of Time. It’s about time to solve the Waterfall Puzzle.
Striker :
These headless brutes are more than just their appearance suggests, as they know a bit of magick, mainly mid-tier elemental ones (Fira, Blizzara and Thundara), and even Protect. They also have Tri-Attack, which does big damage that doesn’t seem to take defense into play, as well a Tremor, which is an earth-elemental attack that can hit multiple characters. They can drop Maggoty Flesh, Earth Magicite, Teleport Stones and Kagenui . In addition to that, you can steal Maggoty Flesh, Earth Magicite or a Gemini Gem, plus poaching them will yield either some Maggoty Flesh or a Gemini Gem. They are weak to wind.
Focalor :
These fish out of water are docile and will not attack unless you attack them first. They are not really any different than the Piranhas you fought on Phon Coast, as they share the same movesets (Lunge, Power Spin and Water Ray). They can drop Ichthon Scales, Storm Magicite, a Power Rod , and Pisces Gems. Plus, you can steal an Ichthon Scale, Balance Mote or Pisces Gem from them, and poaching them will yield either an Ichthon Scale or Dorsal Fin, the latter of which is also the Monograph drop. They are weak to ice.
Waterfall Puzzle
The Waterfall Puzzle is a bit of a convoluted path you need to take through Mirror of the Soul, Falls of Time and the southern section of Destiny’s March. You have to start at a specific spot and pass through specific transitions - once you’re done, the waterfalls will go away and the Pilgrim’s Door will open in Mirror of the Soul. Barring the little piece in the middle, let’s label the four exits that connect Mirror of the Soul and Falls of Time, from west to east, as #1-4. Next, label the five exits that connect Falls of Time and Destiny’s March, from west to east, as A-E.
You will be starting in Falls of Time, by exit #4 (easternmost). Go south, into Mirror of the Soul, all the west and take exit #1 north into Mirror of the Soul. Continue north, through exit A and into Destiny’s March, then run east, through the doors, and south into Falls of Time through exit D. Keep going south, through exit #3 and back into Mirror of the Soul, then go west and north through exit #2 (back into Falls of Time). You’ll have to go north and then east a little bit to get through exit B (into Destiny’s March), then through the doors again and south through exit C. You know you’re doing it right when you see messages about the waterfalls as you pass through Falls of Time.
Also, at the end, you’ll see “a door has opened in the distance,” which is talking about the Pilgrim’s door. You should be able to access the middle portion of the land that was previously blocked by a waterfall. There will be two treasures here, containing a Sakura-saezuri and 1000 Needles technick. Take the transition to the south to happen upon a secret area connecting Falls of Time and Mirror of the Soul. There is a chest in here, which contains a Megalixir . That’s all there is to do here, but there’s another short puzzle in Destiny’s March. To make this easier on yourself - well, it’s the only way - take the easternmost exit in Falls of Time going north to get to Destiny’s March.
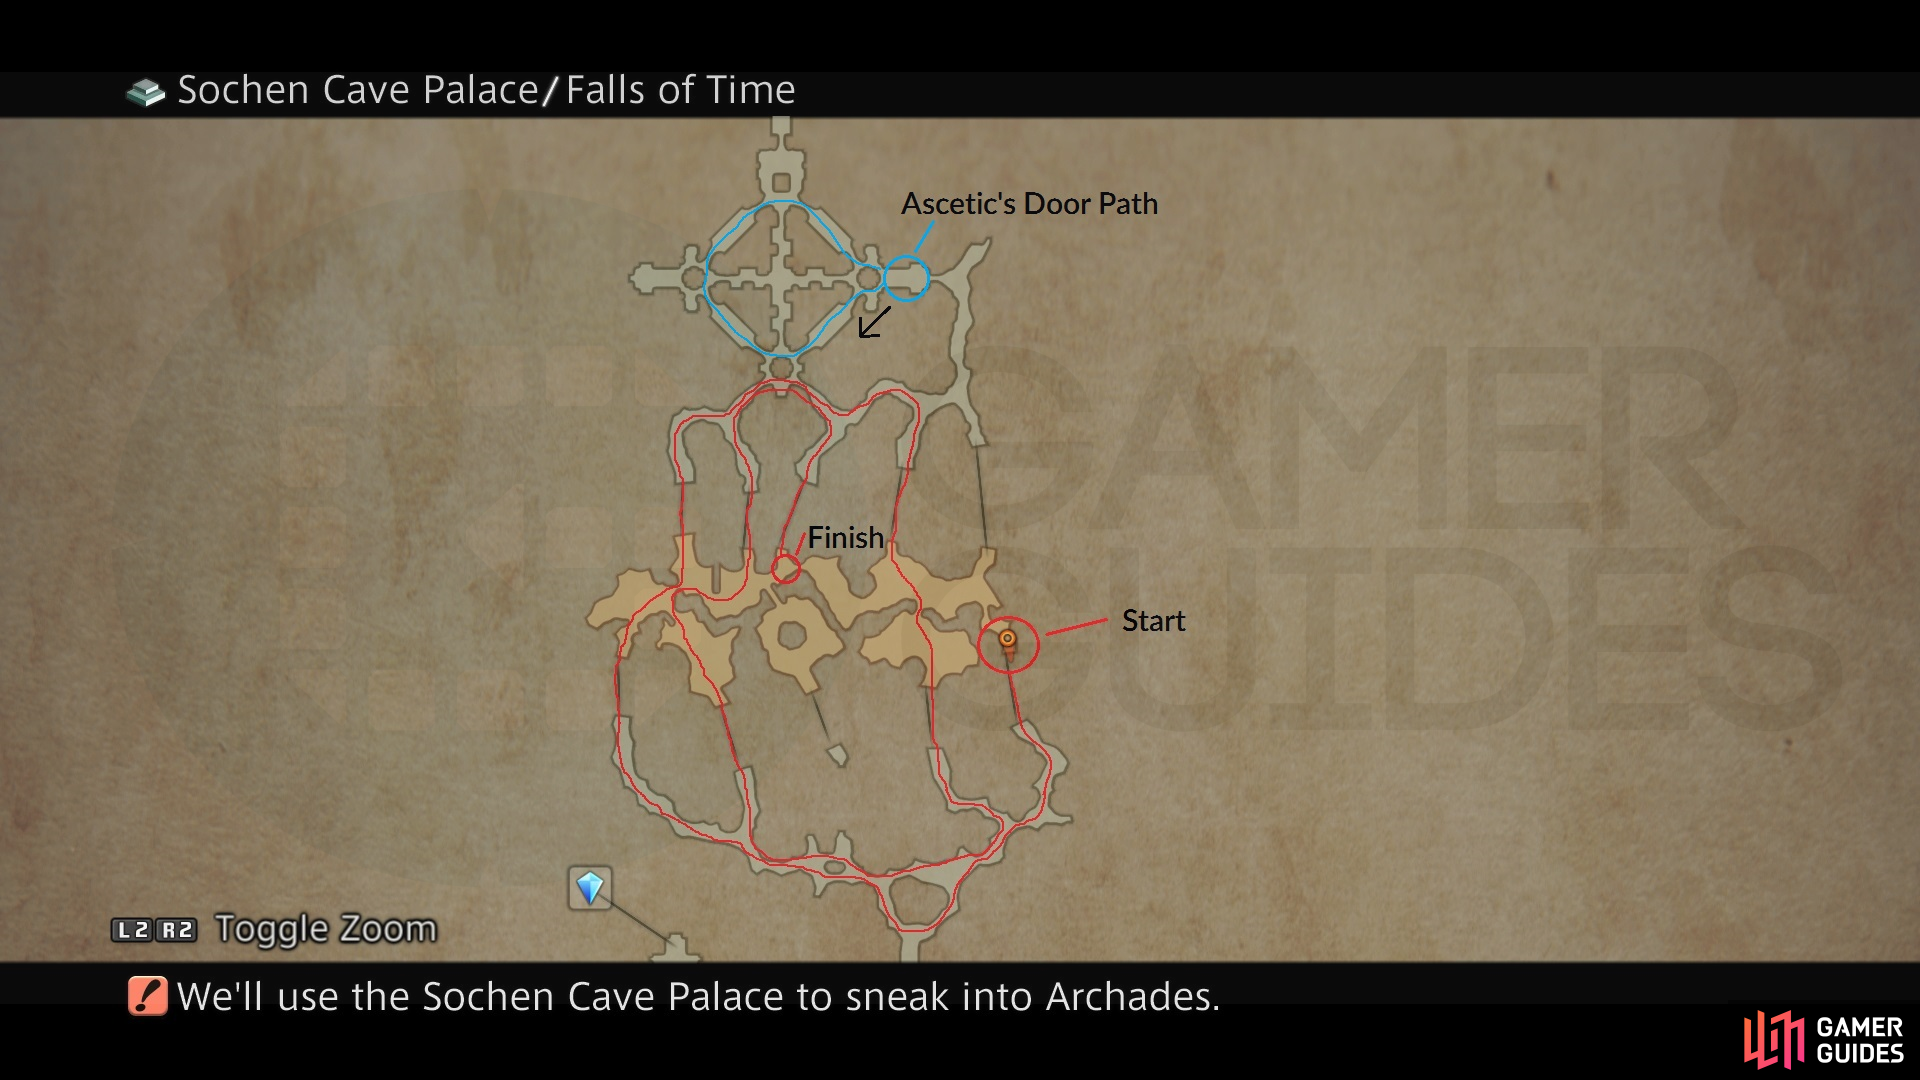
A map of the two puzzles to access optional areas of Sochen Cave Palace.
Destinys March
If you took the easternmost exit in Falls of Time, you should be in the eastern corridor of Destiny’s March. Head straight north, fighting the Zombie Knights along the way, until you get to a door near the northern tip. As soon as you enter through the door, you will be in a small room on the eastern end of a circular area, according to your map. You basically want to go around in a circle, clockwise, but the catch is that the doors to each hallway need to be closed in order to solve the puzzle (simple leaving and re-entering the zone will close the doors again). So, from that eastern room, you go southwest, northwest, northeast, and southeast back into the same eastern room. Upon doing so, you will unlock the Ascetic’s Door on the western side of Destiny’s March.
This door leads to a short secret path, with some powerful enemies (Abysteel and Zombie Warlock), that brings you to a door that cannot be unlocks right now. Hall of the Wroth God is home to one of the optional bosses of the game, a predecessor to one of the superbosses, if you will. Outside of this little puzzle, there’s not much else going on in Destiny’s March, save for one new enemy, the Wendigo. There’s no treasure at all, or at least, none worth opening, as they all contain Hi-Potions and either an Antidote or Chronos Tear. The next zone, Hall of Shadowlight, is located to the north of Destiny’s March and upon entering it, you will be facing another boss.
Wendigo :
These enemies are kind of similar in appearance to Strikers, except they have blue fire or whatever where their “head” would be. As with Strikers, they do have access to a few pieces of magick, mainly Blizzara, Aquara, Aerora and Haste. Their bigger move is Ice Break, which could be considered a bit similar to Tremor, but ice-elemental. Be careful of Tri-Attack, as it will do a specific amount of damage. They can drop Maggoty Flesh, Ice Magicite, Hi-Potions and Gemini Gems, plus you can steal an Ice Magicite, Forbidden Flesh or Gokuu Pole from them. Poaching will yield either some Maggoty Flesh or a Vanishga Mote. They are weak to lightning and absorb ice.
Abysteel :
As stronger versions of the bat enemies you’ve faced up until now, Abysteels aren’t any different than them in terms of abilities. You will only find them on the secret path leading up to Hall of the Wroth God, making them limited for now (you will be finding them more common in optional areas later). They drop Dark Crystals, Spiral Incisors, Soleil Fangs and Vampyr Fangs, while stealing will get you a Spiral Incisor, Teleport Stone or Demon Shield. They are weak to holy.
Zombie Warlock:
Zombie Warlocks, although limited to the secret path leading up to Hall of the Wroth God, are very powerful enemies. They have access to high-tier magicks, namely Aeroga, Blizzaga, Darkra, Firaga, Thundaga and Aquaga - yep, that’s a lot of power. In addition to that, they can use Wail (Silence or Blind), Stone Touch (Petrify) and even Cloying Breath. They certainly have a lot of weapons in their arsenal. Drops include Dark Crystals, Forbidden Flesh, Prince’s Kisses, and Capricorn Gems. You can steal a Dark Crystal, 200 gil or a Capricorn Gem from them, plus poaching them will get you either some Maggoty Flesh or a Forbidden Flesh. They are weak to holy and absorb dark.
Boss - Ahriman
Ahriman can be a bit annoying, especially in the later stages of the fight, as you will see. This boss will mostly attack with magicks, as it has access to Fira, Blizzara, and Thundara. It can also use Immobilizega, Doom and Toxify, with Doom being the biggest threat in the long run. Hopefully you have someone in your active party who has Remedy Lore 3, so they can get rid of Doom. Phantasmal Gaze has a chance to inflict Confuse, so you will want to cover for that with a gambit to either toss a Remedy or use a Nu Khai Sand. Maser Eye is simply a dark-elemental attack that hits one character, so you only have to worry about the damage.
At around 50% or so, Ahriman will start teleporting around the room and using Divide, making a few clones. Unlike other enemies that use Divide, these clones have a lot less HP, but they still retain all of the same attacks that the original has. Since it teleports around a lot, you might have trouble finding the real one, but there are a few ways to do this. Setting up a Gambit to attack the enemy with the highest Max HP will make sure your party members will always attack the real one, although this might backfire a little bit if the real one goes out of range. The fakes should also easily go down in one or two hits, plus it will help in the long run to mitigate the number of attacks you take.
Another method of distinguishing the real one and fakes is by casting a status ailment on the real one during the beginning portions of the fight. For example, considering Ahriman is undead, you can do something like casting Regen on it, plus Ahriman is also susceptible to Slow. Lastly, the fake Ahrimans are solid, while the real Ahriman is a bit transparent. Now, before you go dispatching the fake ones, they do offer something of value, mainly you can steal from them. You can steal a Sky Jewel, Death Powder or Maduin Gear from all of them. The Death Powder can be important later on, as two of them are needed in the Bazaar recipe for the Ultima Blade.
With the Ahriman exorcised, you will find some one-time only chests in the arena. There’s a total of five of them and they always spawn, although they don’t contain anything too special. You can get a Phoenix Down, Cura Mote, Elixir, Bubble Mote and X-Potion from them. When you’re ready, continue on to Temptation Eluded by taking the door on the eastern side, making sure you cast Float on your party before entering.
Temptation Eluded
As soon as you enter, there will be a trap right in front of you, as well as more throughout. This is the final area with enemies in Sochen Cave Palace, and you can find one of two sets of them here. Most of the time, it will be Strikers and Imps, but occassionally, those will be replaced with Wendigos and Pit Fiends. In fact, it’s the latter that will help you spawn one of the Rare Games, Cubus. When you have Wendigos and Pit Fiends, defeat them all and Cubus will drop down right next to you. When you’re finished, take the northern exit to reach Chamber of the Chosen.
Cubus :
Being a member of the Flan family, Cubus has similar moves to them. Its physical attacks can inflict Oil, plus it also has the Oil magick. This, in combination with Fira, will do a lot of damage to your party, so have some Handkerchiefs handy in case. Cubus can also use Silence, Flash to blind your party, Phantasmal Gaze to inflict Confuse and Mythril Bubbles, which can Confuse and Poison. It is weak to water, but absorbs fire, so make sure no one in your party is healing the thing. It can drop a Green Liquind, Holy Mote or Arcana (no very rare drop), plus you can steal a Silver Liquid from it.
Chamber of the Chosen
Despite the faux appearance of loot in this area, there is none, so just ascend the hill until you get to a lift. To activate this lift, look for the Disused Pedestal next to it, which will bring you to Skybent Chamber. There will be a Gate Crystal here, so use it for healing and saving, then open the stone door to the north, transitioning to Old Archades. It took a while, but you’re finally at Archades!
No Comments