


| Bestiary |
|---|
| Coeurl • Gil Snapper (Elite Mark) • Grave Lord (Rare Game) • Hellhound • Judge Bergan (Boss) • Mindflayer (Mark) • Vorpal Bunny (Mark) |
| Items In This Area |
|---|
| Bubble • Carmagnole • Diamond Helm (Drop from Grave Lord) • Gillie Boots • Lightning Arrows • Red Cap (Drop from Hellhound) • Ruby Ring (Steal from Judge Bergan) |
Massacre at Mt. Bur-Omisace
Leave the Stilshrine of Miriam area and venture north back through the Paramina Rift to reach Mt. Bur-Omisace. Here you’ll find that the steel and Nethicite of the Archadians proved stronger than the faith of the Kiltias. Foregone conclusion, really. Fortunately the two merchants here are still doing business, with the Seeq selling new items like the Fuzzy Miter accessory (grants immunity to Petrify), Remedies (you can now fund your Negalmuur grinding as much as you’d like!) and the Bio magick (Black Magick 7, deal area-of-effect damage and can inflict Sap). The Hume merchant, on the other hand, sells a variety of arms and armor, almost all of which you could have found in the Stilshrine of Miriam.
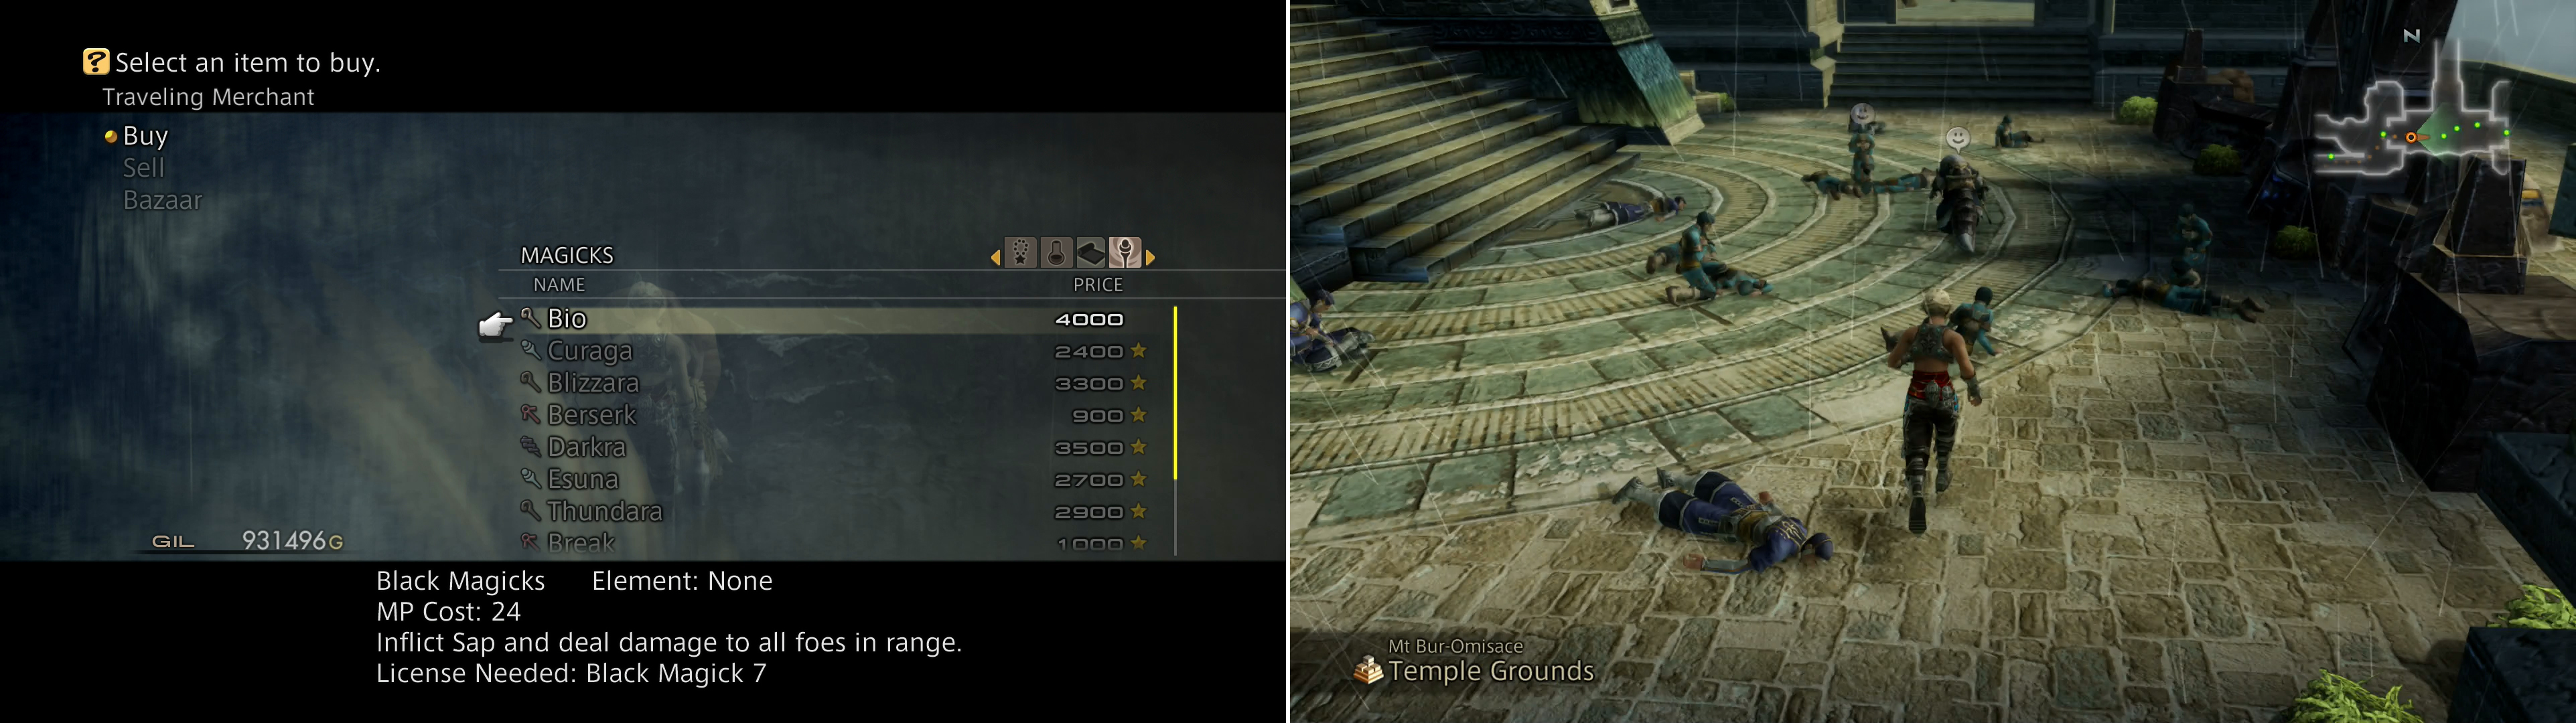
Visit the merchant at Mt. Bur-Omisace again to pick up the Bio magick (left), then make your way through the misery left in the wake of the Empire (right).
Buy whatever items you need and continue on to the next area to find that th refugees, once made homeless by Archadian aggression, have again been victimized. Make your way through Mt. Bur-Omisace, talking to the refugees, acolytes and surviving Kiltias to learn what happened. Apparently a Judge of particularly violent disposition lies ahead, and the Gran Kiltias is in peril. To be fair, though, the holy man did involve himself in politics, and this is one obvious consequence of such a breach of neutrality.
Make your way to the Hall of Light and you’ll witness a scene, where the bloodthirsty Judge Bergan can be found, the destruction left in his wake a testament to the power of Archadia’s manufactured Nethicite… and perhaps the ghostly figure glimpsed above him momentarily? Endure his speech, where he makes some lofty claims about Vayne’s calling, disparages Raithwall and babbles some vague nonsense about man’s control of history, after which he’ll thankfully give you an opportunity to shut him up.
Boss - Judge Bergan
| Judge Bergan | . |
|---|---|
| Level | 30 |
| Weaknesses | N/A |
| Resistances | N/A |
| Immunities | Confuse, Disable, Disease, Doom, Immobilize, Lure, Oil, Petrify, Poison, Reverse, Sap, Silence, Stop. |
| Safety | Yes |
| Drop | N/A |
| Steal | Hi-Potion (55%), Ruby Ring (10%), Ether (3%) |
Judge Bergan begins to the north, near the Gran Kiltias’s throne, and he’s joined by three lesser Judges who begin behind you, to the south. Fortunately, like Judge Gramis, Judge Bergan is content to walk slowly up to the fight, giving you plenty of time to deal with his cohorts - given a high enough Magick Power, a single cast of the newly-purchased Bio should be enough to significantly injure, if not outright kill, the lesser Judges. These lesser Judges are fond of using technicks like Water Spout, offenseively and can also buff Judge Bergan with Shell and Protect, but they shouldn’t live nearly long enough to do so, and otherwise aren’t much of a threat. Finish them off, then turn to face an isolated Judge Bergan.
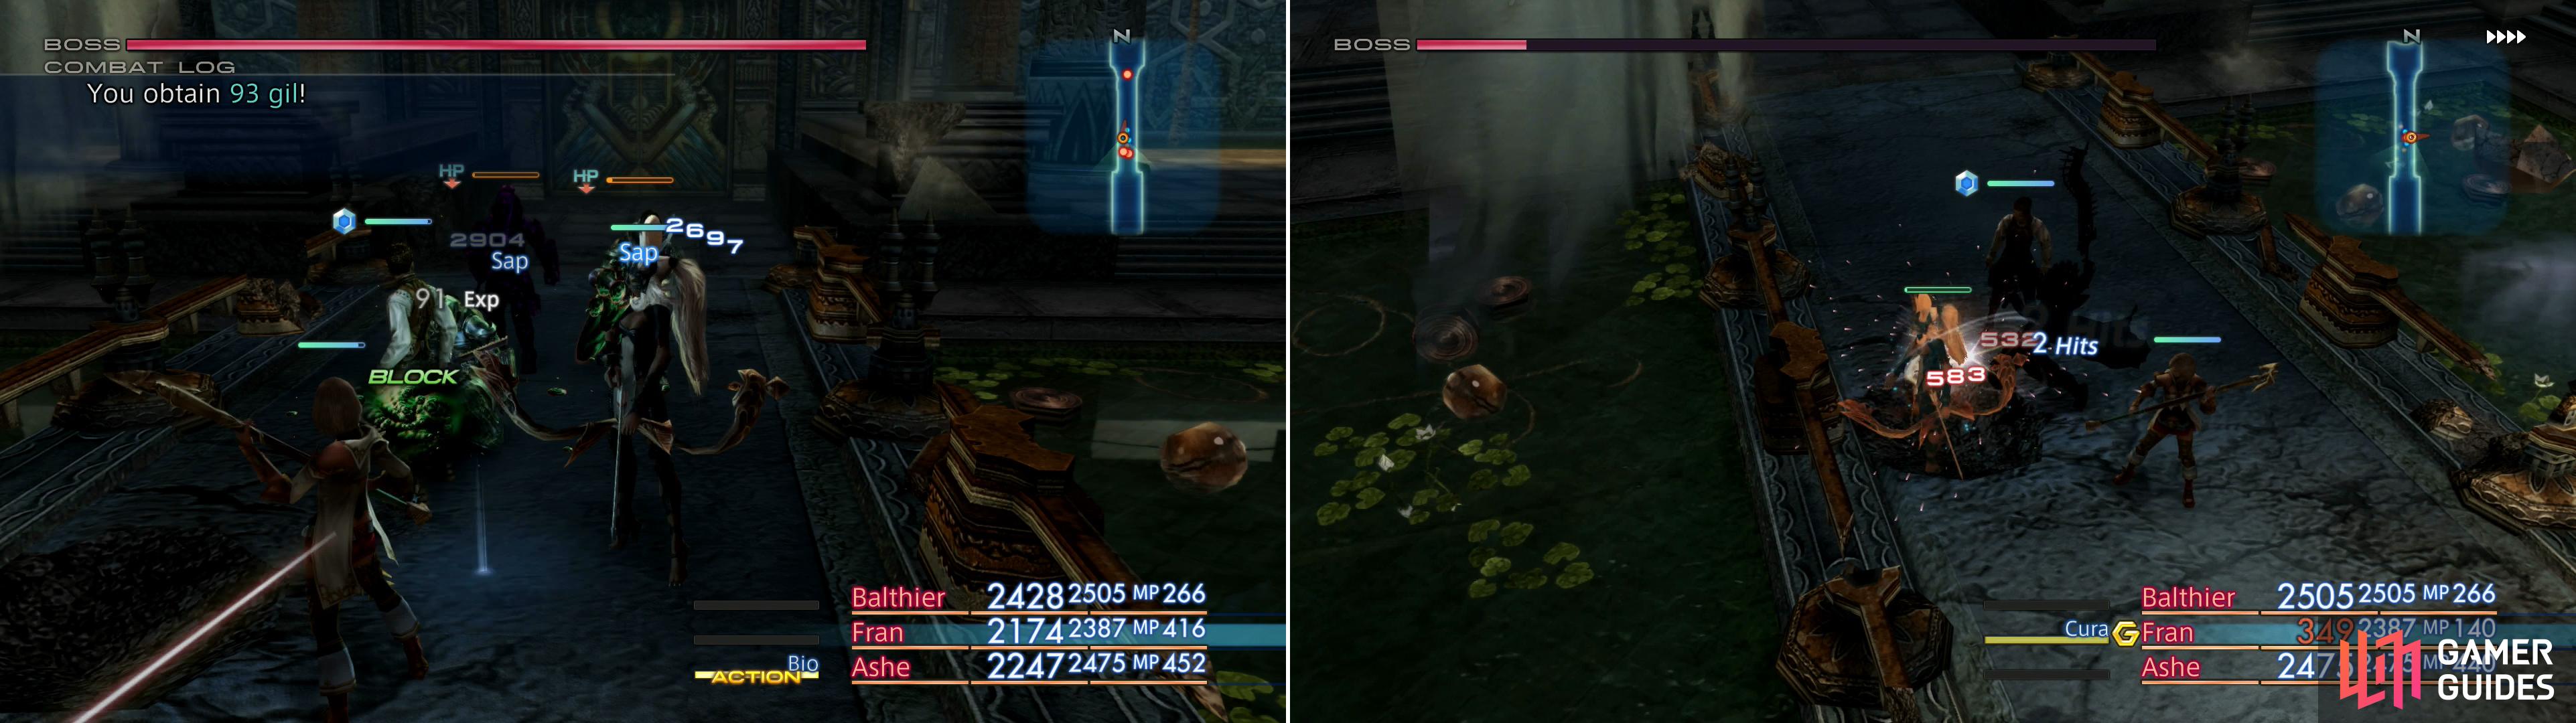
First take out the lesser Judges that accompany Judge Bergan (left) then focus on Judge Bergan himself. Be warned, he becomes more aggressive and combos more when his HP are low (right).
Judge Bergan hits hard - about as hard as Mateus did, but he’s got a much, much higher combo rate. Even if you’re fairly strong, getting caught with less than full health in a two or three hit combo, each hit dealing around 400~ damage could prove fatal. Protect will mitigate his damage greatly, as he prefers physical attacks, including a normal strike and a Kick attack. He can also use the Battle Cry technick, which will boost his damage. He can also inflict Blind when he hits in melee and has the ability to counter-attack when struck in melee.
He himself starts out the battle with Protect and Shell active, which should be peeled away with Dispel. He’s also greiviously vulnerable to key status effects, like Sleep (casting this early can buy you time to steal or eliminate his Judge allies, if necessary), Blind (which will drastically lower his damage output), Immobilize (he’s helpless if you don’t go into melee range), Slow, and perhaps most damning of all, Stop. Whatever mages you have in your party, there’s plenty of ways they can weaken or even completely neutralize Judge Bergan.


After Judge Bergan dies you’ll witness the Mist leaving his body in a torrent, after which Al-Cid Margrace will show up, apparently injured. He’ll update the party on Larsa’s status, make a political request of Ashe, who declines and instead opts to follow Balthier’s advice. This manufactured Nethicite, while not as potent as the real stuff, is still a dangerous, perhaps war-winning weapon. No sense in waiting for the Archadian fleets and Judges to swoop down on the rest of Ivalice, it’s time to make for the Draklor Laboratories, where this fell stone is created. A facility of this importance naturally is in the capital city of the empire itself, Archades, necessitating a long and perilous journey on foot, north of Nalbina.
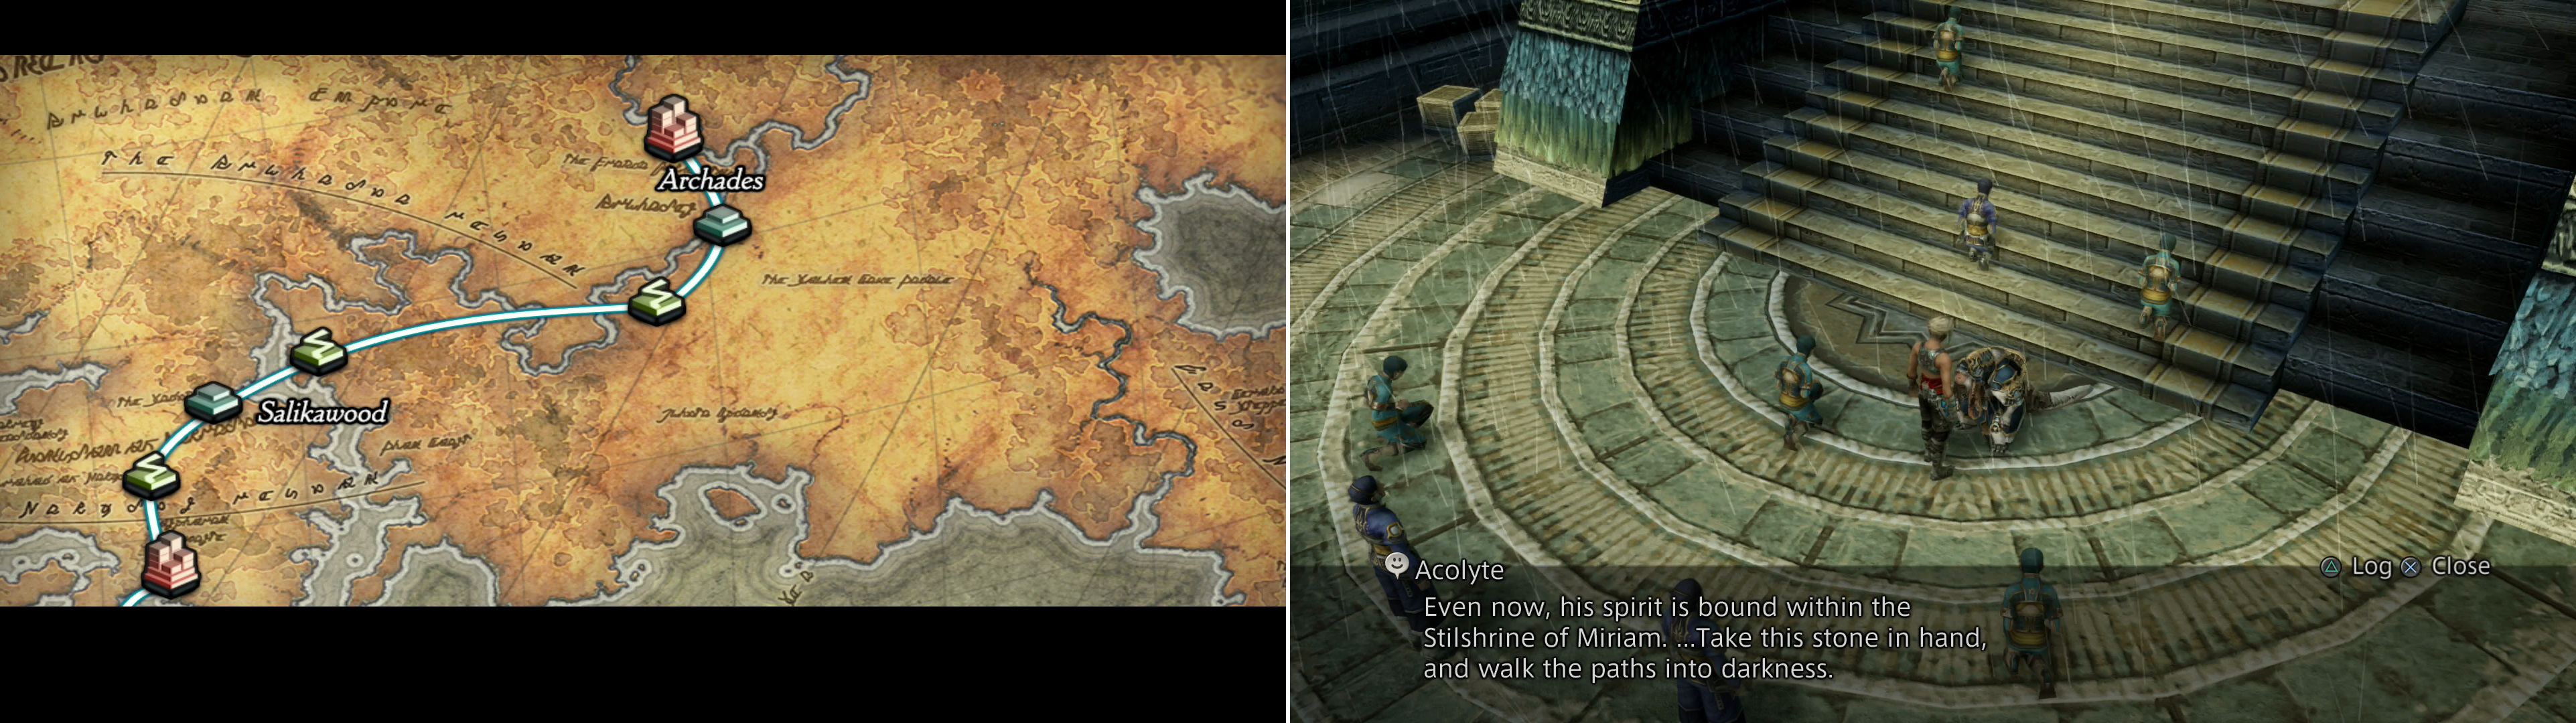
After Mt. Bur-Omisace, the party will plan a route to Archades (left). Talk to an Acolyte and he’ll tell you of a greater trial in the Stilshrine of Miriam (right).
After planning your next moves, you’ll find yourself outside of the Hall of Light and back in control of Vaan. Before you leave Mt. Bur-Omisace, talk to an Acolyte at the base of the stairs leading to the Hall of Light and he’ll tell you about some power-hungry spirit known as “the Condemner”, who still resides in the Stilshrine. Supposedly this is a lesson warning you to temper your lust for power (looking at you, Ashe), but he’ll give you the “Stone of the Condemner” Key Item which will allow you to reach these previously unexplored regions of the Stilshrine… presumably so you can gain more power. Bad lesson there.
While challenging this Condemner is currently beyond your means, there are other tasks you can see to before you take your first steps towards Archades. Namely, it’s been a long time since you’ve visited the Bazaar, and there’s plenty of bundles to unlock. Also, as is the norm, significant story progress unlocked new hunts, many of which you’re now a match for. Achieving the rank of Riskbreaker (16 Marks, 200,000 Clan Points) will open up a wonderful new item at the Clan Provisioner, so it’s well worth doing. If you can’t be bothered, skip ahead to the page “Mosphoran Highwaste” to get on with the story, otherwise continue on below with “Odds and Ends After Mt. Bur-Omisace”.
Odds and Ends After Mt. Bur-Omisace
To get started, return to the Sandsea in Rabanastre by whatever means you find most convenient and pick up the hunts for the Atomos, Braegh and the Vorpal Bunny and Mindflayer. Once done, return to Montblanc in the Clan Hall and talk to him to gain a reward for smiting Vinuskar. Next be sure to pick up the hunt for the Gil Snapper Elite Mark, after which a Seeq on the floor below you will apparently be roused to action by your initiative. Go downstairs and talk to him and he’ll tell you about some “hunter stalker”, a hunter who, presumably bored with Mark, has turned to hunting the hunters, instead. Sometime to keep in mind as you climb the ranks…
| Reward (For vanquishing Vinuskar) |
|---|
| 1,100 Gil |
Continue with the section “Bargains at the Bazaar VI” to check out the new Bazaar deals on offer, or skip to the following sections “Paradise Risen” and “A Chase Through the Woods” to deal with the Gil Snapper and Vorpal Bunny hunts, respectively. You’ll deal with Atomos and Braegh as you make your way to Archades.
Bargains at the Bazaar VI
While you’re in Rabanastre, you might as well sell off some of that loot you’ve been finding. Why Rabanastre? Why not any other merchant… Eh, the city just has that “bazaar” vibe, doesn’t it? Anyways, at ANY merchant, it’s time to go over your long-accumulated loot. You haven’t been directed to sell anything since returning to Rabanstre after the Tomb of Raithwall, so there’s likely a good bit of stuff to sell. The common loot you should have found enough of just by running through each area (and possibly grinding, zoning in and out for treasure… the usual) and the rare loot you were specifically directed to gather will be listed below, in alphabetical order.
You need three Charged Gizzards for a high-level weapon (you don’t need to sell these yet, just make sure you have them), four Chocobo Feathers, four Coeurl Pelts, five Dark Magicite, two Death’s-Heads (again, ensure you have them, but you need not sell them), four slabs of Festering Flesh, four Fine Wool, seven Fire Magicite, five Giant Feathers, two Great Serpent’s Fangs (ensure you have them, don’t sell them), three Grimoire Togail (part of a repeatable bundle, don’t sell), five Ice Magicite, one Ice Stone, three Iron Carapaces, three Leo Gems (don’t sell), four Malboro Vines, four Pointed Horns, two Quality Hides, six quality Pelts, six Storm Magicite, five Sturdy Bones, five Tanned Giantskins, two Tyrant Hides, three Water Magicite, two Wyrm Carapaces, two Wyvern Wings (don’t sell) and two units of Yellow Liquid. Confirm you have the ones you were instructed not to sell, and if not, consider remedying that, and sell the rest. This should unlock the following bundles:
| Loot Sold | Bazaar Bundle | Cost |
|---|---|---|
| Chocobo Feather x4 | Eye Openers (Phoenix Down x5) Prince’s Kiss x5) | 1,280 Gil |
| Coeurl Pelt x3 Dark Magicite x3 Quality Hide x2 | Matching Reds (Red Cap, Brigandine) | 2,480 Gil |
| Coeurl Pelt x4 Ice Magicite x4 Tyrant Hide x2 | Monk’s Garb (Headband, Jijitsu Gi) | |
| Dark Magicite x5 Festering Flesh x4 Giant Feather x5 | Jag-tooth Ninja Sword (Kagenui) | 3,800 Gil |
| Dark Magicite x3 Iron Carapace x3 Tanned Hide x2 | Golden Garb (Golden Helm) (Golden Armor) (Golden Shield) | 3,980 Gil |
| Festering Flesh x4 | Magick Shards (Aquara Mote x4) | 1,480 Gil |
| Fine Wool x3 Ice Magicite x4 Tyrant Hide x1 | Alluring Finery (Enchanter’s Habit) (Lamia’s Tiara) | 3,180 Gil |
| Fire Magicite x7 Demon Eyeball x3 Sturdy Bone x5 | Iron-Forged Pole (Iron Pole) | 2,115 Gil |
| Giant Feather x3 | Triage Kit (Phoenix Down x12) (Hi-Potion x3) | 2,980 Gil |
| Fire Stone x6 Lumber x2 Malboro Vine x2 | Burning Blade (Flametongue) | 2,025 Gil |
| Ice Stone x1 Crooked Fang x4 Yellow Liquid x2 | Ranger’s Crossbow (Crossbow) (Long Bolts) | 1,080 Gil |
| Malboro Vine x4 | Smelling Salts, &c (Hi-Potion x4) Nu Khai Sand x2) | 540 Gil |
| Pointed Horn x1 | Burning Fangs (Soleil Fang x5) | 980 Gil |
| Quality Hide x2 Earth Magicite x4 Wyrm Carapace x2 | Burnished Protectives (Burgonet) (Ice Shield) (Shielded Armor) | 4,850 Gil |
| Tyrant Hide x2 | Sipping Wine (Bacchus’s Wine x3) | 240 Gil |
| Water Magicite x3 Bat Fang x5 Yellow Liquid x1 | Hollow-shaft Arrows (Bamboo Arrows) (Loxley Bow) | 3,980 Gil |
That’s a whole lot of loot, but the standout bundle is the “Jag-tooth Ninja Sword”, which will be revealed as a Kagenui (Ninja Swords 1) when you buy it. With 81 Attack Power and the ability to Slow on hit, it’s right up there with stellar weapons like the Burning Bow and the Deathbringer, only decisively out-shined by the Karkata and the Seitengrat. When you’re done with the Bazaar, it’s time to turn your attention to those hunts you should have picked up, or, if you want to get on with the story, time to skip ahead to the “Mosphoran Highwaste” page.
Giza Plains - Weather Unchained
Gil Snapper should be the first new hunt you attempt, but it may not be the first hunt you carry out. Now that you’ve passed through the Giza Plains in both the rainy season and the dry, the weather will now regularly fluctuate between the two. This happens based on the time on your gameclock, at hourly and bi-hourly intervals. Out of every three hours of game-time, one hour will be the rainy season, and two hours will be the dry season, alternating. If you happen to come into the Giza Plains during the wrong season, wait for the hour number on the game clock to change, then return. If it’s still not right, wait another hour. Do not, however, wait within the confines of the Giza Plains, as the weather will not change as long as you’re in the area.
If you enter the Giza Plains and the weather is rainy… peachy, you can hunt Gil Snapper. If not, there’s still some business you can take care of in the dry season. Return to the Nomad Village, which should again be populated and talk to Elder Brunoa. The ring you recovered from Croakadile belonged to her, many, many years ago, and talking to her prompts her to tell you a story. It won’t be the last time. There’s no reward for this, but hey, at least you finally crossed that off your “to do” list, right?
Hunt - Gil Snapper
When you finally get the rains falling in the Giza Plains, make your way to the Crystal Glade area along the southern end of the map, where you’ll find your petitioner, Nanau. Chat with her and it’ll quickly become apparent - through the interjections of her brother Roaklo - why Gil Snapper has returned to the Giza Plains. After you accept her request to kill Gil Snapper she’ll give you the “Silent Urn”, which you can use to trap Gil Trapper’s soul once you’ve vanquished the beast. Awful lot of work to deal with a turtle.
Gil Snapper can be found in the Tracks of the Beast area, which can only be reached if you knocked down all the Withered Trees throughout Giza Plains earlier and thus created a debris bridge in the Gizas South Bank zone. If not, check out the “Rains in Giza Plains” section to find all the Withered Trees, then make your way to the Gizas South Bank area, where, southeast of the bridge in the center of the zone you’ll find the debris bridge.
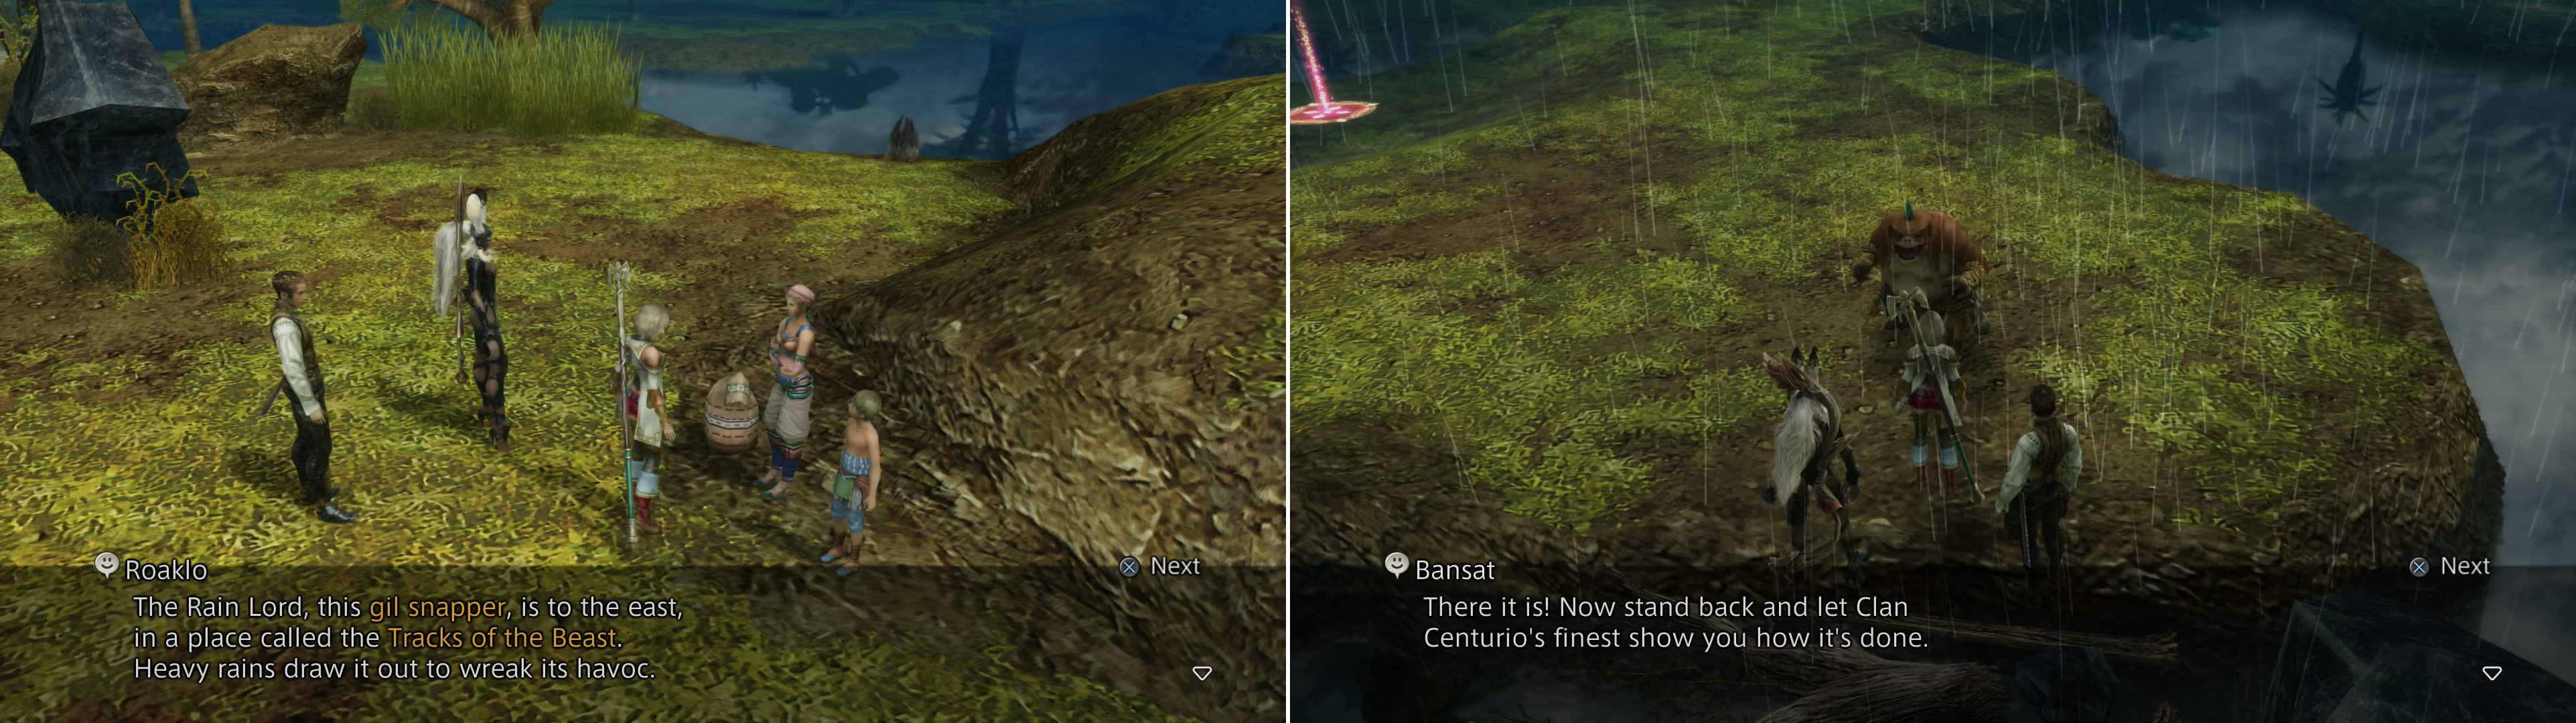
Talk to the Petitioners in the Giza Plains to learn about the Gil Snapper (left). When you reach the Tracks of the Beast area, Bansat will join up and let you know when the weather is right (right).
When you enter the Tracks of the Beast you’ll find your fellow hunter, Bansat, the Seeq roused to action when you picked up the Gil Snapper license. Seems like he’s eager to join the hunt, and will help you take down Gil Snapper… once the pesky beast shows up, of course. The rainy season in the Giza Plains has three weather conditions, cloudy, light rains, and heavy rains. Cloudy weather should be pretty obvious - it’s the only time during the rainy season where there won’t actually be any rain, and the difference between the two degrees of rainfall is pretty easy to spot, either, as heavy rains has more rain density and lighting roiling through the clouds. Gil Snapper will only appear during heavy rains, so you’ll need to zone in and out of the Tracks of the Beast until the weather is right. Don’t worry, Bansat will tell you and remove any doubt.
| Gil Snapper | . |
|---|---|
| Level | 37 |
| Weaknesses | Lightning |
| Resistances | Ice (Absorbs), Dark, Earth, Fire, Holy, Water, Wind (Halves) |
| Immunities | Disable, Doom, Lure, Oil, Petrify, Poison, Reverse, Sap, Sleep, Stop |
| Safety | Yes |
| Drop | N/A |
| Steal | 1,000 Gil (55%), 2,000 Gil (10%), 4,000 Gil (3%) |
Unfortunately for you, the the Silicon Tortoises that prowl the Tracks of the Beast zone haven’t abandoned their range now that Gil Snapper is about. That being the case, you may want to avoid Gil Snapper and eliminate the lesser Testudinidae, first. You need not fear mistaking Gil Snapper for his lesser cousins, as Gil Snapper has a distinctive red shell. When all the Silicon Tortoises are gone, go find Gil Snapper, who should be prowling near the center of the area.
Gil Snapper can seem pretty potent on paper, possessing over 80,000 HP and a fairly high Attack Power. It can cast Blizzara and Blizzaga, preferring the former until its HP are low, at which point it’ll start utilizing the latter. Most dangerous, however, is its Disablega magick, which can neutralize your entire party. Hitting Gil Snapper will prevent this, but it’ll also encourage it to use its technicks more, including Flatten (which can do 800~ damage to all characters in its area-of-effect) and Purify (which can remove Silence and other status effects). That being the case, it’s best to just equip Ninja Belts to immunize yourself to Disable. As mentioned earlier, it also has technicks at its disposal, including Flash, Flatten, Meditate and Purify.
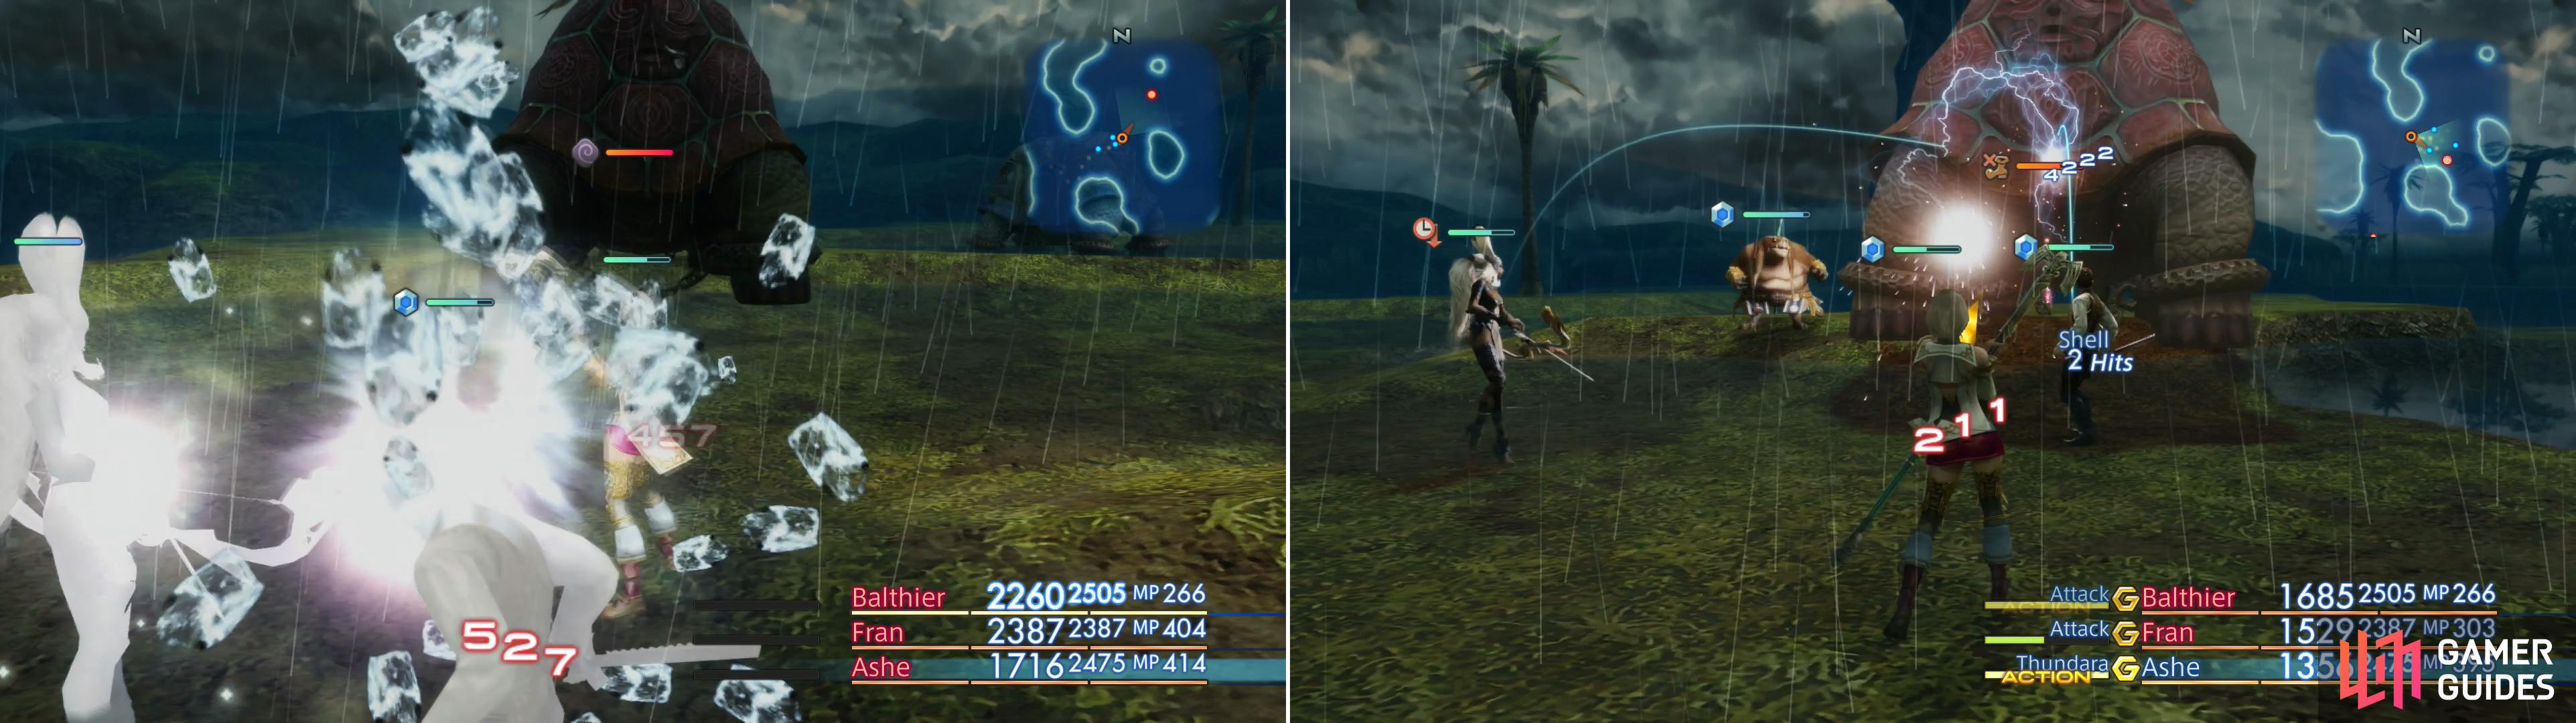
Gil Snapper will fight back with a variety of attacks, including Blizzara (left). It’s also susceptible to a host of status effects, and is weak to Lightning (right).
Despite Gil Snapper’s high damage output, healthy HP reserves, and general buffs to to defense and Magick Power when its HP are low, it’s got numerous, glaring weaknesses. First, it’s susceptible to Blind, Confuse, Immobilize, Silence and Slow, most of which will not bother to remove with Purify. Immobilizing it will force it to attack at range, which it’s more than happy to do with Blizzara, but you can mitigate this with Ice-resistance gear, while Blind will make its physical offense less impressive. They’re a good combination, and together should make Gil Snapper easier to take down. Gil Snapper is also weak to Lightning, so a Black Mage with Thundara will do great damage, as will an Uhlan with a Storm Spear, or an Archer using Lightning Arrows, the latter of which you can obtain by completing the Vorpal Bunny hunt - a fine bonus if you find yourself having to pass time during the dry season.
Speaking of which, after killing Gil Snapper return to the Crystal Glade only to find a note where your petitioner once was. Seems the nomads had such faith in you (or were so discomforted by the weather and the presence of monsters without their precious urn) that they decided to turn in, promising a reward should you meet them during the dry season. Either wait the time out, or go kill the Vorpal Bunny in the meantime (see the section “Vorpal Bunny” below). When the weather is right, return to the Nomad Village to find Nanau and her brother Roaklo near the tents in the northwestern end of the area. Talk to her and after you present the urn with Gil Snapper inside of it, the two siblings will bicker before being interrupted by Elder Brunoa, who bores you with a moralistic lesson before you finally get your reward.
| Reward (For getting rid of Gil Snapper) |
|---|
| 3,000 Gil |
| Phobos Glaze |
Hunt - Vorpal Bunny
Whether you come to this hunt before defeating Gil Snapper (waiting out the dry season, perhaps) or afterwards, it matters little - this hunt is easier than Gil Snapper, and will provide you with the incentive you need to clear the last bit of the Golmore Jungle, which was avoided earlier. First things first, however, return to the Eruyt Village and from the Gate Crystal make your way north to The Spiritwood section of the village. Continue north and northeast until you reach a large circular section, where you’ll find your petitioner, Nera, sitting on a wall to the north. Chat with her and she’ll explain exactly why she wants you to hunt the Vorpal Bunny, warning that the Mark is fast and flighty.
When she’s done babbling, return to The Needlebrake in the Golmore Jungle and make your way to the western end of the zone. From the area transition that leads back to the Paths of Chained Light head south, then east to find some stairs leading down to the unexplored half of The Needlebrake. Make your way southeast beyond a barrier and fight your way to the southeastern end of this area, killing Malboros, Greater Malboros and Hellhounds.
Hellhound :
Stronger than most common foes you’ve faced so far, Hellhounds boast a level in the high 30s, have around 3,500 HP, and significant Attack Power. Expect them to deal around 250~ damage with their normal attacks, and as much as 500~ damage with their technicks. That said, they’re not so strong that they should present you with any serious trouble. They have the Sonic Fangs technick, which is always annoying since it can inflict instant KO, but otherwise they’re offensively unimpressive. They can drop Tanned Hide, Fire Magicite, a Dark Mote or a Red Cap , you can steal an Alarm Clock, Tanned Hide or a Remedy, while they can be Poached for a Tanned Hide or a Libra Gem. They are weak to Water.
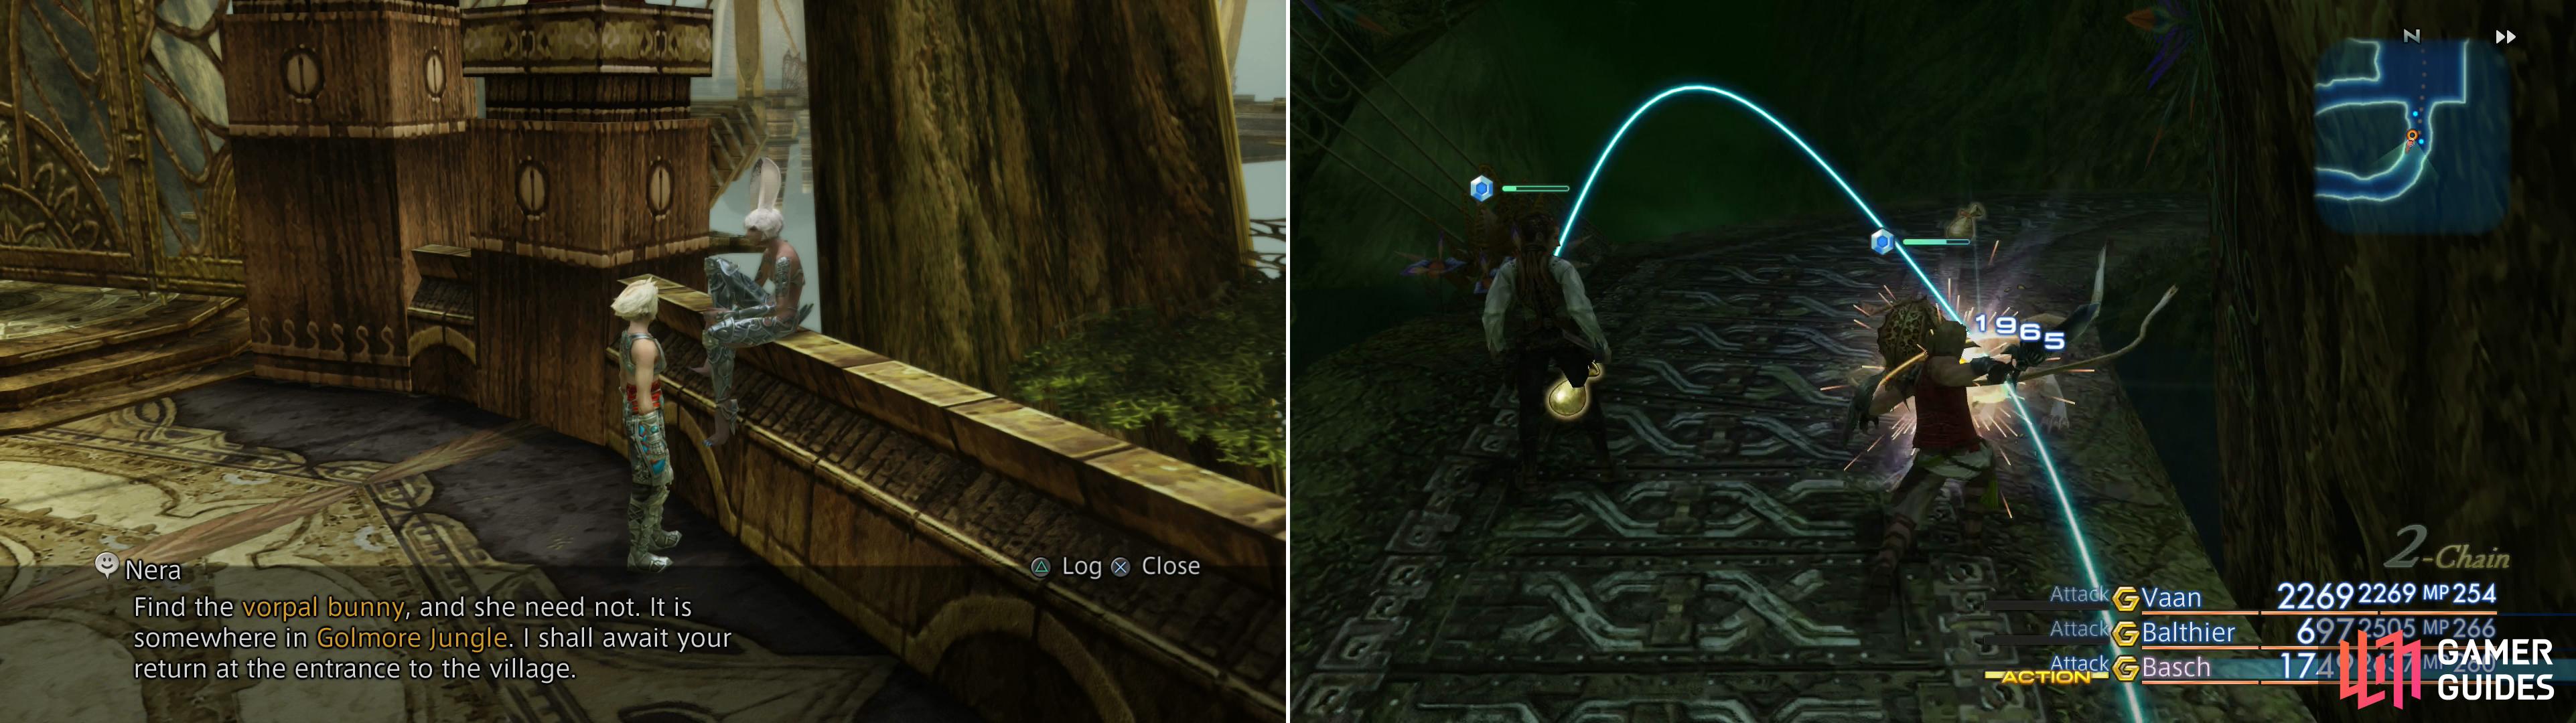
Talk to Nera in the Eruyt Village to learn about the Vorpal Bunny Mark (left). The more enemies you clear out of The Rustling Chapel area, the easier the hunt for the Vorpal Bunny will be (right).
Proceed to the southeastern edge of The Needlebrake to find an area transition leading to The Rustling Chapel area, the southern-most zone of the Golmore Jungle. In addition to Hellhounds you can find a new form of dangerous quadruped - the Coeurl. Otherwise, there’s a Diresaur on hte southern-most square platform near an area transition to the Feywood. It might seem like a good idea to clear the area before hunting the Vorpal Bunny, but if you do the normal enemies will be replaced by Dark Skeletons, and if enough of those are slain you may end up contended with the Grave Lord Rare Game. Not a bad idea in the long run, but that can wait until after you’re done with the Vorpal Bunny.
Coeurl :
Also sporting a level in the high 30s, the Coeurl boasts over 4,000 HP and an Attack Power on par with the Hellhound. Their offense, however, is much more diverse, as they can cast Cura, Silence and Thundara magicks and make use of the Blaster, Mind Lash, Rake and Stone Gaze technicks. In addition, their physical attacks can inflict Sap. They get a boost of Attack Power when at full HP, and a boost to Magick Power when at low HP. They have access to quite a few status effects they can inflict, so having a White Mage handy might not be a bad idea, while a Black Mage can take advantage of their vulnerability to Ice. They can drop a Coeurl Pelt, Storm Magicite, a Warp Mote or a Quality Pelt, you can steal a Coeurl Pelt, Storm Magicite or a Libra Gem, while they can be Poached for a Coeurl Pelt.
| Vorpal Bunny | . |
|---|---|
| Level | 31 |
| Weaknesses | Holy |
| Resistances | Dark (Absorbs), Earth, Fire, Ice Lightning, Water, Wind (Halves) |
| Immunities | Confuse, Disable, Doom, Immobilize, Oil, Petrify, Poison, Sap, Sleep, Stop |
| Safety | Yes |
| Drop | N/A |
| Steal | Drab Wool (55%), Hi-Potion (10%), Blood Wool (3%) |
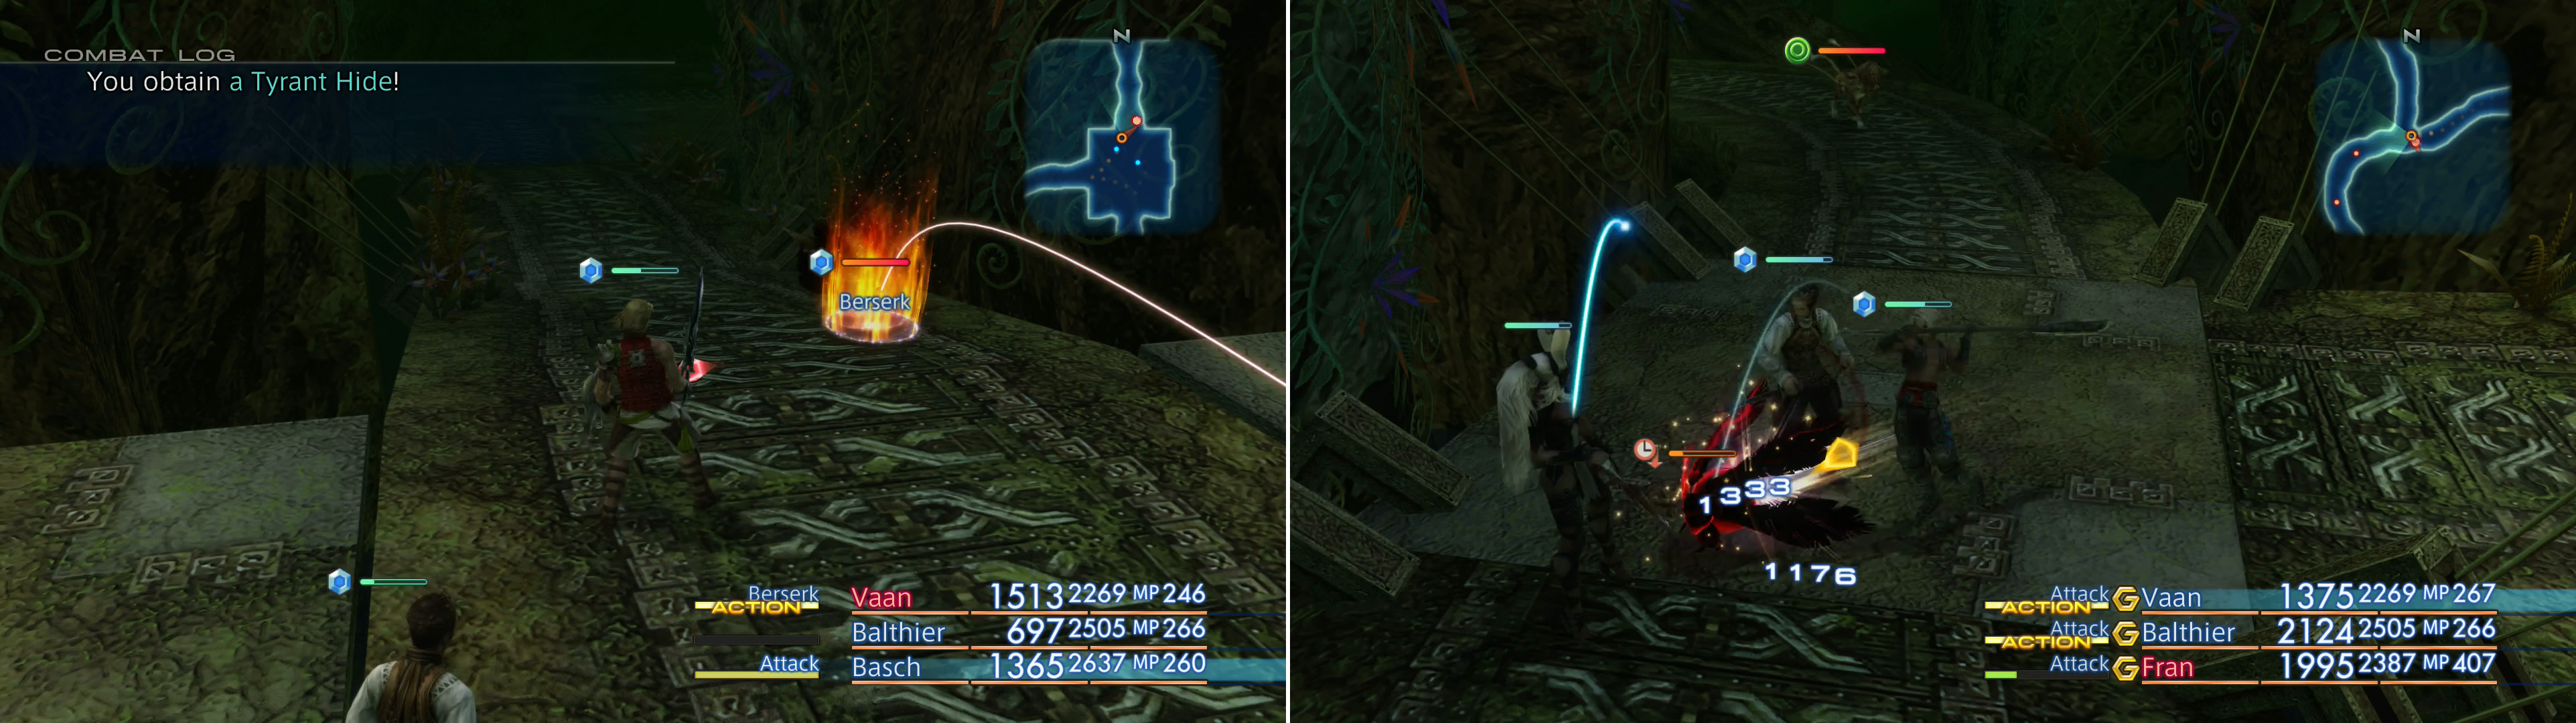
Inflict Berserk on the Vorpal Bunny to prevent it from running away (left) after which it shouldn’t be much trouble to put down (right).
You’ll start out on the northern-most of this area’s three platforms. Kill whatever foes lurk nearby, then make your way to the southwestern end of this platform to find two paths, one running west, then south, and the other running south, then west. Both lead to the same place, another platform near the center of the zone. On this central platform Vorpal Bunny will spawn, popping out of the ground when you approach its hidden burrow. Despite its name, it’s nothing like the Killer Bunny of Monty Pyton fame. Instead, its first instinct is to flee, and should it gain enough distance it’ll burrow again and fully heal. There are two ways to prevent this; either fill your party with characters possessing ranged weapons so they have more chances to strike the elusive rabbit. Failing that, you can always just cast Berserk, which will make the Vorpal Bunny more inclined towards confrontation, even at the expense of increasing its potency.
That said, Vorpal Bunny isn’t an impressive specimen as far as Marks go. It has just over 20,000 HP, no magicks or technicks, and even when buffed by Berserk its physical attacks will struggle to do more than 400~ damage. Against a well-armed party with Protect active, a Berserk Vorpal Bunny is an easy kill. Just be wary, as its physical attacks can inflict Sap. It’ll start out the fight with some buffs active, so be sure to Dispel those before you apply Berserk. A Black Mage isn’t terribly effective in this fight, as the Vorpal Bunny absorbs Dark, is weak to Holy (an element which you likely don’t have access to right now) and takes half damage from all other elements. Too bad you don’t have a holy hand grenade handy, eh? You can further impede its laughable offense by inflicting it with Blind and Slow.
After vanquishing the Vorpal Bunny you’ll be able to pluck off the object of your hunt - its “Rabbit’s Tail”. With it in hand return to the Eruyt Village, where Nera will meet you near the entrance to the town and conduct you in secrecy to her abode. All her scheming is for naught, however, as Alja will drop in during your conversation and discover your collaboration. The two will air their laundry and reveal some of the inner workings of Viera society before you finally get your reward.
| Reward (For vanquishing the Vorpal Bunny) |
|---|
| 2,000 Gil |
| Lightning Arrows |
| Gillie Boots |

Cull the normal monsters in The Rustling Chapel area to cause the undead to rise (left), which must be killed to summon the Grave Lord. While he’s a powerful foe, like all undead he can be clain with a single Phoenix Down (right).
The Grave Lord
Now that you’re done with the Vorpal Bunny hunt, there’s one more thing you can do in the Golmore Jungle before returning to Rabanastre - defeat the Grave Lord. Return back to The Rustling Chapel zone and clear out all its living inhabitants, after which Dark Skeletons will begin to spawn. You’ve already faced these beasts in the Paramina Rift, so they don’t bear much description this time around. It should be noted, however, that these undead are stronger than the ones in the Paramina Rift, having over 4,000 HP and Attack Power on par with Hellhounds and Coeurls. Kill twenty-one Grave Lords (more than this number should spawn in the zone, so wander about racking up kills) and the Grave Lord should spawn in the central platform.
The Grave Lord is far more dangerous than it might seem at a glance, having 40,000 HP and an Attack Power far higher than any foe you’ve faced so far. A single melee attack from it will probably deal over 1,000~ damage to a character buffed by Protect. It has no magicks, but it can use the Ice Break, Lunge, Pyromania and Sandstorm tecnicks. Ice Break, Pyromania and Sandstorm might not be magicks, but they do mimic magicks in that they’re elemental (Ice, Fire and Lightning, respectively) area-of-effect attacks. You can inflict a plethora of status effects on it, including Blind, Confuse, Disable and Immobilize, all of which will help make this fight easier. Aside from that, equipping a Main Gauche and a shield on your Shiraki will help you parry its potent melee attacks. If, however, you wish to take the easy way out and smite this undead without much fuss, you can simply toss a Phoenix Down at it. Like all undead, it’s wounded by curatives, weak to Holy and absorbs Dark. It can drop a Bone Fragment or a Diamond Helm , you can steal a Death’s-Head from it, and it can be Poached for a Pebble or a Blood-darkened Bone.
Clan Rank and the Cat-Ear Hood
After dealing with the hunts above and, perhaps, the Grave Lord, return to Rabanastre and visit Montblanc in the Clan Hall. If you’ve completed all the hunts presented up to this point you should have attained the rank of Brave Companion, for which Montblanc will reward you with two Hi-Ethers and three Teleport Stones. Reaching the rank of Brave Companion will allow you to visit the Clan Provisioner in the Muthru Bazaar, who sells Cat-ear Hoods, an accessory that converts License Points to Gil at a rate of 5G per LP earned per character level; a level thirty character would hence earn 150G per LP, and six such characters would earn 900G per LP. Yes, these things work even on characters that aren’t currently in your party. While this accessory costs a whopping 50,000G, it can end up being a wise investment in the long run… again, you can even keep them equipped on inactive characters and passively earn Gil, which will add up very quickly.
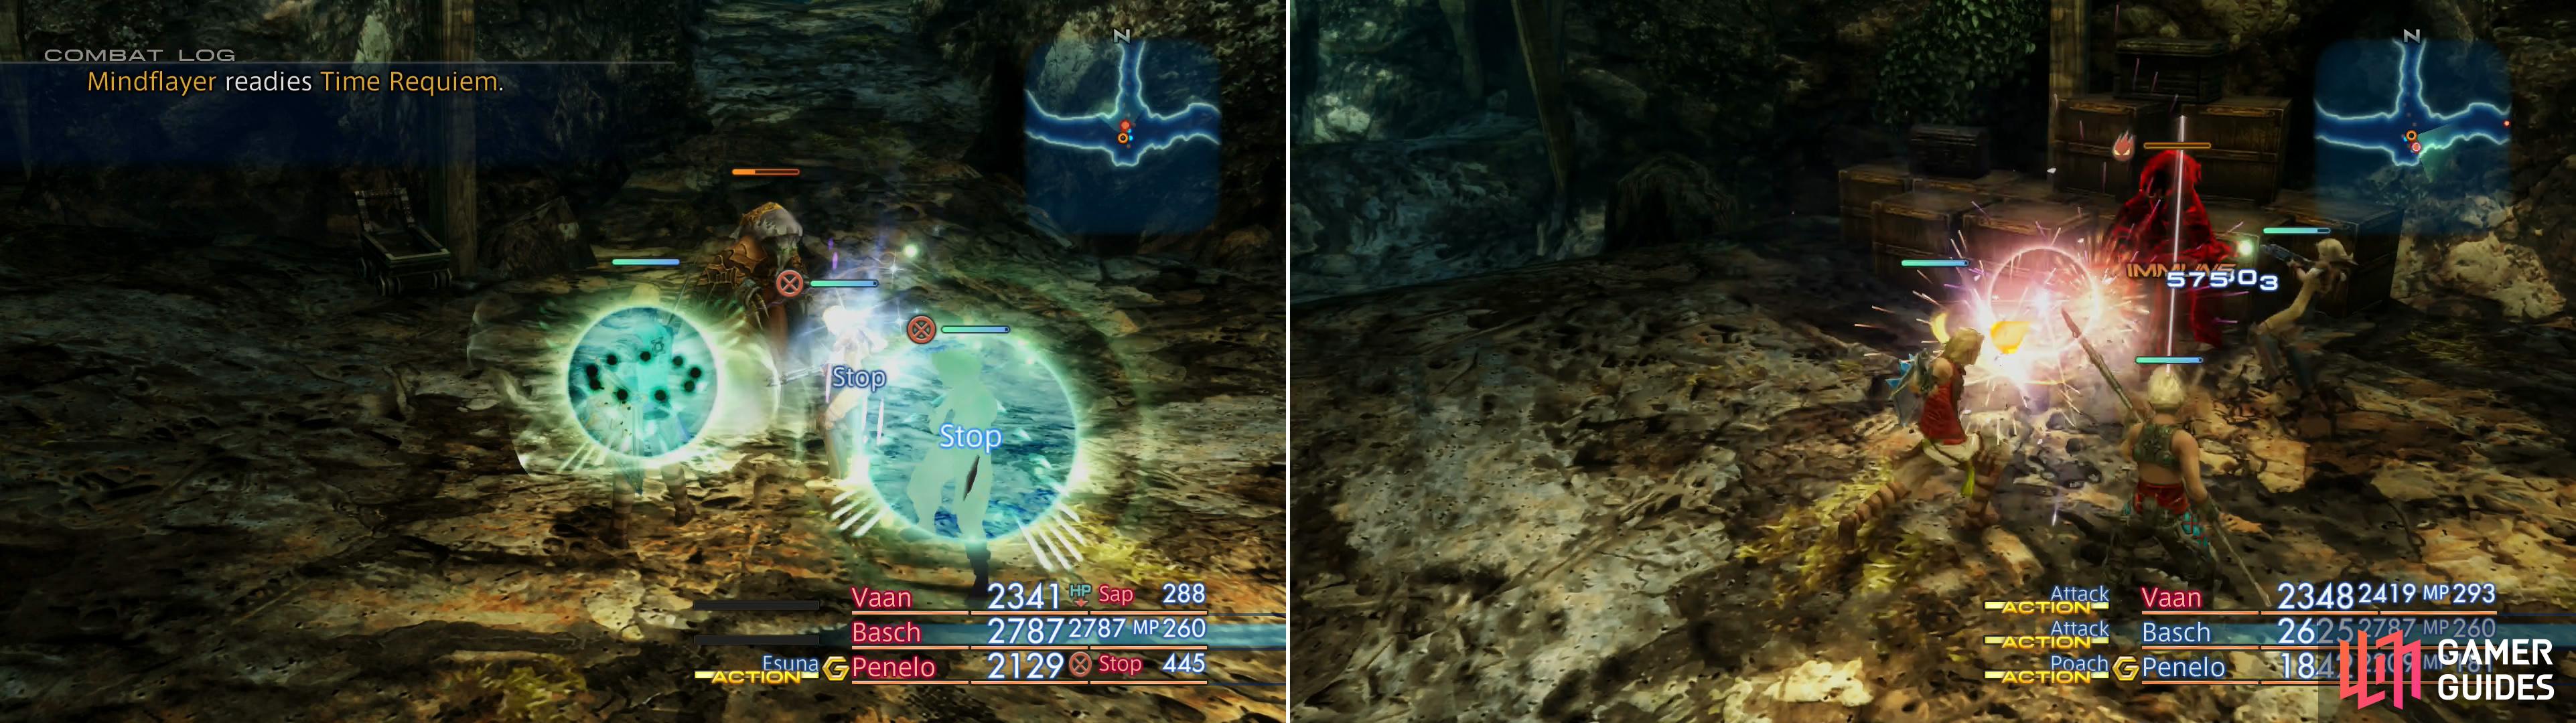
The Mindflayer can use many nasty attacks, like Time Requiem (left), but if you inflict Berserk on it, it’ll abandon those dangerous abilities (right), making the fight much easier.
Hunt - Mindflayer
While the Cat-ear Hood is a fine item, there’s another, better item you can unlock at the Clan Provisoner if you rank up again, and right now you should be sitting at fifteen successful hunts. One more and you’ll reach the rank of Riskbreaker. Let’s get on with it, then - make your way to the Gate Crystal and teleport to Jahara, and from where you appear (in the Banks of the Sogoht area) make your way west into the Lull of the Land area. Here you can find Warrior Guromu waiting for you along the southern end of the zone. Chat with him and he’ll implore you to return to the Henne Mines and smite the Mindflayer, against whose attacks the Garif are powerless.
Once the hunt is properly started, return east to the Banks of the Sogoht area and talk to Gurdy the Moogle to rent a Chocobo, then ride through the Haulo Green area and to The Shred. Once you’re in the Henne Mines, pass through the North Entrance zone, activate the Gate Switchboard, and continue on through Pithead Junction A and Phase 1 Shaft to reach the Phase 1 Dig zone. Here you’ll need to make your way to the southern-most edge of the area, fending off Redmaws and Nightmares as you go.
| Mindflayer | . |
|---|---|
| Level | 35 |
| Weaknesses | N/A |
| Resistances | Dark, Earth, Fire, Holy, Ice Lightning, Water, Wind (Halves) |
| Immunities | Blind, Confuse, Disable, Disease, Doom, Immobilize, Oil, Petrify, Poison, Reverse, Sap, Silence Sleep, Slow, Stop |
| Safety | Yes |
| Drop | N/A |
| Steal | Pebble (55%), Float Mote (10%), Vanishga Mote (3%) |
When you finally spot Mindflayer, be sure to cast Shell on your entire party (or equip Shell Shields or the like). An ideal party for this battle should include a White Mage, a Time Battle Mage, and a competent warrior (Knight/Bushi, Shiraki/Foebreaker). The Mindflayer employs many magicks including Bio, Blizzara, Drain, Fira and Thundara. Worse, yet, are its technicks, including Dark Shock (inflicts Blind and Sap), Invert (reduces a character’s HP to an amount equal to their current MP) and Time Requiem, which can inflict Stop on all characters in an area. Shell will help with this, and there’s nothing that prevents you from swapping out an afflicted character with a fresh one, if it hits. Ideally Shell will keep at least one character safe, but failing that the swapped-in character can help their allies by using Dispel, a Chronos Tear, or Remedies (if they have Remedy Lore 3).

Talk to Warrior Guromu (left) to learn about the Mindflayer, then ride a Chocobo to the Henne Mines (right).
While Invert is one of its more dangerous attack, its other magicks and technicks can prove dangerous, as well, but there is a fine way of dealing with those attacks, and the Vorpal Bunny showed you the way. Cast Berserk on the Mindflayer and it’ll largely substitute its impressive magick and technick arsenal with much, much weaker melee attacks. It will still use Invert while inflicted with Berserk, but it’s a much more manageable fight, all things considered. Be sure to start out the fight with Dispel to clear Faith, Haste and Shell, as this will futher reduce the potency of its attacks and leave it susceptible to your own. It’s immune to nearly every status effect and only takes half damage from every element, so assaulting it with magicks is not advised. Dispel, Berserk, then whittle it down with melee attacks.
If you didn’t use Berserk, it may use Soul Etude when its low on HP, fully restoring the monster, after which it’s fond of following up with Heroes March, which will bestow Bravery, Faith, Haste, Protect and Shell on itself followed by Mystery Waltz, which will increase its level by 20%. All in all, it amounts to one hell of a second wind.
Once Mindflayer falls, backtrack through the Henne Mines and return to Warrior Guromu in Jahara, who will reward you for your deeds, and mention that their Geomancer wishes to speak with you. Pay it no mind right now, however, as the Geomancer wishes to offer you a way to reach the deepest, darkest, most dangerous depths of the Henne Mines. Not only are you not prepared for such a challenge, but the Geomancer will himself note this, suggesting you get more Espers under your control before you risk the worst that the Henne Mines have to offer.
| Reward (For murdering the Mindflayer) |
|---|
| 2,200 Gil |
| Carmagnole |
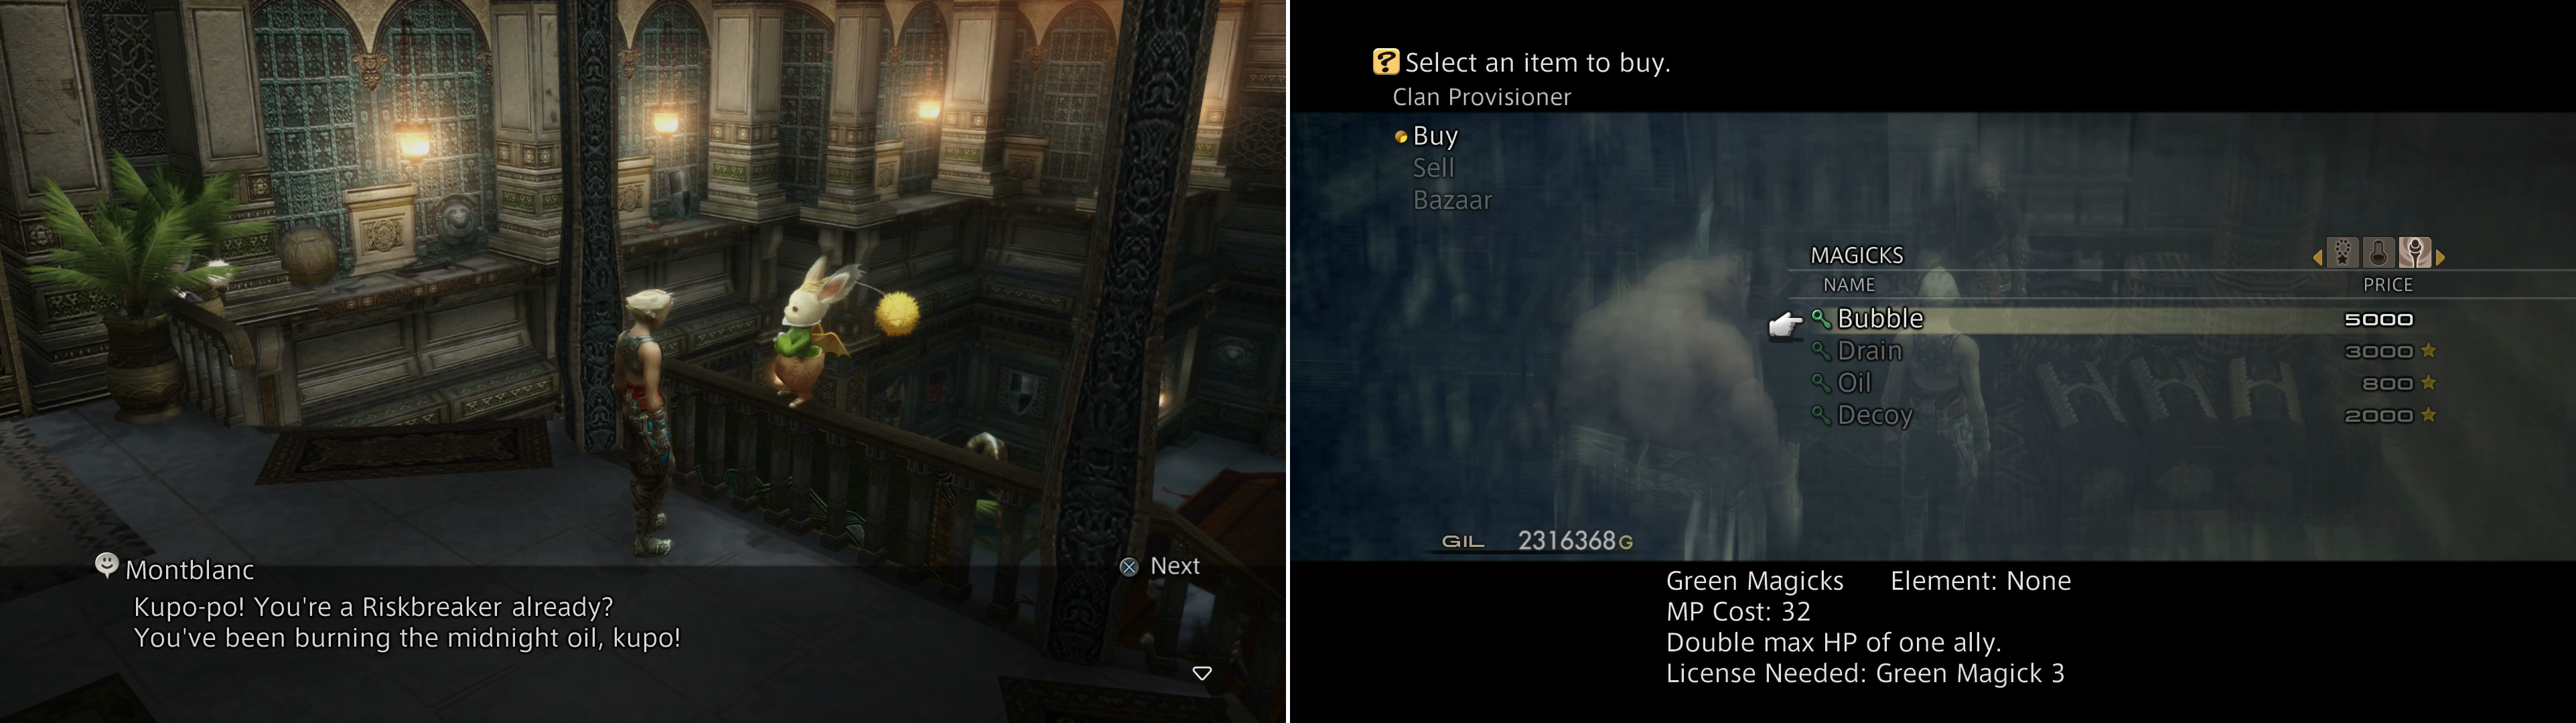
Attain the rank of Riskbreaker (left) and you’ll be able to buy the Bubble magick from the Clan Provisioner (right).
Riskbreaker Rank Rewards
Assuming that Mindflayer was your sixteenth successful hunt and that you have the requisite 200,000 Clan Points, return to Rabanstre and pay Montblanc a visit and he’ll reward you as the situation demands (Elixir x2, Teleport Stone x3). The next rank, Paragon of Justice, requires you to hunt down eight more Marks, so it’ll be a while. That said, there’s no reason you can’t enjoy the lucre provided by your current accomplishments. Return to the Muthru Bazaar and talk to the Clan Provisioner, who should now stock Bubble (Green Magick 3). You had experience with this magick before, courtesy of Larsa, but if you forgot it’ll double your current and max HP for its duration. Now every single spellcaster in your party (Black Mage, Red Battlemage, Time Battlemage and White Mage) have access to it. For tougher fights, this is a fine spell to bestow your entire party with. Monsters aren’t going to stop getting stronger, and having twice the HP will allow you to survive their attacks easier.
Anyway, when you’re done with those hunts it’s time to move on to the Mosphoran Highwaste, the first step in your long, arduous journey to reach Archades.
No Comments