Free Time 5.1 Tasks
| Name | Location | Description | Reward |
|---|---|---|---|
| Mad About Ms. Tokimiya III | Fountain Courtyard | Have Rem earn S-Rank in “Covering the Cadets” Expert Trial | Gold Bangle |
| Monster Pursuit IV | Central Command | Defeat 6 Bombs in Jubanla Region | 5 X-Potions |
| Mother Says II | Sorcery | Defeat 30 enemies with Blizzard BOM | 12 Jeweled Rings |
| Sanative Supplier IV | Main Gate | Procure 1 Phoenix Down | Mythril Gloves |
| Secret Agent Agito IV | Crystarium | Find proof of Cactuar’s existence | Ballistic Shield |
| Slayer’s Spoils IV | Armory | Retrieve 7 Fire Shards | Thunderbolt Armlet |
| SPP Scavenger IV | Lounge | Earn 800 SPP and turn into NPC | 3 Megalixirs |
| The Phantoma Menace IV | Sorcery | Harvest 7 Cyan Phantoma and turn into NPC | Crystal Shard |
Here are some notes for the Tasks above:
- “Mad about Ms. Tokimiya III” requires you to finish the Expert Trial mentioned solo, with no backup from SP and no one in reserves with Rem, with an S-Rank. You can’t die (obviously) and must finish the mission in under 24 minutes with 140 Phantoma harvested. However, since you’re doing it solo and there’s no difficulty requirement, you just need a C-rank for one of the three categories while getting A on the other two (which will get the S-rank overall).
- You can go to the Arena to defeat 30 enemies with Blizzard BOM. Note that you will need a Jeweled Ring (the reward) for a later Task in Chapter 7.
- Fire Shards are dropped by normal Bombs and Flame Flans. Go to Corsi Cave and you will encounter Bombs there if you don’t have enough already.
- To get to the Jubanla Region, you have to go directly west from Mi-Go in the North Togoreth region to find a cave called Northern Corridor. Go through it and you’ll be in the Jubanla region.
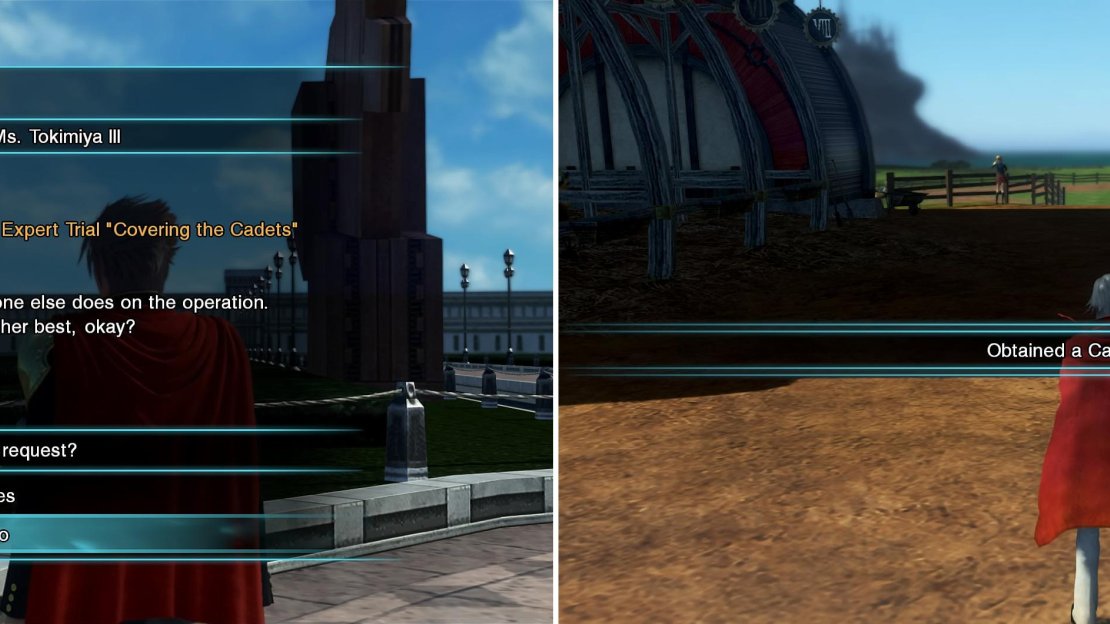
- For “Secret Agent Agito IV”, you need to look in one of four locations for a Cactuar who will randomly appear. These locations are Airship Landing, Terrace, Chocobo Ranch and Back Garden. When you happen to spot it, the Cactuar will drop an item, one of which can be the Cactuar Flower , the item you need for the Task.
You can play this Expert Trial on any difficulty (left). After you find the Cactuar, it will drop the Cactuar Blossom (right).
Free Time 5.2 Tasks
| Name | Location | Description | Reward |
|---|---|---|---|
| An Education in Love II | Fountain Courtyard | Retrieve 1 Diamond Ore | Good-Luck Charm |
| Commander’s Orders II | Terrace | Land 20 Breaksight/Killsight strikes | Shock Shield |
| Monster Pursuit V | Central Command | Defeat 1 Striker in forest of Eibon | 10 Elixirs |
| Sanative Supplier V | Main Gate | Procure 3 Mega-Potions | Platinum Gloves |
| Secret Agent Agito V | Crystarium | Capture 3 Imperial Troopers in forests of Meroe | Protector Ring |
| Slayer’s Spoils V | Armory | Retrieve 2 Beast Fleshs | Gold Bangle |
| SPP Scavenger V | Lounge | Earn 1000 SPP and turn into NPC | 5 Phoenix Downs |
| The Phantoma Menace V | Sorcery | Harvest 10 Sepia Phantomas and turn into NPC | Crystal Shard |
Here are some notes about the Tasks above:
- The Diamond Ore and the Beast Flesh items are both in Bethnel Caverns, a dungeon located right next to the town of Meroe. This dungeon is inhabited by level 55-56 Behemoths, so you should be of appropriate level so you don’t get immediately knocked out by them.
- As with previous ones, do the 20 Breaksight/Killsight strikes in the Arena to save free time.
- Remember to go into the forests in the Eibon region to get the Striker, because those will be the only ones that count.
- Capture the 3 Imperial Troopers before finishing “A Charge on the Border” Expert Trial.

No Comments