
1) Super Mutant Tent
Book - Pugilism Illustrated
Keller Family Transcript (5 of 5)
Once across the landmine-infested bridge head north, north-east past the Anchorage Memorial, jump a guardrail, and swim to the shored beyond. You’ll come across a Centaur and a leveled Super Mutant, (most likely just a Super Mutant Brute at this point). Kill them and loot the Super Mutant’s truck fort. Inside one of the trucks you’ll find, among other things, a copy of Pugilism Illustrated . In the tent you’ll find a captive and Keller Family Transcript (5 of 5) .
2) Raider-Super Mutant Shootout
If you are feeling frisky, head up the coast to the north-west a bit. You’ll find three Raiders on your side of the river, two of which should be on a lower platform. If you go down to mess with them two Super Mutants will show up across the shore, one of which usually comes with a Minigun. Needless to say, it becomes a dangerous venture fairly quickly. Still, to the victor come the spoils. If you use the water to shield you from the fire, you can let the two sides duke it out, and when they (the Raiders) are dead, go mop up the Super Mutants.
Anyways, time to get back on track. Return to the Super Mutant fort and follow the river south-east. On the way you might find some Mirelurk Eggs, which, if tampered with, will likely provoke some Mirelurks. You can also discover Dukov’s Place, but there’s no point in paying Dukov a visit just yet.
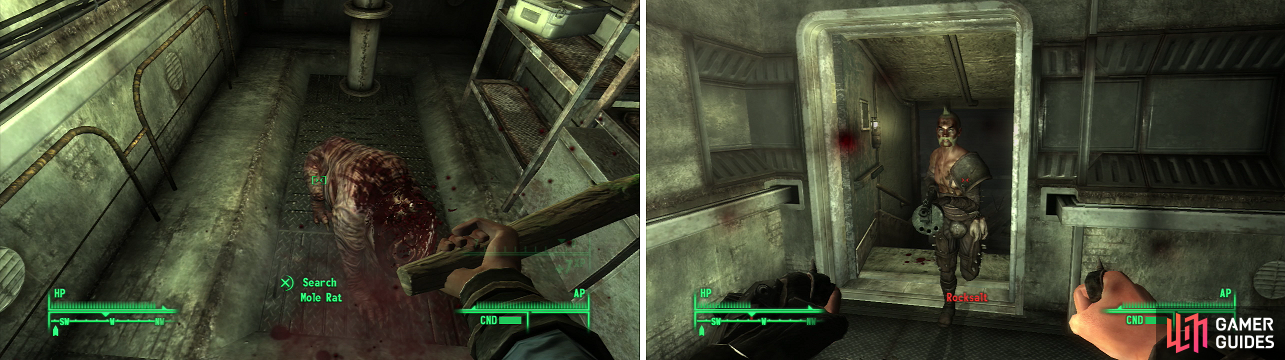
Smack Mole Rats with Moira’s Repellent Stick to give them one hell of a serious dose of “feel bad sensations” (left). Rocksalt (right) is the Raider in charge down here, but it’s nothing a little death can’t fix
3) Feel-Bad Sensation - (Tepid Sewer)
In the room to your right or left you’ll find Mole Rats, and you can easily get you three kills in here without even getting your feet wet. Whack them with Moira’s Repellent Stick and watch that ‘feel-bad sensation’ at work! We could turn the quest in now, but we should really finish Moira’s secondary objective-to kill seven more (for a total of ten), and so we shall. Go down some stairs to find a locked computer [Average], which controls the turrets up ahead. If you want to just get them out of your way, disable them. You can also disable them when they’re a bother, and reactivate them later to destroy them manually for the experience. Ahead of you will be a Raider (most likely still alive) and a number of slain Mole Rats, along with a turret, if you didn’t disable it. At the northern end of the hallway you’ll find a door leading deeper into the sewers. Right and left of this door you’ll find stairs taking you to a room with some living Mole Rats milling about. Kill them, taking our count up to six.
4) Rocksalt
Go through the northern door at the end of the turreted tunnel and you’ll eventually come into a subway tunnel crawling with Raiders and their landimines… although these are nowhere near as well hidden as the ones in Minefield. One Raider, named Rocksalt, will have a key on his body.
5) Tepid Sewer Raider Den
Book - Dean’s Electronics
Between two of the Raider bunkers to the west you’ll find some stairs leading up. Go up the stairs and take two lefts to reach a room with a leaky steam pipe. Over by a turbine, near a toolbox, you’ll find a copy of Dean’s Electronics . You’ll also find the Raider’s resting area, which has a number of goodies and beds, should you need to rest. On the floor near some of the beds you’ll find a safe that can be opened with Rocksalt’s Key.
6) Finishing the Tepid Sewers
Continue north past the second bunker to find a room with more Mole Rats. You should now have your seventh Mole Rat, but let’s finish these sewers off before heading back to Moira. You’ll come to a room where two Raiders and some Mole Rats are fighting it out. There’s a terminal [Easy] in this room that can unlock a locked door… or you could just use Rocksalt’s Key, either way. Inside is Rocksalt’s stash, which includes a number of Frag Grenades and a Power Fist. Exit the room by heading west and up some stairs to find the last batch of Mole Rats. There are more rooms with some minor loot in them, and the exit to Georgetown. Now that We’ve come all the way through these sewers you have two options of egress, either go back through them, or exit to Georgetown and travel back.
7) Georgetown
Book - Grognak the Barbarian
Georgetown is crawling with Super Mutants and you’ll probably get ambushed by some Talon Company Mercenaries if you go there, but it will get you the map marker, allowing you to fast travel back here at any time. Also, the Talon Combat Armor would be a significant improvement over what you’re probably wearing at this point. Let the Super Mutants and the Talon Company Mercs fight it out, but don’t be afraid to jump on the Mercs if you get the chance. After all, you don’t want to have to fight all three of them at once. When they’re all dead loot the collapsed building to the west of the Tepid Sewers. On a shelf on the second story you’ll find a variety of goodies, namely a Stealth Boy and a copy of Grognak the Barbarian . If you don’t care to explore Georgetown West at this point (and besides looting, there’s no real reason to) skip to Step #16. We can, at least, discover all the areas that comprise Georgetown, for future reference.
8) Radiation King
Head north to find a store called Radiation King. Inside a Scavenger has made themselves at home. Search the wooden crate on the toilet to find some Stimpaks. Other than that there’s some Scrap Metal. Leave and head west to find a Grocer.
9) Grocery Shopping
There’s numerous food items to be had in this store, all guarded by a sorry pair of Radroaches. Behind the counter is a first aid box and a locked floor safe [Average].
10) To the Riverside
Leave the grocer and head west to find an alcove with a Pulowski Preservation Shelter, inside of which you’ll find plenty of beer and a Nuka-Cola Quantum. Go back to the Tepid Sewer entrance and head south to find a river. You can go across a bridge to find a first aid box, an ammo box, and an Assault Rifle on the far side of the river. Go down some stairs to reach the riverside, where you can find a door leading to DCTA Tunnel 014-B Potomac. We’ll explore this area later, much later, and from the other side.
11) Georgetown North
Go east up a ramp to find Georgetown North, a metro station that leads to the Foggy Bottom Station. From here, head south to find a Townhome. If you continue south you’ll eventually find Georgetown South, which leads to Georgetown/The Mall Metro. Again, these are places we’re not exploring yet. For now just be content to discover locations around Georgetown. Before that, though, let’s explore the Townhome.
12) Townhome
Book - Lying, Congressional Style
Grab the Lying, Congressional Style on the table next to a camera. It’s a promising way to start this place out, eh? Loot the rest of the house, which is much less interesting. There’s a terminal in the room to the north with which you can activate a Mister Handy. You can have it perform a variety of tasks, the most interesting, and chilling of which is have it read a bedtime story.
13) Missile Launcher Mutant
Head east around the Townhome and head down an alley to find another, more damaged house east of the Townhome. Super Mutants and Centaurs lurk around here, so tread carefully-it might not be a bad idea to lure them back west down the alley instead of trying to fight them all on open ground. Once they’re dealt with, head up to the ruined house to the east. Disarm the pressure plate in the doorway and head inside, but avoid the doorway-there is a leveled Super Mutant with a Missile Launcher on high ground across from the house. It can’t shoot you through the boarded-up window, but it will surely try. Disarm the bear trap by the entrance to the house and be wary of landmines.
There are two good ways to deal with this Super Mutant. Shoot the Missile Launcher out of its hands, retreating back in the house if you miss so you can let your V.A.T.S. recharge, or just let the damned thing keep shooting until the Missile Launcher breaks. The former tactic is especially nice if it’s a Super Mutant Master or Overlord. Once it’s disarmed, there’s nothing it can do. Being on top of an unreachable platform is a double-edged sword. If you don’t have any good ranged weapons, you can find a dead Raider upstairs with a Sniper Rifle, although the upper level is much more vulnerable to missile splash damage than the lower level.
14) Georgetown East
North of the house you’ll find a tree with numerous Gore Bags around, and on the far side of the tree, several ammo boxes and a pair of Stimpaks. Turn south to find Georgetown East, which leads to the Penn. Ave/Georgetown Metro. Travel south some more to find La Maison Beauregard Lobby.
15) La Maison Beauregard Lobby - ( La Maison Beauregard Lobby)
Book - U.S. Army: 30 Handy Flamethrower Recipes
This area contains a pair of Super Mutants, one of which occupies higher ground and carries a Missile Launcher, so some care is suggested with these enemies. Behind the counter to the north you’ll find some Beer and a copy of U.S. Army: 30 Handy Flamethrower Recipes . Up the ‘ramp’ to the east where the Missile Launcher-bearing Super Mutant was you’ll find a bar with some alcohol, a fridge, a .32 Pistol, and a Nuka-Cola Quantum near it. Over to the north is a pool table with some Missiles, Stimpaks, a Stealth Boy, and a Mini-Nuke on top. Now we can head back to Megaton. Yes, we realize spent as much time doing extra exploration as we did doing the quest we set out to do. That’s what this guide is all about, baby.
16) Return to Moira… Again
Talk to Moira and get your reward for the Mole Rat repellent.. “It’s like explosive whack-a-Mole Rat. Can I get it in bullet form? For people?” Priceless. Anyways. She’ll give you some left-over chems… two Jet and two Psycho… no wonder their heads exploded. Agree to pursue the injury quest next. In reality, it’s time to take a break from Moira. We’ll go gather some Bobbleheads, now that we have better armor, weapons, and more importantly, a home base to return to. If we get injured (you need a crippled limb for the optional requirement of this quest) we can return to Moira and continue her quests, although the Mirelurk portion calls for some… finesse.. we don’t yet have.
First up, It’s time to get the Lockpick Bobblehead , so let’s head on over to the Bethesda Ruins. If at any time you get a crippled limb and get yourself down to less than 50% of your health, go visit Moira to complete the injury portion of the guide… alot of this exploring is to provide us with such an opportunity. You can, of course, skip ahead if you don’t care to go on the Great Bobblehead Hunt chronologically with the guide.

 Sign up
No Comments