
1) A One-Way Trip
Go down the floors of the ruined building. As Three Dog promised, it’s a one-way trip, a fact that’s deadened a bit by your ability to fast travel. To the east, north-east across a bridge you’ll find an unmarked entrance to Metro Junction. Note the Ghouls down in the road you’ll cross over-if they come up to you, deal with them, if not… we’ll get to them later. From this metro entrance head south, south-east to find a picnic table with an Assault Rifle on it, and some ammo boxes and a first aid box nearby. Head west, south-west down to the nearby road, then turn south, south-east to find a door leading to the Collapsed Car Tunnel.
2) Collapsed Car Tunnel
Head south down a hallway to find a door, which opens to… well, a collapsed car tunnel. It’s occupied by Ghouls (More Ghouls. Joy…) If you head to the southern end of the car tunnel, then turn west and head through a doorway, you’ll find the exit to Dupont Circle, but to reach the Mall we need to go through the Dupont Circle Station to Metro Central, with is through a western door along the northern end of the car tunnel. If you want to explore Dupont Circle now would be the time to do so, but like Georgetown it’s completely ancillary. Unlike Georgetown, however, it’s not really that rewarding to explore. So… kill whatever Ghouls you wish, then go through the door leading to the Dupont Circle Station, which is just across the car tunnel from the door we entered.
3) Dupont Circle Station
Book - Lying, Congressional Style
Head south into a room where you can activate a metro Protectron. Really though, these opportunities are useless, as the Protectron usually just gets wasted by the enemies in the Metro. There’s a copy of Lying, Congressional Style in a plastic bin on one of the desks. Go through a door and head east to find the gate to Dupont Circle, around which you’ll find two Super Mutants lurking. Head west through a door and follow the tunnel until you reach a train tunnel leading south.
4) The Dupont Raiders
Kill a Raider and head around a corner to the west to find the Raider’s abode, which has some loot around it, including a pair of ammo boxes. Head south to find a door to the west and go down the tunnel a short way, kill a Raider, and loot their cubby to the north which contains a bunch of drugs on a metal shelf and a table, as well as another pair of ammo boxes. Continue south down some stairs to find a Raider outpost. You can hack a terminal [Average] and turn their turret on them for good fun. Continue down some metal stairs to reach some natural caverns. On the cavern floor, turn south to find a tunnel, which you should follow until you come to a utility gate. Go through the door to reach some sewer tunnels, where you’ll find some dead Ghouls and Raiders. Grab the ammo boxe and assault rifle on the cinder blocks, as well as the nearby Frag Grenades. Go down a short tunnel to the south, disarming some Frag Mines as you go, then go up a tunnel to the east, disarm a tripwire and grab the grenade bouquet above it. You’ll find a door leading to Metro Central.
5) Metro Central
Book - Pugilism Illustrated
Metro Central is a bit of a hub (hence the name, Metro CENTRAL), and it’s just one way we can reach the Mall.
Head south and you’ll find some Ghouls and Raiders fighting. On a table you’ll find some Frag Grenades, Stimpaks, and a 10mm Pistol. You’ll also find an Assault Rifle nearby, and three ammo boxes under the table. Head through a door to the south to reach a metro train tunnel and continue south to reach a metro hub area. Pick your way through the rubble to find two train tunnels to the south, and follow the western-most one. Along the way south you’ll find another tunnel veering south-west, at the end of which two Ghouls are happily hovering over the remains of a Wasteland and a Raider. Keep going south until you spot a doorway to the west, with another Brotherhood sign pointing this as the way to the “Mall Outpost”. Shortly beyond is a door to the Museum Station, which is where we want to go… after we finish off Metro Central. That’s right, another detour.
Return to the train tunnel. Near the door you’ll find a dead Raider, and a bit to the north are some ammo boxe near a sand bag barricade. In the tunnel to the east you’ll find a pack of Vicious Dogs guarding a locked door [Average] behind which are some drugs, some components, and a copy of Pugilism Illustrated .
6) The Foggy Bottom Branch
Book - Dean’s Electronics
Head back north to reach the large metro hub chamber and go up the stairs to the next level of the metro. Go up the stairs to the west to reach the second level of Metro Central. From here head down some train tunnels to the west. Along the way you’ll find a small connector tunnel within which is a locked gate [Easy], beyond which you can find a copy of Dean’s Electronics on a table. Keep heading west down the southern tunnel and you’ll find a door to the north just before some radioactive barrels, where some Ghouls are probably playing. Kill them and loot the body of a Talon Company Merc on the train tracks. Go through the door to the north and score a trio of ammo boxes on and below a table behind some more sand bag barricades. Continue down some stairs to the north to find the Foggy Bottom Station, which we won’t be exploring right now.
7) The Freedom Station Branch
Return back east to the metro hub chamber, and continue east to find another train tunnel. After a short distance you’ll find a door to the north which leads to a room with a door to the Freedom Station in it. Another place we won’t be exploring yet. Head back into the train tunnel and continue east to find a connector tunnel to the south, where you’ll can find a pile of bodies, amongst which are the remains of another Talon Company Mercenary, along with some Stimpaks, Assault Rifles, 5.56mm Rounds, and a Chinese Assault Rifle.
8) The Pennsylvania Avenue Branch
From the second level of Metro Central (the level on which the Foggy Bottom and Freedom Station entrances are found) head up the stairs to the north and continue up a tunnel… also to the north. Past some turnstiles, in the corner where the tunnel turns east, you’ll find some bathrooms. In the men’s bathroom you’ll find a skeleton with a Chinese Assault Rifle, some 5.56 Rounds, and some Stimpaks near it. Back in the main tunnel you’ll also find the entrance to Pennsylvania Avenue, so if you want to check out the ‘ol White House, here you go. When you’re done head through the door to the Museum Station.
9) Museum Station
Book - Grognak the Barbarian
Loot the room you’re in and head east, flip an electrical switch, and go up some stairs. In this room you’ll find a bunch of alcohol and pool balls, and on a table you’ll find a copy of Grognak the Barbarian . Go through a door to the east to find a metro train tunnel. To the north you’ll find a Raider camp with little loot. To the south you’ll find a large metro hub with more Raiders in it. In the south-eastern corner of the hub room you’ll find their camp, which has some ammo boxes to grab. You can continue south to find the Anacostia Crossing Station, but we’ll ignore that for now. Don’t worry, we’ll explore it soon enough.
10) To the Mall
Book - Chinese Army: Spec. Ops. Training Manual
Head up the stairs in the large metro hub. You can now either go east or west. East takes you to right outside the Museum of Technology, but west is more profitable, so go west first. You’ll find two bathrooms, in the men’s room you’ll find some Buffout in the sink, some Jet on a toilet seat, and a dead Wastelander. In the ladies restroom you’ll find Rad-X on a sink, a Cherry Bomb in a toilet, and in a wooden crate by a skeleton you’ll find Buffout, Jet, and a copy of Chinese Army: Spec. Ops. Training Manual . Now head over to the east to score some drugs, ammo boxes, and about fifty Tin Cans. Exit the metro and head south-east a short distance to find a door leading to the Museum of Technology Atrium.
The name of the riddler gives away the game-all the answers are prime numbers (left). Life in a vault! Not really as much fun as they make it out to be… (right)
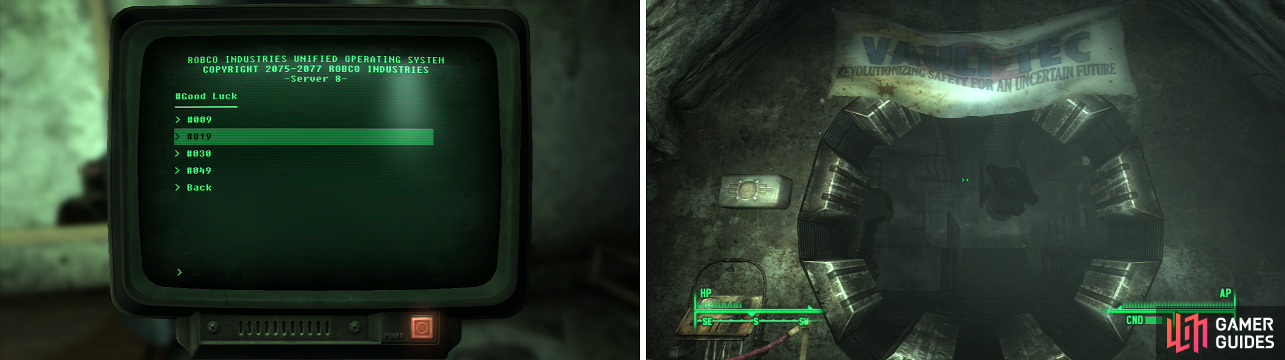
11) Prime’s Riddle
First things first, kill the Super Mutants in this level. On the main floor you’ll find a Stealth Boy in the south-west corner, and a terminal south of the desks labeled “Museum Information”. Activate the terminal and selection option #000 to find a letter from a guy named Prime to somebody named Jiggs. You’ll have to find terminals throughout the Museum to get access to Jiggs’ loot. Leave the terminal and select it again to find the entry #000 replaced with #001. When you select it you’ll get four numbers:, #9, #19, #30, and #49. You want to select #19, which is, of course, the prime number there.
12) Life In A Vault
Book - Nikola Tesla and You
When you’re done with the terminal head through a door to the south to find a small room with two bathrooms to the east, and another door to the south. Go through the southern doorn and up some stairs to find a room with two terminals. Near the Museum Maintenance console you’ll find a copy of Nikola Tesla and You . There’s also a “Turret Control Terminal” [Average], which… well, you might as well hack. Head back out to the main room and go up the stairs north of the desks. Head through the first door to the east to find two Stealth Boys on stands. Once they’re yours, head back out to the west and go around a walkway to the south to find a door to the south leading to the Vault Tour. Life in a Vault… how romantic! When you’re done with the tour continue until you find the door to the Museum of Technology West Wing.
13) The West Wing
To the west you’ll find two terminals, the western-most of the two has the #002 entry on it. Select it to bring up four numbers, #24, #38, #53, #88. Anybody who wasn’t born under a rock and is capable of reading this guide realizes that the only even number that is prime is 2, which eliminates all but one option. Pick #53 and continue through a door to the south to wind up at the Delta IX Rocket display, which is crawling with Super Mutants.
There are three ways to reach the Lunar Lander, one by going downstairs through the Planetarium, and the other two by going through the Delta IX Rocket display. What kind of guide would this be if we didn’t explore them all?
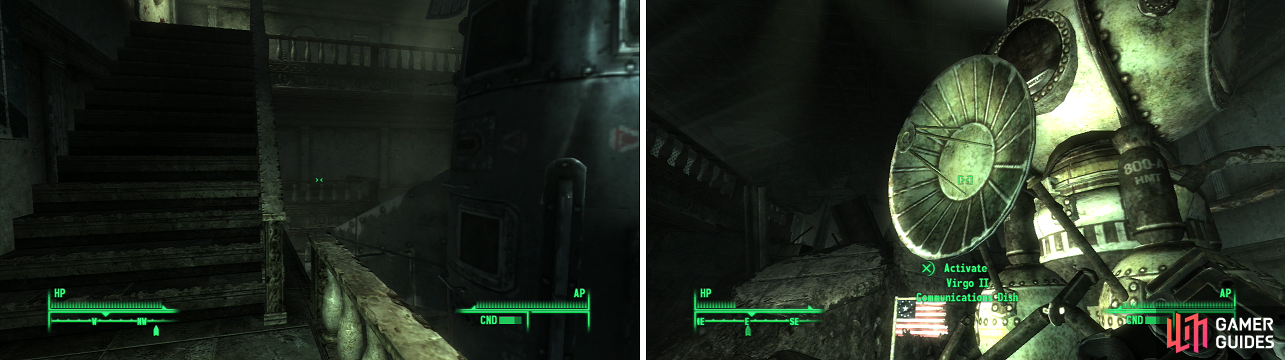
To reach the balcony in the distance, you’ll have to jump onto it from above (left). Grab the Virgo II Communications Dish off the Lunar Lander-your objective in the Museum of Technology (right).
14) Balcony Leaping
Book - Guns and Bullets
First, however, head up to the top of the stairs. You’ll notice that in the south-western corner of the room is a balcony that we can’t reach, it’s directly south of a Vault-Tec banner on the wall. The only way to reach it is to jump down from the staircase above to land on the ledge, where you’ll find a room to the south. You’ll find some skeletons on a matress on the floor in a very questionable position… why does one have a knife? Anyways, there’s a copy of Guns and Bullets of the table, as well as some Nuka-Cola, Purified Water, and a Stimpak in the fridge.
15) Delta IX Rocket Display
Go down the stairs in the Delta IX Rocket display room until you reach the bottom, stopping to search another terminal on the northern wall. Activate #003 to get four numbers, #99, #105, #111, and #113. Pick #113 and the entry will change to #Get Passcode. Select it to get Prime’s note to Jiggs, which will tell you to get some loot in a security office safe upstairs. It also tells you to meet him in a diner near the Jury Street Metro Station. Will do. You’ll get the note “Earned Your Share.”
16) The Lunar Lander
Head upstairs now, ignoring the passage to the west. Yes, it leads to the room with the Lunar Lander, but we’ll get there soon enough. At the top of the stairs you’ll find a door [Average]. Go through the door, down some stairs, and loot a desk to find a Key - Custodian Key for Tech Museum. Continue through a door opening to the north, around a walkway, and down some stairs to find the Lunar Lander. Kill whatever Super Mutants are around and relieve the Lunar Lander of its coveted Virgo II Communications Dish, now we just need to get to the Washington Monument.
17) Jiggs’ Share
Go north through a doorway and through the first door on your left. Go up some stairs until you reach a door leading to a security room, much like the one you found in the Atrium. There’s a terminal [Average] which controls the deactivated turrets outside, a safe you can’t open, and a Museum of Tech Security terminal. Activate the terminal and, if you did all the steps of Prime’s terminal game, you’ll have the option to #Unlock Safe. Open the safe for 200 Caps, a Gun Locker Key, and some drugs.
18) Planet-arium!
Head back downstairs and continue through the passage to the north until you reach the Planetarium. The Planetarium should spring to life and begin regailing you with idealistic nonesense about space travel… until it screws up and loops. Two Super Mutants should also enter in time, approaching from the south. Kill them and search about the room for what meager loot it has, then head through a door to the east. In the room beyond you’ll find a Nuka-Cola Quantum on a shelf, and a gun cabinet [Very Hard] that you can open with Prime’s Key. There’s also a Planetarium Terminal [Easy]… whatever good it does. Now make your way out in any way you find convenient. It’s time to explore the Mall!
19) Super Mutant Central
Book - Duck and Cover!
This place is Super Mutant central. From the Washington Monument to the Capitol Building spans a Super Mutant-sized trench system. In the trench you’ll find besides plenty of delicious Super Mutants-some Ammo Boxes scattered about, and the odd dead Brotherhood character. Be wary of Grenade Bouquets, as the Super Mutants are not above booby-trapping their own fortifactions. You’ll also find the entrance to a Bunker in the trenches. If you want to explore it, be wary, as Super Mutants will spawn in the trenches if you do so. Inside you’ll find a copy of Duck and Cover! some Super Mutants, and two trip-wire traps.
20) Combat at the Capitol Building
Across the Mall to the north you’ll find the National Archives and the Museum of History, two places you’ll be visiting at some point. You’ll also find the Washington Monument to the west. To the east you’ll find the Capitol Building, where a titanic war between the Talon Company Mercenaries and the Super Mutants is erupting, so only travel there if you’re itching for a fight. At higher levels, you’ll certainly Super Mutant Overlords here, so we might as well take a look at the weapons they carry.
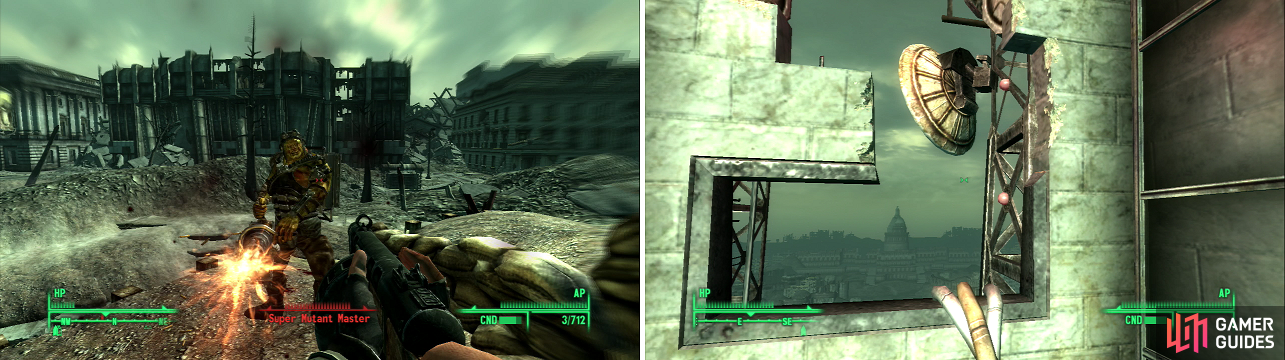
The Mall is over-run with Super Mutants, who will put up fierce resistance in the trenches (left). Install the Virgo II Communcations Dish on the Washington Monument to restore the voice of the people to the Wasteland (right).
21) The Voice of the People, Restored
Head over to the Washington Monument and access the Washington Monument Security Terminal to open the gate. Go through the door to the Washington Monument, activate the Elevator Control, and ride the elevator to the top of the monument. Once on top click the Galaxy News Radio Relay and “Install the Virgo Dish and activate the relay.” Wee! Now you can listen to Galaxy News Radio anywhere in the Capitol Wasteland.
Time to head back to Three Dog and get him to live up to his end of the bargain. He’ll give you the note “The Weapons Cache”, and tell you that it is hidden in Hamilton’s Hideaway. You’ll also get the Weapons Cache Key. Who is Copperhead? Anybody’s guess. Head over to the Moonbeam Outdoor Cinema, as Hamilton’s Hideaway is to the north-west. Head down a path with some wooden “steps” leading down to find some docks, on and near which you’ll find some ammo boxes.From here, Hamilton’s Hideaway just to the north-the slope leading up to it is hidden behind a rock, so search around.


22) Hamilton’s Hideaway
Sure, we could have come here earlier when we were messing around with Arefu, but since we couldn’t score the weapons cache here… what was the point?. Head west, north-west from the door, head down several flights of stairs, turning north, north-east when you get the chance. You’ll come to a four-way split in the path. To the east, south-east are some rooms with precious little loot inside, the best of which is probably a Bottlecap Mine on a workbench. The other two paths will eventually both lead to a dead Wastelander, on which are some drugs.
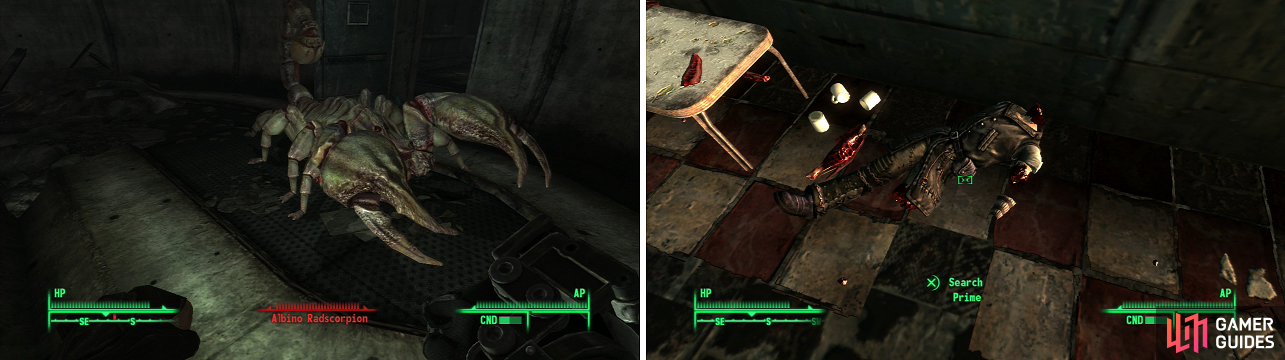
Albino Radscorpions are the kings of the insect world (left). Whatever killed Prime wasn’t interested in his equipment, but you should be (right).
23) Albino Is Bad
Book - Duck and Cover!
From here there are two paths to take, but like the previous two paths that led here, they end up in the same place… since the western path is more lucrative, though, let’s take that route. Head down the western path to find a room filled with goodies including a copy of Duck and Cover! and a Nuka-Cola Quantum, both of which are on a counter. In the same room, on some shelves nearby you’ll score some drugs. There’s a chance you’ll encounter Raiders here, but they’re not friends with the local Radscorpions, and a leveled batch of Radscorpions-particularly an Albino Radscorpion-are more than these Raiders can handle.
24) The Hamilton Stash
Book - Guns and Bullets
Speaking of which, head north through a door and down a tunnel, exterminating Radscorpions as you go. Down at the far northern end of the tunnel, where rubble impedes further progress turn to the left (west) to find a hole in the wall. Inside is a cell door that can only be opened by the Weapons Cache Key, beyond which is your payday. You’ll find a locker, two footlockers, about seven ammo boxes, two first aid boxes, a Mini Nuke, a Stealth Boy, four Frag Grenades, an Assault Rifle, and a copy of Guns and Bullets on a footlocker. It’s not the best cache we’ve scored, and it might not even have been worth all the trouble to get it, but it’s something. Now lets head over to Jury Street Metro Station to meet Prime.
25) You’re Number’s Up, Prime
Just opposite the metro entrance you’ll find your diner. Go into the diner and around to the serving side of the counter to find what’s left of Prime. On him you’ll discover 500 Caps, two Buffout, three Frag Grenades, two Jet, two Mentats, a Merc Cruiser Outfit, two Psycho, and the unique Xuanlong Assault Rifle . Hell, this was more rewarding than Hamilton’s Hideaway! Now it’s time to finally explore off Rivet City, and hopefully learn a thing or two about where Dad went.
No Comments