
1) The Capitol Building
Book - Nikola Tesla and You
Clear your way up to the Capitol Building and head through the Door to Capitol Building West Entrance. Ignore the door to the Capitol Building East Entrance and head to the north-east to find a hallway running to the east. There are numerous Talon Company Mercenaries around, and it’s clear that, at least in this part of the building, the Super Mutants have been successfully purged.
Explore the room on the left and exit back into the hallway via the door to the east. Head down the hallway to the east and enter a room to the right. There is some Super Mutant resistance to be found, but not much. Kill whatever red ticks you find and search the room for whatever minor loot is lying around. Head through one of the doors on the southern side of the room and through a locked [Hard] door and grab the loot within, including the copy of Nikola Tesla and You on the table.
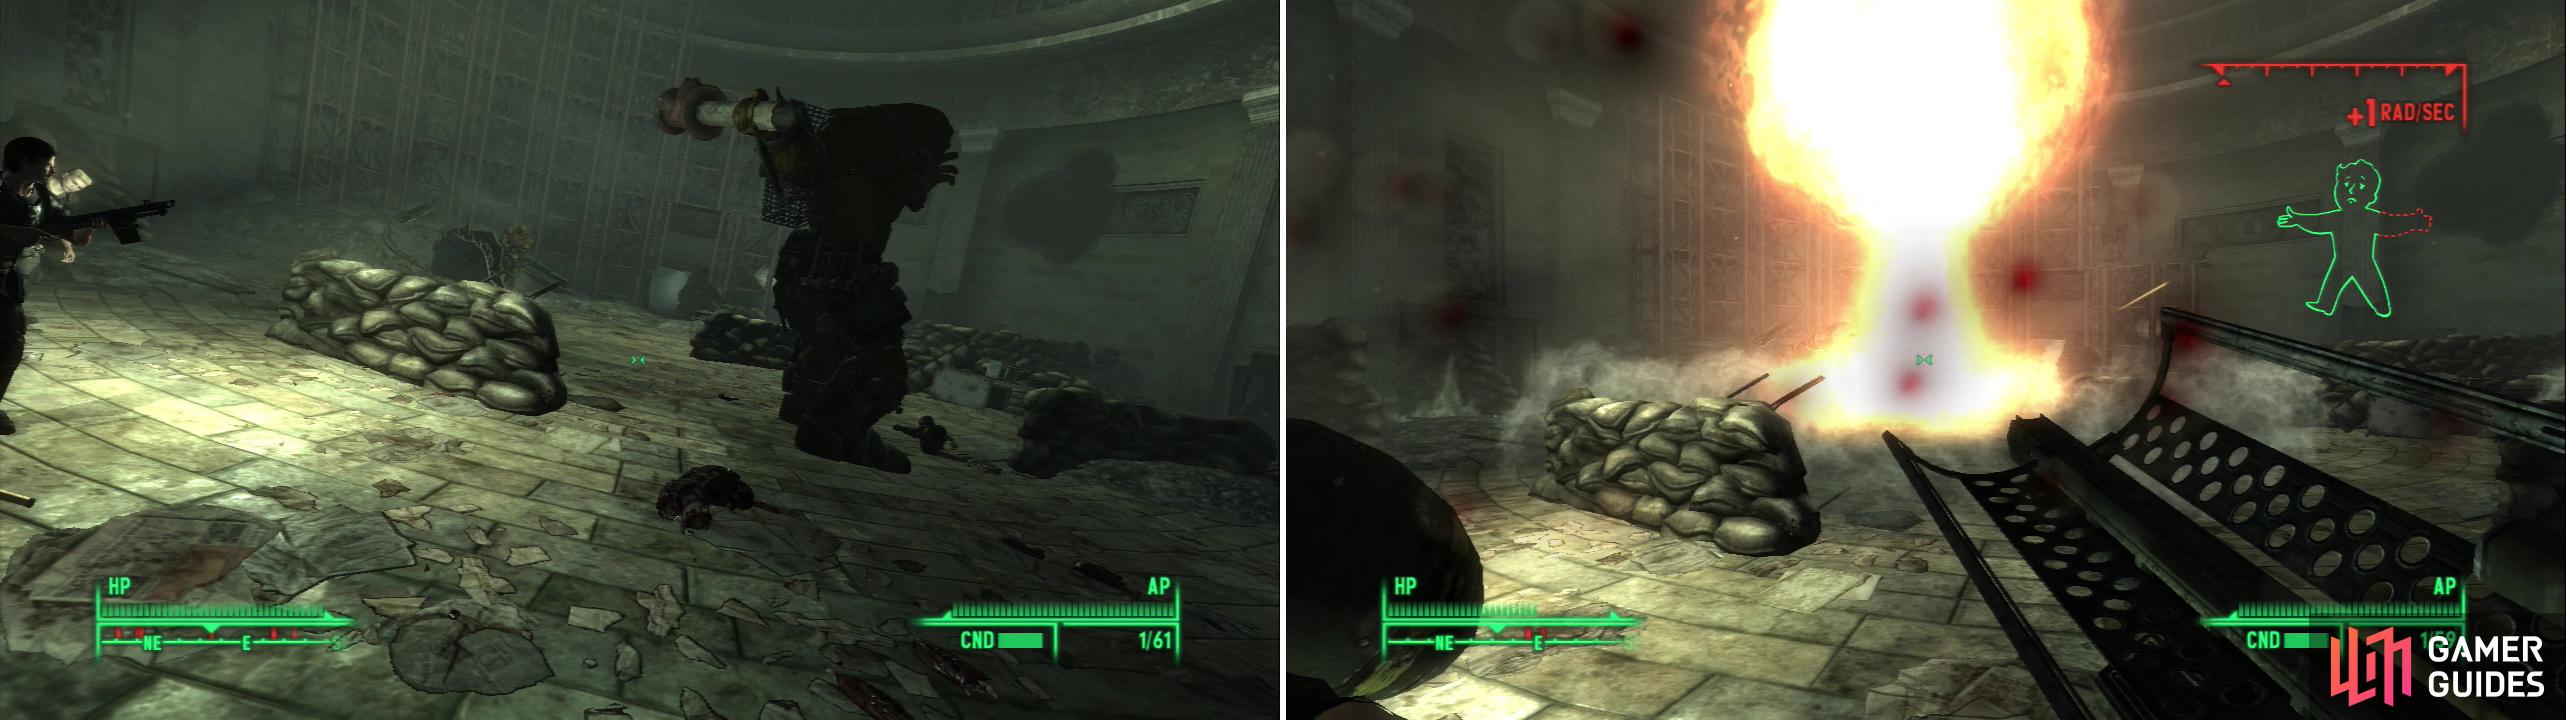
The ongoing struggle between the Talon Company Mercs and the Super Mutants intensifies in the Capitol Building (left), including a Super Mutant Behemoth on one side, and a Talon Company Merc armed with a Fat Man on the other. Target the latter, and turn the captured weapon on the Super Mutant Behemoth (right).
2) Behemoth Battle
Book - U.S. Army: 30 Handy Flamethrower Recipes
Super Mutant Behemoth
Now exit to the east, go down a hallway to the south until you come into a room that leads off in four directions, two of which are blocked. Go east to find a large room where all hell is breaking loose. Inside are numerous Super Mutants, including our last Behemoth, and some awfully brave Talon Company Mercenaries.
Despite what history has taught us about leveled Super Mutants fighting Talon Company Mercenaries, this group of mercs has a decent chance of winning the fight against the Super Mutants… or at least of taking down the Behemoth. This is mostly due to the fact that one of them carries a Fat Man, which is the only instance where an enemy carries such a weapon. Obviously you should be sure to take this guy out, as the AI will have no qualms about launching a Mini Nuke at you.
If you want to cause a little more chaos head through the door to the left before the large domed room. It’ll snake around to the north, then the east, eventually depositing you in a hallway north of the domed room, where a “Turret Control System” terminal [Average] awaits, allowing you to activate some Mark VI Turrets in the domed room.
Once they’re dead loot the large domed room, where you can find a copy of U.S. Army: 30 Handy Flamethrower Recipes in the south -astern side of the domed room, on a table near some shelves. The shelves themselves are covered with loot, including a Mini Nuke. There also three ammo boxes and a grenade box nearby.
Since this is our fifth (and final) Super Mutant Behemoth, the trophy/achievement “The Bigger They Are…” should unlock… if you’ve managed to kill all the Behemoths yourself, anyways.


3) Hall of Columns
Book - D.C. Journal of Internal Medicine
Now that the large battle is over, go to the east to find a series of offices with some minor loot inside. When you’re done return to the domed room and go south to find a hallway with a door on the left leading to a staircase, which in turn will take you to the Hall of Columns. As soon as you reach the Hall of Columns you’ll hear more Talon Company Mercenaries and Super Mutants fighting it out. Let them finish, then go through the doors and clean up. Go through a door to the west and up some stairs to reach the bridge on which the Talon Company Mercenary sniper was (or is) on. On the span across the hall you’ll find some .308 Rounds and a D.C. Journal of Internal Medicine on the south-facing railing, and an ammo box nearby.
4) To the Middle
Book - Chinese Army: Spec. Ops. Training Manual
Return to the ground floor and from here head up south past the bodies of Super Mutants until you reach a more open area with a deactivated turret. Grab the Assault Rifle, the 5.56 Rounds, and the three ammo boxes on and around the table nearby and head west past the some barricades to find a “Turret Control System” [Average], and a door to the south. Do what you will with the terminal and head through the door to the south, where you’ll eventually come to a locked [Hard] door to the right. This room is similar to the locked [Hard] supply room we found upstairs, insomuch that it contains many metal boxes on and around metal shelves, and a book on a table. In this case it’s a Chinese Army: Spec. Ops. Training Manual .
5) To the South
Head back out into the Hall of Columns and continue south. You’ll soon find that the Talon Company hold on this place is fleeting, at best, as Super Mutants occupy the southern end of the hall. Kill any you encounter until you find a large room with more unleveled Super Mutants within.
Eliminate them and head through a door to the south, then take a right and go down some stairs. Across the hall a Super Mutant and a Talon Company Mercenary will be shooting it out. Let them fight, or kill them both and show ‘em how it’s done. Loot the room across the hall to the east of its meagre offerings, then go through on the eastern side of the room. Once through the door head east some more and go down some stairs on your left until you reach a door leading to the Conference Hall.
6) Conference Hall
Book - Lying, Congressional Style
Go up the stairs, where you’ll hear… you guessed it, more Super Mutant on Talon Company violence. They just never learn. Cross the hall to the north to find a small and uninteresting room. There are three ways to go now. There’s a door to the west [Hard], which hides another typical supply room, but, alas, no book. There are two doors to the north, one leads into the conference room after which this area is named and the other leads upstairs. Sneak into the conference room and kill whatever Super Mutants you find. If you can stealth-kill the one that usually mills around down here without alerting the ones upstairs, you’ll save yourself some hassle. Search behind the raised desks to find some Assault Rifles, a Frag Grenade, and two ammo boxes, the hallmarks of any free-speaking forum, and on the podium you’ll find a copy of Lying, Congressional Style .
7) Back to the West Entrance
Head through a door to the south and up some stairs to reach the raised area above the conference room. Head west, then north, then east around the raised area, clearing side rooms as you go. Most are decidedly uninteresting, and few threats remain to obstruct your progress. Head north through a room full of electronics, then west through a hallway, and up some stairs to the north. Once upstairs go west to find a door leading back to the Capitol Building West Entrance, where you’ll again be greeted by the sounds of combat. Loot this upper level for what little loot it has, then drop to the floor below and head west into the domed room to find the new combatants who have spawned. Kill and loot them and head back to the entrance. It’s now time to explore the East Entrance.
8) Capitol Building East Entrance
Book - Tales of a Junktown Jerky Vendor
And all is… quiet… Odd. Loot the room you’re in and head south. Kill the Super Mutant who is hanging out and loot this room, too, before heading out the door to the east and into some barricade-laden hallways. Head south, then east, killing Super Mutants as you go. If you’re careful, you’ll realise that this entrance allows you to get behind much of the Super Mutant defense, enabling you to stealthily kill them at your leisure. Go into some doors on the left and empty them of loot and life. You’ll find plenty of alcohol around, and on one desk will be a copy of Tales of a Junktown Jerky Vendor , and on a cabinet nearby will be a Pre-War Book. At the eastern end of the room you’ll also find a Nuka-Cola Quantum on a counter. Don’t let the parallel hallway go unmolested, as there are three ammo boxes and two Frag Grenades on and around a table behind a barricade.
You can continue into a room to the east to find the exit to Seward Square, as well as an exit to the Presidential Metro, which is as of yet innaccessible. We’re now done with the Capitol Building, and by that stroke, all of Fallout 3 save Little Lamplight, which we’ll postpone until after the expansions.
Now it’s time to consider which expansion to do first? Of them, Broken Steel and Point Lookout are the most involved. You also can bring the spoils from all the other quests and expansions into those two, whereas in The Pitt and Operation: Anchorage you cannot. So since we can’t bring anything with us to the previously mentioned quests, we might as well do those first. At least there we can score some loot we CAN bring out with us. Which to do first is a matter of opinion, as you cannot, obviously, bring loot from one to help with the other. That said, The Pitt will grant you a variety of Perks which are useful in all following expansions, whereas Operation: Anchorage, short as it is, will not. For that reason, it makes sense to do The Pitt first. That and it’s just a more interesting expansion than Operation: Anchorage.
No Comments