
1) Arlington Utility
Book - U.S. Army: 30 Handy Flamethrower Recipes
This area is occupied by Raiders, and hence, not much of a threat at all. Follow the metro tunnel until you find a door to the north, which will eventually deposit you at a fork in the road. Head north up some stairs, then turn east at another fork, go up some more stairs to find a room with a copy of U.S. Army: 30 Handy Flamethrower Recipes on a metal shelf. If you backtrack to the most recent fork and explore to the west you’ll find more rooms to loot, and if you head back to the earlier fork and go east you’ll eventually turn south and enter come caverns with plenty of Raiders in them. Loot and fight your way through the caverns until you reach some sewers, where you’ll find the door to DCTA Tunnel 014-B Potomac.
2) DCTA Tunnel 014-B Potomac
Head south through a doorway to reach a metro tunnel, which you should follow east, then south through a connector tunnel to reach a longer metro tunnel. You’ll notice the area has all the indicators of Raider activity, but alas, no Raiders. Scallops got ’em. Head east down the long metro tunnel until you reach a fork in the metro. Along the way you will pass a doorway to the south leading to some uninteresting rooms that lead nowhere. At the fork you can head east to find the exit to Georgetown, or more interestingly, you can follow the other metro tunnel as it curves south.
3) Swimming with ’Lurks
Book - D.C. Journal of Internal Medicine
There are plenty of Mirelurks around, and plenty of Mirelurk Egg Clutches to loot. Go through a door to the east and continue past a partially flooded tunnel to reach a fork in the road, marked by a Dead Settler. If you go east you’ll find an entrance to the Foggy Bottom Station, so go south. You will reach a half-flooded series of tunnels, which eventually leads south into a fully submerged area. Save your game and put your swimming goggles on. Swim down the tunnel and eventually you’ll reach a door leading to a room. Surface at the stairs and kill a Mirelurk. Besides Mirelurk Egg Clutches you’ll find a D.C. Journal of Internal Medicine and some Stimpaks on the machinery in this room. Once you’ve obtained the goodies, backtrack and head to the Foggy Bottom Station.
4) Foggy Bottom Station
From the entrance to the DCTA Tunnel 014-B Potomac head north, disarming a trip wire and taking the two neutered grenade bouquets as you go. Follow the tunnel as it turns east and take the first left you find. Behind a fence you’ll find a Nuka-Cola Quantum sitting on a ledge. What you really need to know is that it’s filled with Raiders and that you’re heading to the upper level, exiting to the north at Dupont Circle. You will find numerous components and odd valuables on the way, but nothing exceptional. There are also exits to Georgetown and Metro Central, both of which we’ve explored by now.
5) Dupont Circle
Book - Tales of a Junktown Jerky Vendor
Finally we come back to Dupont Circle, and as mentioned before… it’s not very interesting. It’s crawling with Raiders, and in one of the ruined buildings you’ll find a Pre-War Book on a bookshelf. Other than that, hit Lady Frumperton’s Fashions for a copy of Tales of a Junktown Jerky Vendor , which is safely tucked away in a locked [Average] safe. Ignore the Dry Sewer for now (as it leads to the Our Lady of Hope Hospital, which we’ll get to later), but since the Sunken Sewer in this area doesn’t lead anywhere we’ll explore later, we might as well explore it now.
6) Sunken Sewer
Book - U.S. Army: 30 Handy Flamethrower Recipes
From the center of Dupont Circle (the fountain where all the Raiders and Frag Mines were) head north-east until you find a sewer entrance near some debris. Pop some Rad-X, as this sewer is highly irradiated, and head inside. As an irraditated sewer, there’s going to be one of two types of enemies inside: Ghouls or Super Mutants. Unfortunately it’s the former. Head south, then east into a chamber and exterminate the Ghouls wandering around. Cross the catwalks in the center of the room to find a stash along the northern wall consisting of some components, some Rad-X, a Scoped .44 Magnum, two ammo boxes, and a safe [Average]. Best of all, on top of the safe is a copy of U.S. Army: 30 Handy Flamethrower Recipes . Just like that, we’re done with Dupont Circle. Leave this irradiated hell-hole, return to the fountain, and from here head north to find Metro Junction, which is past the Collapsed Car Tunnel.
7) Metro Junction
Book - Grognak the Barbarian
Metro Junction’s size belies its simplicity, and the only real reason to explore it is simply so that we can say we did… and to grab the lone book present in all this mess, a copy of Grognak the Barbarian . To find this book, head into the large metro hub area south-east of the lower Vernon Square exit and climb some stairs to reach the platform. To the north, north-east is another exit to Vernon Square, but more important to the east, south-east of the tunne leading to Vernon Square, on the raised platform, you’ll find some wooden boards forming a ramp off the side of the platform. Get on this platform and look down to see a table lit by a lamp, near which is this book. There are also exits to Chevy Chase and two exits to Dupont Circle. As for the two exits to Vernon Square, we want to exit out the elevated one.
8) Vernon Square
Ah, the second to last external area in the D.C. area to explore, and it’s crawling with Super Mutants. What did you expect? You’ll discover Vernon Square North when you arrive. Kill whatever Super Mutants are around while being careful to avoid the pressure-plate rigged to two Combat Shotguns just south of Metro Junction and head east to find Vault-Tec Headquarters. We might as well explore it, since we’re here and all.
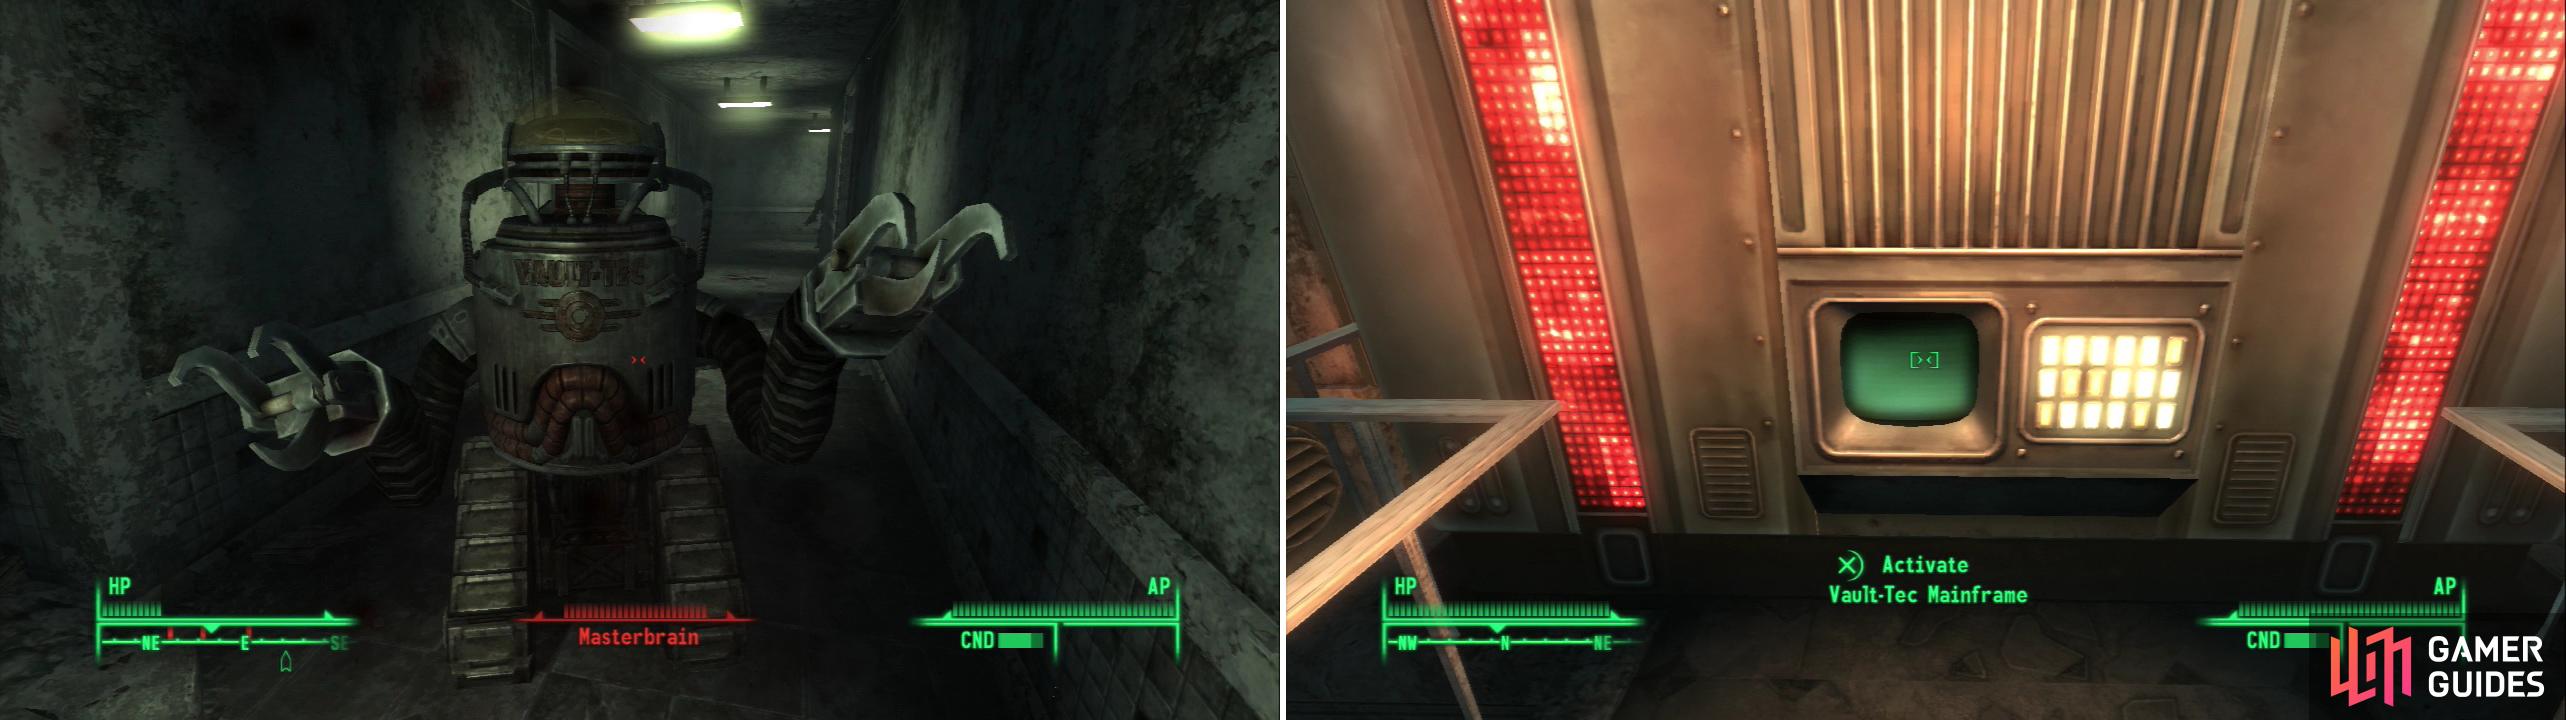
Destroy the Masterbrain to shut down the rest of the security in Vault-Tech Headquarters (left). Interact with the Mainframe to find out about the Vaults in the D.C. area (right).
9) Vault-Tec Guest Relations
You’ll notice that this isn’t a friendly place just by seeing the dead Super Mutants lying around. Of course, they’re not leveled, so don’t give Vault-Tec security too much credit yet. You can explore the bathrooms to the west and the upstairs portion to the south-west, but to get anywhere you’ll need to head up the stairs and into the Corporate Offices.
10) Vault-Tec Corporate Offices
There are plenty of robots in this level, and many rooms have holes in the ceiling from which robots on upper floors can be alerted to your presence. This is just one of many areas where sneaking comes in handy. Head up the stairs until you come to a split path. Go through the door across the hallway and into a room to the left, where you’ll find numerous toolboxes, a first aid box, and a safe [Easy]. Make your way east until you find some stairs leading up.
11) Looting the Upper Levels
Book - Big Book of Science
At the top of the stairs take a right, head down to the end of the hallway and take a left at a garbage can, then take another right to find a room with a Nuka-Cola Quantum on a bookshelf. Head east through a hole in the wall (avoiding the hole in the floor) to find another room. On the eastern wall across from the entrance is a shelf with a Big Book of Science on it. Head back out into the hallway and continue down another hallway to the west a short ways, taking the first right into yet another floor-holey room. Head to the north and creep along the edge of the room to reach the door on the other side of a large hole in the floor. Beyond you’ll find a Stealth Boy, two ammo boxes, a first aid box, and a Laser Pistol. Head back out into the hallway and continue south until you find another flight of stairs, which in this case lead to the Vault-Tec Administration area.
12) Vault-Tec Administration
Immediately to the west will be an unleveled Turret that needs to be shot down. Head through the doorway to the north to find two terminals, a “Turret Control System” [Average] which can be repurposed to suit your needs, and a “System Operation Station 3” terminal, which is one of three terminals you need to access to shut down the masterbrain and or gain access to the mainframe.
13) Mainframe Level
Head to the south until you find some stairs leading up, at the top of which you’ll find a leveled turret. Continue through a door to the west to find the “System Operation Station 1” terminal. Go back out into the hallway and through the door on the right to find a “Vault-Tec Employee Terminal”, which is fairly useless, and some minor loot.
14) Masterbrain
Book - Grognak the Barbarian
A unique Robobrain named “Masterbrain” should be wheeling around by now. If you destroy it you can activate the remains and disable the rest of the security in the area, or you can go to the end of the hallway, head west, and enter the first door on the right to find the “System Operation Station 2” terminal, which can be used to shut down Masterbrain… you still have to go back and mess with the disabled robot to shut down the rest of security, however. Continue west until you find a hallway leading south. Enter any of the three doors on the right and head into the left-most office to find a copy of Grognak the Barbarian on a desk.
15) Mainframe
Book - Tales of a Junktown Jerky Vendor
Go back into the hallway and continue south. Either hack the “Turret Control Terminal” [Average] or deal with the leveled turret beyond. Continue through a cell door to find the Vault-Tec Mainframe, from which you can download information on all the Vaults in the area… 87, 92, 101, 106, and 108. Head down the stair cases in the north-western corner of the area map to make a quick trip back down to the previously inaccessible side of Guest Relations. Search the tables in the north west corner of the Guest Relations area to find a copy of Tales of Junktown Jerky Vendor .
16) Vernon Square Crater
Once back in Vernon Square, head west to Vernon Square North, then from there travel south-west. Kill the Super Mutants you find and teach them not to suck by looting their ammo boxes and first aid box. Continue south between two buildings to find a large crater in the ground with a downed aircraft in the middle. Before we tackle that, however, head west along a road and turn north at a blue car to find a sewer entrance to a… Sewer Entrance.
17) Sewer Entrance
Book - Dean’s Electronics
This place is a lot more rad-friendly than the crater we’re about to explore, so enjoy it. Disarm the trip-wire attached to a Grenade Bouquet before the first room and make your way to a locked door [Average]. In the room beyond you can find a copy of Dean’s Electronics on a table. Now exit back to Vernon Square.
18) Another Super Mutant Sewer (With Radiation Sauce)
Book - D.C. Journal of Internal Medicine
To have any chance of exploring the crater you’ll need to pop some Rad-X… and possibly deal with the Super Mutants nearby. Quickly head down the pit to find a sewer entrance (leading to just a Sewer this time). Even with two Rad-X popped you’ll probably be taking a fair amount of Rads. Once you’re in the sewer the rads are significantly less dangerous. Head down a tunnel to find a Super Mutant camp, wherein you’ll find some metal shelves holding a variety of goodies. This haul includes a bit of chems, a Scoped .44 Magnum, a Stealth Boy, and a D.C. Journal of Internal Medicine . If you look around you can also find some dead Wastelanders, a Raider, and a Mercenary, but you’ll have to weigh your greed with the practical need to get out of here before your Rad-X wears off.
19) Slaughtering More Super Mutants
Once out of the Sewer some Regulators/Talon Company Mercenaries will spawn. There’s also a building full of Super Mutants to the west which should be cleared and looted. If you didn’t kill the Super Mutants off already, they should cheerfully set themselves on the Regulators/Talon Company Mercenaries. Once you’re the last biped standing loot the Super Mutant-occupied building to the west, especially grabbing the loot in and around the locked safe [Easy]. If you head to the top of the building and cross a bridge to another building to the south you’ll get access to another small stash.
20) Finishing Up Vernon Square
From the Super Mutant building you can head south-west to find the Vernon Square Station (Freedom Street Station). There’s a Pulowski Preservation Shelter nearby with a Radiation Suit inside, but other than that there’s little reason to go here save the map marker. To the south east-you’ll find the Statesman Hotel, which you can clear out now if you wish, but since we’re imminently heading there as part of the quest “Reilly’s Rangers” , and our progress through the hotel is severely limited as of now, we might as well leave it be. In fact, our Vernon Square exploration is complete.
The only thing left to do is hit the “Our Lady of Hope Hostipal”, which is south of Freedom Street Station. There are two entrances from here, you can either head south through the ruined building connected via bridge to the Super Mutant-occupied building to find a side door, or head south of the crater to find the main entrance. This guide will assume you entered via the side entrance.
No Comments