


Another Trip to Colony 6
Following the events at Valak Mountain, the party will learn that their enemy is awaiting them at Sword Valley. Head to the west once you regain control to unlock the final Landmark to complete your map, Bionis’ Wrist. Your destination lies just ahead but for now, it’s a good time to take a detour to continue with the reconstruction of Colony 6 while clearing some more Quests so once you’re ready, return to Colony 6. You’ll notice a few new Quests have appeared but for now, let’s work on the reconstruction itself, this will cause more Quests to appear.
Reconstruction Level 2
| Category | Material Requirements | Gold |
|---|---|---|
| Housing | 1 Eks Iron Heart, 4 Sturdy Armour, 2 Oil Branch | 55000G |
| Commerce | 3 Shiny Kromar Hide, 2 Slick Kromar Stone, 2 Blue Ladybird | 55000G |
| Nature | 3 Jagged Tail, 2 Despair Clover, 2 Ice Cabbage | 40000G |
| Special | 2 Squall Element, 2 Snow Element, 3 Lemonade Sky | 50000G |
-
Housing - You can obtain an Eks Iron Heart from different Eks enemies in Makna Forest. You can also trade for them with Nelo in Alcamoth at 2✰ affinity. Sturdy Armour is a material dropped by Flavel Andos at Eryth Sea. You can also trade for it with Jer’ell and Galdo in Alcamoth at 1✰ affinity. Oil Branches are a collectable found across Eryth Sea. You may also trade for some with Ricoth and Scarlen in Alcamoth at 2✰ affinity.
-
Commerce - You can obtain Shiny Kromar Hide from Kromar at Eryth Sea and they are most commonly found around Hovering Reef 8. You can also trade for them with Arielle in Alcamoth at 2✰ affinity. Slick Kromar Stone are a dropped by Maleza Kromar and Flute Kromar at Eryth Sea. Alternatively, you could trade with Yura for them if you have 2✰ affinity in Alcamoth. You will also need to find some Blue Ladybirds, which are collectables found in the High Entia Tomb.
-
Nature - Jagged Tails are dropped by Eryth Hilns and Eryth Ansels at Eryth Sea. You can also trade for them with Kuralth at 1✰ affinity in Alcamoth. Despair Clover are a collectable found in Colony 6 and Eryth Sea. Ice Cabbages are one of the rarest collectables in the game so finding two will definitely be tricky. They spawn on Valak Mountain. They can be traded for with Yura when he is found on Valak Mountain. You may be inclined to just wait until Yura can be found at Valak Mountain before attempting to collect Ice Cabbages, because of how rare they are.
-
Special - Squall Elements are obtained from Bono Nebulae at Eryth Sea and Emeraude Nebulae on Prison Island. They can also be traded for with Nelo in Alcamoth at 3✰ affinity. Snow Elements are a material dropped by Vague Barbas and Reef Nebulae on Valak Mountain. Both are found regularly around Nagul Waterfall. Alternatively, you can overtrade with Yura (only when he is on Valak Mountain) for them. Lemonade Skies are a collectable found in Colony 6 and Makna Forest. You may also trade for them with Kilaki and Rono at 3✰ affinity in Frontier Village.
Completing all reconstruction categories up to level 3 will result in the residents gifting you a Topple Plus IV gem. You will also receive the bonus of Street Lights when completing all of the reconstruction categories up to level 3. Additionally, during your upgrades, you’ll accept a new Defend Quest so get right on it!
Defend Colony 6 - Reptile
You’ll need to make your way to the Freight Road section of Colony 6 and then head east where you’ll encounter five Lv 37 Fiery Ignas. At this stage of the game, they should be a pushover but either way, focus on one at a time and make use of Melia’s Wind and Blaze Arts to strike all of the enemies at once.
With all four categories now at Lv 3, you’ll notice a new shop has opened along the main street to the east, be sure to pay it a visit and purchase the new set of Art Manuals available while you’ll find two new Heart-to-Hearts to register in both the park and the main street. Next, there are some new residents you can recruit that will open up more Quests so begin by heading to Colony 9 and sending one of Perrine or Mefimefi to Colony 6 (use the Affinity Chart to locate them).
Next, make your way to Frontier Village to pick up both Norara (if Perrine or Mefimefi are already at Colony 6) and Berryjammy while ignoring the Quests here for now. Finally, make your way to Alcamoth and have Yura head to Colony 6 if you’ve already had your Ice Cabbages from Valak Mountain. Make your way back to Colony 6 now and you’ll find a whole host of new Quests to accept.
Cook-Off Showdown!
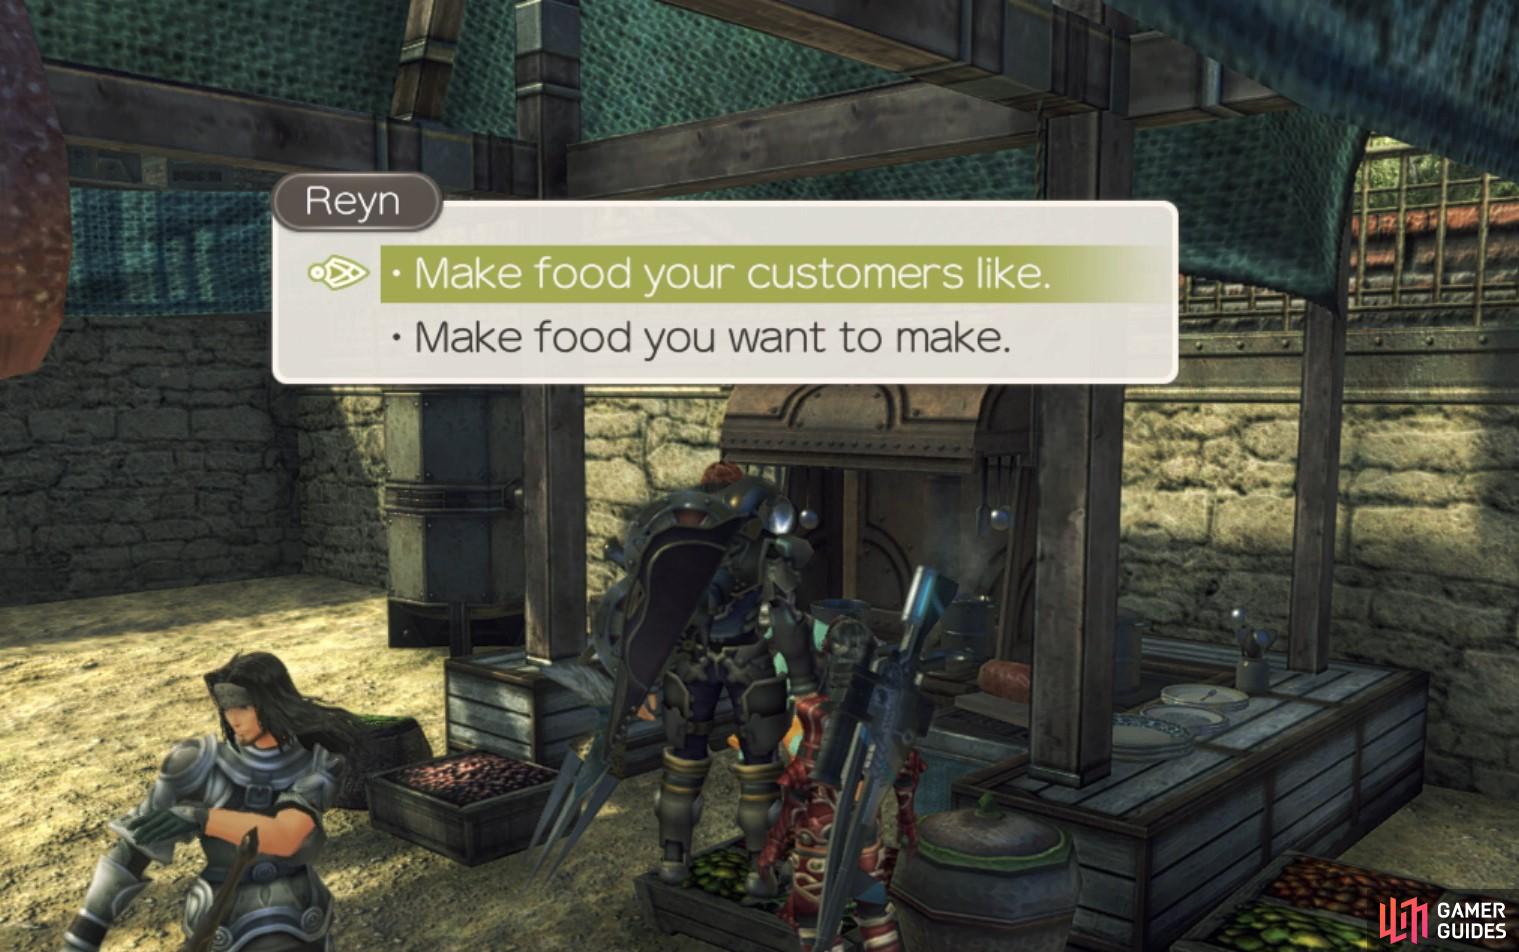
After you have completed Missing Lodger and Cook-Off Final Blow?!, Ma’crish will offer this quest. However, she will only offer it if Reyn is party leader. After activating the quest, you will have to speak to Hoko, who will tell you to collect 2 Soya Paste Shells from Entma Kings on Valak Mountain. They are found commonly near the Mechonis Wound landmark and Chilkin Lair. Once you have the required materials, return to Hoko. He will tell you that he misses making his old, smelly food. You will then be asked to choose a route:
-
“Make Food that your customers want.” (Route A) - Pick this route and Hoko will continue to make high quality food. Ma’crish will be upset but grateful she could have one last meal from him. This will allow you to boost your area Affinity higher than Route B.
-
“Make food that you want to make.” (Route B) - Pick this route and Hoko will be happy to begin making his bad food again. Ma’crish will also be very happy about the change. The HP Steal II gem is only available to you if you take this route, you cannot obtain the gem anywhere else in the entire game.
You can decide whether Hoko keeps making yummy food or reverts back to his old, stinky food.
For the sake of this walkthrough, Route A was selected for the extra boost in Affinity (you’ll need it shortly). Once you have completed the quest, regardless of chosen route, you will unlock Reyn’s fourth skill branch, Impatience. Be sure to speak to Pokopoko once A Tantalising Treat is completed to create an Affinity Link between him and Hoko.
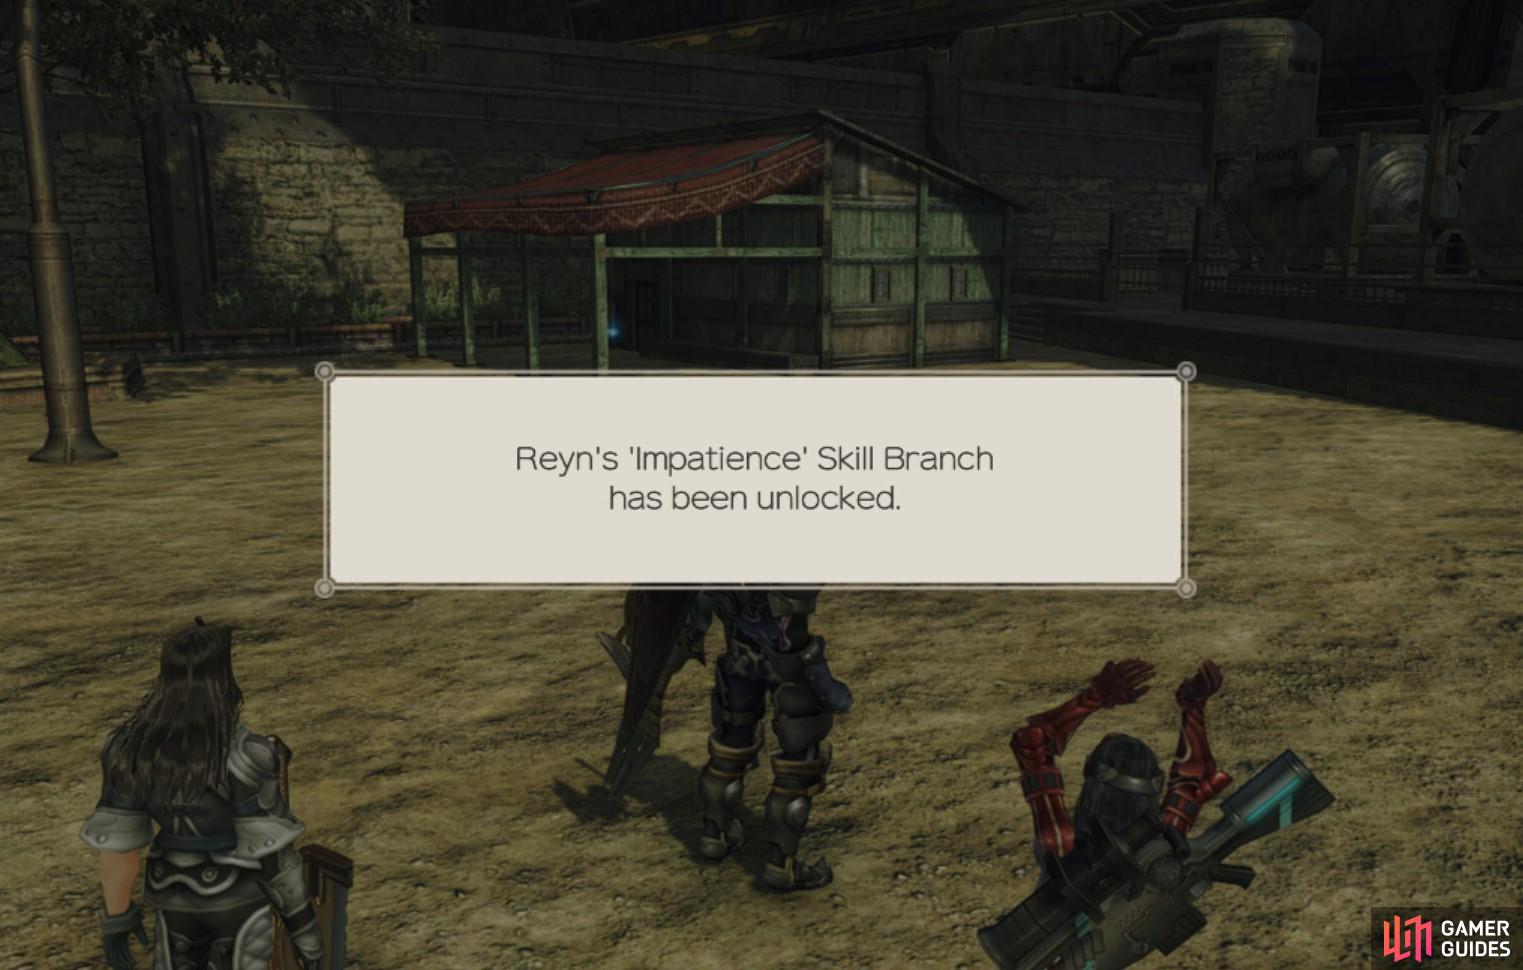
Competing this quest will unlock Reyn’s skill branch, Impatience.
A Tantalising Treat
Once you have reached Valak Mountain and completed the quests, A Delectable Delicacy and Cook-Off Final Blow?!, you will be able to activate this quest from Pokapoka. He asks that you collect him 3 Pagul Cold Pies, which are dropped by Sparas Paguls on Valak Mountain. They are found specifically around Nagul Waterfall, which is southeast from the Mechonis Wound landmark. Once you have collected 3 of the Pagul Cold Pies, head back to Pokapoka to complete the quest.
Cursed Berryjammy
Head over to Norara in Colony 6 to begin the quest and she will ask you to speak with Mefimefi about Berryjammy’s illness. Mefimefi is active between 18:00 and 06:00 in the same area you found Norara. Mefimefi will tell you to collect a Statue Fragment from the Sororal Statues in Satorl Marsh. You will actually want to go to the Statue Summit landmark rather than Sororal Statues, and then descend the statue, the quest marker is west, so when you’re making your way down make sure to go in that direction. When the female statue is in sight, walk onto her chest, near the Ether deposit and then jump down, aiming towards a narrow ledge. On that ledge you should find the Statue Fragment. Once you have it, head back to Mefimefi, who will then tell you to take it to Norara. Speaking to Norara will complete the quest.
The Statue Fragment is found on the female statue to the west of Statue Summit.
Weak Berryjammy
If you sent Perrine to Colony 6 over Mefimefi then Norara will offer this Quest instead. She mentions about Berryjammy’s illness and asks if you can track some ingredients down to make some medicine. The Juicy Grapes are a Collectible that can be found in Makna Forest or you can trade for it with Puko at Frontier Village. The Thick Nectar can be found on Bionis’ Leg as a drop from Leg Skeeters however you can trade for it with Nikita here in Colony 6. Once you have both sets of items, return to Norara to hand them over and complete the Quest.
Obstinate Berryjammy
After you have completed Weak Berryjammy or Cursed Berryjammy and reached 2✰ affinity with Colony 6 residents, Norara will offer this quest. She will tell you that Berryjammy isn’t taking the medicine, and has asked that you help to convince her. Berryjammy is active between 18:00 and 03:00 just southwest of where Norara is found. When you find her, speak to her using Dunban to convince her to drink her medicine. Once you have spoken to her, head back to Norara to complete the quest.
Unstoppable Berryjammy
After you have reached 3 affinity in Colony 6 and completed Chemist’s Reopening and Obstinate Berryjammy, you will be able to pick this quest up from Berryjammy. She has been drinking her medicine as if it were juice. You have two routes that you may take here, though it would be advised that Route A is taken since you will receive more EXP from fighting enemies, and the affinity chart will be updated positively.
-
Talk to Norara (Route A) - Norara will tell you that Berryjammy is drinking far too much of her medicine all at once! She will then tell you to collect 3 lots of Caterpile Vinegar from Satorl Caterpiles. They can be found most commonly in the southeast parts of Satorl Marsh, particularly around Glowing Obelisk and the Place of Judgement. The Vinegar is a bit of an uncommon drop, so you may have to farm a few of them to get 3 lots, but once you have the required amount, head back to Norara. She will then make a weaker and more bitter medicine and ask you to take it to Berryjammy. When you take the medicine to Berryjammy, the quest will be completed. If this route is taken, Berryjammy and Norara will become Best Friends on the affinity chart.
-
Give her Olga’s medicine (Route B) - If you choose this route then all you need to do is collect the medicine from Olga, who will give you it for free because you helped her reopen her Chemist’s. Once you have given the medicine to Berryjammy, the quest will be completed. This route will result in a negative affinity link being formed between Norara and Berryjammy.
Miss Sweetness Showdown! (Berryjammy)
The Miss Sweetness contest of Colony 6 has just begun and Berryjammy has requested your assistance in the matter. Her request is for the “world’s most transparent thing”, the answer of which you can learn from The Most Transparent Thing Quest. The item in question is the Pure Ice Flower that can picked up at Url Crevasse on Valak Mountain. Return to Berryjammy with the item in question to complete the Quest.
Miss Sweetness Showdown! (Ma’crish)
Ma’crish has asked that you help her to win the title if Miss Sweetness. She needs you to find the world’s most transparent thing. Beginning this quest will also automatically activate The Most Transparent Thing, which is the same quest for both routes of the Miss Sweetness Showdown! quest. You do need to complete the latter quest so that you can proceed with this one. It will ask you to retrieve the Pure Ice Flower from Url Crevasse on Valak Mountain. Once you have the flower, return it to Ma’crish to complete the quest.
The Most Transparent Thing
You’ll receive this Quest at the same time as you accept either version of Miss Sweetness Showdown! and your chosen client will direct you to Lalapa in Frontier Village for more information. Head to the Chief’s Residence at 09:00 to find Lalapa who will direct you to Dakuku at the Nopon Camp on Valak Mountain to complete the Quest.
That’s all for Colony 6 for now, you’ll have to wait until you raise the Area Affinity to 4✰ however there are more Quests to tackle so make your way back to Frontier Village for more Nopon adventures.
Medical Advancements
You can only pick this up if you have completed Mushy Mushrooms and have not finished Let’s Make Fillings!. You can pick this quest up before or after activating Let’s Make Fillings! but you will only be able to complete one of them. If you want to do this quest instead of Yusa’s then Medi will ask you to collect 2 Ories Horns from Ories on Valak Mountain.Zegia Ories will drop Ories Horns and several can be found just northeast of the La Luz Church landmark. Once you have the required materials, return to Medi to complete the quest.
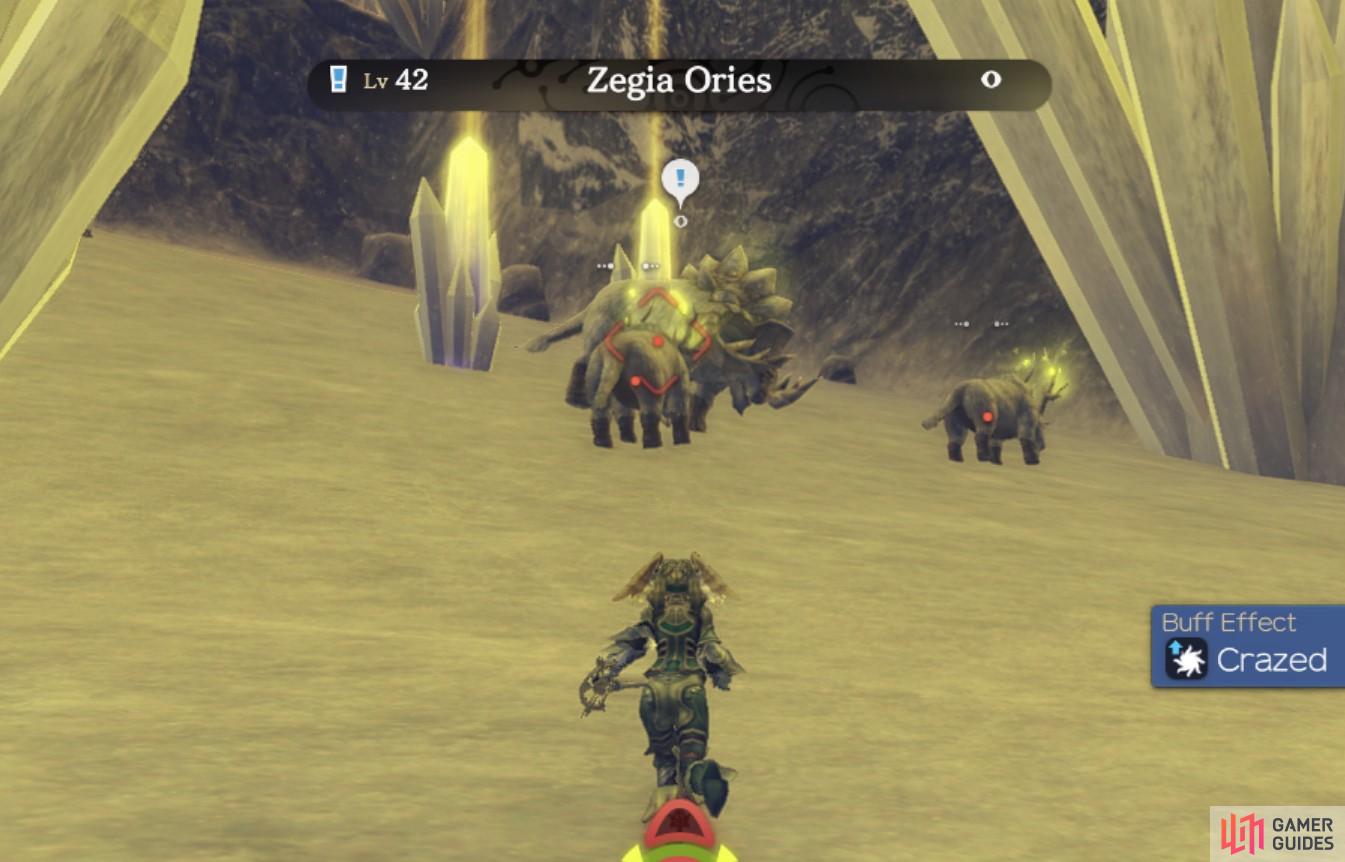
These enemies move in groups, so you will likely always have to fight more than one at once.
World’s Strongest Flavour
This quest is only available to you if you chose the mutually exclusive quest, Medical Advancements. You cannot access this quest if you chose to complete Let’s Make Fillings! Kofuko wants to eat new foods now that his teeth are all fixed! He has asked you to fetch him a variety of new things so he can put them in a bitter red stew.
| Item | Type | Location | Trade (Optional) |
|---|---|---|---|
| 2 Crimson Citruses | Collectable | Frontier Village | Medi and Pachipa at 4✰ in Frontier Village |
| 2 Ruby Mangoseteens | Collectable | Valak Mountain | – |
| 2 lots of Bloody Brog Sweat | Material from Makna Brogs | Nopon Arch, Great Makna Falls (Makna Forest) | – |
| 2 lots of Frozen Aries Meat | Material from Aries enemies | La Luz Church (Valak Mountain) | – |
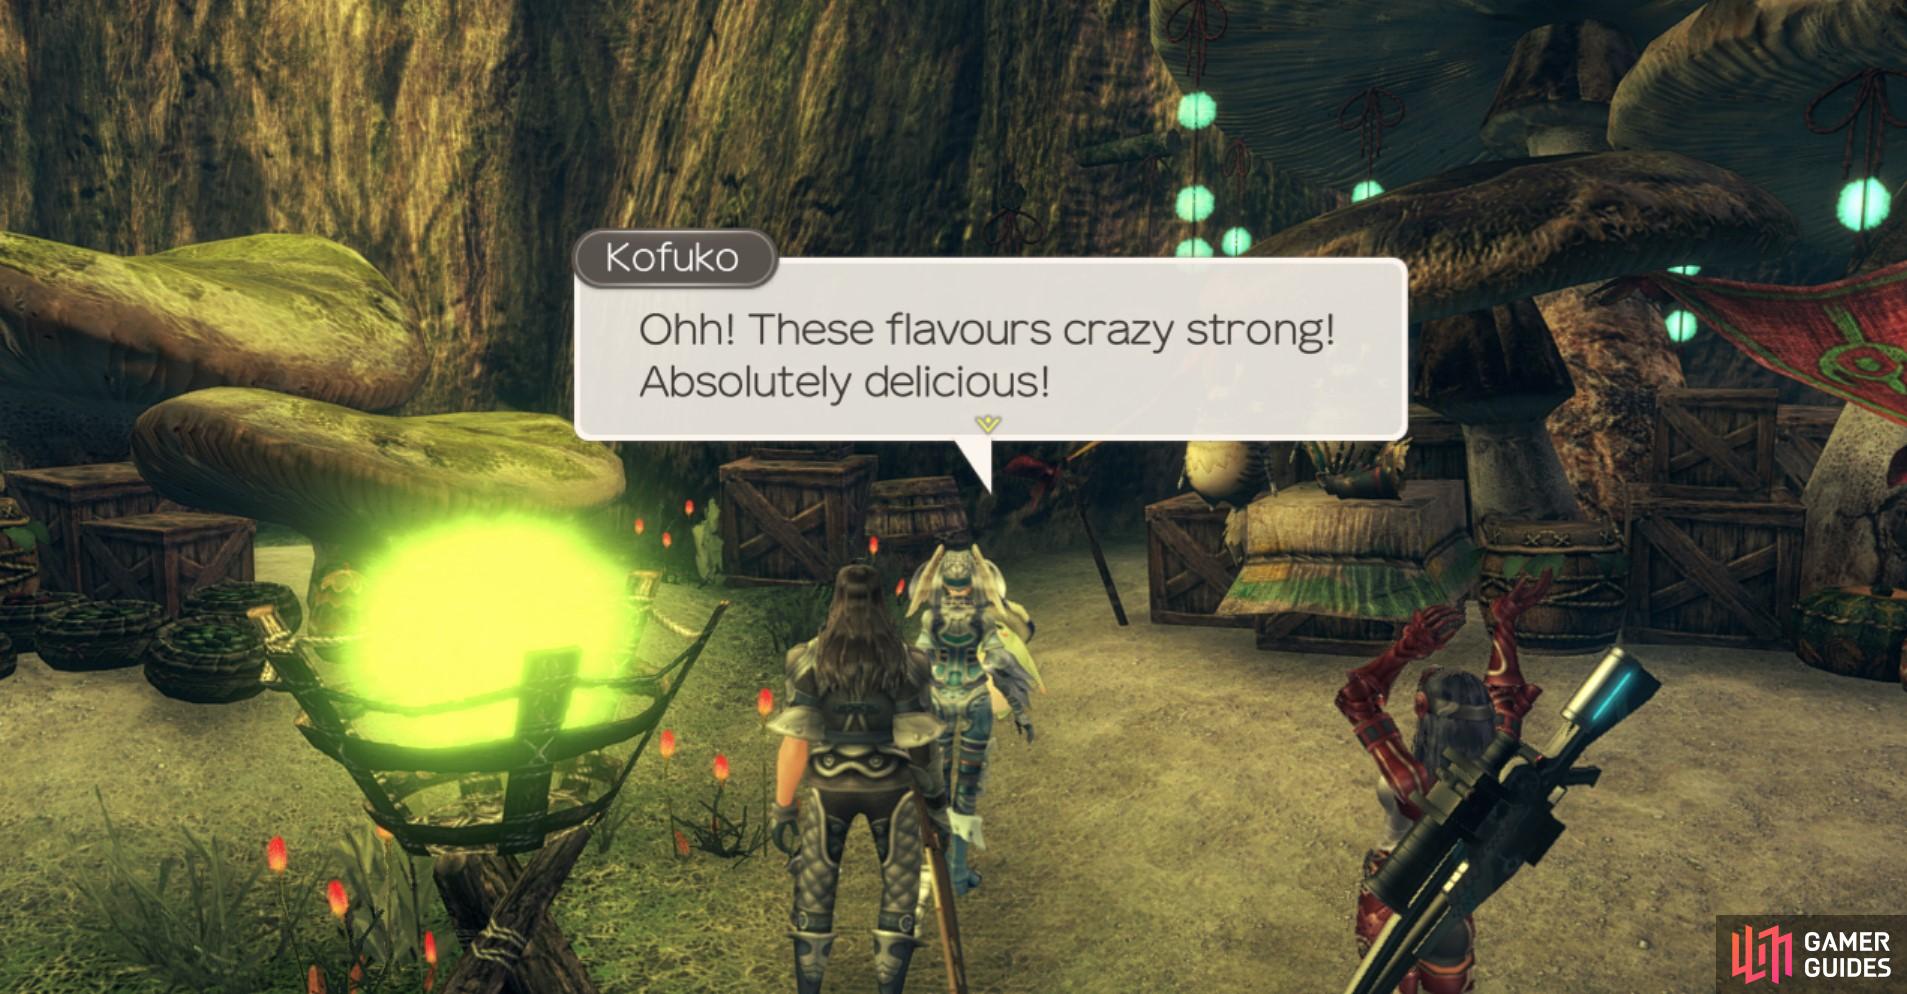
Kofuko is more than satisfied with the ingredients you collected for him!
Let’s Make Fillings!
To activate this quest you must have already completed the side quest, Mushy Mushrooms and have a 2✰ affinity with Central Bionis residents. Yusa will tell you he is in competition with Medi, he has asked you to fetch him 4 Vang Milk Teeth from Vangs in Satorl Marsh so he can continue his dentistry business. Once you have accepted this quest, you can also pick up Medi’s opposing quest, Medical Advancements. You may only complete one of them, so choose carefully since they also have mutually exclusive quests that can only be taken depending on the quest you chose to finish.
If you want to do Yusa’s quest, then head over to Sororal Status landmark in Satorl Marsh. Swim west to Basin Cave where you will find a few Storm Vangs who have the chance to drop Vang Milk Teeth. You may have to do a bit of farming to collect 4 of them. You can do this easily by saving and reloading, since normal enemies will always respawn. Once you have the required amount, head back to Yusa to complete the quest.
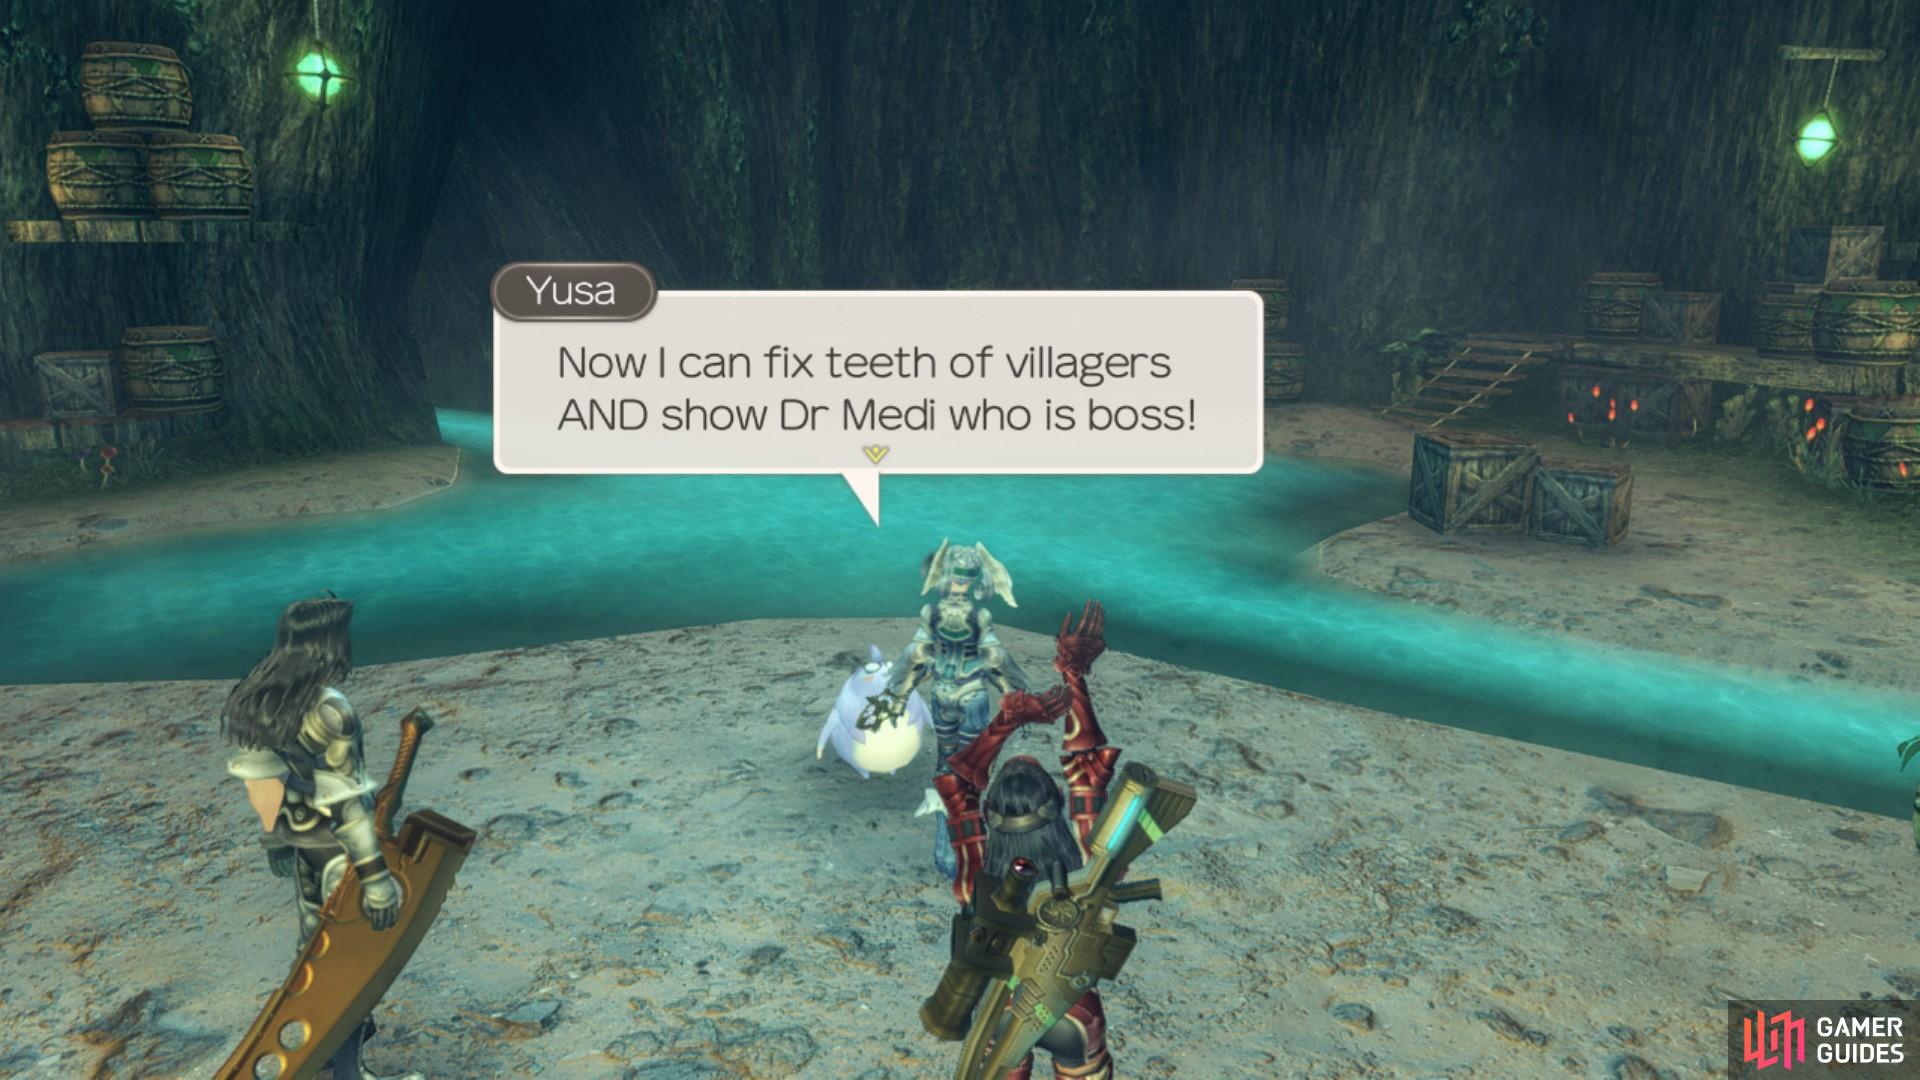
Yusa is happy to finally one-up Dr. Medi!
Reversed Tastes
To access this quest, you must have chosen to complete Let’s Make Fillings! and not Medical Advancements. You cannot access it if you chose the latter quest. Kofuko now loves to eat disgusting food, he has asked you to fetch several different gross foods to see if he will enjoy them!
| Item | Type | Location | Trade (Optional) |
|---|---|---|---|
| 3 Lots of Dense Ansel Meat | Material from Eryth Ansels | Syrath Lighthouse, Hovering Reef 4 and 7 (Eryth Sea - daytime only) | Ricoth and Zain at 1✰ in Alcamoth |
| 3 Moramora Meat Pies | Material from Moramoras | Mechonis Wound (Valak Mountain) | – |
| 4 Shin Newts | Collectable | Tephra Cave | Kantz at 3✰ in Colony 9 |
| 3 Hard Lotuses | Collectable | Bionis’ Leg | – |
Once you have obtained all the required materials and collectables, head back to Kofuko to complete the quest.
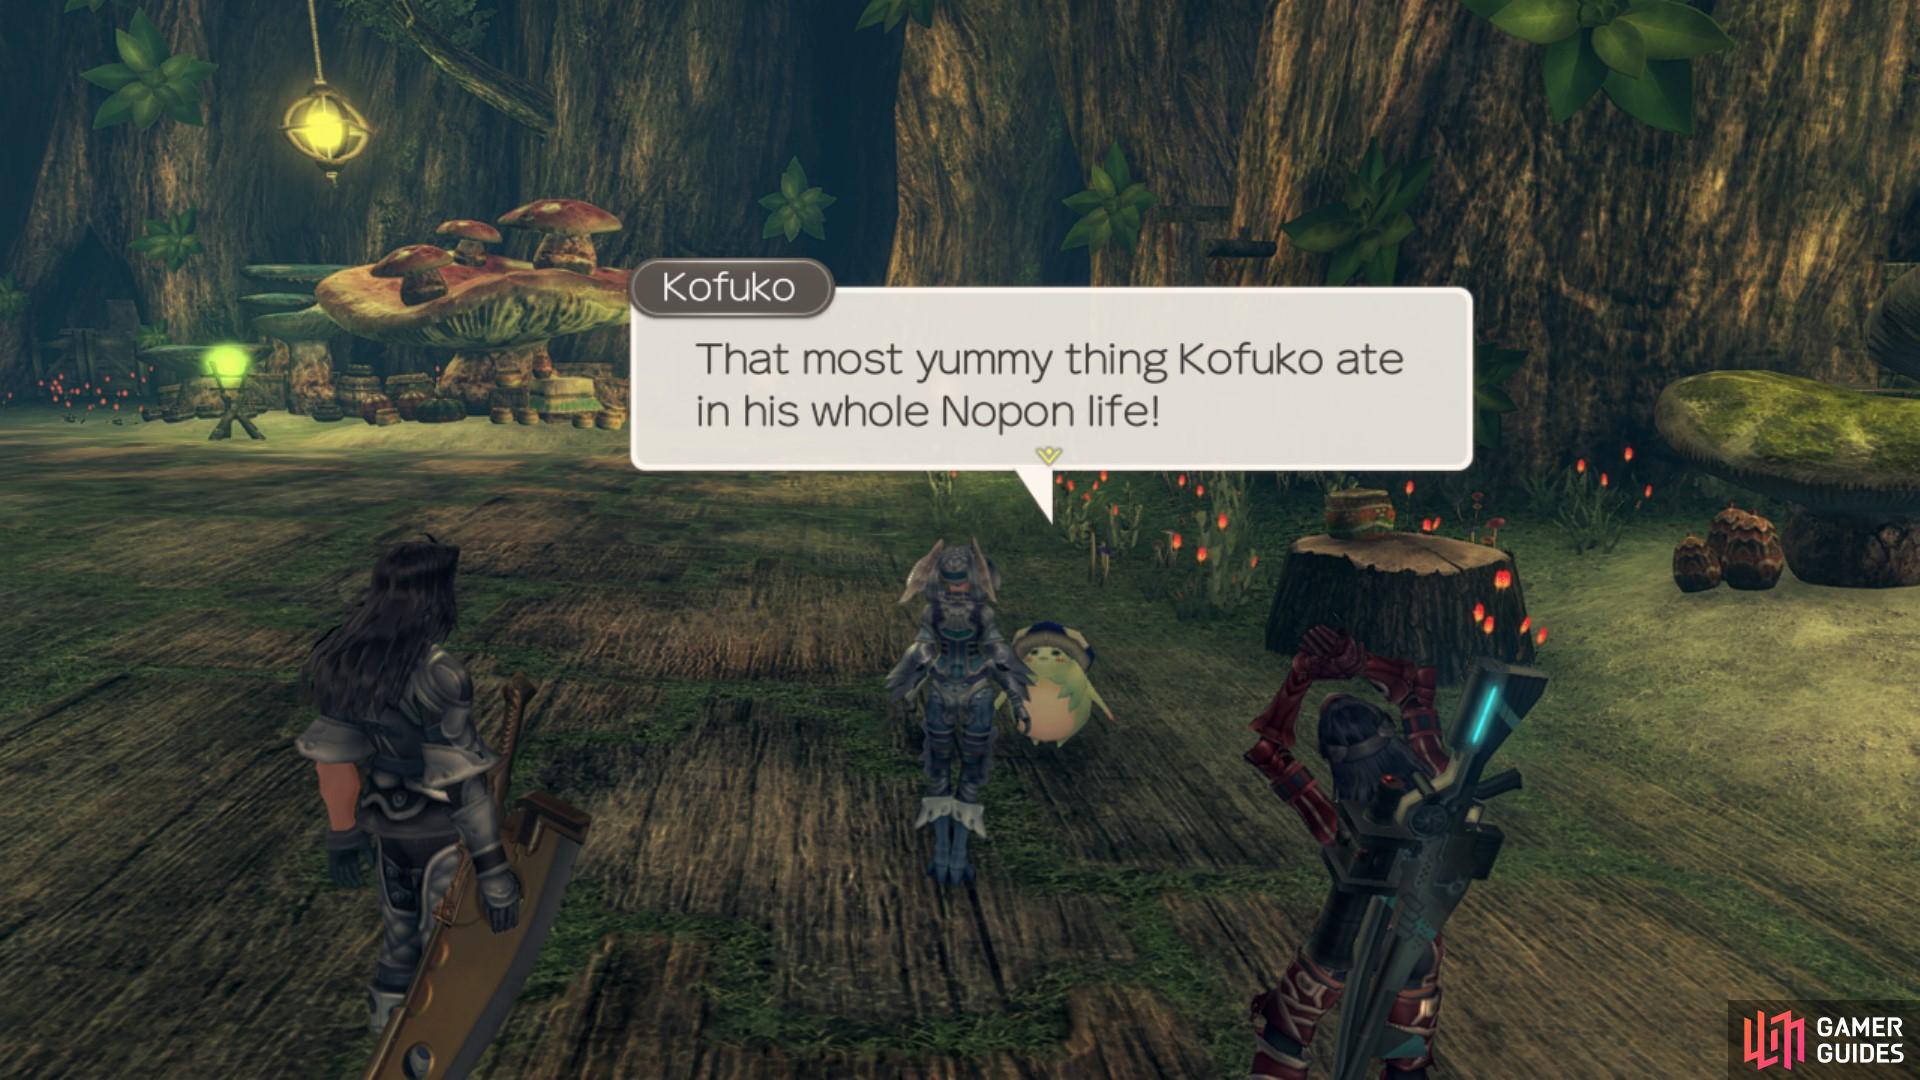
Kofuko loves the disgusting food that you collected for him!
Healing the Healer
To unlock this quest from Npa, you must have completed either Let’s Make Fillings! or Medical Advancements. She will ask you to chat to Medi about helping Dr. Yusa’s painful legs. Medi will tell you about an old Nopon tradition where you take sacred flowers to a location on the Bionis that matches the pain of the Nopon’s body. Your next objective once you have spoken to Medi, is to talk to Yusa about his leg pain. Talking to Yusa will activate the quest Legendary Nopon Charm. To complete Healing the Healer you must first finish Legendary Nopon Charm.
Once you have completed Legendary Nopon Charm, you will be able to return to Yusa. When you talk to Yusa he will tell you that his knee pain is all cleared up! To finish the quest, talk to Npa. After you have completed the quest, Yusa and Medi will go from having a negative affinity link to a positive one.
Legendary Nopon Charm
This quest be activated upon talking to Yusa during the Healing the Healer quest. This quest must be completed before you can proceed with the initial quest. Yusa will give you 4 Sacred Flower items and ask you to take them to different parts on the Bionis’ Leg.
- Kasharpa Falls Altar - There is an altar near Kasharpa Falls, which is on the upper level of the Bionis’ Leg. You can get there by travelling to Spiral Valley landmark and then walking southeast. This is the only altar on the upper level, the rest of the flowers are offered on the lower level of the Bionis’ Leg.
- Tranquil Grotto Altar - There is an altar south of Raguel Bridge - North in Tranquil Grotto. To get there, jump down into Raguel Lake from the landmark and swim south until you reach a small cave in the cliff.
- Viliera Hill Altar - There is an altar to the east of Kamos Guidepost near Viliera Hill. To reach it, walk east from the landmark and then up the Viliera Hill land bridges.
- Southern Gaur Plains Altar - There is an altar directly south from Jabos Rock Rest Area landmark. To reach it you simply need to walk south from the landmark to the southern regions of Gaur Plains. Take care walking to the altar though, as there are a couple of level 77 Magnis Ardun enemies that will attack you on sight.
Once you have placed all of the flowers, this quest will automatically be completed. You will now be able to proceed with the quest, Healing the Healer.

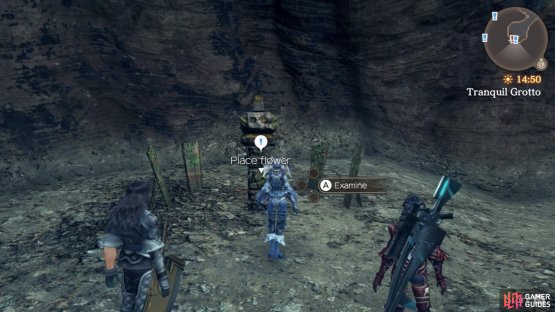
(1 of 2) Kasharpa Falls Altar location
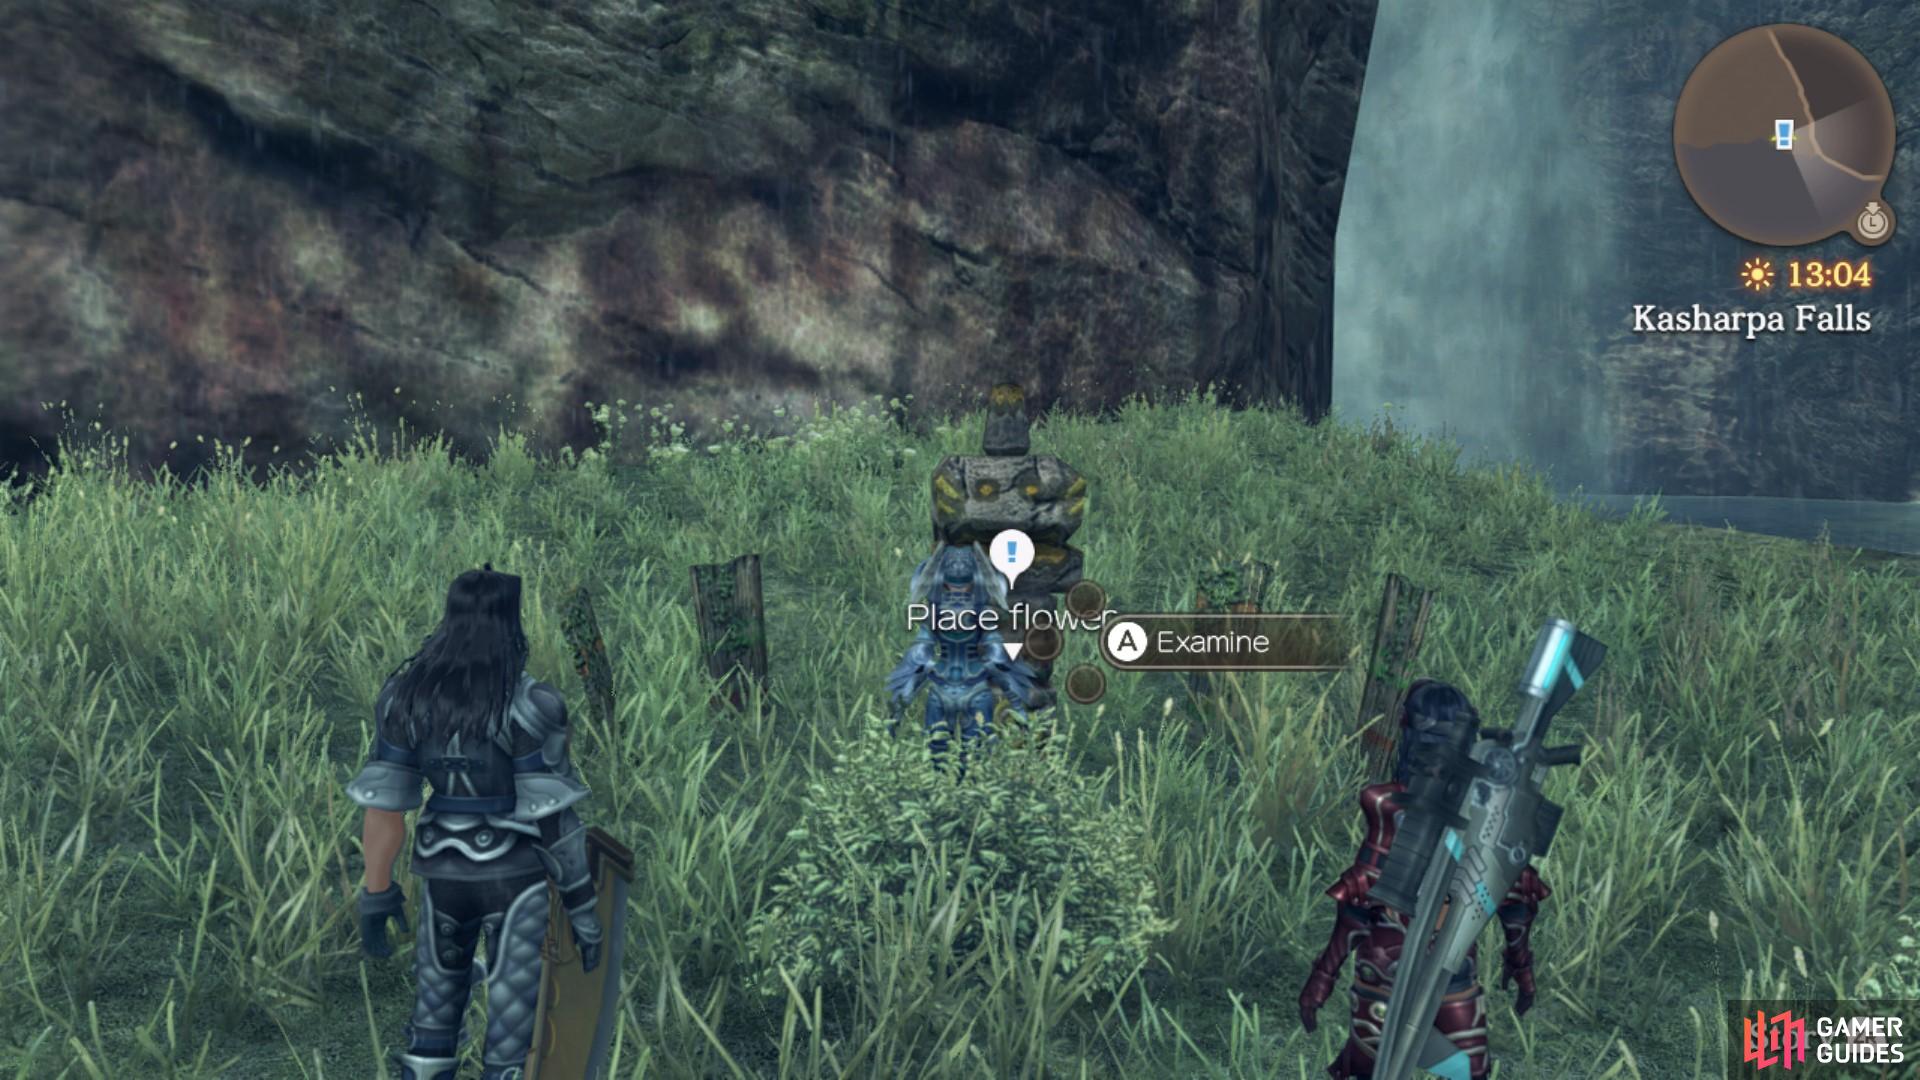

Kasharpa Falls Altar location (left), Tranquil Grotto Altar location. (right)
Mislabelling Problem
Once you have completed Healing the Healer, you will be able to pick up this quest from Medi. He will tell you that people are starting to complain about his medicine and he asks you to talk to Puko, his supplier, about why his medicine is not working. Puko is active between 09:00 and 18:00 around Kyn Shopping Street. He asks you to defeat the Abominable Hiln near Showdown Cliff at Eryth Sea. The Abominable Hilns go around in a group so you will likely have to fight more than one at the same time. Once you have defeated an Abominable Hiln you may head back to Puko in Frontier Village. After speaking to Puko, you can then talk to Medi to complete the quest.
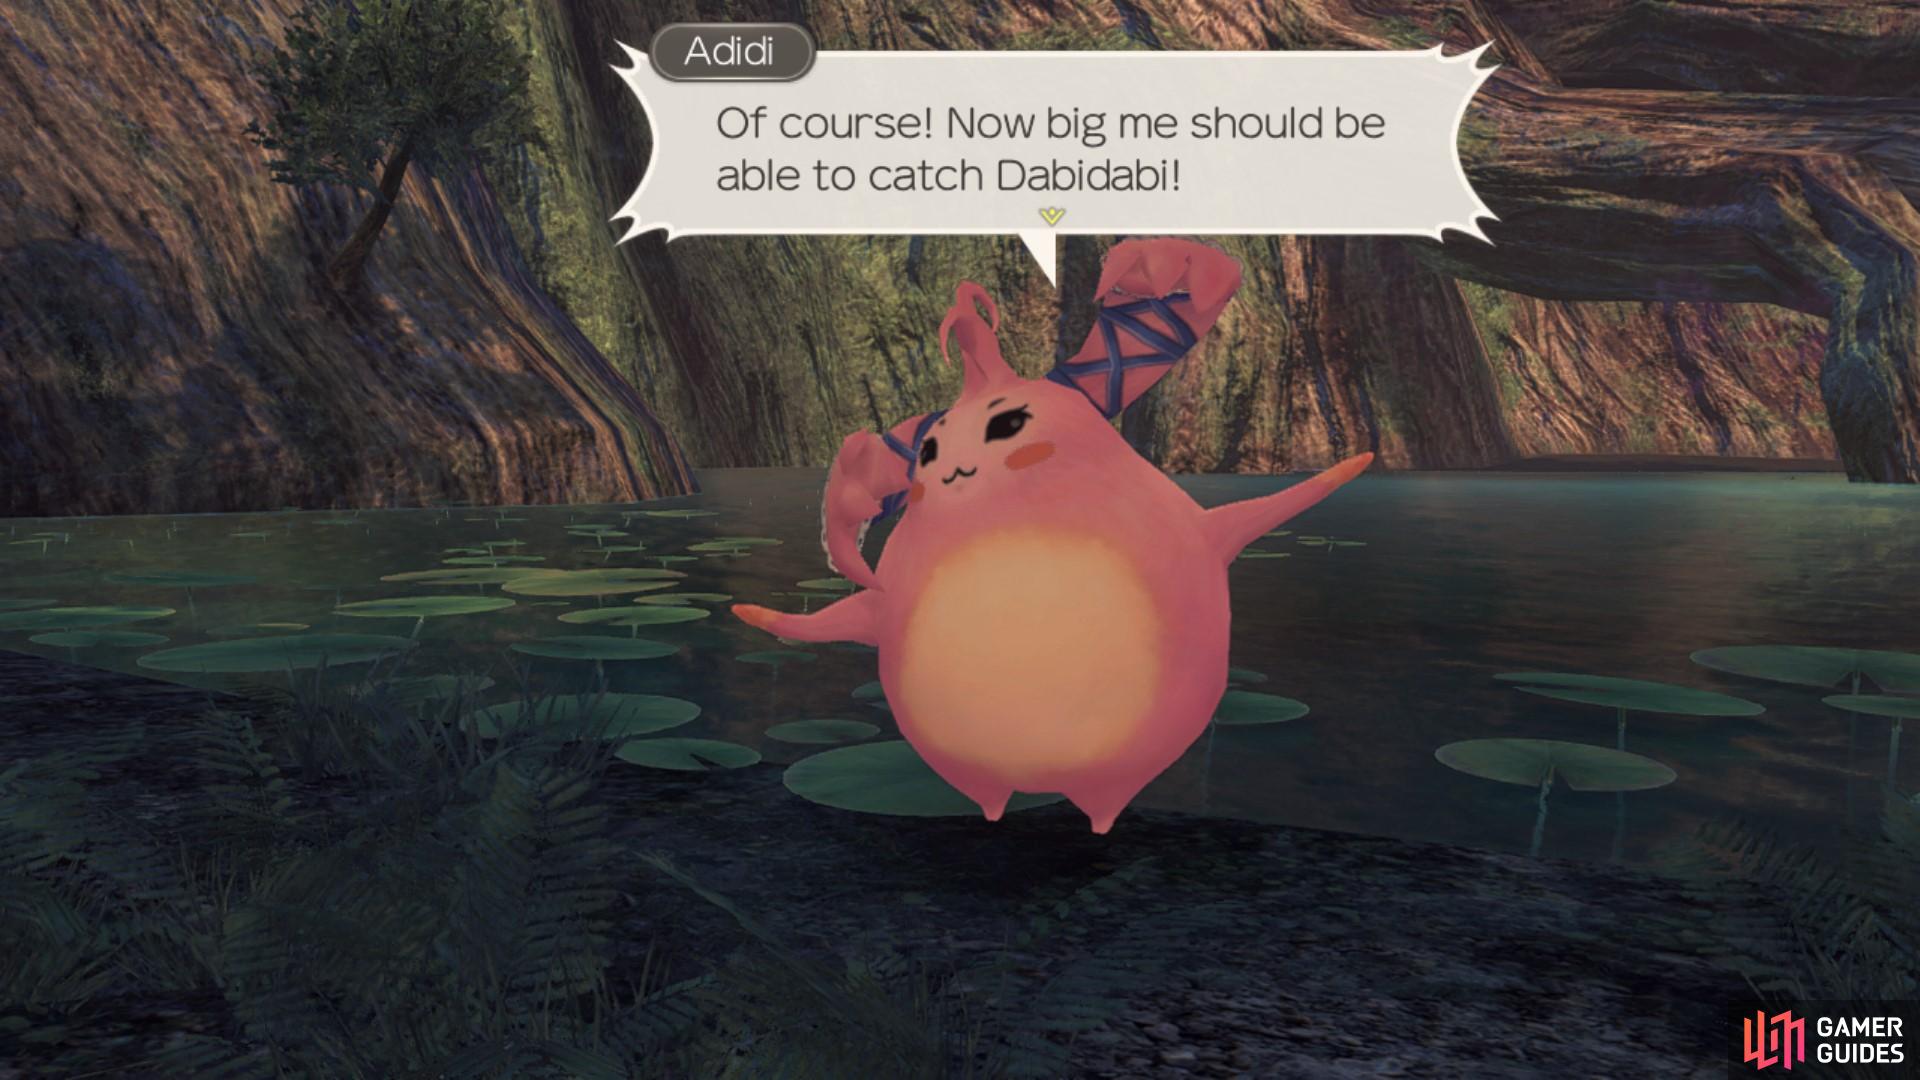
Getting Bigger! and Who is Bigger?
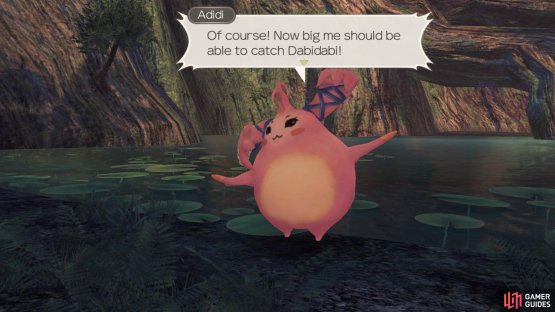
The Getting Bigger quest is only activated if Riki is the party leader, and you must have also have completed Mislabelling Problem. Dabidabi tells you that he needs to show he has courage by jumping into the lake from a ledge near the Chief’s Residence, so that Adidi and him may finally be together. Your first objective is to talk to Adidi, who is available from 18:00 to 06:00 near the Reservoir. She will then tell you to grab 5 pieces of Ekidno Jaw Gristle from Ekidno at Eryth Sea. Circonia Ekidno have a chance to drop them, and they are commonly found on Hovering Reef 7 and 10. Once you have collected 5 pieces, head to Puko. He is active from 09:00 till 18:00 around Kyn Shopping Street. Talking to Puko will activate the quest, Who is Bigger? which must be finished before you are able to complete this quest.
Who is Bigger? - You have the option here to give the Enlarging Seaweed to Adidi or Dabidabi.
- Give the Enlarging Seaweed to Dabidabi (Route A) - When you give Dabidabi the seaweed he will grow large and the jump down to the reservoir will be easy for him! If this route is taken, Dabidabi’s trade items will change to:
| Item | Affinity |
|---|---|
| Aerial Cloak II | 1✰ |
| Jungle Cap | 1✰ |
| Forest of Gossip | 3✰ |
| Lion Cutlass | 3✰ |
| Rumble Box | 4✰ |
| Aerial Cloak III | 4✰ |
- Give the Enlarging Seaweed to Adidi (Route B) - Adidi will be tempted to try some of the seaweed, and when she does, she will grow! She will then decide that she will just catch Dabidabi when he jumps. If this route is chosen then Adidi’s trade items will change to:
| Item | Affinity |
|---|---|
| Dark Mango | 1✰ |
| Decrepit Wing | 2✰ |
| Orluga Grass Skirt | 3✰ |
| Strength Down IV | 4✰ |
Dabidabi’s trade items will also change if this route is taken:
| Item | Affinity |
|---|---|
| Quirky Liver | 1✰ |
| Poison Plus II | 2✰ |
| Bitter Kiwi | 3✰ |
| Panther Bottoms | 3✰ |
| Poison Plus III | 4✰ |
To complete the quest, you will have to speak to Dabidabi again. The endings do not vary too much as the rewards are the same and both choices result in them being together. Both quests will be completed at the same time and will result in Riki unlocking his fourth skill branch, Cowardice.

(1 of 2) Dabidabi will grow large with Route A
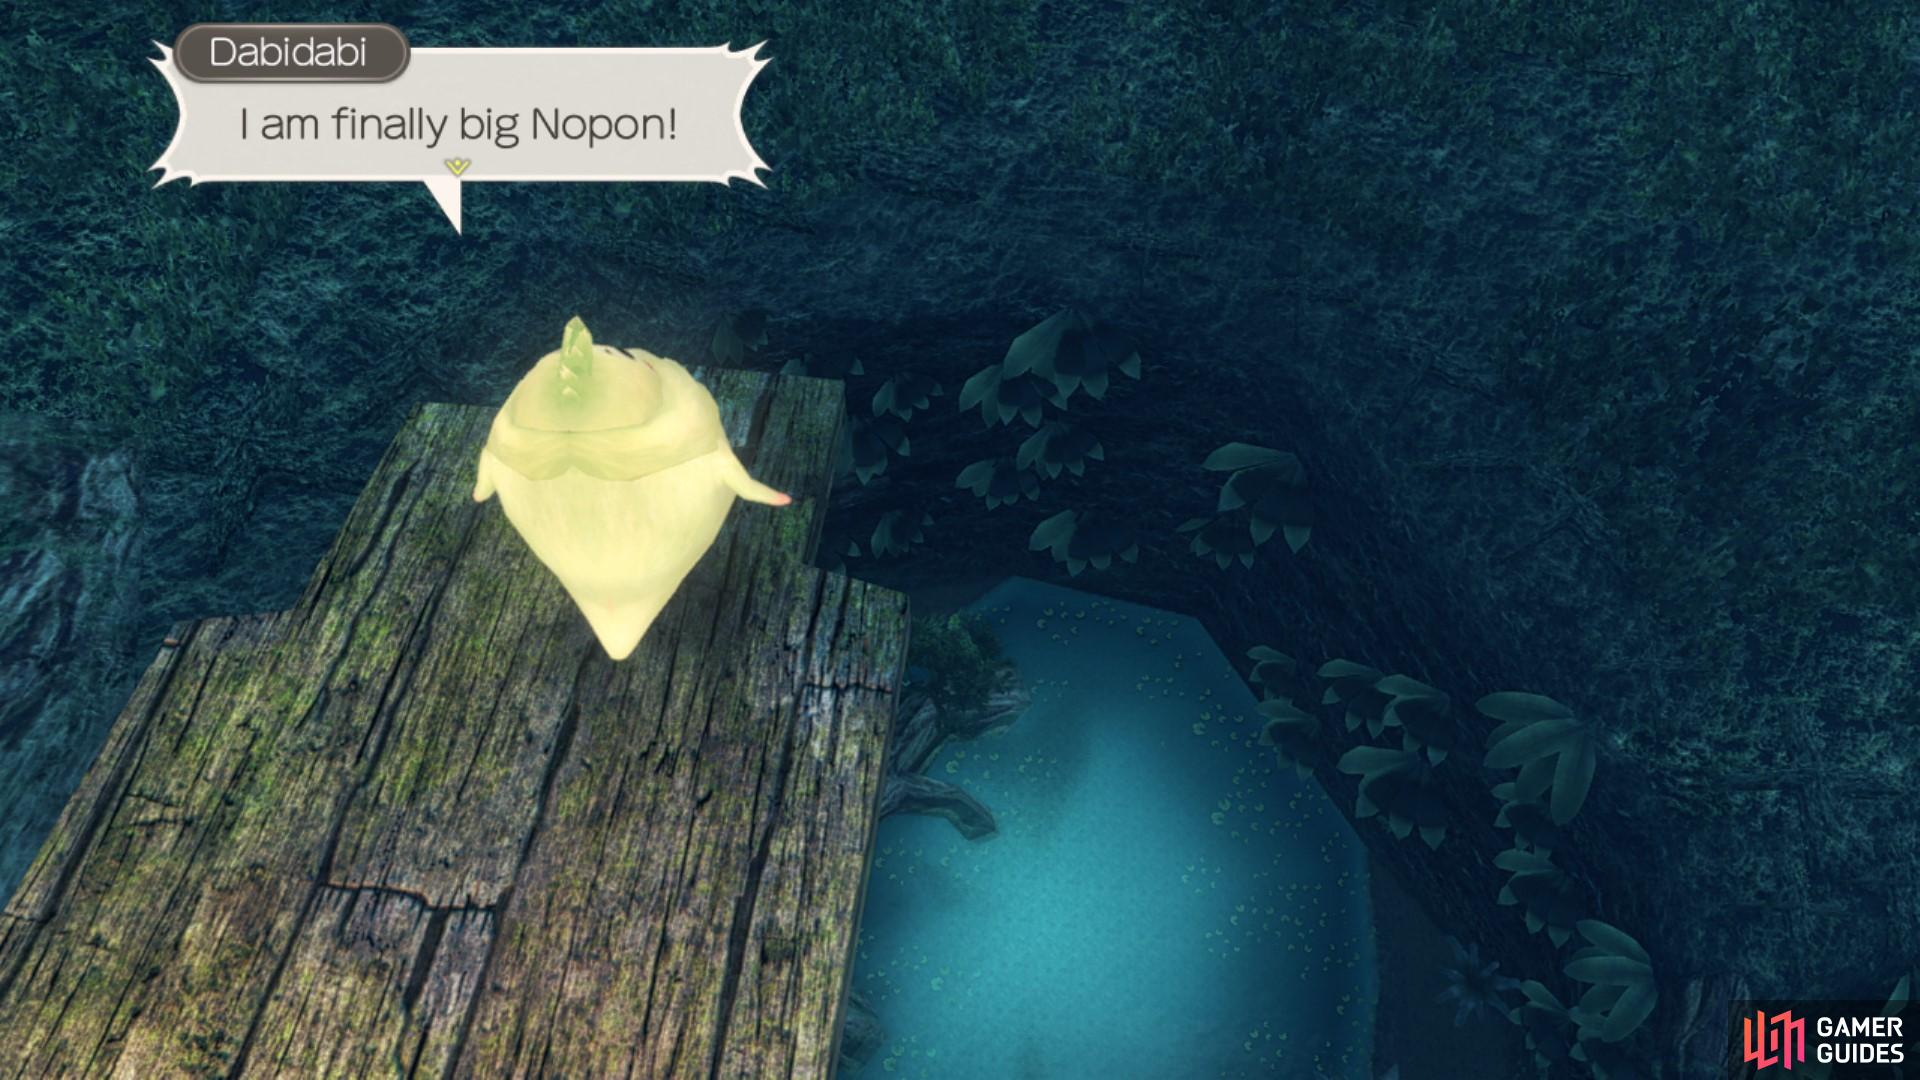
Dabidabi will grow large with Route A (left), and Adidi will grow large with Route B. (right)
Giant Attack!
To activate this quest, you must have completed the quest Bridge Repair in Makna Forest, which is available once you reach the Pod Landing Site Landmark and are on your way to Valak Mountain. Once the bridge has been repaired, the Orlugas think it’s the perfect time to attack! Lalapa has asked you to defeat 3 Ashy Orlugas that have made their way to Nopon Arch in Makna Forest. Head over to Nopon Arch (fast travel if you wish) and defeat the 3 Orluga enemies. Once you’ve dealt with them, head back to Lalapa to complete the quest.
Mystery of Makna Ruins 1
To unlock this quest, you must have already completed Kind Lupa’s Grampypon. Once you have reached Valak Mountain and have a 2✰ affinity with Frontier Village, Lupa will give you this quest. She needs to find some Ancient Documents that will allow her to open the doors to Makna Ruins. She has asked you to find the documents, which are scattered across Makna Forest, for her. You will find one of the documents beneath Bridge Three, in an alcove next to the river. The second Ancient Document can be located on the other side of Bridge Two. The last document is found northwest of the Pod Landing Site landmark. Take care when going for the last document, since there are a few enemies guarding it, including a big, nasty Suelo Orluga. You could sneak around him but you will likely have to fight your way to the final Ancient Document.
Once you have obtained all three documents, head back to Lupa to complete the quest.
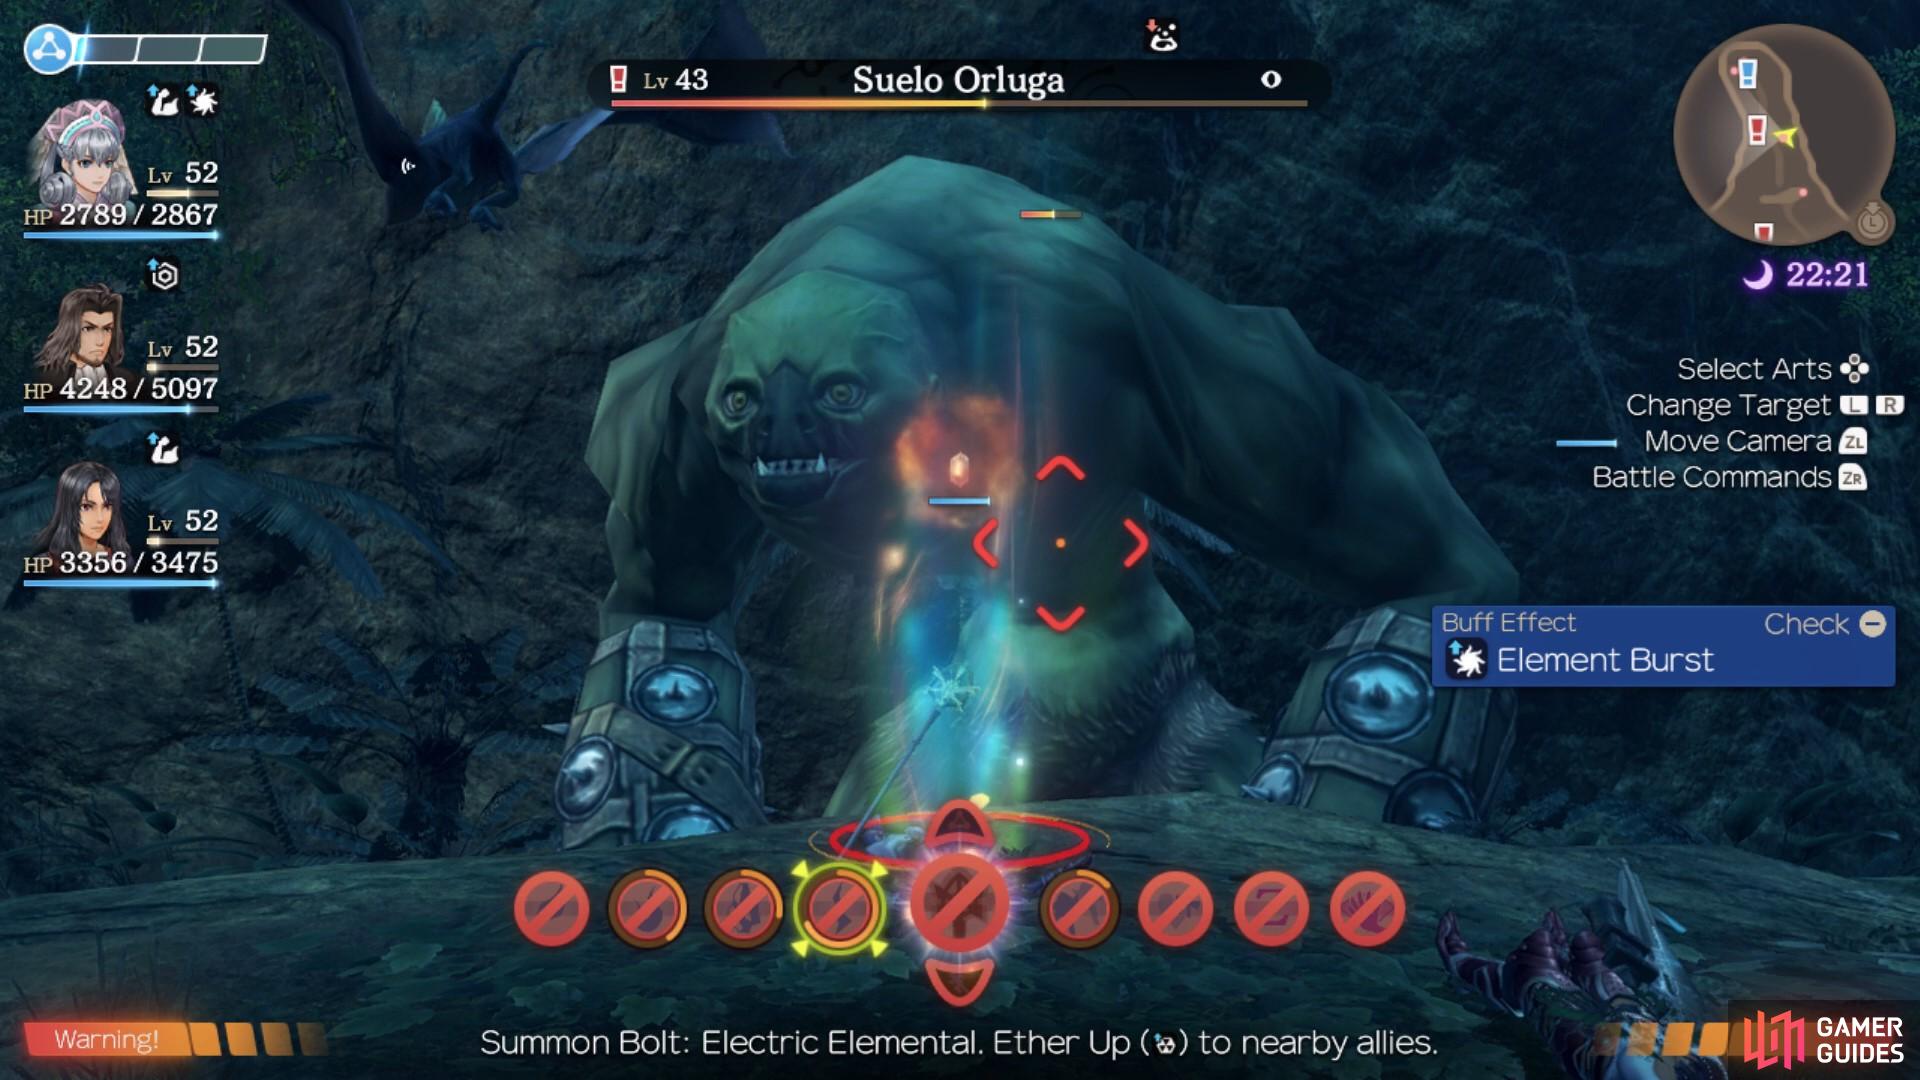
The Suelo Orluga is a giant Orluga-type enemy.
Mystery of Makna Ruins 2
Once you have completed Mystery of Makna Ruins 1 you should be able to immediately pick this quest up. Lupa will ask you to recite a prayer in front of King Agni’s Tomb so that the tomb may open. The path to King Agni’s Tomb is just south of the Valak Pass landmark in Makna Forest. The path is guarded by another Suelo Orluga but once you have gotten past it, you will reach the Secret Area of King Agni’s Tomb. In front of the large, sealed door is an altar for you to recite the prayer at.
Once you have done that the doors will open. You will notice that there are several dead bodies strewn across the floor as you make your way into the tomb. Once you reach the main room, you will come across the level 46 unique monster, Brutal Gravar who will be sat on the very tomb you wish to investigate. You can sneak around him if you have equipped some earth cloak gems, however, you will likely have to fight him. He is quite a tough fight and his Arts pack a punch. Once you have either sneaked past him or defeated him, then investigate the tomb by pressing ‘A’. After investigating the tomb, head back to Lupa to tell her what you have found. Talking to Lupa will complete the quest.
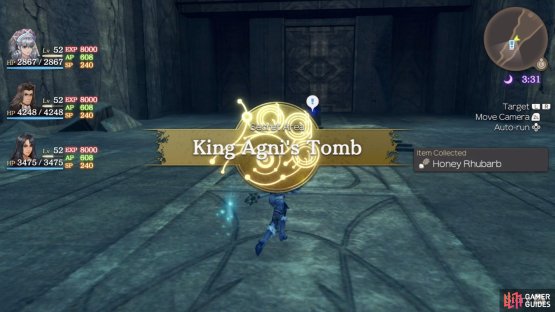

(1 of 2) King Agni’s Tomb is a Secret Area


King Agni’s Tomb is a Secret Area (left), the Brutal Gravar is ready for a fight. (right)
Mystery of Makna Ruins 3
After completing Mystery of Makna Ruins 2 you will be able to pick up this quest from Lupa as soon as you have 3✰ affinity with Central Bionis residents. She wants you to move the heavy coffin but you’re going to need Lubricant Oil to do so. She asks you to collect 3 lots of Aqueous Andos Oil from Flavel Andos at Eryth Sea. They are commonly found around Hovering Reef 1, 3 and 8. You must also collect 3 lots of Algora Sap from Sap Cave in Makna Forest. Sap Cave can be found behind some Makna Brogs at a lake just opposite Bridge Three. Once you have obtained the required Sap and Andos Oil, head back to Lupa and she will make the Lubricant Oil. Talking to Lupa will also complete the quest.
Mystery of Makna Ruins 4
This quest will automatically be given to you upon the completion of Mystery of Makna Ruins 3. You will be asked to head over to the coffin in King Agni’s Tomb and use the Lubricant Oil to move it. Since you have been to King Agni’s Tomb before, you will now be able to use the landmark to fast travel there. There is a slight chance that Brutal Gravar may also have respawned and you will likely have to fight him again to reach the tomb. When you reach the tomb, use the oil by pressing ‘A’. You can then walk down into a small room with a Giants’ Treasure Chest. The chest contains an Eater Records and Battle Soul book. Eater Records is a new Monado Art, and the Battle Soul allows you to increase the levels you put into the art. Once you have investigated the secret treasure room, head back to Lupa to complete the quest.
That’s all for Frontier Village for now, next stop is Alcamoth where a couple of Quests await you.
Adventurers in Peril
You will need to complete Preparing for Adventure 3 before this quest becomes available. Miriall is worried about Zain and Kurralth, as there has been no communication from the pair after they went to the ruins on Valak Mountain. Both of them are found on the path to Three Sage Summit, one of the Secret Areas on Valak Mountain. Before you can gain access to it, you first need to progress the main story enough to obtain the item that lets you melt ice. From Zokhed Pass, go down the hill and ignore the first path on the right. When you spot the second path on your map, take it and melt the ice.
This path diverges into two, but you want the incline heading northwest. This will culminate in an ice slide that shoots upwards. At the end of this slide, time a jump off of it and if done right, you should reach a climbable wall. At the top, you will be on the path to Three Sage Summit. Both Kurralth and Zain will be found on this path, so speak to them both (don’t forget to discover the Three Sage Summit landmark). After speaking to them both, return to Miriall in Alcamoth to report that they are safe.
Believing Again
In order to have this quest available, you need to have completed Building Bridges first. Vidian is located on the outer walkway on 1F of Alcamoth, towards the southern side. Thanks to you helping out Lesunia, she is now speaking with Vidian again, but she seems a bit cold. In order to get Lesunia to think about Vidian normally again, she asks you to get some Morning Dew Ice from Befalgar Pedestal at dawn. Belfagar Pedestal is one of the Secret Areas in Valak Mountain and is not too tricky to find.
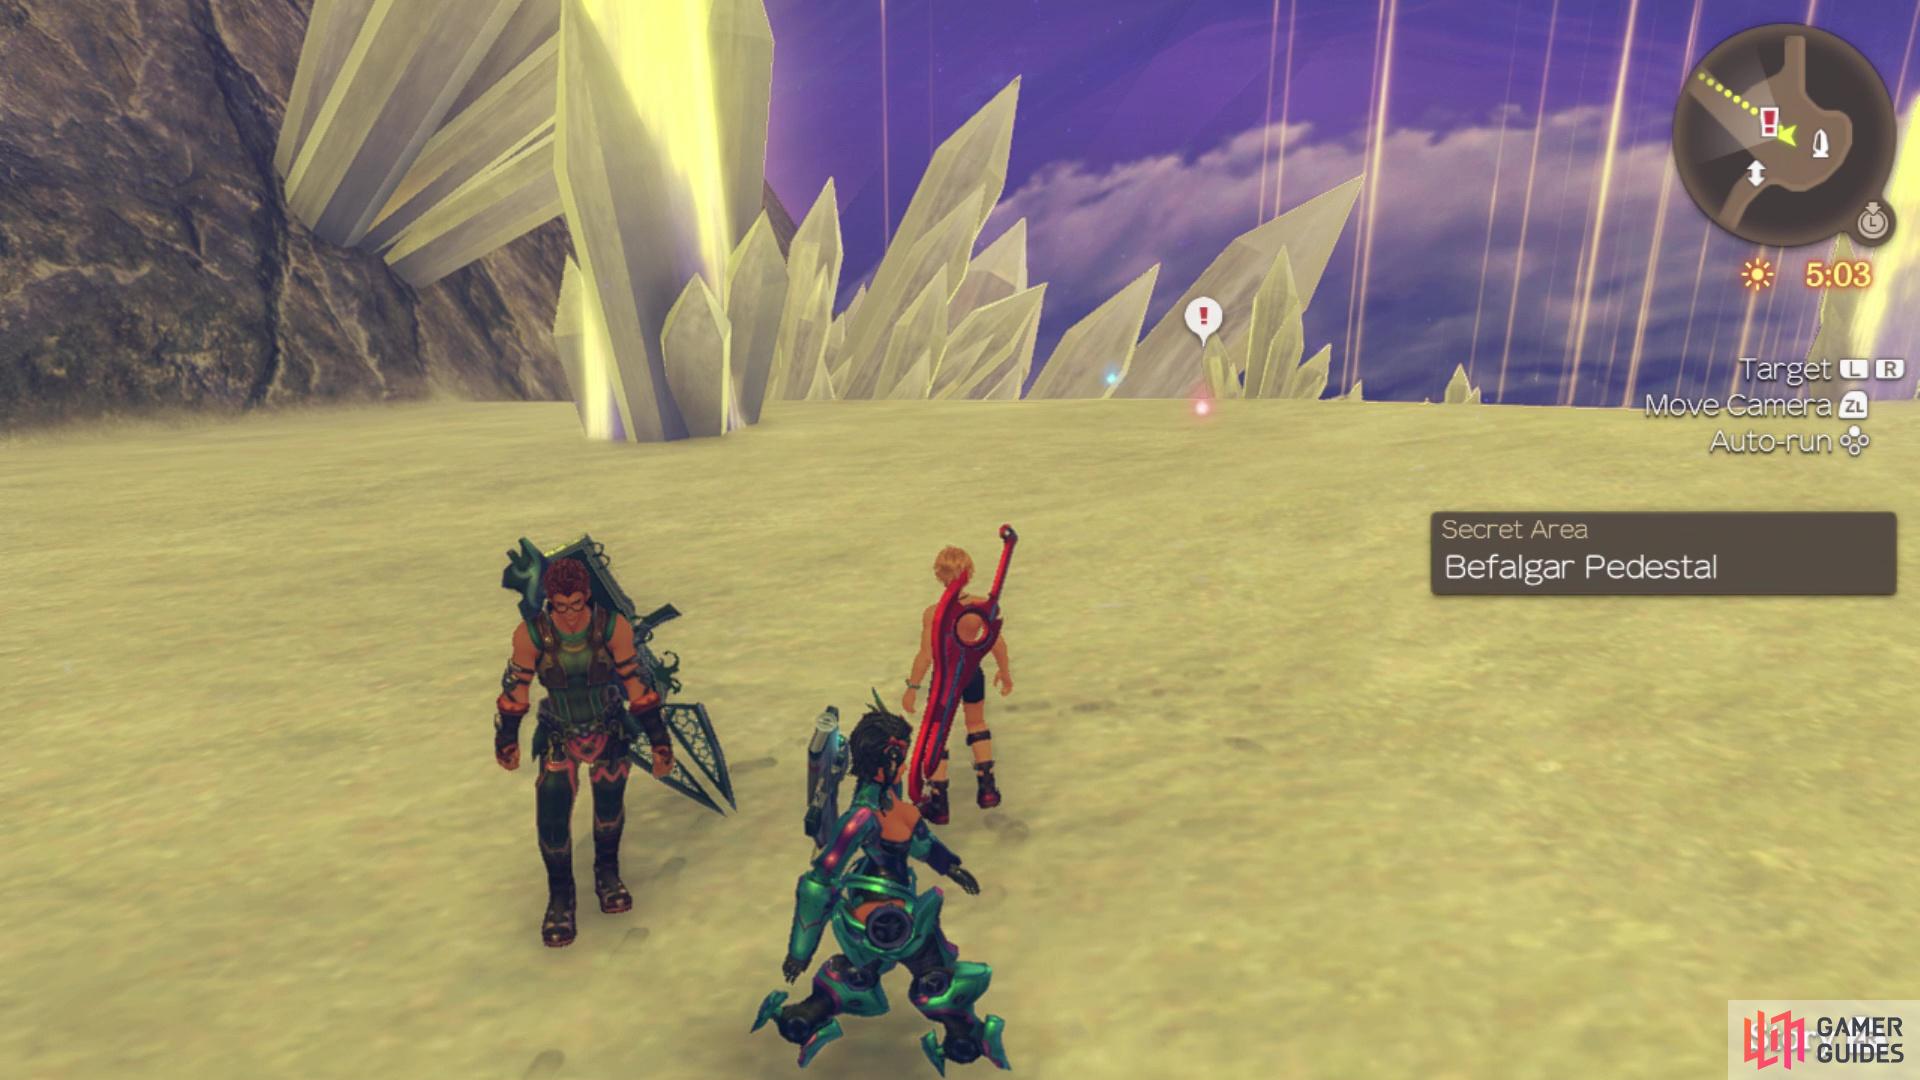
You can find the Morning Dew Ice only at dawn, so change the time when you get to Belfagar Pedestal
From the beginning of the map (Zokhed Pass), head up the first path on your right, then cross the land bridge to your south. You should pass by a hill that has some ice halfway up it; ignore this and use the climbable wall to your south to find an area with a bunch of Nebulae. There will be another path here, leading to one more little wall to climb and Belfagar Pedestal. Change the time to 05:00 and you will find the red orb for the Morning Dew Ice. Bring it back to Vidian in Alcamoth, who will ask you to bring something to Lesunia. She is found southwest of the Imperial Palace at night. Once you talk to Lesunia, return to Vidian to complete the quest.
That’s all of the Quests available for now but before you continue on with the story, take the time to complete any Heart-to-Hearts you meet the condition for (check the menu to see easier). This is also a good time to take a break and go around a tour of Bionis to defeat any Unique Monsters that you haven’t yet, the extra Affinity Coins will make your character a lot more powerful due to being able to link more expensive skills. Head over to the Tour Guide section of the guide to see where you can find each one. Once you’re satisfied, make your way back to Valak Mountain and toward the Story Flag, Sword Valley beckons.
No Comments