This page details how to play the Capture the Flag game mode in Halo Infinite. Includes the basics of point scoring, how to play well with a team, how to keep the flag long enough to capture it, effective use of power items, map features and vehicles, and the differences between Quick Play and Ranked Arena.
Capture the Flag Match Conditions Overview
Quick Play Match Conditions
| No. of Players | Captures to Win | Time Limit | Special Conditions |
|---|---|---|---|
| 4 vs 4 | 3 | 12 minutes | Start with MA40 AR automatic rifle, friendly fire off, radar on |
Ranked Arena Match Conditions
| No. of Players | Captures to Win | Time Limit | Special Conditions |
|---|---|---|---|
| 4 vs 4 | 3 | 12 minutes | Start with BR75 precision rifle, friendly fire on, no radar |
Big Team Battle Match Conditions
| No. of Players | Captures to Win | Time Limit | Special Conditions |
|---|---|---|---|
| 12 vs 12 | 3 | 15 minutes | Start with MA40 AR automatic rifle, friendly fire off, radar on, vehicle access |
Scoreboard Points for Capture the Flag
| Steal Flag | Return Flag | Stop Runner | Capture Assist | Capture Flag |
|---|---|---|---|---|
| 25 Points | 25 Points | 25 Points | 100 Points | 300 Points |
How to Win a Capture the Flag Match
Know When to Drop the Flag
One of the most important things to keep in mind when you’re carrying a flag across the map is knowing when to drop it. Whether you’re alone or surrounded by allies, you’ll be able to muster the best defence if you can actually wield a weapon against enemy forces. If you keep the flag in hand and expect your allies to do all the defensive work, you’ll drastically reduces the chances of you retaining the flag, especially if you’re outnumbered. When a flag is dropped it will remain in that position for as long as you remain within the circle boundary, which is clearly highlighted from the centre of the flag position. This means that you always have the option to drop the flag if you’re being attacked, and it will give you the best chances of keeping the flag so that you can move it further towards the capture point.
Although the above advice in terms of making a habit of dropping the flag when you’re being attacked applies to most scenarios, there will be times when it makes more sense to continue running with the flag. The most obvious situation is when you’re extremely close to the capture point and it will take just a few more steps for you to place the flag. Even if there’s a good chance of you dying as you place the flag, you will at least achieve the primary objective of the game mode. There will be times when it makes more sense to hold onto the flag and try for a melee attack rather than take out your gun. This is because you’ll be able to kill most enemies with two melee attacks when you have the flag in hand. The best time to use this advantage is in tight spaces or when the enemy is within range.
Another good time to risk running with the flag, even as you’re being pursued by enemies, is if there’s very little time left in the game. If you’re the last one alive with flag in hand, you might as well run for the capture point and risk being killed if there’s only 10-20 seconds left on the clock. If you make it, you could keep your team in the game. If you don’t try, you’re going to lose anyway at that point if you’re low on flag captures. You’ll learn more about instinctually knowing when to be patient and when to make a run for it with the flag as you play more Capture the Flag games, and much of the time you’ll be making your own judgement call, but in general you’re better off being patient and moving with your team rather than going alone.
Stick With Your Team
Following on from the above, this advice applies to almost all of the Halo Infinite Multiplayer game modes, and Capture the Flag is no exception. There are plenty of good reasons why you should move together with your team, rather than hop around the map alone. In Capture the Flag it’s particularly important because if you don’t defend a flag in transit (by remaining in the circle if you drop it), it will be sent back to the enemy spawn point and you’ll need to start all over again. The best way to defend a flag is to have as many allies around it as possible, giving you the best chances of fending off an organised attack from the opposing team. If you happen to be the one carrying the flag initially, you can drop it on the ground the moment that you’re attacked, so that you can help in the defence by firing at opponents, rather than standing there without any offensive capability, or moving slowly across the map as an easy target to pick off.
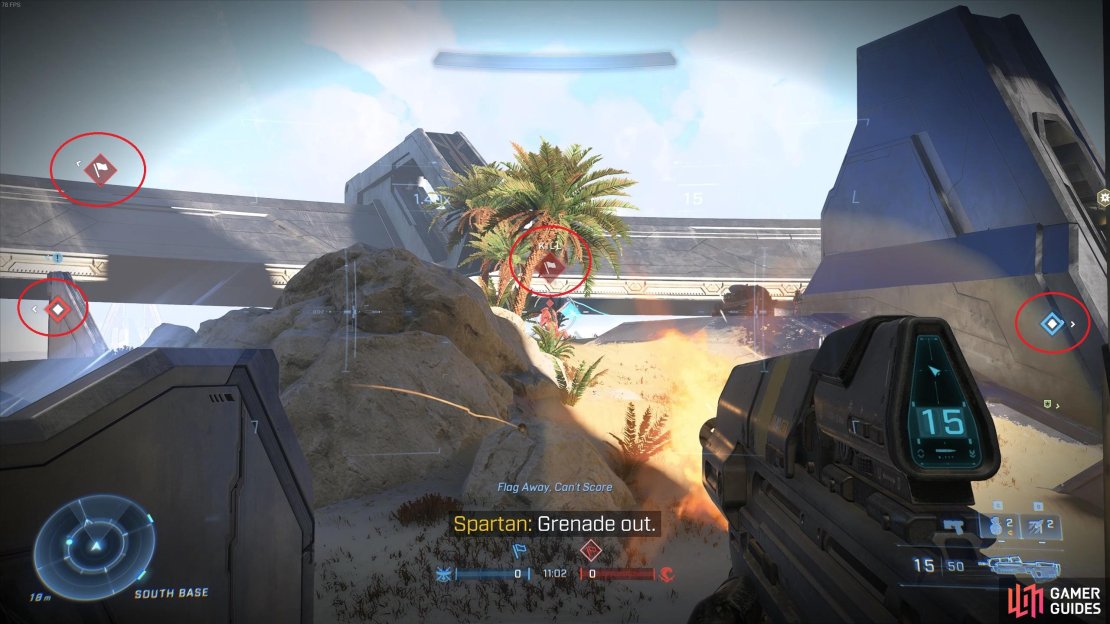
(1 of 4) You’ll be able to see flag icons at the side of your screen, giving you an idea of the match situation at a glance.
The principle of sticking with your team doesn’t necessarily mean that you should all be standing on top of each other most of the time. Instead, you’ll need to be smart and take up tactical positions, giving you a good view of the surrounding area so that you can anticipate enemy attacks and begin firing before they reach the person with the flag. Essentially, you’ll want to maintain line of sight with your allies without being too close. If you all move in one group roughly in the same position, you’ll be vulnerable to AoE (Area of Effect) attacks from grenades, rockets, and energy blasts. Another thing to consider is that if you have access to power items such as Drop Wall or Repulsor, you can save these for key moments in a fight when you need to protect the flag and your allies from potentially overwhelming firepower.
Use Power Equipment, Vehicles & Map Features
The power items mentioned above are some of the best in terms of defending a specific position, but there are other items which can be used with more versatility. For example, the Grappleshot can enable you to outmaneuver opponents as you navigate the map, potentially allowing you to reach a defensive point faster than you would without it. However, there’s another cool use of the Grappleshot: it can be used to essentially harpoon the flag and snatch it from the ground. This won’t be possible in the flag’s default spawn point position, but so long as it’s on the ground in transit you can snag the flag away from an enemy so long as your aim is true. This is particularly effective if you’re chasing a group of enemies who are trying to capture your flag, since it not only removes the flag from the defensive circle, but it allows you to stand inside it and begin sending it back to your spawn point from a distance.
The Overshield and Thruster power items provide obvious benefits in terms of keeping you alive for longer in the former case, and allowing you to briefly gain some extra speed in the latter, which can make all the difference if you need to avoid a grenade that has just been launched in your direction, for example. In terms of vehicles, these will only be available during Big Team Battle matches, but they can make things much easier for you to bring the flag home, and much more difficult for the enemy to intercept you. If you’re playing with a skilled driver who you can rely on to get you back to your spawn safely, all you need to do is enter the vehicle with the flag in hand, and almost everyone else on the battlefield will find it incredibly difficult to stop you before you reach the capture point. In this way vehicles can end a Capture the Flag game rather quickly if they’re used properly.
The use of map features will be fairly limited, but some maps such as Behemoth have energy platforms which propel you at great speed in a specific direction. These can be extremely useful to intercept enemies who are attempting to capture your flag in transit, as shown below:
Prioritise Intercepting Flags
The main objective for your team in Capture the Flag matches is to capture enemy flags, but you won’t be able to do this if the enemy has your flag in transit. This is because you won’t be able to capture the enemy flag unless your own flag is safe at your spawn capture point. So, whenever your team has a flag at the same time as the enemy team has one of your flags, you’ll need to proceed carefully and divide your forces effectively. The most obvious way to do this in 4 vs 4 matches is to have two people defend the flag that you’re attempting to capture, and send the other two after the flag that you need to intercept and retrieve. This can make things tricky depending on where you are on the map, especially if you’re exposed without cover.
In a situation where both teams have the enemy flag in transit and are close to the capture point, the first team to kill the opposing flagbearer’s wins. If you’re part of the team who is attempting to intercept the enemy to retrieve your flag, remember that you not only need to kill the enemy forces near their own base, but you’ll then need to wait within the circle of the flag to send it back to the spawn point. This is worth risking your life for, especially if the rest of your team are waiting at your own spawn with the enemy flag. As soon as your flag is returned to its spawn point, your teammates will be able to capture the enemy flag.
One important thing to keep in mind once you know that the enemy is in transit with one of your flags, is that you won’t see the icon for the flag marking their locations until they’re sprinting. This means that you’ll need to pay attention to the movements of the enemy and don’t rely too much on following the icons. However, it also means that you can take advantage of not being seen by moving slowly in an area with lots of cover.


No Comments