
This takes place in Chapter 2: Covert Ops as part of the INTERmission DLC, once you defeat Scarlet and the Crimson Mare.
Deepground is the final part of Chapter 2: Covert Ops in INTERmission.
A New Threat
| Enemy | Weaknesses | Notable Loot |
|---|---|---|
| Deepground SOLDIER | Fire | – |
| Unknown Entity | Ice | – |
| Zenene | – | – |
| Riot Trooper | Fire | – |
| Elite Grenadier | Fire | – |
| Projector | – | – |
| Diabolic Creation | – | – |
Following your encounter with Scarlet, Sonon rushes off to what appears to be a new threat. Take the eastern exit out of this current room and follow the path to catch up to Sonon where you’ll soon face off against a group of Deepground SOLDIERs. Not only can these enemies use invisibility, but they can also cast both Fire and Ice magic your way. Waiting for the invisibilty to wear off is the ideal time to strike, this will cause the Stagger gauge to fill.
Following your victory, a scene will trigger and Yuffie and Sonon will be forced to retreat into the Combat Simulator Prototype. Make use of the nearby bench and vending machine if needed before approaching the door to trigger another scene.
The pair will be forced into the Combat Simulator as you’re pitted against a gauntlet of enemies. Unknown Entities are up first, these don’t have much HP and a few casts of any Ninjutsu will take them down with ease. Two Zenenes will soon follow, these are a lot more deadly along with more HP. They have the frustrating Throat Clamp ability so try to keep your distance and use Ninjutsu from range, any will do so long as it’s not Fire (their Resistance).
Another simple group of Shinra grunts follow this battle, they should take nothing more than a few casts of Ninjutsu to down. The final group of combatants will appear after this, a Projector and the Diabolic Creation. The goal here is to take down the Projector to end the combat simulator however you won’t be able to damage it until the Diabolic Creation has been dealt with. Not only does it have plenty of HP, but the Projector will also summon more after a period of time. Focus on using Ninjutsu with Windstorm to build up the Banishment gauge on the Diabolic Creation and then unleash it on the Projector once it’s vulnerable.
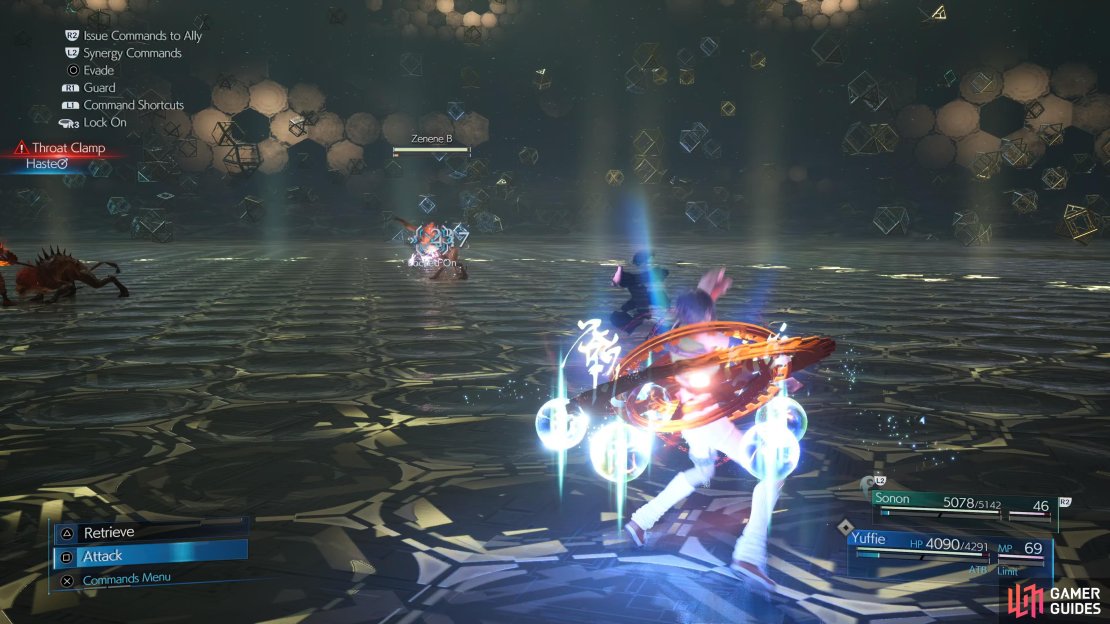


(1 of 4) Watch for Zenene’s Throat Clamp
Following your victory, you’ll be ejected out of the simulation and have a chance to use the bench and vending machine one last time. Be sure to take this opportunity to fully prepare for the upcoming final battle. For Yuffie, you’ll want to use either 4-Point Shuriken if you’ve unlocked all of the Materia Slots, otherwise go for the Steel Reaper, Precision Defense: Regen is really useful if you can pull it off with ease. The Marshalist’s Staff is the best weapon for Sonon, it gives the most HP, some Defense and the useful Synergized Limit Breaks ability. As for Materia, both characters will want HP Up, Magnify-Healing on Yuffie and Magnify-Haste on Sonon (if you got the second Magnify). Everything else is up to your own discretion, just consider you’ll want to go on the offensive.
With your final preparations made, save your game and then approach the door to trigger a scene. Once you regain control, follow the path to the northwest and head through the door at the end to trigger the final boss of INTERmission.
Boss: Nero the Sable
Nero the Sable is your final opponent in INTERmission.
| Enemy | Weaknesses | Notable Loot |
|---|---|---|
| Nero the Sable | Lightning | – |
Phase One
Nero makes his first appearance in Final Fantasy VII Remake as your final advesary and it’s a difficult battle that may take a few attempts to nail. Like Sephiroph in the base game, he has many phases to him and a multitude of abilities at his disposal that you’ll need to be on the lookout for.
To begin with, the first phase shouldn’t cause you too many issues as Nero doesn’t have much to use against you. He’ll use Pinion Pistols at will, a simple barrage of bullets that you can guard through however he will mix it up by leaping into the air and using it from above from time to time, still, this shouldn’t cause too much damage even if you are struck. When in the air, Nero will follow this up with Disembowel, an attack which sees Nero swoop down on a target, this is easy to avoid if you’re at range but can be difficult when close.
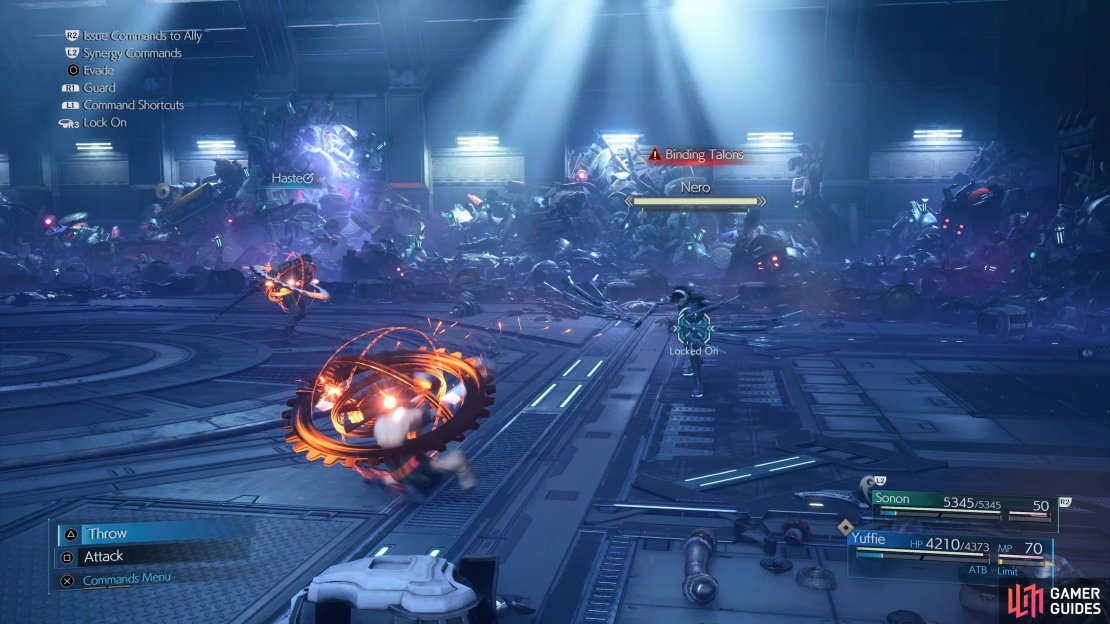
Binding Talons is his deadliest attack during this first phase, Nero will swoop towards a target and attemp to grapple them. If he’s successful, the target becomes bound and you’ll need to use Yuffie or Sonon to attack Nero and drop the bound target. His only other attack during this phase is Sweeping Darkness, Nero will unleash darkness in an arc in front of him that is easily evaded by dodging to the side or behind. During this first Phase, look to dodge Pinion Pistols and follow up with some attacks to Pressure him, it shouldn’t take long to force him into Phase two and you want to prevent him from using Haste on himself.


Phase Two
As the music indicates, Nero is now unleashed and means business as the final boss truly begins. Nero begins to infuse his attacks with darkness at this point, which adds the nasty side effect of causing HP Drain that you can’t remove until it wears off. Binding Talons will now see him drain your HP while holding you and Sweeping Darkness adds the HP Drain effect too.
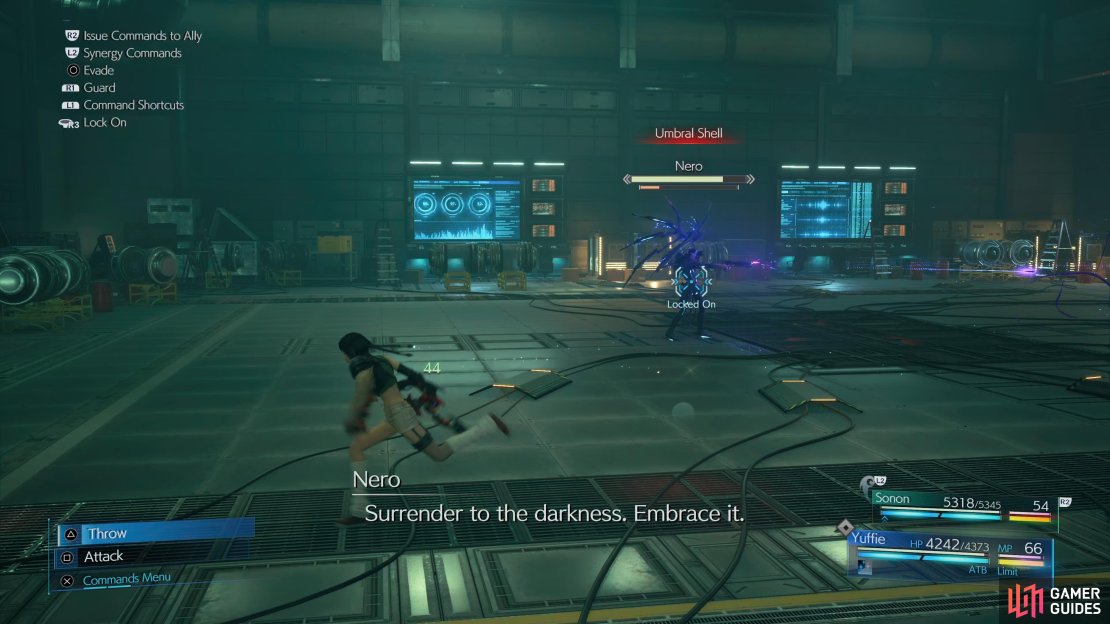
On top of this, there’s some new abilities sprinkled in which causes Nero to be far more deadlier. Chthonic Surge will see him shoot a large blast of Darkness in the area in front of him, this becomes easy to dodge should you have range but up close, you’ll have to rely on blocking through it. Umbral Shell is the evolution of Pinion Pistols, dealing more damage per bullet and causing HP Drain should you get struck by multiple bullets.
At any point, Nero can take to the skies and use Dark Torrent, an ability where he’ll shoot a spiral of Darkness at a target which, like all of his other darkness based attacks, will cause HP Drain. He’ll often follow this up with Umbral Shell too so don’t relax after avoiding Dark Torrent. Sweeping Darkness returns in this phase too, with a slightly wider range and with the same HP Drain effect.
Chaotic Pulsars is a darkness based attack that will cause multiple groups of tentacles to appear over the battlefield and attempt to lash out any target nearby before disappearing. This Phase is all about keeping up the damage on Nero without wasting too many resources, his new abilities make him deadlier but they’re still relatively easier to avoid and the next two Phases are a lot trickier.


Phase Three
You’ll be on the other side of the glass now and you have much less room to manoeuver so make sure you keep locked on to Nero at all times. He will often begin this Phase with Spatial Shift, this sees him teleport around the arena after disabling your lock-on before following up with another ability so be sure to keep track of him and get ready for the follow-up. Dark Ferocity is one such ability which will see him use a barrage of strikes (so long as the first one connects) that deals moderate damage for the entire combo, be sure to keep on the move and dodging and you should avoid this.
Salvo is the third upgrade to his pistol based attacks, this sees a volley of bullets fired at a target that is easily dealt with by running or rolling to the side, so long as you keep an eye on the outside field of darkness (which will damage you should you wade through it). Veil of Woe is a purely defensive based ability that will see Nero use the power of darkness to cast a shield on himself, this acts similar to Barrier.
Dark Matter is arguably Nero’s most deadliest ability during this Phase and the rest of this battle. Nero will rise into the air and plunge the entire battlefield into darkness, this means you’ll have to deal with the HP Drain effect no matter what so be sure to cast Regen on both party members at once. If, for some reason, you don’t have Regen available to you, be sure to recover your HP before it drops too low and go on the offensive to try and force Nero into his final Phase.


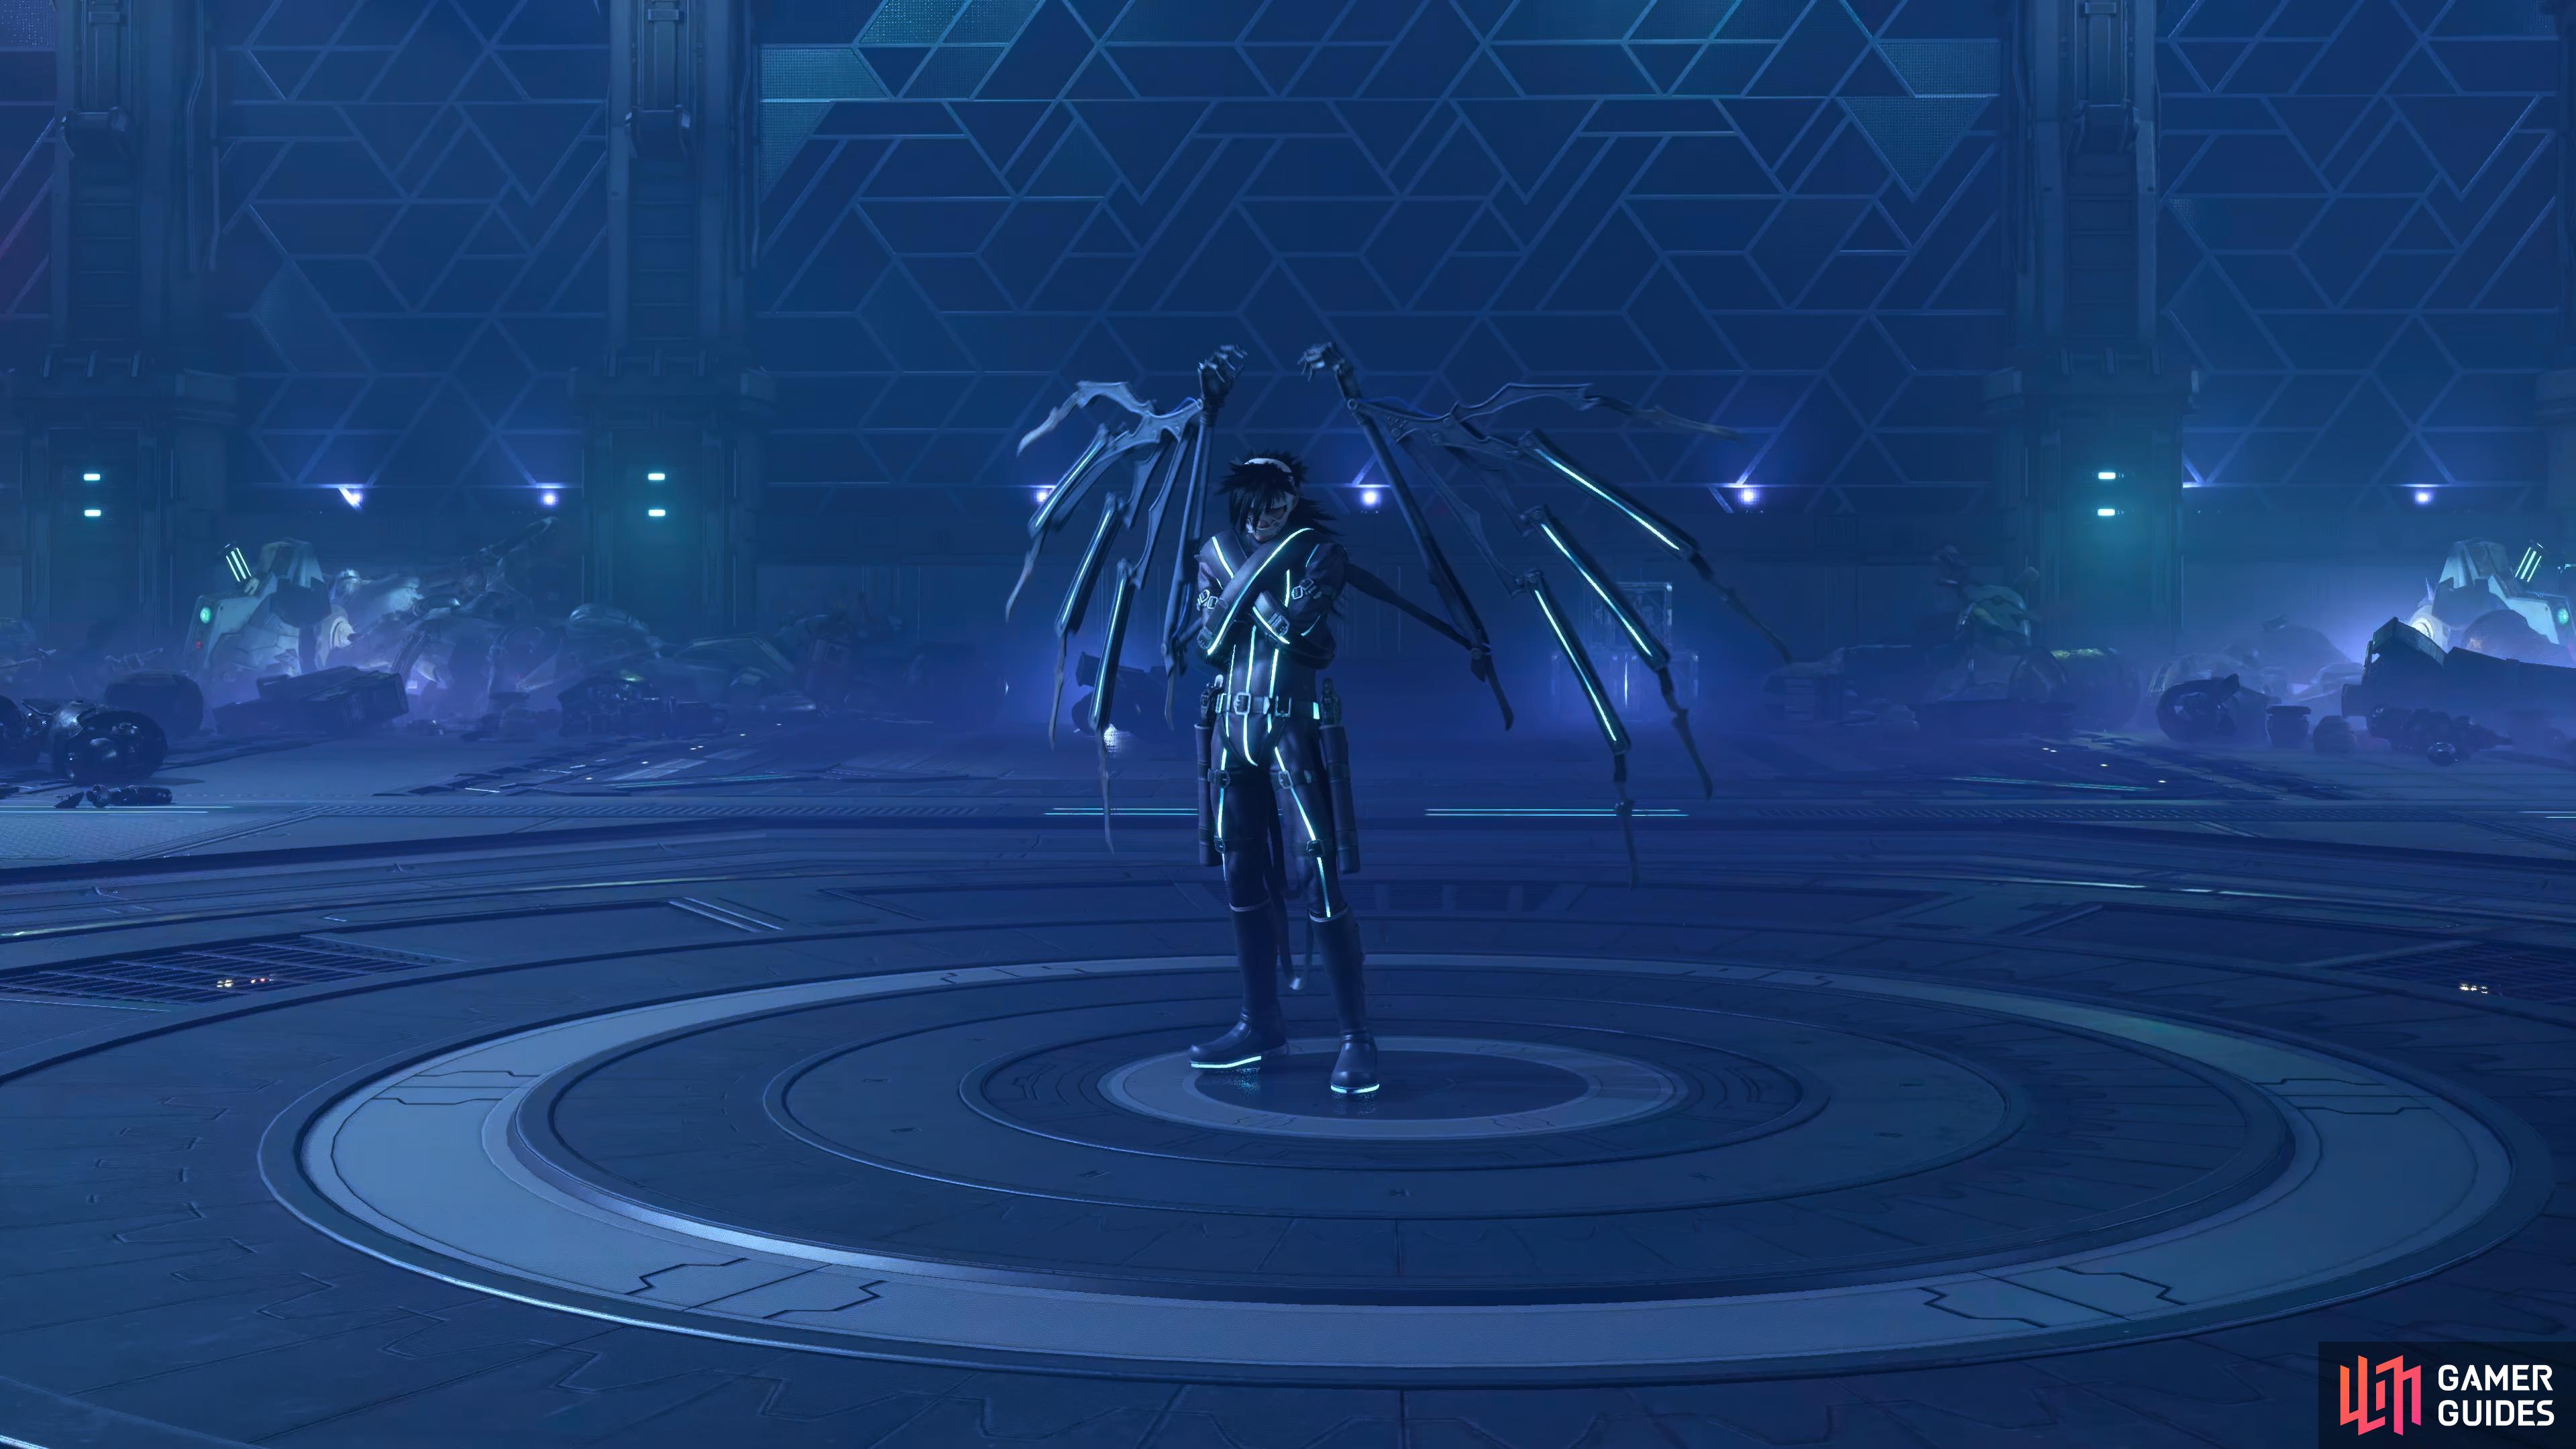
Phase Four
Once you bring Nero below 25% HP, he enters his final and most deadliest phase as he unleashes his wings. These become a target that you should focus on in order to pressure and eventually Stagger him along with limiting his new attacks.
Not only will Nero use all of his other attacks at a faster pace, but there’s a few new Wing based abilities and he’ll use Dark Matter more often. Winged Fury will see Nero shoot out in a line in front of him, slashing with his wings causing moderate damage for each hit along with HP Drain. Tenebrous Talons will see him jump in the air before swiping down with the wings for moderate damage, both of these can be tough to dodge so consider guarding if you’re at close-range.
This final Phase is a race against time, take too long and the HP Drain effect will gradually wear you down. Thankfully, if you’ve reached this stage without using Limit Breaks or summoning Ramuh, you can put them to good use here and finish off Nero once and for all, bringing INTERmission to a close and play several lengthy scenes, unlocking Out of Darkness's Clutches.
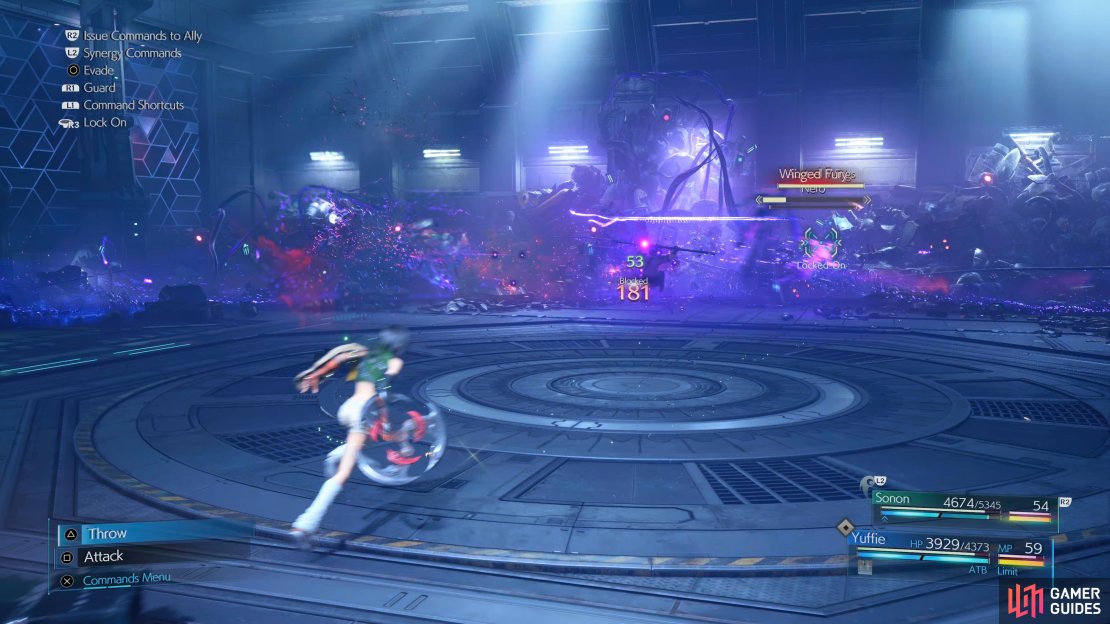


(1 of 3) Winged Fury is a deadly combo in a straight line
What’s Next
That’s not all INTERmission and Intergrade has to offer. You’ll unlock Chapter Select where you can play through both Chapters on Hard Mode to locate all the missing Manuscripts and unlock more Trophies. The Combat Simulator has opened up for Yuffie in Chapter 2, this sees you with two very challenging Hard Mode gauntlets that culminates in another Trophy. Finally, the Combat Simulator for Cloud and the gang in Chapter 17 now features the ultimate challenge in Final Fantasy VII Remake, a match against Weiss the Immaculate!
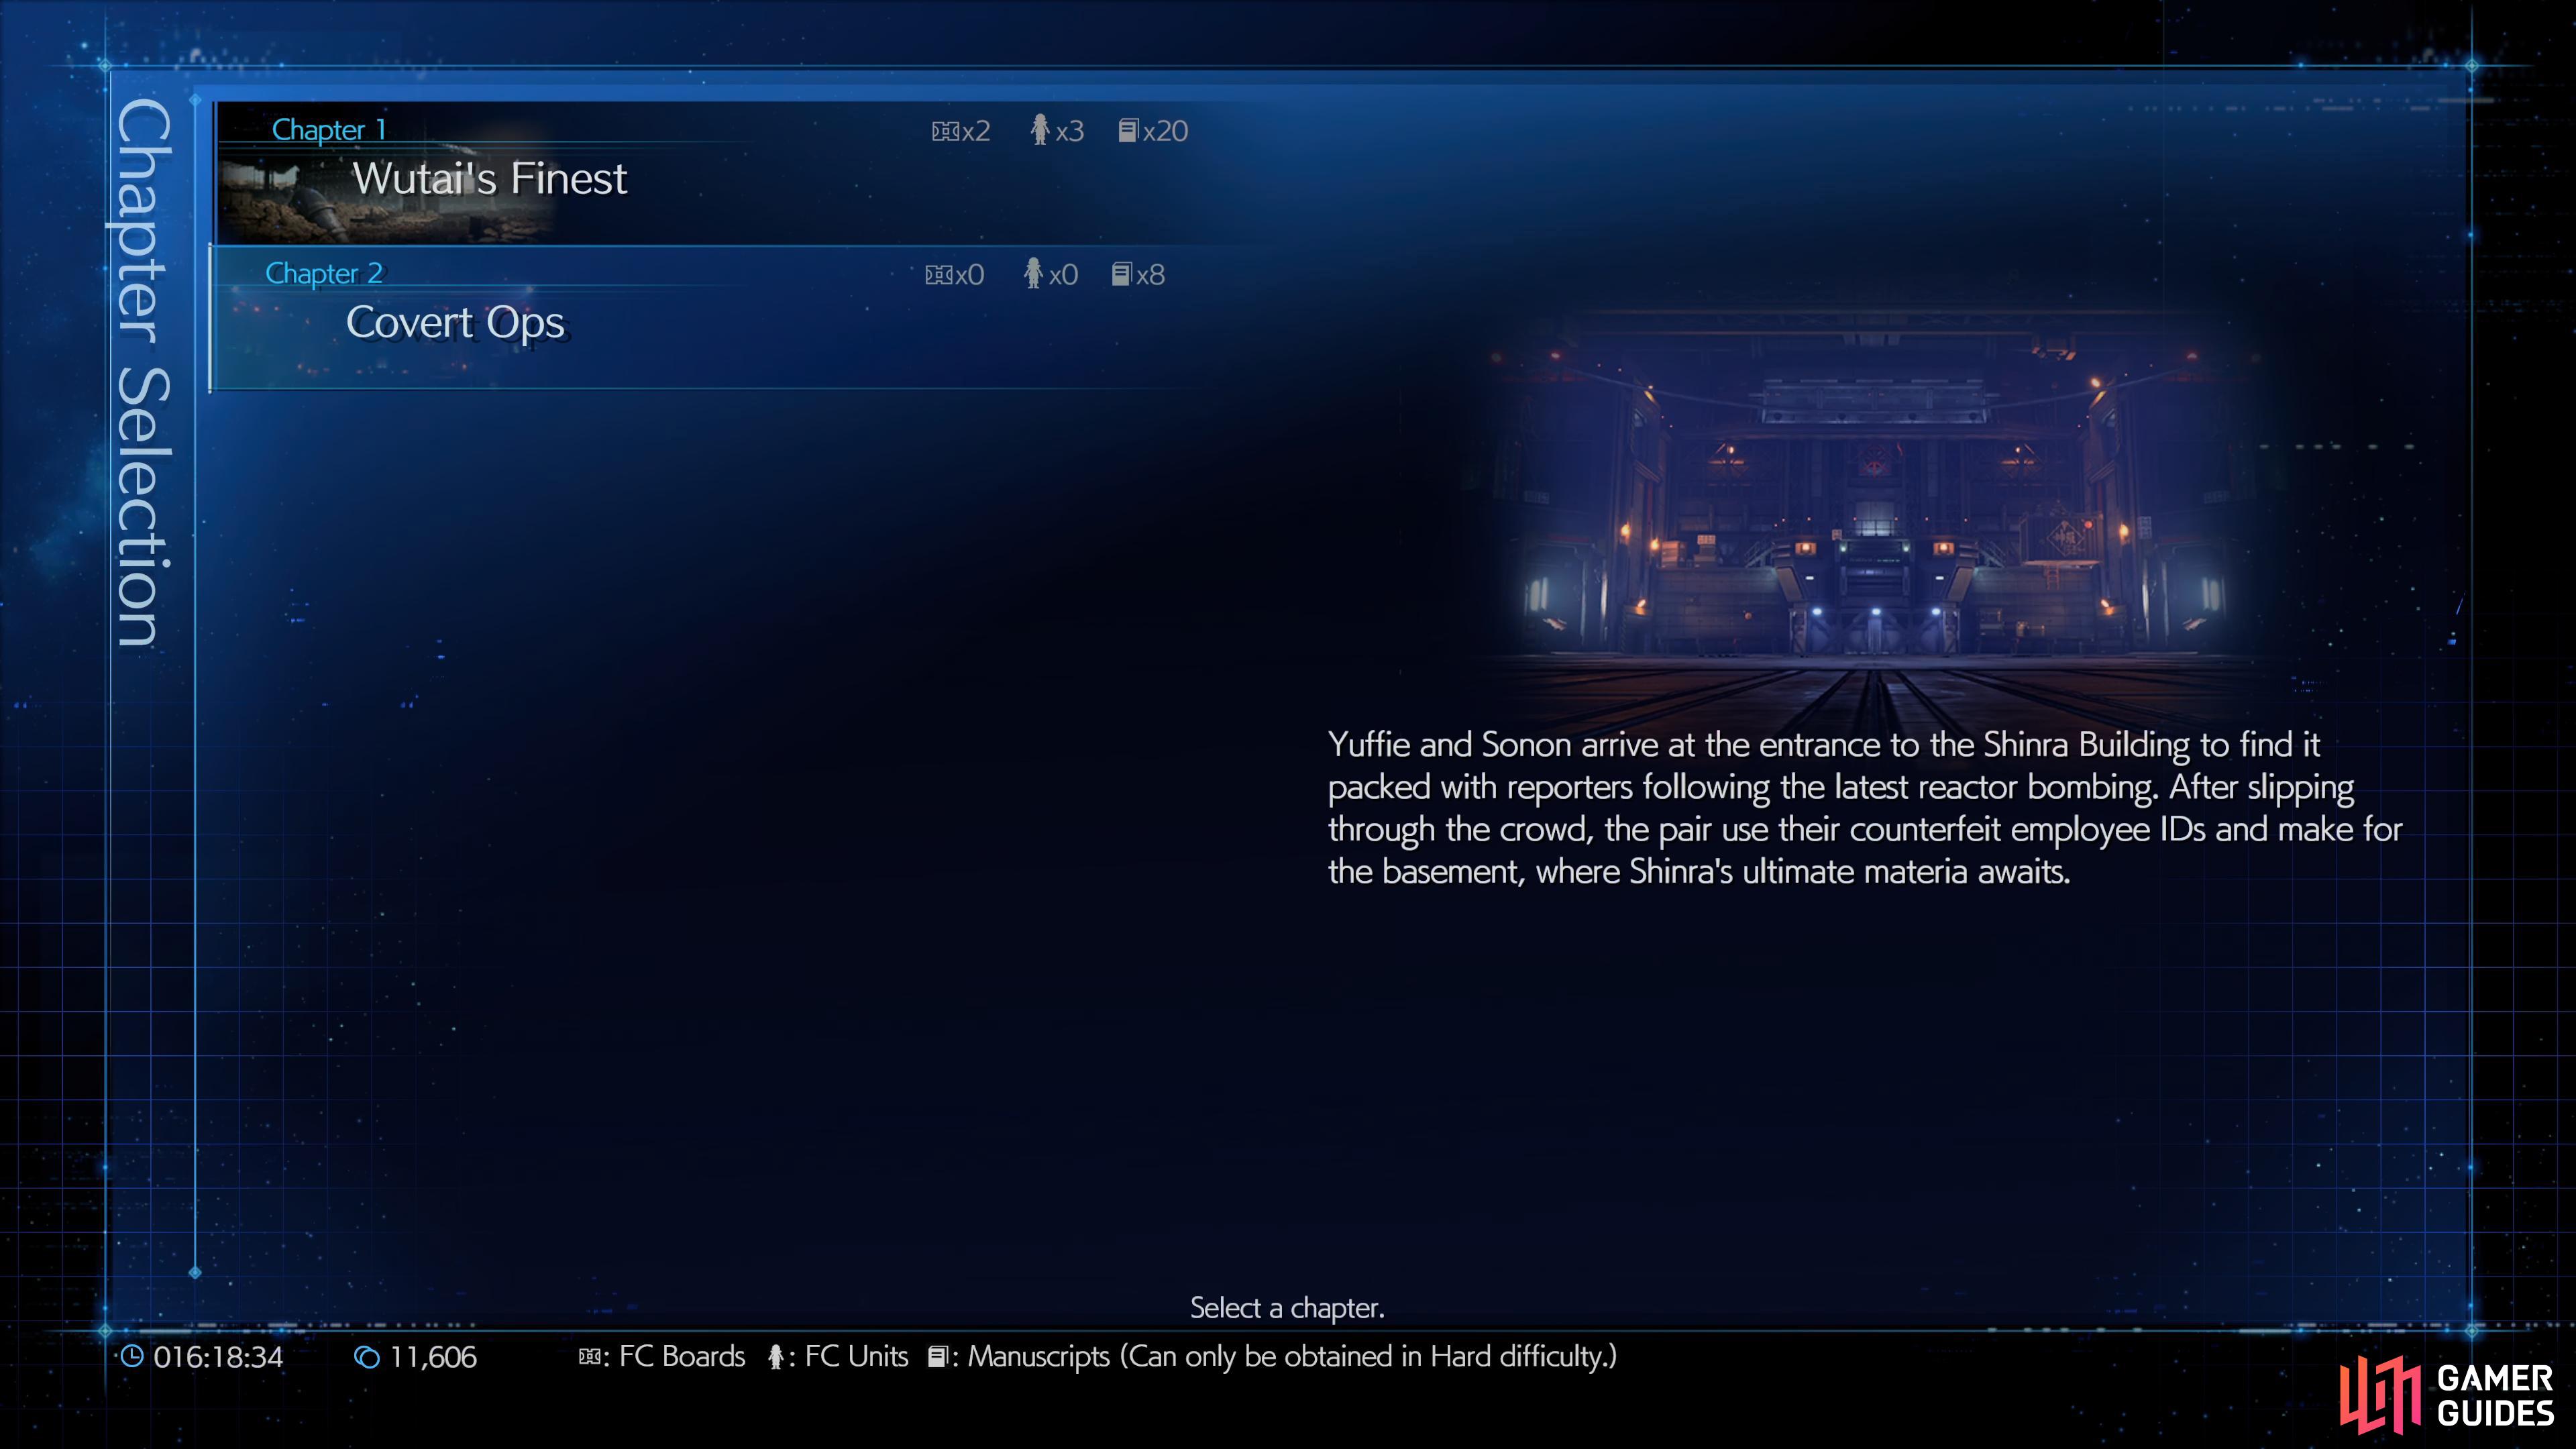
You’ll unlock Chapter Selection, Hard Mode, and difficult optional battles for completing INTERmission.
No Comments