
The Inland Sea
Back in the Costa Valor, grab a horse and make your way to where the Salty Stallion is docked to reach the Inland Sea once more. Although you now have access to Gondolia again, hold off on it for now as you’ll be travelling that way later. Instead, make for the Zwaardsrust Region to the northwest. As you approach land, the monstrous beast that attacked Nautica, Alizarin, attacks the ship. Following the events, the Hero is thrown overboard and wakes in a strange place.

Climb the ladder on the side of the house to reach the person.
When you regain control, cross the bridge and climb to the roof of the lone house to speak with the woman fishing (who was moments ago a Merman). Take heed of her notice and grab one of the nearby fishing rods and listen to the advice of The Seer. Drop back down and enter the house to learn more about The Seer and you’ll be left with cryptic clues as you awaken on the shore.
Zwaardsrust Region
Unlike most other places in Erdrea at the moment, Zwaardsrust is relatively unchanged save for the appearance of Vicious monsters. Your destination is the Warrior’s Rest Inn but first check the fields of hay to the southeast of the Inn to find a small gravestone. This is the treasure that the girl in Quest 32 was looking for. Once you reach the Warrior’s Rest Inn and register it as a Zoom destination, return to her and complete the quest to obtain a Chronocrystal.
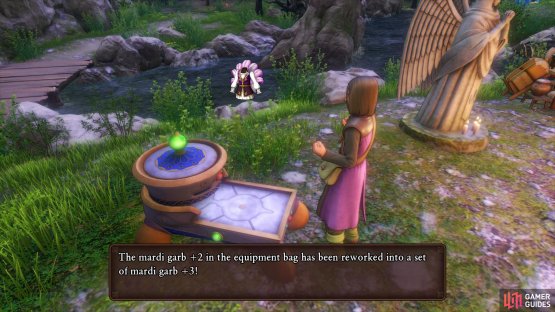
Additionally, head to a Camp and rework the Mardi Garb to +3, this should allow you to reach 330 Charm to complete Quest 28 and obtain a Recipe Book, Glam Gear for Go-Getters which will allow you to forge a new costume for Sylvando.
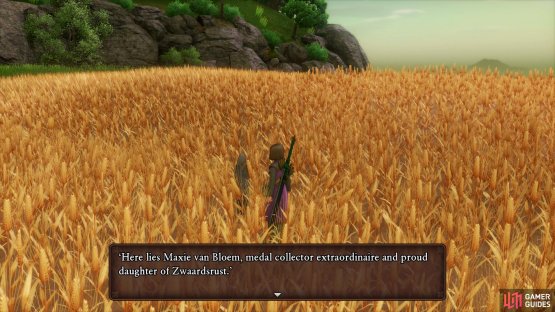
(1 of 2) You’ll find a gravestone in the fields to the east of the Warrior’s Rest Inn


You’ll find a gravestone in the fields to the east of the Warrior’s Rest Inn (left), rework the Mardi Garb +3 to boost your Charm needed for Quest 28. (right)
Zoom back to The Warrior’s Rest Inn and search the shop to stock up on any items you may need, the Warrior’s Helm offers sturdy defense when upgraded to +3. Head inside and rest for the evening and you’ll dream about a Drasilian Knight followed by a request to release him from his anguish. With your target now set, save your game and leave the Warrior’s Rest Inn, taking the western path into the Dundrasil Region.
Dundrasil Region
Southern Dundrasil is rather unchanged too surprisingly, it seems the monsters finished with it long ago. Make your way north past the Ruins and rest at the nearby Camp to register it to your Zoom destinations. While you’re at this Camp, switch it to night and then look around the area for a glittering Headless Horseman. Defeat it and then mount it, this should be the final monster mount and unlock a Trophy in the process.

The Headless Horsemen should be the final mount you need for the Trophy.


Make your way into the Ruins now and use the well once more to reach the Castle ruins. Follow the path through the rubble and Rab will uncover a secret passage. The dungeons are devoid of monsters and the path remains linear until you reach an intersection where you’ll find a chest containing four Sage’s Elixirs. Follow the path south to eventually reach the Restless Knight who attacks the party without hesitation.
Boss: Restless Knight

The Restless Knight has around 2400 HP and can pack a punch with his attacks. You’ll want to Blunt and Sap with Rab to make him more manageable when he Peps Up. The Darkness Wave attack will hit the entire party for over 70HP and can be followed up by a Falcon Sword based attack that will really hurt the character it hits. He’ll also Curse characters, a status effect that Rab can remove if you’re fortunate enough to not have him be the victim of it. Finally, he can also Pep himself up to increase his damage greatly, be sure Blunt is on him if this occurs.

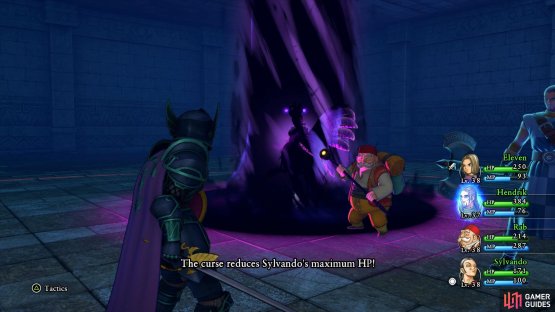
(1 of 2) Darkness Wave will hit the entire party for around 70+ HP
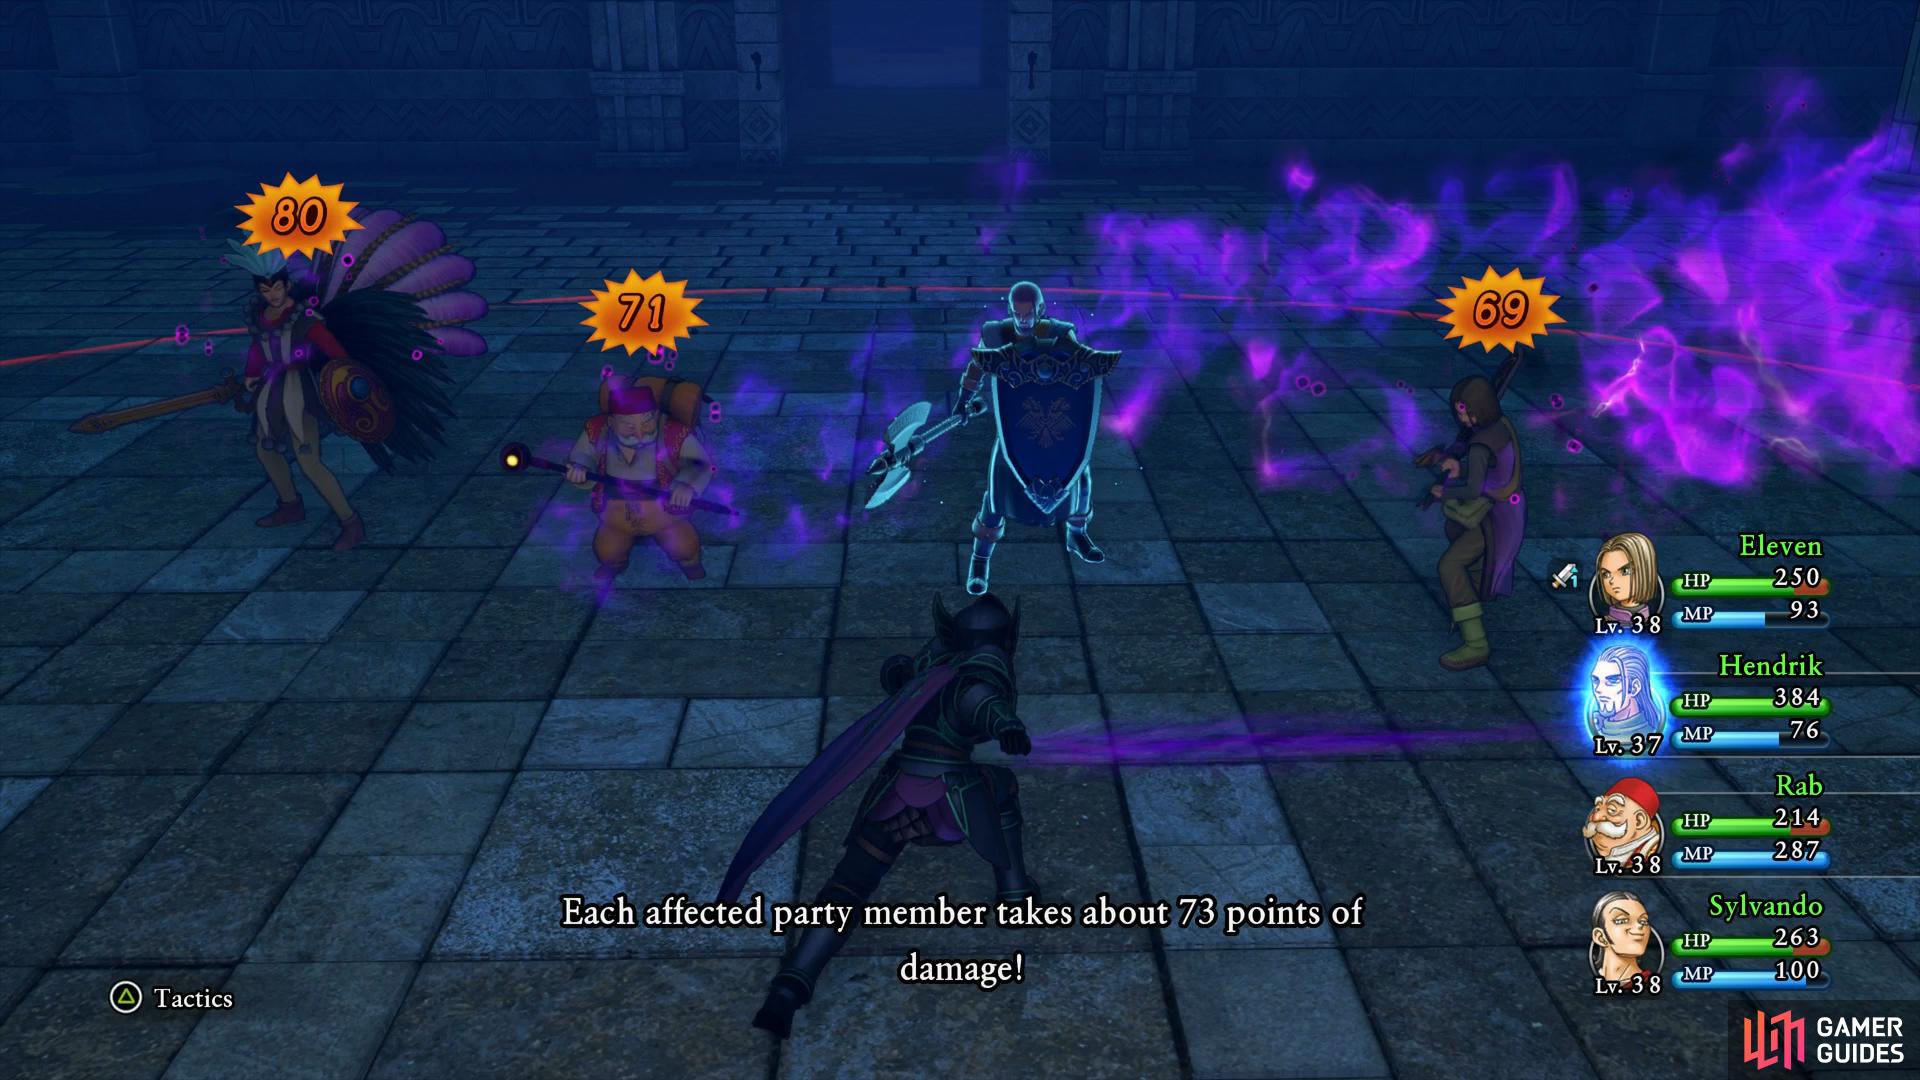

Darkness Wave will hit the entire party for around 70+ HP (left), remove Curse with Rab as soon as possible. (right)
As for attacking the Restless Knight, Sap or Helm Splitter him to decrease his defense and then use Sylvando to Oomph the Hero. Unbridled Blade will hit for over 600 HP at this point and four of them will kill him outright. Pearly Gates is effective from Rab if you get the chance to cast it as is Parallax from Hendrick, leave Sylvando to Oomph or Hustle Dance duty.
Following your victory, it turns out the Restless Knight is in face King Irwin, the last King of Drundrasil and the father of the Hero. When you regain control, examine Irwin and move in closer to be whisked away.
Dundrasil Castle
| Items | Area |
|---|---|
| Wakerobin | Middle Floor, Banquet Hall, pot |
| Wakerobin | Middle Floor, Banquet Hall, pot |
| Special Antidote | Middle Floor, eastern room, pot |
| Sage’s Elixir | Top Floor, Lord Robert’s Bedchamber, wardrobe |
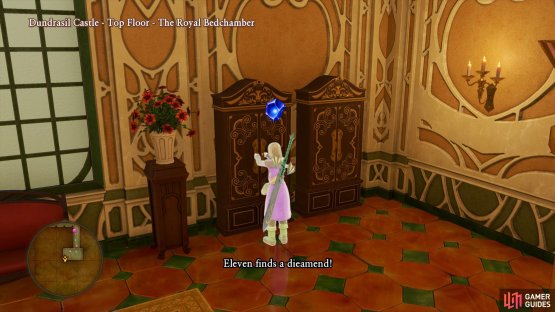
| Dieamend | Top Floor, Royal Bedchamber, wardrobe |
| Special Medicine | Bottom Floor, south room, barrel |
You’ll find yourself in the past of Dundrasil on the day the four great leaders meet to discuss the birth of the Luminary. Once you regain control in the Banquet Hall, check out the northwest and southeast corners to find some pots to smash, inside you’ll obtain two Wakerobins. Leave the Banquet Hall and head over to where the King’s are conversing before heading across the gardens and into the eastern room here to find more pots in the corner to smash containing a Special Antidote.
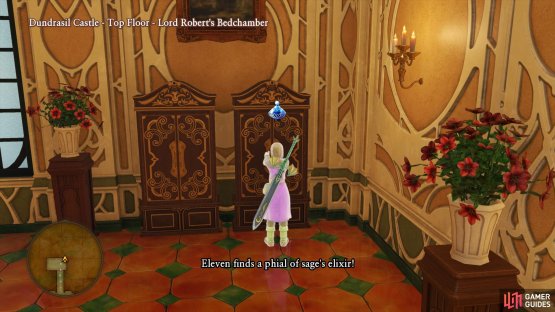
(1 of 2) You’ll find a Sage’s Elixir in Lord Robert’s room


You’ll find a Sage’s Elixir in Lord Robert’s room (left), along with a Dieamend in the Royal Bedchamber. (right)
Take the stairs to the Top Floor and go into the Throne Room where you’ll find another two rooms you can enter. Go inside the northern room first and search in the wardrobe for a Sage’s Elixir. Head into the Royal Bedchamber next to find Queen Eleanor and Jade with the baby. When you regain control, search the wardrobes in the corner to find a Dieamend and then make your way over to the Council Chamber. You’ll witness firsthand the Colloquy from the intro as the King’s discuss the future of Erdrea now the Luminary is born into the world. Just as matters seem settled, disaster strikes as the monsters begin their attack on Dundrasil.
As you regain control, race out of the room and following the event, make your way back to the Throne Room. Follow the King down to the Bottom Floor as they realise the front door is too risky, leaving the tunnels as the only means of escape. Head into the southern room first to find a barrel containing the final item, a Special Medicine. Enter the northern room now and follow the King into the tunnels below where you will eventually run into the King again. When you’re ready, examine the monsters standing in front of you to help Irwin fend them off. Quadraslash is useful here allowing you to hit all of the monsters at once.
Follow Irwin as he attempts to reach King Carnellian as you witness the moment Mordegon takes control of him. You’ll find yourself back in present time, make sure to recover your HP and MP before interacting with the beast in front of you.
Boss: Gloomnivore

The Gloomnivore is a tough boss with many damaging attacks that sits with around 2750 HP. His Nightmarish Sigh will hit the whole party for around 70HP each and will increase by more when he increases his attack. On the plus side, this decreases his Defense too which saves you the trouble of reducing it with Sap. Have Rab reduce his attack with Blunt and this skill will actually be to your benefit.
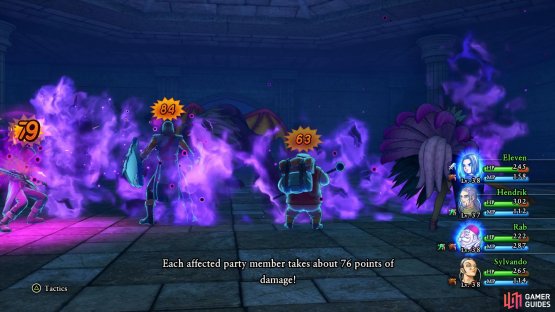
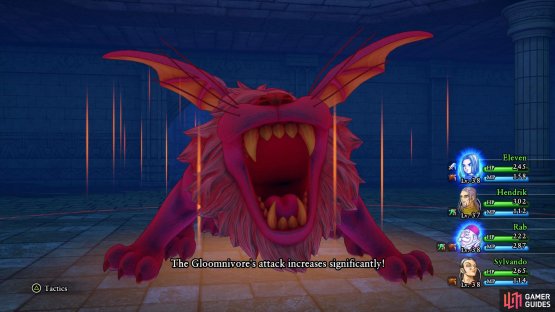
(1 of 2) Nightmarish Sigh hits the party for over 70 HP


Nightmarish Sigh hits the party for over 70 HP (left), this can be increased further when he goes on the Offensive. (right)
With the decrease in Defense, the Hero with Oomph will deal devastating damage to Gloomnivore with Unbridled Blade. Gloomnivore is also susceptible to Paralyze so Parallax will be useful and like always, let Sylvando heal the party with Hustle Dance. If you manage to get Paralyze to land, you’ll whittle Gloomnivore down in no time with no threat at all.
Once the Gloomnivore defeated, Irwin is at last free from his nightmare and will meet his son before he departs with Queen Eleanor to the afterlife.

The Hero’s Character Builder will expand at this point, with the Swordmastery tree getting access to the most powerful skills and the Luminary tree being expanded massively. You have a couple of options for how you want to build him for now, you can continue to progress and unlock the highest Giga based spell for Swords or Greatswords or you can dabble in the Luminary tree. To the right of the tree you’ll find spells such as Fullheal and Omniheal while to the left you’ll find Zapple and Kazap, two very powerful spells. For now, consider unlocking the mystery panel in the center of the Luminary tree, Pep Up, which will allow you to induce the Pepped Up state for the Hero at any time.
Dundrasil Region
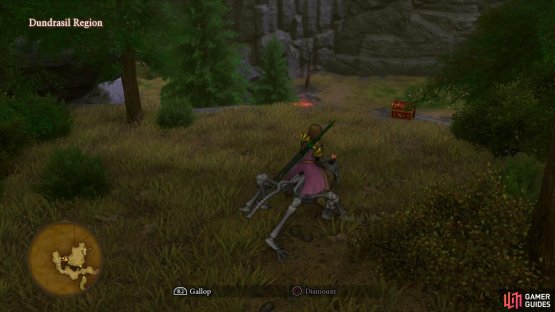
Rest up and save your game before heading north in the direction of Octagonia. Continue north at the intersection and defeat a glittering Vicious Demonrider to mount it. Climb the nearby wall to find a Sparkly Spot containing Molten Globules and then while still mounted, head back to the intersection and take the eastern path. You’ll reach another intersection shortly after, head west and follow the path to the end to find another wall to climb.
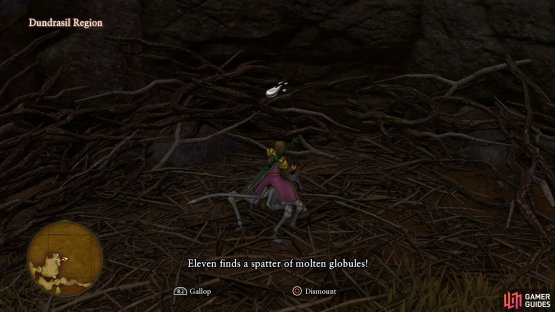
(1 of 2) Use the Demonrider mount to reach this Sparkly Spot in the northeast


Use the Demonrider mount to reach this Sparkly Spot in the northeast (left), while you’ll find a chest to the northwest. (right)
Follow this path to a Sparkly Spot containing a Brighten Rock before climbing down the nearby wall to reach a chest containing a Mini Medal. Drop back down and follow the path back towards Octagonia where you’ll run into a man who will let you know about a woman who may be of particular interest to the party. Follow the brothers north and into the town of Octagonia.
Octagonia
You’re greeted at the entrance by a monster which fills you in on the current state of the town. Octagonia is a monster paradise with a brand new Casino on the Upper Part. Check out the Weapons shop to begin with, the Sage’s Staff is a nice upgrade for Rab as is the Obliteratoriser for Hendrick if he’s using Axes.
Save your game at the nearby Goddess Statue and then head up the stairs to the new Casino. This rather strange Casino will present you with 2000 free Tokens at the Exchange shop, be sure to take her up on the offer and then hit the 100 Token slots. You’ll notice very quickly that your luck has increased tenfold and you’re hitting Jackpot after Jackpot. Don’t be fooled by this, as the Casino is a scam to bait customers in, the Prizes on offer aren’t anything great.

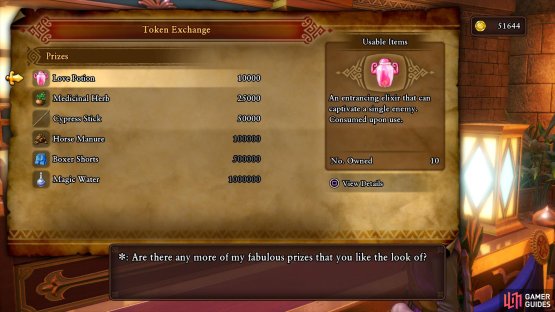
(1 of 2) Don’t be duped by the sudden surge in luck


Don’t be duped by the sudden surge in luck (left), the prizes are worthless except for the Love Potions. (right)
The Items on offer at the Prize Counter is a Love Potion, Medicinal Herb, Cypress Stick, Horse Manure, Boxer Shorts and finally, Magic Water. As you can see, none of these items are of value other than the Love Potion. This is used in some Recipes (such as the new costume set for Sylvando) and you’ll need one to reach the VIP area too so spend all your Tokens on a batch of these.
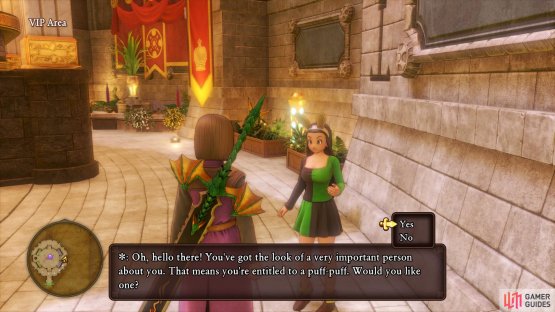
Head over to the Dracky near the stairs and present him with a Love Potion to gain access to the VIP area. Before you head up, be sure to have lots of MP healing items on Rab, the Hero and Sylvando, you’ll need them. As you’re escorted to the middle of the area you’ll encounter a rather changed Jade who, when prompted, attacks you.
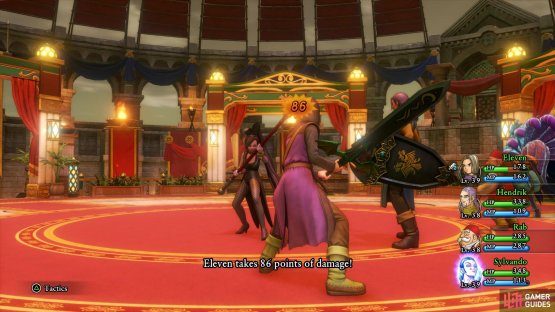
Boss: Jinxed Jade

Jade is no pushover and will make full use of her alluring abilities to assault the party. Like all bosses at this point, she will attack twice a combat round and her attacks hit for around 80 HP or more depending on your gear. She can target a single person or a group with her spear attacks and Sexy Beam will hit hard for over 130 HP so make sure you keep your HP up. She has around 1800HP herself so if you can Sap her, you’ll be able to take her down fairly quickly. Finally, she can use Puff-Puff which has the possibility of Charming someone.
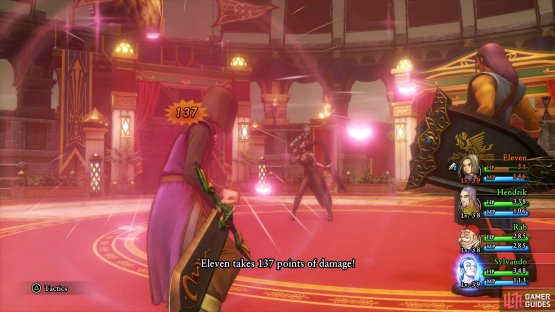
(1 of 2) Jade’s regular attacks hit hard


Jade’s regular attacks hit hard (left), as does the damaging Sexy Beam. (right)
Sylvando should have learnt Oomphle by now, be sure to use it on the Hero to let him use Unbridled Blade and then return to Hustle Dance. Let Rab cast Blunt and Sap like always and Hendrick can make use of Parallax to deal hefty damage too.
Following your victory, you’ll be introduced to the Spectral Sentinel in charge of this charade, Booga. After his revelation that the monsters in Octagonia were once humans, you’ll be thrust straight into another boss.
Boss: Booga

Hopefully you was able to take Jinxed Jade down without losing too much HP or MP as you’ll enter this battle in the exact same state as you were in at the end of that battle. Booga is a tough battle as he has the ability to easily Charm your party members as well as steal large amounts of MP from the party. If Sylvando is unaffected by Charm then make sure he uses Sobering Slap to free the person under the spell. Booga has around 3200 HP so it’ll take a while to kill him, Blunt and Sap are absolute musts for this battle and Sylvando will be on permanent Hustle Dance/Sobering Slap duty.

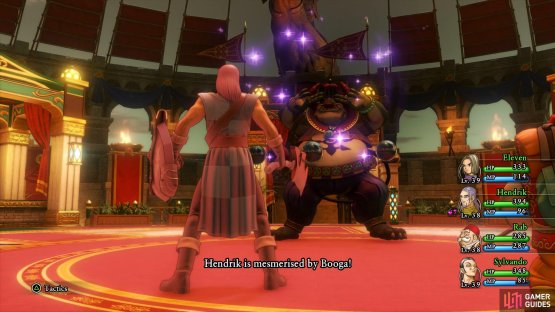
(1 of 2) Giga Mega Drain will siphon massive amounts of MP from the entire party.


Giga Mega Drain will siphon massive amounts of MP from the entire party. (left), Sobering Slap anybody who is hit with Mesmerise (right)
On top of all this, Booga will use Seductive Dance that can cause the entire party to dance if you’re unlucky. His other attacks consist of a Swirling Cyclone that will hit for around 45 HP to the entire party and regular attacks that hit hard at around 90+ HP. Your method of attack should be no different from the past few boss battles, Sap the boss followed by Oomphle on the Hero and Unbridled Blade. Hendrick can contribute once the boss is sapped with Parallax too. If you find yourself low on MP, dish out the items that you should have stocked beforehand, MP management is a large factor in determining your victory.
Following your victory, Booga’s spell weakens and reverts everybody in Octagonia to their human forms, Jade included. As jade enacts her revenge, you’ll obtain the Green Orb once more. Jade will rejoin the party at this point along with the very useful Re-Vamp and an extended Character Builder. On top of all this, you’ll obtain Lorelei’s Harp once more allowing you to access the Outer Sea.

Equip Jade with the best gear you have for her and then take a look at her Character Builder. Once you’ve grabbed Lightning Thrust, begin heading up the Fisticuffs tree towards the mystery panel to the right of Miracle Moon, this is one of her most damaging attacks. Before you leave Octagonia, there’s a hidden quest for you to complete and a new Casino to make use of. Head up the stairs towards the Casino and speak to the small girl there and agree to help her get a statue from Richie in the Casino.

Talk to this girl near the entrance to the Casino to begin a hidden quest.
Octagonia Casino
| Items | Tokens |
|---|---|
| Love Potion | 100 |
| Sage’s Elixir | 1000 |
| Bow Tie | 3000 |
| Your Very Own Aegis of Illusions | 5000 |
| Molten Globules | 20000 |
| Cheat Sheet | 30000 |
| Imp Knife | 60000 |
| Scandalous Swimsuit (Costume) | 70000 |
| Fire Ball | 80000 |
| Twinkling Tuxedo | 200000 |
| Shimmering Dress | 200000 |
| Happy Hat | 300000 |
| Gringham Whip | 750000 |
As you can see from the Prize list, there’s a large amount of Prizes to claim at this Casino. With the addition of Roulette on the top floor, you can now earn Tokens at a larger rate and the Prize list reflects it. Notable prizes are the Recipe Book and the Imp Knife (which can’t be obtained anywhere else), the rest of the items can be considered luxuries however do note that the Scandalous Swimsuit is a costume for Jade and if you wish to obtain the Platinum Trophy, you’ll need to get this at some point. The Gringham Whip is a great whip that deals full damage to all enemies however Whips in general are not as useful as the other weapons in the game.
Make your way up to the VIP area and head around to the east of the bottom to find your next Puff-Puff girl. Head over to Richie at the 200 Token Roulette table and speak to him to begin Quest 35 - Richie’s Rock-Hard Roulette Challenge. You’ll need to win the Jackpot on one of the Roulette tables to complete this quest, a task not easily accomplished. The best way to go about this is by speaking to the woman near the Jackpot Tower and wait for her to say “I have a feeling someone’ll be winning the whole pile before long!”. If she says anything different, head to the Inn to rest and return the next day, keep repeating it until you get that line.
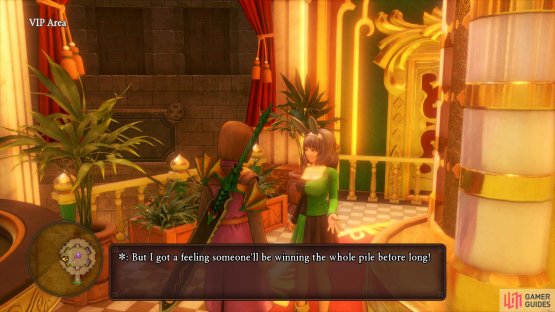
(1 of 2) You’ll find the next Puff-Puff girl in the VIP area


You’ll find the next Puff-Puff girl in the VIP area (left), once you start the quest, look for this line from the Jackpot Bunny Girl. (right)
Once you get the line, exit to the previous screen and return to create an autosave. You now want to play on any of the tables and there’s a few ways you can go about betting. You can put a bet on every number on the table if you have enough Tokens, you won’t win anything for a non Jackpot spin but you’re guaranteed to not lose any either. The alternative is to bet on the numbers 12 and 14, the Roulette table at times favors these numbers and before long you’ll have your Jackpot. Once you do, speak to Richie to obtain the statue needed for the girl and complete the quest and obtain a Vest for Success.
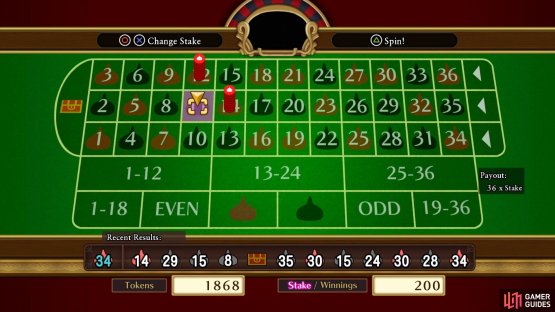
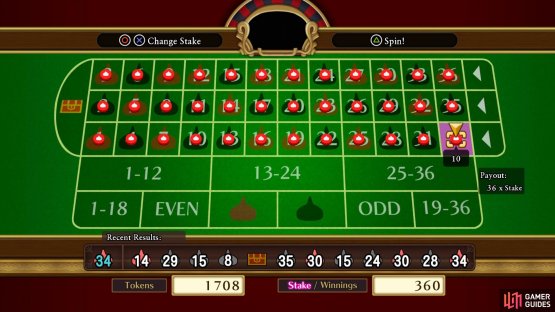
(1 of 2) Try betting on just 12 and 14


Try betting on just 12 and 14 (left), or placing a bet on every number to help you hit the Jackpot. (right)
Once you’re satisfied with gambling for now, Zoom back to Zwaardsrust (Sea) and navigate towards The Strand.
No Comments