
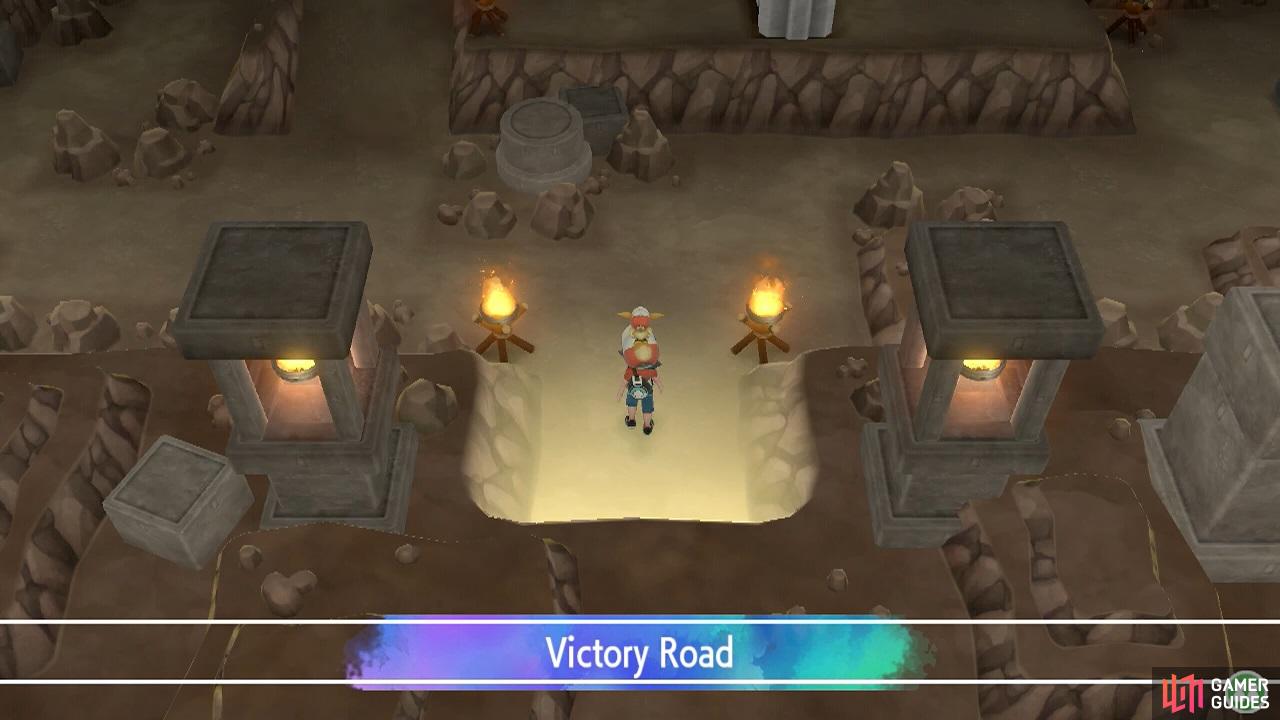
Victory Road separates the weak from the strong.
Wild Pokémon
| Pokémon | Type | Location | Chance (%) |
|---|---|---|---|
 Rhydon Rhydon |
Ground/Rock | Cave | 5 |
 Rhyhorn Rhyhorn |
Ground/Rock | Cave | 10 |
 Onix Onix |
Rock/Ground | Cave | 10 |
 Machoke Machoke |
Fighting | Cave | 15 |
 Machop Machop |
Fighting | Cave | 10 |
 Graveler Graveler |
Rock/Ground | Cave | 15 |
 Geodude Geodude |
Rock/Ground | Cave | 10 |
 Golbat Golbat |
Poison/Flying | Cave | 15 |
 Zubat Zubat |
Poison/Flying | Cave | 10 |
 Chansey Chansey |
Normal | Cave | Rare spawn (1F) |
 Hitmonlee Hitmonlee |
Fighting | Cave | Rare spawn (2F) |
 Hitmonchan Hitmonchan |
Fighting | Cave | Rare spawn (3F) |
Victory Road is the final test for a Pokémon trainer before they can say they’re ready to challenge the Pokémon League. There are many tough Pokémon trainers inside, so you’ll need to bring your A-game. Oh and it wouldn’t hurt to bring along some recovery items and Ultra Balls etc.
Floor 1F
Start by heading east. Soon, you’ll stumble upon a stone block right next to a switch embedded in the floor. Use Strong Push to shove the stone block one space right, so it falls on the switch. This will cause the big stone gate near to the left to fall down. Return towards the entrance, then go up the slope to the left, to reach higher ground.
Head east past the fallen stone gate, then carry on north for a bit. After you go in-between two flame torches, there will be two paths: left and right. Go right first. After going down the slope, there’s a Coach Trainer near the bottom-right corner.
Coach Trainer Alemana
| Pokémon | Level | Type |
|---|---|---|
 Ditto Ditto |
49 | Normal |
Depending on what Pokémon you send out, this could be a pretty tricky fight. For those unaware, Ditto’s gimmick is that it can use Transform to completely copy your Pokémon. If you’re prepared, you can make this a joke battle by putting something like  Magikarp up front. Otherwise, you’ll need to figure out your own Pokémon’s weakness.
Win the mirror match and you’ll receive 10 Partner Candies. The Pokémon League is just around the corner, so don’t hesitate to stuff your partner  Pikachu or
  Eevee with them. Anyway, continue towards the north-east corner of this floor. Around here, there’s a stone block and two items on the other side of the stone block.
If you look carefully, you should realize you can only obtain one of the items, depending on if you push the stone block all the way left, or left and then up. For your information, the item near the top is TM56 Stealth Rock. This damages opposing Pokémon that switch in. Meanwhile, the other item is a Leaf Stone.
Now if you’re only planning to grab one item, you should grab the TM. Otherwise, you can exit this floor after grabbing the first item and then re-enter. This will cause the stone block to return to its original position, so you can push it a different way. To be honest, the Leaf Stone probably isn’t worth going back, unless you’re a completionist.
After that, go back and head left. You’ll have to battle your way past an Ace Trainer.
Ace Trainer Naomi
| Pokémon | Level | Type |
|---|---|---|
 Kangaskhan Kangaskhan |
47 | Normal |
 Venusaur Venusaur |
48 | Grass/Poison |
Kangaskhan is a fairly well-balanced Pokémon. Naomi’s can use Dizzy Punch for STAB and to potentially inflict Confuse, Sucker Punch to potentially go first and damage Ghost-types, and Outrage to deal heavy neutral damage to most foes. Fighting-types are ideal.
Next is Venusaur, which is a fully evolved  Bulbasaur. It’s weak to Fire, Flying, Ice and Psychic. For attacks, it can use STAB Sludge Bomb, and Solar Beam, an incredibly strong attack but requires a turn to charge. If you’re sneaky, you can use Protect to fend off Solar Beam.
Past Naomi, go down the slope towards the west side. Down below, there’s a stone block that you can push to create a shortcut back to the entrance. Hopefully you don’t need to leave just yet. If you want to keep going, head north. To the right, there’s a male Ace Trainer looking left and up. Past him are 3 Ultra Balls.
Ace Trainer Rolando
| Pokémon | Level | Type |
|---|---|---|
 Rapidash Rapidash |
47 | Fire |
 Victreebel Victreebel |
48 | Grass/Poison |
 Starmie Starmie |
47 | Water/Psychic |
Rolando has a pretty balanced team. His Rapidash is an evolved  Ponyta with pretty high Speed. It can use Flare Blitz to deal heavy STAB damage at the cost of inflicting damage to itself. A Water or Rock-type would be ideal.
Next can be Victreebel, a fully evolved  Bellsprout. This carnivorous plant is weak to Fire, Flying, Ice and Psychic. For attacks, it can use STAB Power Whip and Sludge Bomb, and Sucker Punch to sneak in the first attack and hurt Psychics.
Finally, he has a Starmie to complete the Fire, Grass, Water triangle. Just in case, it’s weak to Grass, Electric, Bug, Ghost and Dark. It can use STAB Surf and Psychic. Plus Dazzling Gleam to hurt Fighting and Dragon-types.
After that, go up the ladder in the top-left corner.
Floor 2F (main)
You should be glad that Kanto’s Victory Road is one of the more simpler ones.
On the next floor, head south towards the south-west corner. There will be a stone block not far from a switch. Approach the block from its right, then use Strong Push to shove it left one space, down one space and then left onto the switch. The stone gate to the north-east will go down. Easy peasy. Go up towards the fallen stone gate. You’ll need to battle.
Juggler Nelson

Nelson has brought along an evolved Drowsee. This hypnotic Psychic-type can use STAB Psychic. Otherwise, it can use Hypnosis, followed by Dream Eater to steal your sleeping Pokémon’s HP. Use a Dark-type if you’ve got one. Otherwise, just try to keep your Pokémon awake.
Then we’ve got  Slowbro, an evolved
  Slowpoke. Like it’s unevolved form, it’s weak to Grass, Electric, Bug, Ghost and Dark. Nelson’s Slowbro can use STAB Surf and Psychic. If you don’t have a super-effective Pokémon for some reason, try to use a special attacker.
After Nelson’s dropped his balls, carry on east along this section of higher ground. But as you get close to the nearby corner, be wary of a Black Belt looking up and right.
Black Belt Daisuke
| Pokémon | Level | Type |
|---|---|---|
| Hitmonless | 47 | Fighting |
 Poliwrath Poliwrath |
47 | Water/Fighting |
Daisuke leads with the high-kicking Hitmonlee. This one can use Hi Jump Kick, a powerful STAB move that injures the user if it misses. Plus Feint to try and go first, and Mega Kick for more reliable but weaker damage. Psychic or Fairy-types would be great here; Ghosts too.
Poliwrath is a fully evolved  Poliwag that’s gained the Fighting-type. It’s weak to Grass, Electric, Flying, Psychic and Fairy. Daisuke’s Poliwrath can use STAB Waterfall and Brick Break. Plus Body Slam, which can paralyze.
Further east, there are two slopes leading south. It doesn’t matter which one you go down. Back on lower ground, follow the cavern west for a bit. Around here, there’s a switch but no stone block in sight. Above the switch, check out the corner to find TM45 Solar Beam. This is a potent Grass-type move, but requires a turn to charge. So it’s very risky.
Afterwards, head east towards the south-east corner of this floor. Along the way, you’ll go past a stone gate blocking a ladder. When you reach the south-east corner, follow the path anti-clockwise. When the path widens, there’s a Tamer in the middle who rotates around. To his south-west is a Full Restore by the corner.
Tamer Vincent
First up is  Primeape, an evolved
  Mankey. This angry simian can use Low Kick for STAB, and U-Turn to hurt Psychic-types and switch out. It can also use Screech to lower Defense. Flying and Fairy-types would be fantastic here.
Then we’ve got  Tauros, a deceptively strong physical attacker. This one can use Double Edge and Thrash to deal lots of damage, but with their own drawbacks. All of its moves are Normal-type, so you could field a Ghost-type if you want an easy battle.
To Vincent’s north-east is the ladder to the next floor. Before going that way, continue north along the left side. Then make your way towards the north-east corner of this floor. Before you can reach the corner, you’ll have to battle a Juggler.
Juggler Gregory
Gregory has two Pokémon that Sabrina used. His  Mr. Mime is weak to Ghost, Poison and Steel. Which are fairly obscure Types. It uses Psychic as its main attack, and can use Light Screen and Reflect to reduce the damage it takes.
Meanwhile, his  Alakazam is a fully evolved
  Abra. This genius Psychic-type can use Psychic for STAB, and Shadow Ball to hurt other Psychics, as well as Ghosts. A Dark-type would be perfect here. Failing that, you can focus your physical attackers on it.
Past Gregory, scoop up TM49 Superpower above the ladder. Superpower is an extremely powerful Fighting-type move, but it lowers the user’s Attack and Defense afterwards. Unless you’re sure you can KO the foe with it, it’s probably not worth using–and it’ll hurt you in the long run. In any case, climb up the ladder near Tamer Vincent.
Floor 3F (main)
You’re making fine progress!
You’ll start near the center of the floor. First, head north. Soon, there will be two paths: left and right. Go right first. Over here, there’s a male Ace Trainer guarding a Max Revive above a stone pillar.
Ace Trainer George
 Scyther is weak to Fire, Electric, Flying and Ice, and exceptionally weak to Rock. George’s Scyther can use STAB X-Scissor, and Brick Break to hurt Ice and Rock-types. Flying-types are the safest choice, followed by Fire and Electric.
 Marowak is an evolved
  Cubone, as you probably know. This one can use STAB Bonemerang, Iron Tail to hurt Ice, Rock and Fairy-types, and Double Edge to handle other targets. Water and Grass-types are recommended. Most Flying-types should be more than OK.
Go back and head west instead. Pay attention to the northern-most wall. A short distance from where the path branched out, there’s a little bit of water flowing out of the wall. Search around here to find some hidden Fresh Water. Don’t ask if the water is safe to drink.
Just below the police lady is a stone block. Go past it for now. To the south is TM51 Blizzard. This is a very powerful Ice-type move, but it has somewhat low Accuracy. If in doubt, use Ice Beam. Return to the stone block. Face the stone block from below and shove it up one space. Then go to its right side and push it left two spaces.
You probably know what’s coming next. Push the stone block one space down, then 4 spaces left. If you push it 5 spaces left, that’s fine. Next, push it down 3 spaces. Finally, push it right so it goes on top of the switch. If the stone block gets stuck, go down the nearby ladder to reset its position. Anyway, this will lower the stone gate further south.
Now go down the ladder to the north of the switch.
Floor 2F (north-west)
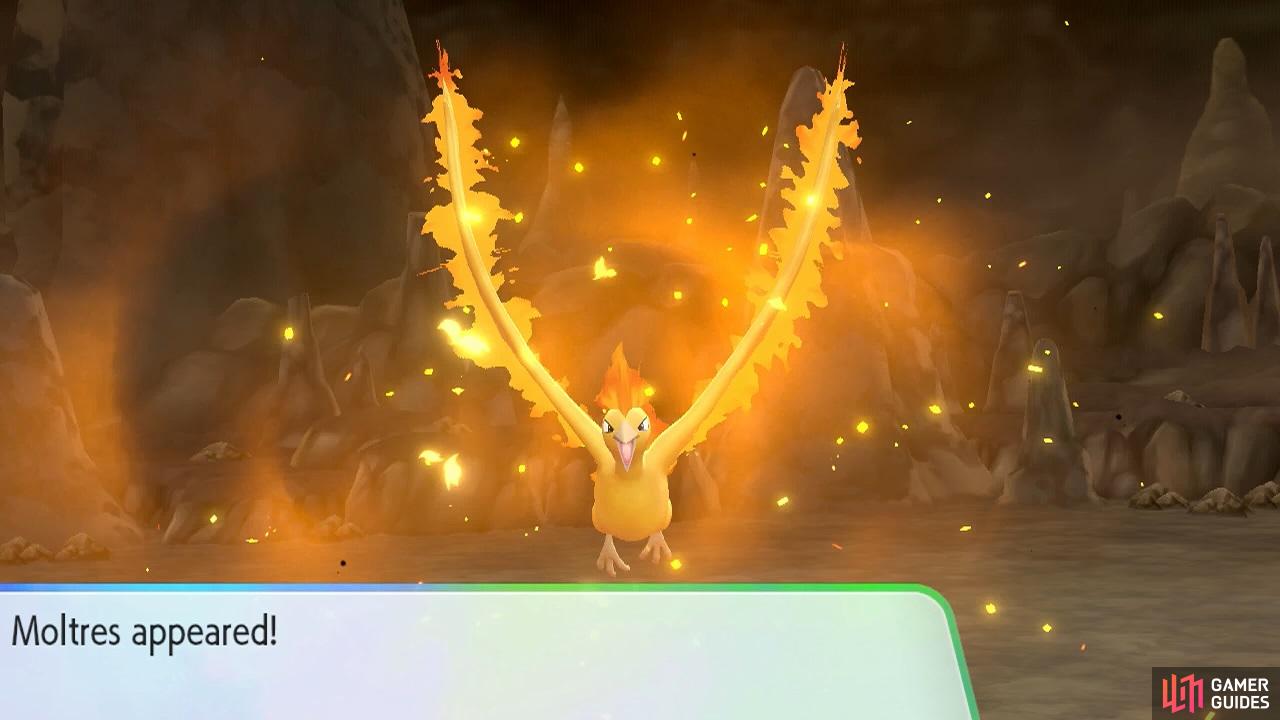
You’ll arrive in an isolated part of the 2nd floor. Head east. There will be a slope leading up to the Legendary Bird  Moltres. Before approaching it, search the stone pillar to the left of the slope for a hidden Pretty Wing. We’re guessing this belonged to Moltres. Also, south from the slope is a PP Max in plain sight.
Legendary Pokémon: Moltres
| Pokémon | Level | Type |
|---|---|---|
| Moltres |
50 | Fire/Flying |
Moltres is the third and final member of the Kanto region’s Legendary Bird trio. If you’ve only counted two Legendary Birds in your collection, you’re probably missing  Zapdos from the Power Plant. Anyway, Moltres is probably the second best, but suffers from a big weakness.
At the start of battle, all of Moltres’s stats will go up. By default, it has high Special Attack, so its attacks are going to hurt some. Speaking of, it can use STAB Flamethrower, Heat Wave and Air Slash. Plus Agility to greatly increase its Speed.
Now for the important information. Moltres is weak to Water and Electric, and takes massive damage from Rock. Rock-types are strongly recommended here, not just for their damage output, but because they resist both Fire and Flying. Talk about an easy decision!
Even after Moltres’s flames have gone out, you’re not finished just yet. As you need to catch the flaming turkey. If you’ve caught  Articuno and/or Zapdos, there’s nothing more for you to learn. Moltres has a tendency to fly around, but it will go back towards the center eventually.
We haven’t seen Moltres run yet, so you can wait until it’s in the center, then unleash all your Ultra Balls. Don’t forget you can use Razz Berries to make things easier. Plus you could even summon Player 2. Even if Moltres does run, if you saved earlier, you can easily redo the battle.
Floor 3F (main; again)
Having caught Moltres or otherwise, return towards the ladder near the center of the third floor. Then head west. Nearby, there’s a bunch of rocks. Search the rock in the middle of the formation to find some hidden candy. Next, head up the nearby slope to reach higher ground. You’ll need to battle a female Ace Trainer.
Ace Trainer Alexa
| Pokémon | Level | Type |
|---|---|---|
 Dragonair Dragonair |
47 | Dragon |
| Hitmonchan |
48 | Fighting |
 Wigglytuff Wigglytuff |
47 | Normal/Fairy |
Alexa opens with Dragonair, an evolved  Dratini. This elegant Dragon-type can use STAB Dragon Pulse, plus Surf. Fairy-types are obviously ideal. But if you don’t have one, you should be fine since it’s not fully evolved.
Next can be Hitmonchan. This fast-punching Fighting-type can use Fire, Thunder and Ice Punch. Plus Feint to try and attack first. Psychic and Fairy-types are your best bets. Otherwise just try and hit it hard and fast.
Finally, Wigglytuff is an evolved  Jigglypuff. This pink fluffball is weak to Steel and Poison. We know not everyone has those, but don’t worry since it’s not super strong. For attacks, it can use STAB Dazzling Gleam, plus Shadow Ball and Psychic.
Once she’s dust, go west. When you reach the nearby corner, be sure to grab the Max Potion by the flame torch. Then travel south. You should reach the stone gate that you lowered earlier. Head down the slope to go back to lower ground. You’ll be near the south-west corner of this floor. Go east now.
However, be mindful of a pair of Ace Trainers along the middle of the path. The one at the top is facing right, while the one below is facing left. It’s possible to avoid one of them, but you can’t avoid the other. We’ll cover the female trainer first, then the male one.
Ace Trainer Caroline
Caroline’s  Jynx can use STAB Ice Beam and Psychic. Plus Lovely Kiss to put the target to Sleep. It’s weak to Fire, Rock, Bug, Ghost, Dark and Steel. So you’re spoilt for choice.
Next can be  Arcanine, an evolved
  Growlithe. This fabled Fire-type can use STAB Flare Blitz, Crunch to hurt Psychics and Ghosts, and Outrage to deal neutral damage to most Types. Go with Water or Rock if possible.
Finally, Golbat… actually, it’s probably been a while since we’ve seen one. This evolved Zubat is weak to Electric, Rock, Ice and Psychic. It can use STAB Air Slash, and Leech Life to feast on Psychics. Rock is a solid choice, pun not intended.
Ace Trainer Colby

| Pokémon | Level | Type |
|---|---|---|
 Electrode Electrode |
47 | Electric |
 Kingler Kingler |
47 | Water |
 Pidgeot Pidgeot |
47 | Normal/Flying |
| Rhydon |
48 | Ground/Rock |
Colby leads with Electrode, an evolved  Voltorb. This speedy Electric-type can use a powerful STAB Thunder, which is liable to miss, and Swift, which never misses. Ground-types are essential for a headache-free battle.
Next can be Kingler, which is evolved from  Krabby. This one can use STAB Crabhammer, X-Scissor to damage non-Poison Grass-types, and Superpower to crush Normal, Steel and Dark-types. Grass/Poison-types are ideal.
Pidgeot is a fully evolved  Pidgey. Colby’s Pidgeot can use STAB Air Slash, plus Hyper Beam for massive damage, but makes it immobile the following turn. Rock-types are recommended; Electric and Ice are also good.
Finally, we have Rhydon. This evolved Rhyhorn is weak to Ice, Fighting, Ground and Steel, and massively weak to Grass and Water. It can use Earthquake for STAB, Fire Punch to melt Ice and Steel, and Ice Punch to hit Ground and Grass. Go with Water if you can.
Before moving on, pick up the 5 Golden Nanab Berries to the north-east of Ace Trainer Caroline. Then keep going until you reach the south-east corner of the floor. You should find a stone block right next to a hole. While Strong Push is active, shove the block into the hole. Then fall down the hole yourself.
Floor 2F (main; again)
You’ll drop near the south-east corner of the second floor, with the stone block on your left. This is slightly repetitive, but keep pushing the stone block all the left. If you recall, there’s a switch in that direction. Once the stone block finally reaches its destination, the stone gate towards the east will lower.
Go up the nearby slope and head east, past the lowered gate. You’ll have to battle a weirdo–sorry, an enthusiast–to get past.
Poké Maniac Dawson
 Lickitung is nothing to really shout home about. Dawson’s Lickitung can use STAB Slam, plus Power Whip to hurt Rock-types. It’s got nothing on Fighting-types. Otherwise, anything not weak to Grass should be fine.
Meanwhile his Onix is weak to Ice, Ground, Fighting and Steel, and doubly weak to Water and Grass. This one can use STAB Rock Slide and Earthquake, and Iron Tail to damage Ice-types. The other Types listed should do great.
Then we’ve got  Blastoise, a fully evolved
  Squirtle. This dual-barrelled Water-type can use STAB Hydro Pump, Aqua Jet to try and go first, and Flash Cannon to surprise Ice and Fairy-types. Stick with Grass or Electric.
Past Dawson, go up the ladder.
Floor 3F (south-east)
You’ll arrive in a small corner of the third floor. From the ladder, grab the Full Restore just below. Then head north. Over here, you can battle a Coach Trainer.
Coach Trainer Ryan
Ryan has a pretty competent team. All of his Pokémon can use Outrage to deal heavy neutral damage to most targets. His Primeape can also use Brick Break for STAB and to shatter barriers. Fairy-types are ideal, while Psychic and Flying are very good choices.
Next can be  Gyarados, which is evolved from the pitiful Magikarp. This ferocious specimen is weak to Rock and exceptionally weak to Electric. Besides Outrage, it can use Waterfall for STAB and to cause flinch. Electric-types are recommended.
Arcanine is an evolved Growlithe, which you should have already battled here. Ryan’s Arcanine can also use Flare Blitz to deal heavy STAB damage, but causes damage to itself. We suggest switching in a Water or Rock-type just to be safe.
Finally, we have Tauros, a fairly reliable Normal-type. In addition to Outrage, it can use Thrash, which is the Normal-type equivalent (and the original version, to boot). Fighting-types are great, or you could wall it with a Steel-type.
Put up with Ryan’s outrageous Pokémon and he’ll gift you with TM39 Outrage. This move is great for slaying Dragon-types, but beware that you’ll be locked into it for 2-3 turns and it’ll cause confusion to the user afterwards. In any case, go down the ladder near Coach Trainer Ryan.
Floor 2F (east)
After going down the ladder, search the right side of the nearby flame torch for some hidden candy. Then continue east to reach the exit.
Route 23
Outside, you’ll be back on Route 23. Make your way north from here. You’ll reach an area lined by Poké Ball statues. Keep going and a cutscene will play. Afterwards, climb up the stairs up ahead.
No Comments