| Item List | Item List Cont |
|---|---|
| Apprentice’s Amulet | Ring of Study |
| Blackened Heartwood Staff | Rod of Fire |
| Buckle of the Winds | Rod of Fire Request Form |
| Charm of Still Waters | Shimmering Orb of Light |
| Ephemeralist’s Belt | Signed Rod of Fire Request Form |
| Fade Striders | Spirit Charm |
| Iced Band | Valor’s Staff |
| Laboratory Storage Key | |
| Mage Robes | |
| Magic Staff |
| Codex | Codex Cont |
|---|---|
| 062 Andraste: Bride of the Maker | 083 The Cardinal Rules of Magic |
| 063 The Rite of Annulment | 084 Blood Magic: The Forbidden School |
| 065 The Black City | 085 The Four Schools of Magic: Creation |
| 066 The Chant of Light: The Blight | 086 The Four Schools of Magic: Entropy |
| 068 The Maker | 087 The Four Schools of Magic: Primal |
| 073 The Founding of the Chantry | 088 The Four Schools of Magic: Spirit |
| 074 The Fraternity of Enchanters | 089 Beyond the Veil: Spirits and Demons |
| 075 Hierarchy of the Circle | 090 The Tranquil |
| 076 History of the Circle | 154 The Tevinter Imperium |
| 077 The Fade | 158 The Grey Wardens |
| 078 The Harrowing | 169 Duncan |
| 079 Lyrium | 174 Knight-Commander Greagoir |
| 080 Maleficarum | 177 First Enchanter Irving |
| 081 Mana and the Use of Magic |
Requirement : Human/Elf, Mage
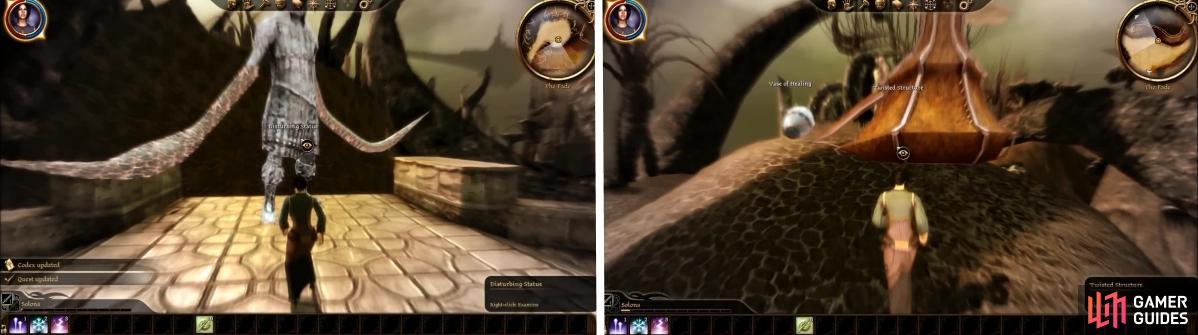
After the intro and some discussion you are thrust into the Fade to perform the Harrowing. You gain the quest “ The Harrowing “; check the vase of healing to find a Shimmering Orb of Light and the disturbing statue for Codex 089: Beyond the Veil: Spirits and Demons . Head to the south to encounter a Wisp Wraith that should easily fall. Follow the path and take out more Wisp Wraiths until you run into Mouse. He will follow you so turn the corner and go west to find a vase of healing and a twisted structure for Codex 065: The Black City .
Approach the Spirit of Valor to the south. Ask him about his weapons and then accept his challenge to a duel to obtain the Valor’s Staff . Go west and kill the Spirit Wolves that attack you, continue to the Sloth. Ask him for help and he will agree to teach Mouse to turn into his form under one condition, you correctly answer three riddles.
Riddle 1 : I have seas with no water, coasts with no sand, towns without people, mountains without land. What am I?
Answer : A map?
Riddle 2 : I’m rarely touched, but often held. If you have wit, you’ll use me well. What am I?
Answer : My tongue?
Riddle 3 : Often will I spin a tale, never will I charge a fee. I’ll amuse you an entire eve, but, alas, you won’t remember me. What am I?
Answer : A dream?
If you answer a question incorrectly then you must beat the Sloth in which case he teaches Mouse anyways. Go back east and kill the Spirit Wolves, continue till you reach the fiery area where the Lyrium vein is. The Demon will spawn, approach it and have a small chit chat before fighting it. Wisp Wraiths are summoned so take them out first and let Mouse pick up the Demon. Use the Lyrium Vein when you need to replenish your mana and be sure to use the Shimmering Orb of Lights that you have to stay alive. Mouse turns out to be the real Demon, a scene occurs and you wake up in your bed.
Examine the many things in Ferelden for Codex information about the world as a whole. You can also find good items hidden in a variety of places so search it all.
Jowan approaches you and tells you that First Enchanter Irving would like to see you. You gain the quest “ A Mage of the Circle “; check the vanity and the chest in the room. Leave the room and go left through the metal door to a vase. Head back east and enter the room next to yours to find a chest and a vanity then head to the next area. Check the cabinet and continue around the circle to the shelves. In the next room check the second row of shelves for a book on Codex 077: The Fade . Make your way to the center area to find another book this time on Codex 081: Mana and the Use of Magic . Now proceed to the second floor.
Take the south east exit into the library. Check the seven bookcases for Codex 075: Hierarchy of the Circle , Codex 076: History of the Circle , and Codexes 085-088: The Four Schools of Magic: Creation, Entropy, Primal, Spirit . The next room over has an armoire and the one after that has an armoire and a chest. Head to the next room to find an armoire, shelves, and a book on Codex 083: The Cardinal Rules of Magic . Continue to the Mage Laboratory and check the storage cabinet and books on Codex 080: Maleficarum .
Go to the Chapel, which is the next room over, to find a book on Codex 063: The Rite of Annulment and an altar for Codex 073: The Founding of the Chantry . Read The Prophet Andraste for Codex 062: Andraste - Bride of the Maker then check the two bookcases for Codex 066: The Chant of Light - The Blight and Codex 068: The Maker . Make your way to Irving’s Study and speak with him and Duncan. Afterwards you receive Mage Robes, a Ring of Study, and a Magic Staff . Check the pile of books in the back for Codex 084: Blood Magic - The Forbidden School.
Escort Duncan to his quarters and then speak with Jowan. Agree to help them out and obtain the quest “ Bound in Blood and Magic “. Speak with Owain and you will update the quest and receive the “ Rod of Fire Request Form “. You can talk with Irving and tell him of Jowan’s plans but he tells you to carry them out so they may be caught red-handed. Irving can also sign the form you have if you would like.
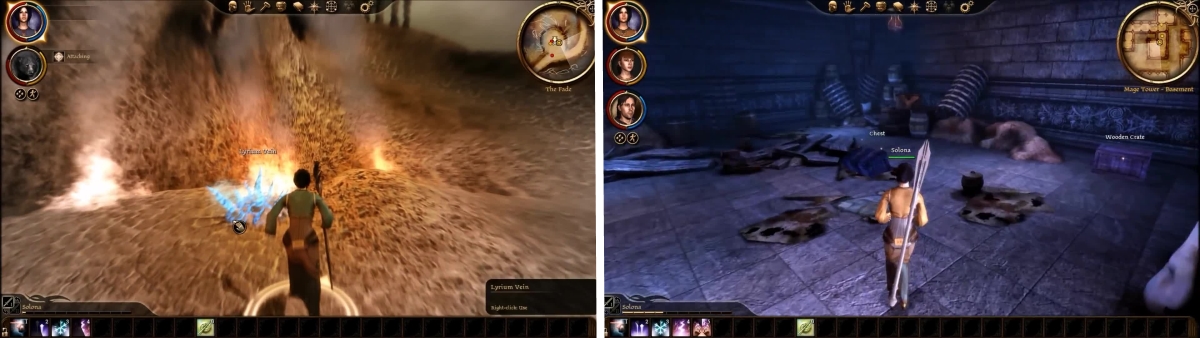
Lyrium Veins are especially useful if you are a mage. Make good use of them if you see them. You can also find some nice items for your character in the basement.
Head over to the Mage Laboratory and speak with Senior Enchanter Leorah. Tell her you will help to get the quest “ Infested Storerooms “. Enter the Storage Room and open the wooden crate and chest. Head down to the fork and turn left, defeating the Giant Spider that attacks. Make your way south and defeat more spiders. Check the wooden crate and the barrel then continue west. Loot the chest for some Fade Striders then check the cocoon further west. Another cocoon and wooden crate are at the next intersection. Head north and kill the final spider then leave the Storage Room. Talk to Leorah and ask her for a reward, which is either numerous potions or the signing of your form.
Head over to Owain to get the Rod of Fire then return to Jowan. Tell him you have the rod then return to the first floor. Make your way around the circle and into the basement. Go through the first door but be stopped at the second. Take the option to try the other door which can be unlocked. A Sentinel attacks from behind; kill him and proceed around the corner to find two more. Open the door and check the wooden crate then head to the next area to find a chest. Go through the door at the end of the hall and fight off more Sentinels. Check the chest and wooden crate then go through the next door.
Defeat more Sentinels and proceed to the next area to find Deep Stalkers and a Deep Stalker Leader. Check the storage cabinet and head through to the south room to find a chest and wooden crate to obtain an Apprentice’s Amulet and the Ephemeralist’s Belt . Proceed west down the hall defeating the enemies in your way. Check the chest and go through the door. Go down the hall into a large room. Check the chest for the Blackened Heartwood Staff then examine the bookcase. Talk to the statue to get Codex 154: The Tevinter Imperium then check the artifact to destroy the wall.
Defeat the Sentinel Guardian and open the chest. Head up the stairs and destroy Jowan’s Phylactery . Head south through the second door and return to the first floor. Watch the scene enfold and when Irving asks if you took anything you can Persuade him that you did not in order to keep the staff. Duncan comes and you are on your way to being a Grey Warden.


No Comments