Alfyn’s third chapter takes place in Saintsbridge, so teleport there and choose to start the story from the tavern. After stopping Vanessa in Goldshore, Alfyn arrives in Saintsbridge to see if he is needed there. Alfyn happens upon another apothecary that refuses to treat an injured patient, as he deems the person “not worth saving.” Without any hesitation, though, Alfyn helps out the injured person, who is named Miguel. With hunger setting upon him, make your way to the tavern in the northern part of town, where Alfyn will find another person in need.
He doesn’t seem to know what’s wrong with the boy, though, sparking the entrance of the other apothecary, who fixes the boy right up. Despite the previous encounter, Alfyn realizes that Ogen is quite the apothecary. After the admiration settles, he sets off to see if anyone else in town needs his help. There are two people you need to Inquire, with the first just south of the tavern. The other is in the southern part of town, in the house just north of the Provisioner. Return to where you found the first person to find another to Inquire. This leads to another scene, where Alfyn learns about Miguel.
Outside, Alfyn encounters Ogem again, who sticks to his guns about Miguel. Return to the barn where he was before, in the southern section of town, for another scene. After promising to turn over a new leaf, Alfyn decides to heal up Miguel. However, the next morning, you see that Miguel was lying, as he kidnaps the kid you healed earlier and runs off to Rivira Woods.
Rivira Woods
Immediately upon entering, there will be a save point in front of you, at a crossroad. For now, head north and there will be a chest off to your right not too far from the beginning (Purifying Dust). Continue north to find another chest, this one being purple, in the corner (Gaolbreaker). There will be a path leading west nearby, so take it and you’ll eventually run into another chest (Refreshing Jam). Return to the beginning of the dungeon and head west now. When you get to the next four-way split, go east to get to that chest you saw near the save point (Silver-filled Pouch).
Reptalions are annoying enemies because of having only a single weakness
Return to the last split and go west to find another chest at a dead end (Injurious Dust). Head north at the previous crossroad and continue in that direction a little bit, until you spot the path moving northwest, which leads to another chest (Purifying Seed). Keep going north a little bit more and venture west on the path just south of the chest you opened earlier to the north. When you can turn south, do that and then turn right at the first possible moment to find another purple chest (Ice Amulet).
Back on the main path, journey west a little bit to see a save point to your north. Ignore that for right now and head straight south, all the way until you see a trail to the west. There will be a chest at the end of this path, holding an Energizing Pomegranate (L). Double back to that save point, heal up and move left to find Miguel, who will serve as your next boss.
BOSS - Miguel
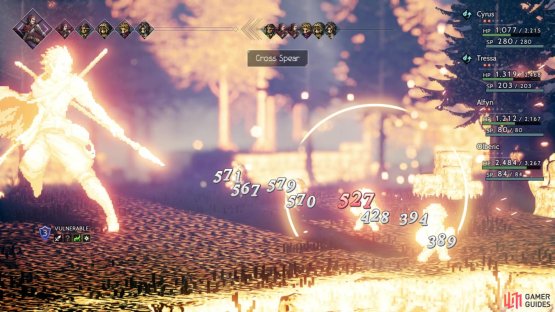
Miguel can be a challenging boss, as he starts the battle by making it so he has two actions per turn. All of Miguel’s attacks are physical, so if you can get a Merchant to use Hired Help with the Mercenaries, then you’ll get a nice physical defensive buff to help out. You can also add on to this by using the Thief’s Shackle Foe to debuff Miguel’s physical attack. The only problem is that Miguel has a move called Twin Spears, which hits a single character twice and can debuff both their physical attack and defense. Cross Spear will hit your entire twice, for medium damage each hit.
One attack that might confuse you is Hurl Spear, where Miguel will toss a bunch of them up into the air. On the turn he uses this, you won’t get hit at all, but when the next turn occurs, a bunch of spears will randomly fall onto your characters, with each one hitting for medium damage. Of course, this attacks seems to have a higher chance of missing, similar to your own attacks like Rain of Arrows, as an example. Weakness-wise, Miguel is a special case among Chapter 3 bosses, as you will see shortly.
(1 of 2) Without proper defenses, Cross Spear hurts a lot
Without proper defenses, Cross Spear hurts a lot (left), Recovering from a break will cause Miguel to shift his weaknesses (right)
He has seven shields and will not gain anymore throughout the entire fight, nor will he block any of his weaknesses. However, upon recovery from breaking Miguel, he will change his weaknesses to a new set. He’ll begin with weaknesses to swords, bows, wind and light, then switch to a second set upon recovering from a break. He actually has four different weakness sets and seems to go through them in order, which are as follows:
– Sword, Bow, Wind, Light
– Spear, Dagger, Fire, Light
– Axe, Staff, Ice, Lightning
– Sword, Axe, Fire, Lightning
Note that the weaknesses will be shown between sets, so whenever you uncover fire in the second set, it will automatically be shown in the fourth set. At half health, whenever his name turns yellow, Miguel can do the usual dark aura thing. He doesn’t have an ultimate attack, but he will gain five actions per turn, which can be brutal and doom for your party if he manages to perform them all. However, break him and that advantage will disappear.
Of course, Miguel has one final trick up his sleeve, which occurs at 25% HP (red name). He’ll do another dark aura and his first action will be to use Drink Medicine, healing himself for around 5,600 HP. He’ll then follow this up with Storm of Spears, an attack similar to Hurl Spear, but with more of them. Note he has five actions per turn at this point, but only for a single turn. Overall, Miguel has a lot of options in his arsenal to help with defeating your party.
(1 of 2) The familiar purple aura gives Miguel five actions on his next turn
The familiar purple aura gives Miguel five actions on his next turn (left), Near the end of the fight, he can heal himself once (right)
As already mentioned, the Thief’s Shackle Foe is great to use in conjunction with a physical defense buff on your party, although that will likely get cancelled out now and then on a character with Twin Spears. Leghold Trap is always a good option to use, especially once he gets to 50% health and below, as it will delay his actions and give you a greater chance to break him before his five turns come to pass. This can be a difficult boss and is probably one of the few equipment checks you will find in the game (equipment matters more than levels, although the latter helps).
With Alfyn finally putting a stop of Miguel, he quickly patches the boy and returns to town. After a short little scene, head towards the exit of the town for another scene, eventually bringing an end to Alfyn’s third chapter. His next destination will be Orewell in the Cliftlands.


No Comments