You’ve reached the end of another chapter, so it’s time to clean up some of the Side Stories you didn’t get to finish earlier, some of which are left over from Chapter 1. Note that there are still a few sidequests you won’t get to finish right now, due to them passing through some high level areas.
The Slumbering Giant
If you don’t remember this quest, then it’s gotten from a NPC in Flamesgrace, but it wasn’t done before because it involves a Danger Level 25 dungeon and boss. You need to Inquire/Scrutinize the Muttering Codger for the Where the Ice Giant Sleeps information; he’s at the base of the hill that was used during Ophilia’s first chapter. Once you do this, you will need to journey to Hoarfrost Grotto, which is located in Western Flamesgrace Wilds. If you’ve already uncovered this, it seems like going there from S’warkii might be shorter, so just follow the trail, going east in North S’warkii Trail to Western Flamesgrace Wilds and finding the cave just northeast of the save point.
Follow the trail in the cave until you reach the first save point, then head east to find a chest at the dead end (Healing Grape M). Continue south from the save point and there will be a slightly hidden path leading west that eventually brings you to another chest (Light Nut). Return to the last fork and head east this time, to another split, where a chest will await you to the right (Olive of Life M). Venture north now and at the second brazier, you should notice the path on the ground going east a little bit.
This is actually a path that will bring you to another chest, which contains 10,000 Leaves. Return to the main trail and look for the one going north, bringing you to a purple chest that you might have noticed earlier (Soul Hatchet). Double back to the last split in the road and continue east until you spot a save point. Venture south from there to find one final chest, holding an Inspiriting Plum (M). Save your game, step into the opening north of the save point and you’ll come face to face with the Jotunn.
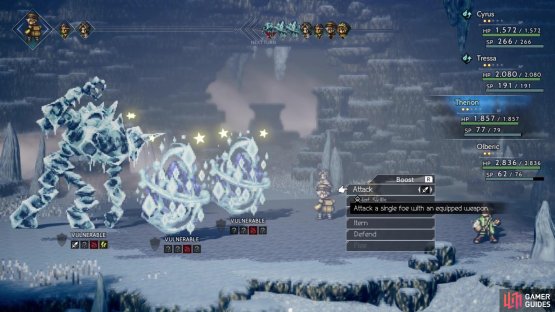
Depending on when you come here, this boss could prove a little challenge or it might be quite easy. At the beginning of the battle, the Jotunn is alone and only has four shields. On its first turn, it will summon two Snow Elementals, which are different from the elementals you have seen inside of the Grotto. They are weak to daggers, staves, fire and light, only have four shields and around 8,000 HP. They can use Icicle to target a single character, as well as Icewind to hit your party with an ice-elemental spell.
(1 of 2) Jotunn and its two helpers are all weak to fire
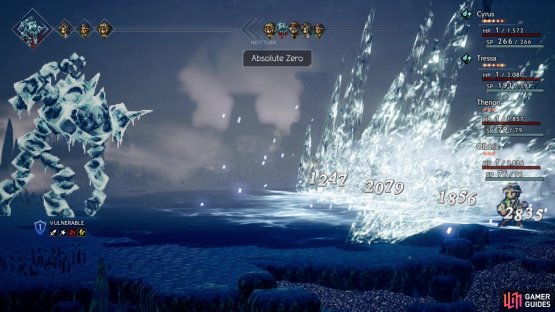
Jotunn and its two helpers are all weak to fire (left), Absolute Zero will reduce the entire party’s HP to 1 (right)
As for the Jotunn, it can use Freeze to target a single party member and Big Freeze to hit them all. The Jotunn is weak to swords, axes, fire and lightning, and upon breaking it, the boss will recover and gain two additional shields. It can only do this twice, so the most shields it will ever have at once is 8. Once the boss reaches half health, it will signify its ultimate move with the message that a chill is in the air (followed by the familiar dark aura). It will use Absolute Zero on its next turn, which will reduce everyone’s HP to 1. You want to make sure that you either have someone who can heal (even with a Healing Grape Bunch) or you can break it before the Jotunn manages to perform the skill.
At this point, the Jotunn shouldn’t give you much trouble at all and will go down with ease. For winning the battle, you will receive the Jotunn Horn, which is a key item. Return to Flamesgrace and enter the inn to find the Diligent Student. Show him the horn and you will finally finish this side story.
| Objective | Reward |
|---|---|
| Proved the existence of the jotunn | 4,500 Leaves, Calamity Spear |
The Weaver’s Predictament
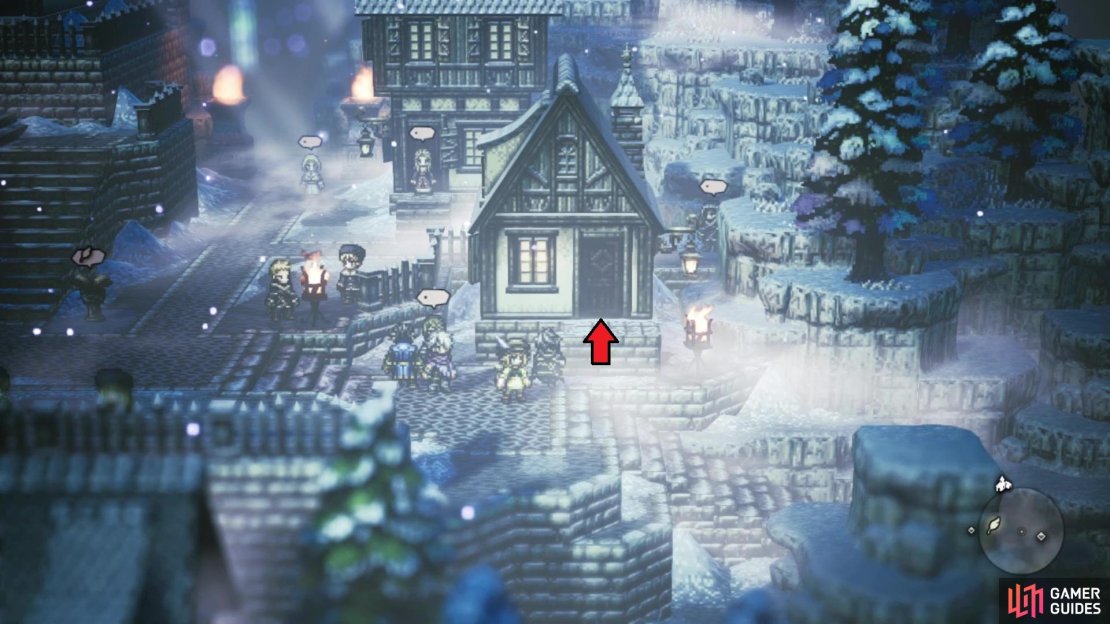
This Side Story begins in Quarrycrest, in the lower section of the town, and it has two different solutions. Gendy’s business seems to have waned, despite it flourishing in the past. For the first option, you can either Steal or Purchase the Gendy’s Footcloth from the questgiver (easier to buy it with Tressa). Once you have acquired this item, fast travel to Flamesgrace and enter the house closest to the exit to the Path to the Origin Cave (it’s the southeastern house). You know you have the right one when you find the Shivering Townsperson, who is you need to give the Gendy’s Footcloth to finish this quest.
The other option for this quest involves heading to Noblecourt. In the western side of town, look for the last NPC right before you get to Orlick’s Manse. You know it’s the right NPC when you see the name, Fashionable Traveler. Inquire/Scrutinize this person to get the A Use of Textiles information, then bring this info back to Gendy in Quarrycrest to finish the sidequest.
The Shivering Townsperson can be found inside of the pictured house
| Objective | Reward |
|---|---|
| Helped Gendy’s business get back on track | 6,500 Leaves, Weaver’s Charm |
A Miner Dilemma
In the northern portion of Quarrycrest, you will find a miner at the top of the town, who is having trouble digging through some rock. To complete this Side Story, you will need to travel to Goldshore. In the northern part of town, in front of the equipment shop, is a Stonemonger. Either Steal or Purchase the Orewell Whetstone from him, then bring it back to the Miner in Quarrycrest to finish the quest.
| Objective | Reward |
|---|---|
| Solved the Miner’s pickaxe troubles | 9,000 Leaves, Sharp Nut, Critical Nut |
Left Behind
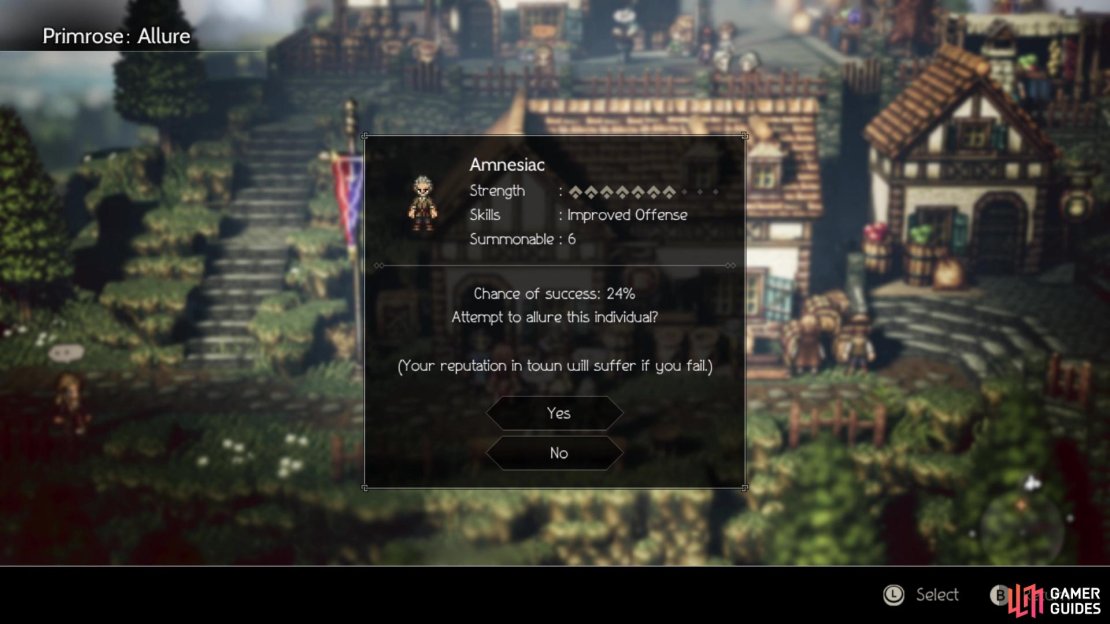
This Side Story begins in Goldshore, on the beach in the southern part of town. The former sailor tells you that some years back, his ship went down and while most of the crew were found, the captain is still missing. Head on over to Victors Hollow and look for an older-looking gentleman in front of the tavern. This is the captain that the sailor talked about, so you will need to either Guide or Allure him to get him to follow. The only problem is that he is quite tough to Guide/Allure, with Ophilia needing to be level 40, and Primrose’s chances likely being quite low. Save beforehand and keep trying until you get him, then return to the sailor in Goldshore to finish.
Although her chances are low, it’s a lot easier Alluring the required NPC than trying to level Ophilia to 40
| Objective | Reward |
|---|---|
| Found the former sailor’s captain | 4,500 Leaves, Elemental Ward |
Scourge of the Seas
The Fledgling Fisherman in the northern part of Goldshore and talks about some creature that is terrorizing the seas. This quest has two parts, with the first one involving Stealing/Purchasing the Leviathan’s Egg from the fisherman. Your Steal chance might be pretty low, so it’s a lot easier to just Purchase it with Tressa. Once you have the egg, exit Goldshore and cross the first bridge, then venture south and cross a second bridge. When you reach the end here, look south for a chest (Bottle of Blinding Dust), then continue north to find the entrance to Captains’ Bane. This is a dungeon with a Danger Level of 35, so it might be rough in here.
Luckily, there is a save point as soon as you get inside, so save your game and try out a battle or two to see if you can survive. If not, then it won’t hurt to come back and finish this sidequest later. If you’re staying, head east from the save and instead of going north, keep going east to find two chests (Olive of Life M and Healing Grape Bunch). At the previous split, go north and hug the bottom, where you’ll find a hidden path with a chest (Energizing Pomegranate L).
Continue north to find the path heading east, where there will be a dead end with nothing, but you should spot a chest just north of there. Get on the northernmost path and go into the little alcove to the right with the chest (Refreshing Jam). When you get to the end to your west, make a U-turn to the north and head back east for another chest (Articulate Stone). Make your to the end to your west, where you’ll find a save point and one final purple chest to the south of it (Hedgehog Spear). Step into the clearing to begin a boss fight against the Leviathan.
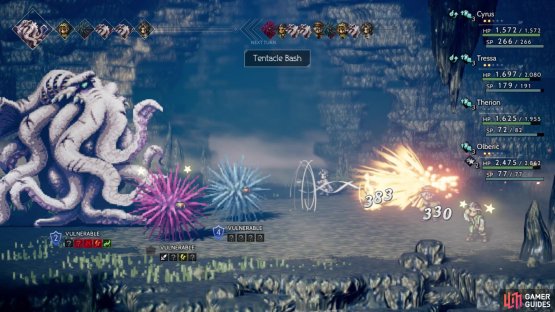
The Leviathan can be a difficult boss, especially if you tackle it at the end of Chapter 2. It will begin the battle with three actions, and its attacks can hurt. On its initial action, the Leviathan will summon a Crimson Urchin and Sea Urchin to join in on the fun, which will block its three center weaknesses. Considering that the Leviathan is strong and gets three actions per turn, you will want to get rid of the Urchins as soon as possible. It isn’t just because of the blocking of weaknesses, but the Urchins can do some damage as well. Roll is a single-target attack, as is Venomous Sting, but the latter can inflict Poison. You might also see one use Venomous Rain, which does random hits to the entire party, although it’s not clear if this can also Poison.
(1 of 2) The urchins called out don’t help things in this battle
The urchins called out don’t help things in this battle (left), especially since they will block some of the Leviathan’s weaknesses (right)
The Sea Urchin is weak to daggers, staves, fire and light, while the Crimson Urchin is weak to swords, axes, lightning and dark. Even after defeating them, the Leviathan can resummon them back into the battle multiple times, although they only have half health and a fraction of their original shields. Should they be summoned again, you want to get rid of them as quickly as before, since the boss can devour them to recover 5,000 HP. With those two out of the way, let’s take a deeper look at the Leviathan.
This boss can certainly dish out the damage, as well as annoy you with Constrictor, which does good damage to a single target and inflicts Unconscious. With three actions per turn, this can be dangerous if it decides to use it on your healer or multiple characters get afflicted with it. Sweep will damage your entire party once and Tentacle Bash are three to five random hits on any of your characters. While the hits are random, if a single character takes a good chunk of the hits, then they might be in trouble of dying, especially if the Leviathan has more actions following Tentacle Bash.
Breaking the boss might be easy at first, since it only has four shields, but upon recovering, it will gain an additional two shields, up to a total of eight. Of course, the Leviathan becomes more dangerous once it hits yellow health, as it seems to start using Dissolving Mist, which hits the entire party and removes all of their buffs. To add to this, it can use a boosted attack, gaining the dark aura and following that up with Rampage. This attack hits the entire party for some good damage and it might even be followed up with other attacks, depending on the turn order.
Naturally, you don’t want to dawdle too long in this fight against the Leviathan, so hitting hard and quick will be a top priority. A Merchant and Thief will be ideal here, since the Mercenaries from Hired Help will boost you defense, while Shackle Foe from the Thief can lower the Leviathan’s physical attack. Keeping these buffs/debuffs on at all time will make the damage a lot more manageable. Despite blocking the middle three weaknesses while the Urchins are out, you can still break the shields with spears and wind; the middle three weaknesses are bow, fire and lightning. Considering the weaknesses, a Warrior/Hunter can make quick work of the shields with their multi-hit attacks, hopefully making this boss a little easier.
(1 of 2) Constrictor is annoying because of the Unconscious ailment
Constrictor is annoying because of the Unconscious ailment (left), Tentacle Bash can be dangerous if it focuses on a single character (right)
After the fight is over, there will be a quick, little scene and the sidequest itself will be finished.
| Objective | Reward |
|---|---|
| Quelled the beast rampaging the water | 7,000 Leaves, Leviathan Shield |
A Corpse with No Name
For this sidequest, fast travel to Saintsbridge and exit to East Saintsbridge Traverse. Make your way to the save point/signpost, then head south and cross the bridge. A little west from there will be the beginning of this Side Story. There will be a man standing over a body laying on the ground, who just washed ashore without any idea of who he is, other than a mole. There are actually two different ways to complete this. The first way is to travel to Victors Hollow and look for the Restless Woman in the southern section of town. She is standing just south of the Provisioner and you will need to use Guide/Allure to bring her back to the body in East Saintsbridge Traverse.
The other method to complete this sidequest will involve either Tressa or Therion. South of where the questgiver is located, you will find a dungeon named Farshore. Head inside, cross the first bridge you see and look right for a chest (Healing Grape Bunch). There’s another chest to the north (Energizing Pomegranate M), and another to your right, but you can’t reach it yet. Despite that, though, head right and south to open the chest there (Olive of Life M), then continue right and up when you see the NPC.
This NPC is who you need, but before interacting, look to the left to find a chest (Ice Soulstone L). Go south from the NPC, on the previous trail, and continue south until you spot a chest to your right (Inspiriting Plum Basket). Venture right of the NPC and make your way south, then hold right until you enter a secret passage, leading to a purple chest (30,000 Leaves). Find your way north and continue east, crossing the next bridge and then heading south. In the bottom right corner will be another purple chest (Clarity Stone) and in the upper right will be nothing.
(1 of 2) The location of the Side Story
The location of the Side Story (left), The entrance to Farshore is a little ways south of the questgiver (right)
Double back to the NPC you saw and either Purchase/Steal Hugo’s Journal. Exit Farshore and return to the questgiver, handing him the journal to finish.
| Objective | Reward |
|---|---|
| Solved the mystery of the corpse with no name | 5,000 Leaves, Gentleman’s Charm |
That’s about it for the end of Chapter 2, so it’s time to move on to Chapter 3. Now, the majority of those stories will take place in towns you’ve already visited, with the exception of one you might not have unlocked yet. So, there won’t be too much in the way of exploring, which means you can get right to the point.






No Comments