
Another optional bit of exploration before you start your next Wyrmhunt quest, by the time this Walkthrough Sequence is over with, hopefully you’ll be familiar enough with the area to allow for more vague directions when you have to head through here on subsequent quests. For now, however, put future deeds aside and focus on the exploration at hand! The Deos Hills don’t really need the same warning the Vestad Hills needed, as the Bandits here aren’t really any more powerful than the ones you encountered earlier, and by now Chimeras, Cyclopes, Goblins, Hobgoblins, Skeletons and Phantoms are old news. Simply put, anything you encounter in the Deos Hills you should be able to handle. That’s not to say there aren’t some new monsters around, nor that some fights won’t be dangerous, but if you made it through the Vestad Hills, you can handle the Deos Hills, too.
Old Garrison
Let’s start exploring the Deos Hills from the northern end of the bridge that connects it to the Estan Plains, of course. From the end of the bridge head north until the split in the road. From there, continue due north off the road and over (or around) some boulders. North of here you’ll find a Goblin camp marked as the ‘Old Garrison’ on your map. Presumably this wasn’t always infested with Goblins, and also presumably it was a bit more substantial than some tents set up south of some cliffs. At night there will of course be no Goblins nor Hobgoblins here, but perhaps the highest concentration of Phantoms in the game. You can score a rounded chest and a square chest here, even if they only give you junk. When you’re done exploring, head back south to find the road, you’ve already taken the north-western fork when you traveled to the Catacombs, now explore the north-eastern fork, marked on the map as ‘Conquest Road’.
Conquest Road
Let your explorations now be bound by the beach to the south (which you’ve already explored) and by Conquest Road. As you already know, if you’re here at night you’ll be pestered by Skeletons. You can also find the odd Wild Boar wandering about. Continue north-east and eventually you’ll come across a pair of large boulders that serve as home to a Goblin tribe-just a few Goblins and a helmeted leader, nothing to get worked up over. North of the eastern-most boulder you’ll find a series of gravestones. Perhaps at some point this place - like many around Gransys - held more importance than its present state would suggest.
Continue north-east past more gravestones, the ruins of the walls that once bound them suggest that this was a significant spot once upon a time, which has since slipped out of immediate care and control of the duchy. Your progress to the beaches in the south is now impeded by sheer cliffs, and the road (marked on the map as ‘Conquest Road’) that serves as a convenient boundary for exploration will turn north. Your exploration now focuses on the area between the road to the west and the cliffs to the east. Past the graveyard, more Skeletons will appear (if it’s night) an further north they’ll be joined by Phantoms. During the day, your foes will be… well, grazing Oxen. A few square chests that house junk can be found, as well as a few warrior remains not worth recording. Apple trees can be found regularly as you explore, making this a rather pleasant spot to explore. One possible encounter is worth mentioning, however-along the elbow of the road-where it turns from heading north-east to north, you’ll find a sack caravan, where Snow Harpies will often be found picking at the remains. Kill, loot, explore your way to the north until you reach the cliffs that house a crumbling fortification to the north; Windbluff Tower.
Monster Info: Snow Harpy
Besides being lighter in color, Snow Harpies are also much stronger (as evidenced by their experience rewards) and more aggressive than normal Harpies. They don’t bat an eye at the prospect of flying-by and raking with their claws, which they can end up doing in succession if they’re encountered in groups-which they often are. In addition to fly-by attacks, fly-up attacks, and snatch-and-drop grapples, Snow Harpies also have a frost-breath attack which not only deals damage, but also has a chance to freeze you solid, forcing you to break free. Last but not least, they of course can also sing, which like normal Harpies they’ll do while circling overhead.
Windbluff Tower will mark the northern extent of your explorations in the Deos Hills because… well, beyond it is the Northface Forest. You’ve got no real reason to snoop around there, either, nor is it very lucrative to do so, so just let it be a pretty landmark for now. West of Windbluff Tower are rocky, uneven hills that are often occupied by Direwolves, and like the rest of the Deos Hills, by Skeletons and Phantoms during the night. Together with Snow Harpies, Direwolves make up the staple foes of the northern reaches of Gransys, both of which will be more common when you explore the Northface Forest, to the north. All in all, the forest west of Windbluff Tower and, further south, west of ‘Conquest Road’ are somewhat unexceptional, unless you prefer the hordes of Deer which pollute these hills somewhat more appealing than the Oxen in the east. You’ll find a few ore veins if you stick near the cliffs to the west (which form a convenient terminus to your exploration), a few apple trees and fallen branches with various sylvan materials mark the only meager pickings here. Explore west along the cliffs, however, and you’ll eventually spot a glowing spring to the south (due south from a ore vein, no less).
Monster Info: Direwolf
While they may not be more aggressive than normal Wolves (which were already aggressive enough!) Direwolves are bigger and stronger, and hence, much more dangerous. Unlike Snow Harpies, they do not have any new attacks that their lesser counterparts do not-they will lunge, jump, and maul just like Wolves do.
Healing Spring
Who can resist glowing water in the distance? -the last words of many a Fallout player, surely. But this isn’t a post-nuclear RPG, it’s swords and sorcery! Surely only good things come from glowing water in such a world? Sure enough, what flows so luminously in the distance is nothing less than a Healing Spring. Walk in-get healed-walk out and enjoy the ‘Impervious’ condition for a short while. It’s a town away from town! Except you can’t stash loot or change Vocations here. Lazy water! There are a few fish bouncing around in the water -they must be the healthiest damn fish ever - and if you brought empty flasks, you can fill them with healing water, making ‘Spring Water’-an improvised healing potion.
From the Healing Spring head west, where you’ll find more the same scenery. This time, however, the beasties take center stage. You’ll either fight throngs of Goblins and Hobgoblins (unusually heavy in favor of the Hobgoblins this time) or Skeletons and Phantoms. Either way, the horde of lesser monsters will be accompanied by an armored Cyclops, which, despite the threat it poses, you should know how to defeat by now. Why would undead and Cyclopes make natural allies? Beats me. Once the Cyclops and its handlers have been smote, there’s very little of interest along the way as you continue west-a few junk-filled square chests, some plants… nothing really worth mentioning in detail. Eventually you’ll come to a ledge, under which lies the road leading to the Catacombs.
Descend the ledge and continue west to the Catacombs, you’re not here to explore it again, of course, but its environs deserve a mention. South of the entrance to the Catacombs-on top of the hill into which it is built-lurk a tribe of Goblins. At night there will be no Goblins- but Hobgoblins, instead. Aside from a few bogus square chests and various plants, there’s not much loot to score up here.
North of the entrance to the Catacombs is a slope that leads to a hill where a few lootable sarcophagi sit, amongst some apple trees. Now note the road that runs east-west across the front of the Catacombs, which unlike the path that connects the main road to the south to the Catacombs actually shows up on your map. Follow it west until it abruptly and pointlessly ends.
North of the end of the road you’ll find a short slope leading up into the mountains a bit, where apple trees, a square chest, and an ore vein lurk. You can also find a Seeker’s Token hiding in the grass just north-west of the road, if you look carefully enough. Due south of here along main east-west road you can often find the remains of a sacked caravan and some warrior remains to search (which will be there even if the caravan isn’t). There are also foes nearby-either a Chimera (at night), a group of female Bandits joined by Direwolves (day), or, very rarely, a Golem. Since the latter is so uncommon, Golems won’t be covered in detail here, but do be wary of the fact that one can spawn here.
| Warrior Remains |
|---|
| Iron Shield |
You’ll again use a road and cliffs to bound your explorations-in the south and north, respectively. Explore the forests west of the hill the Catacombs are built into. The big encounter in this Step takes place around a Bandit Camp in the forest, around which a small horde of female Bandits congregate-but only during the day. At night the camp will be unoccupied, possibly due to the nearby Chimera? Whatever the case may be, Dispatch them, although be warned, their power varies quite a bit, and on the whole you can expect them to consist of some of the more challenging Bandits, going by their experience values. Once they’re dead you can find a loot-bearing square chest. Continue west, and eventually the road in the south will be briefly washed out by water, near which lurk some more female Bandits. Where the road here ends, so to shall your explorations, as you’re decidedly crossing into Cursewood territory now.
| Square Chest |
|---|
| Bone Armor |
| Incognito Mask |
| Leather Gloves |
The Deos Hills Riverside
The road will remain a landmark boundary, but it’ll now become your northern terminus, as you shift your focus to the area south of the road, north of the river. From the washed out section of road head due south to reach the river, where you’ll find a new foe; a Wight. Essentially, a powerful undead Mage, this Wight will be encountered along with Skeleton Mages, so having some sort of ranged option is a good idea. First dispatch the Skeleton Mages, who, despite being ‘lesser’ foes will provide more offensive power than the Wight, as they cast simple, yet annoying, offensive elemental spells. Once they’re all dead (there’s about a half dozen of them) focus on the Wight, whose spells should be easy enough to dodge. This encounter, like most regarding undead, will only take place at night. If you’re here during the day, replace the entire paragraph above with the words ‘Sulfur Saurians’.
Monster Info: Wight
It hovers, it flies, it casts spells! Wights are almost never encountered alone; they tend to have some form of land-base skeletal backup, which should be destroyed before attacking the Wight, as they - not the Wight - might prove troublesome. Wights enjoy casting debilitating spells their lackeys can take advantage of, but are not opposed to using brute offense, from time to time. If you’ve got bows or spells, taking down a Wight should be relatively simple. If not, just wait for your Pawns to do it, and attack the few times when the Wight drops within reach.
All in all the Sulfur Saurians encountered during the day are probably more of a threat due to their toughness and number. They’ll be sun-bathing in the water, on rock, or just wandering around. Be wary of them, as they almost constantly employ camouflage. This beach is bound in the east by some cliffs, and in the north by some boulders. The water itself also has convenient barriers, as well. In the east this stage of the river terminates in a waterfall. To the west, upstream a ways, you’ll find a shallow crossing (occupied by Sulfur Saurians) that connects the Wilted Forest in the south to Cursewood in the north. Be sure to search fishing spots here, as there is one in particular that almost always yields a Snakeskin Purse, should you need it to satisfy a Notice Board quest. This particular fishing hole is near the northern shore, close to a long dead tree, half of which is submerged.
Now, you’re finally done exploring this very busy beach. Head to the cliffs in the east and follow them north until you can find a way around them to the east. Here you’ll find elevated ground littered with boulders, on and around which lurk Sulfur Saurians. If you search around you can discover some Grandgrapes and an unrewarding square chest. If you’re here at night-substitute Sulfur Saurians for Skeletons and Phantoms, the usual foes lurking about the Deos Hills in the darkness.
Eventually the land will trend downhill, and a large tree serves as a good landmark for the beginning of this area. Beyond a boulder to the east you’ll see some burning standards, which mark a camp of Goblins and Hobgoblins. It’s a short-lived change of pace, however, as Sulfur Saurians lurk on the rocks further east, and to the north. Continuing east, the trend downhill continues, and Sulfur Saurians dominate the rocks-albeit, more sparsely than they were to the west. Again, both the Goblinoids and Saurians will be encountered during the day, at night it’s Skeletons and Phantoms.
Continue downhill, and, following the contours of the road in the north and cliffs in the south that define your exploratory limits, start heading south-east, instead of east. Rocks and boulders start to give way to grass and trees. Lurking amongst some rocks near the road, you may encounter a band of male Bandits during the day, or the old news of Skeletons and Phantoms if traveling at night. As you near that familiar old bridge linking the Deos Hills with the Estan Plains, you’ll encounter Rabbits and Wild Boars again. Once you reach the bridge, your explorations are over, for now.
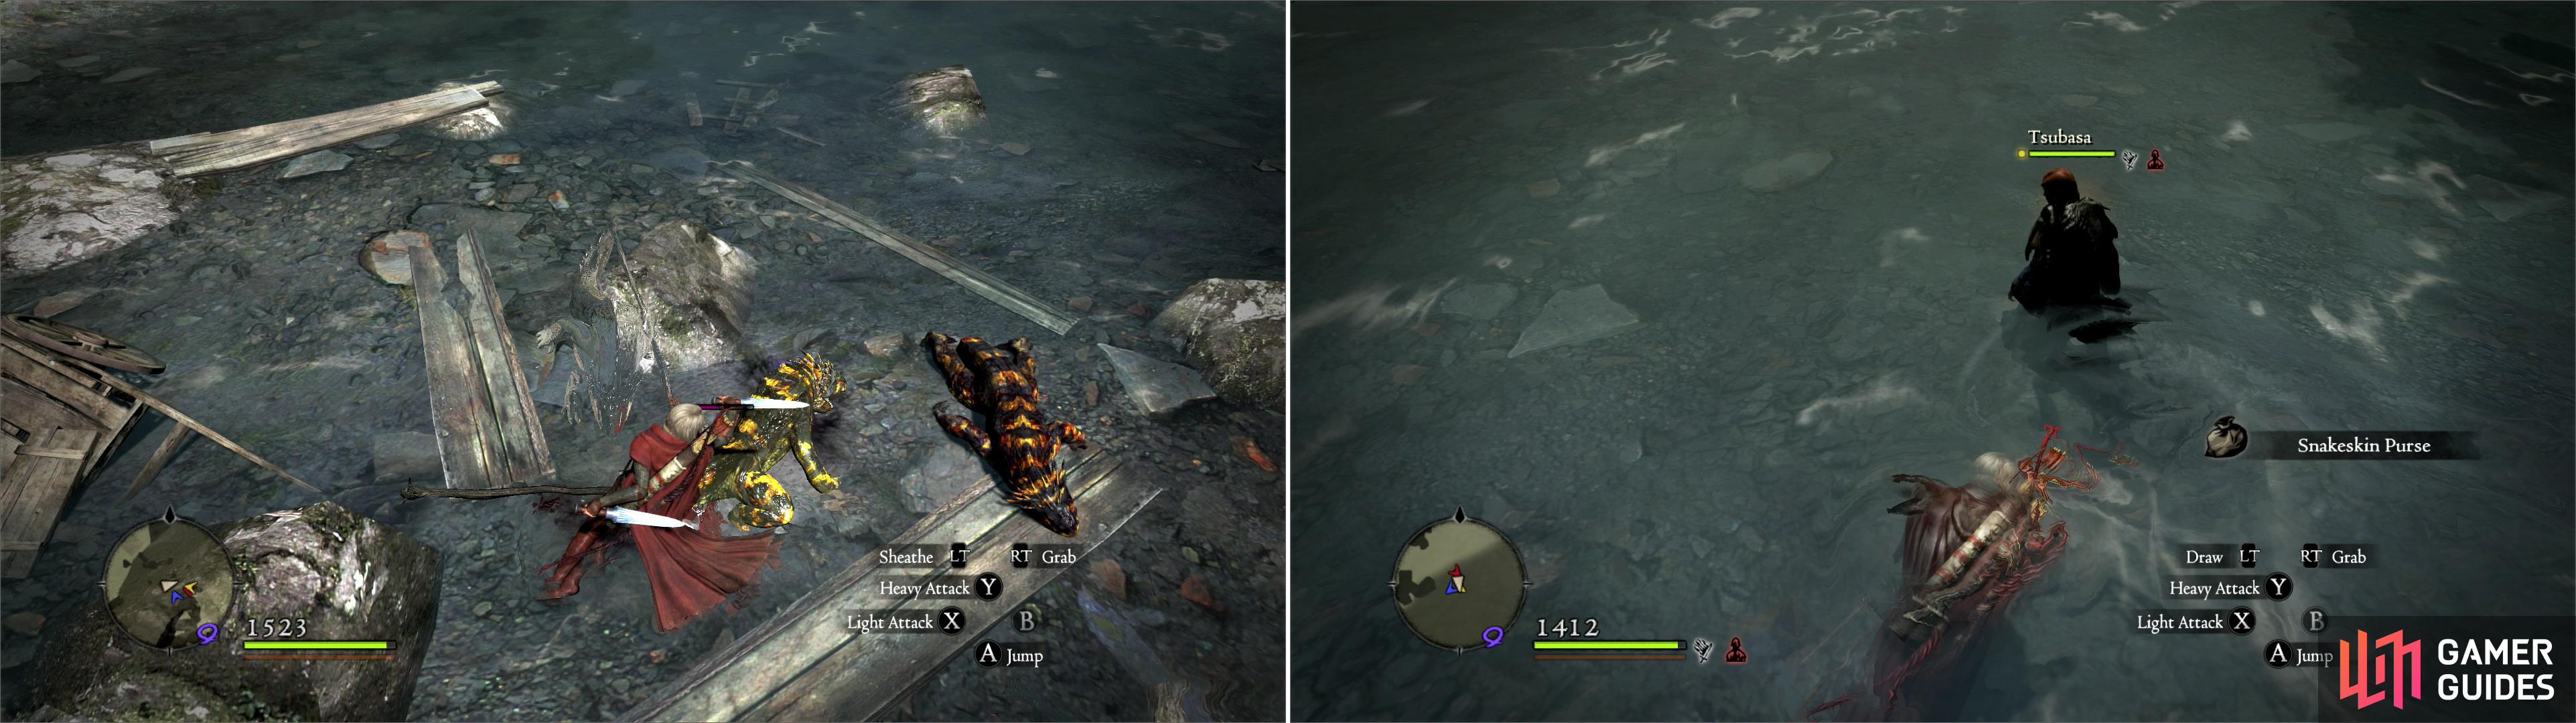
Sulfur Saurian’s lurk on the river crossing connecting the Wilted Forest to Cursewood (left). If you explor the coast of the river you can find a fishing spot which dependably contains a Snakeskin Purse (right).
Making Good With Maul
Before you start another Wyrmhunt quest, let’s finish off Maul’s quest ‘No Honor Among Thieves’. If you haven’t killed ten female Bandits yet… well, you know whereabouts they lurk, if that’s the path you want to take. Otherwise, head off to Cassardis, where you’ll find Pike-the thief you caught during ‘An Uninvited Guest’. During the night he’ll be hanging out at Pablos’ Inn, where he now works. During the day… he’ll wander all around the town-from the beach, to the chapel, and back again. If you talk to him, he’ll admit to understanding how Maul and his gang would see him as a traitor, and ask you for advice. The only answer worth giving here is ‘Return to Maul’s hold and offer up your life.’ upon which he’ll do so-which will satisfy Maul’s request. You can, of course, simply kill Pike, which will also satisfy Maul’s request.
| Objective | Reward |
|---|---|
| For satisfying Maul by killing ten vixens | 6000 XP, 20 Rift Currency, 10000 Gold, Maul’s Badge of Amity |
| For satisfying Maul by killing the traitor | 8000 XP, 20 Rift Currency, 12000 Gold, Maul’s Badge of Amity |
| For satisfying Maul by rehabilitating Pike | 12000 XP, 20 Rift Currency, 15000 Gold, Maul’s Badge of Amity |
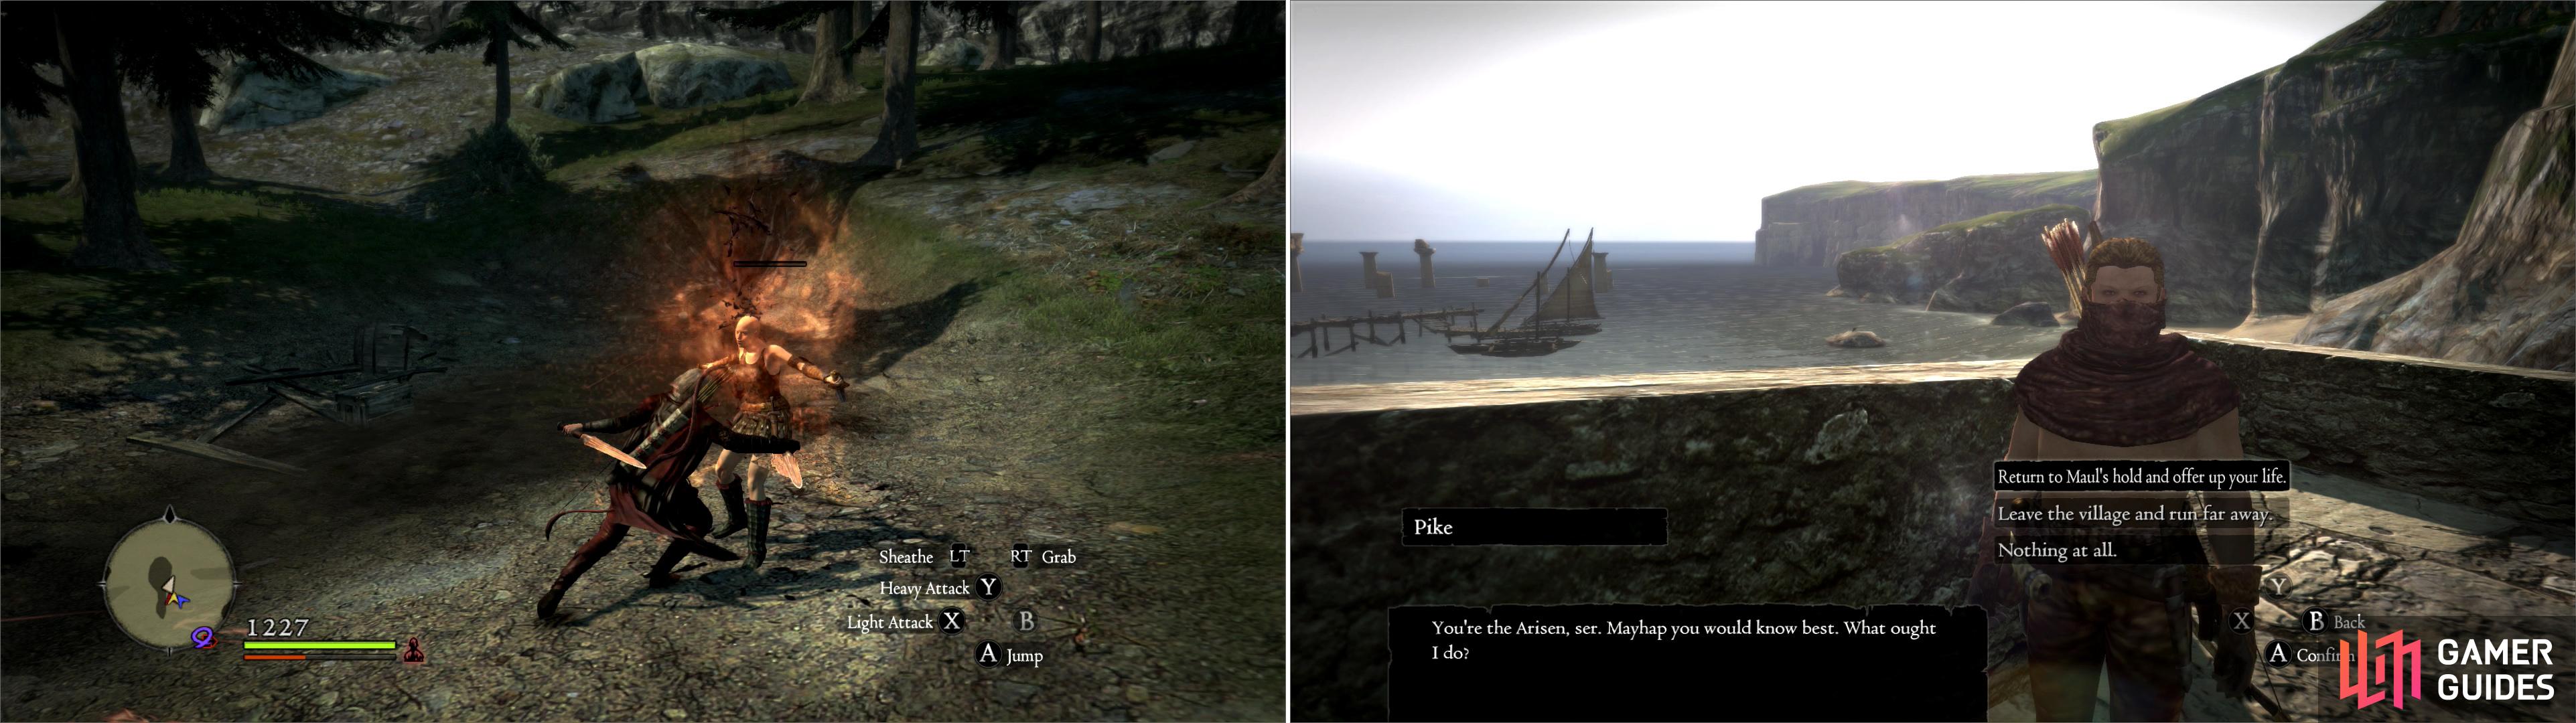
Satisfy Maul by either killing ten rival female Bandits in the Deos Hills/Cursewood (left) or deal with the treacherous Pike (right).
Ultimately this quest affects Pike more than anything else. If you left him alone and killed the vixens, Pike can live a peaceful, crime-free life in Cassardis. If you forced him to return to Maul, you return him back to his life of crime. Either way, he seems happy with how things turned out. If you killed him… well, that’s the end of that story, eh? Maul’s disposition is also worth considering-Pike is clearly like a son to him, one he seemed all too happy to pardon. One must guess that his ‘stay of execution’ is to be indefinite in duration. Upon Pike’s death, one can feel upon the hint of traces of resolute resignation. He’s not happy Pike is dead, but glad somebody took to upholding the honor of his Bandit group-something he was clearly not willing to do himself. If only these characters were more developed, one could consider this the emotional end of a significant story arc. The way things stand, however… one must dig fairly deep to find any humanity in most of Dragon’s Dogma’s NPCs.
While you’re here, you might as well loot Aernst Castle again-the least you can do is score another Wakestone Shard and a Ferrystone to get you back to Gran Soren quickly. As for Mauls Badge of Amity-stash it away for a rainy day, you never know when some oddball collector will put up a request for it at Arsmith’s Alehouse…
No Comments