
It’s time to get back to Dante, so it’s time to get used to his playstyle. There will be a giant hole right in front of you at the beginning of the mission, but there will be platforms sticking out of the sides that will contain some miscellaneous orbs. Once you reach the bottom, drop into the next room and some enemies will spawn. Initially, there will be three Scudo Angelos and a Proto Angelo, but a Baphomet will come to replace one of the Scudo Angelos upon its demise. Should you spawn the Baphomet, try and swiftly bring its end before it has a chance to annoy you with its ranged attacks.
Pass through the tunnel and there will be another hole to descend, with some platforms crumbling beneath you once you step on them. Before you start, try and look on the opposite side, a little lower than where you begin, as there’s an alcove with a Gold Orb there. At the very bottom, jump through the next hole to land in an arena with two Hellbats and a Behemoth. This is a pretty small place, so you’ll want to eliminate the biggest threats of the Hellbats, so go after them first. That leaves just the Behemoth, who you should have more than enough experience to deal with it swiftly.
For the next bit, the stage will have two different paths to take, similar to the previous mission, except there are actual collectibles on both paths. You will not be able to get them all in a single go, so you will need to restart the mission from the beginning to get everything.
The High Path
Switch to Trickster and use the breakaway platforms to get to the other side of the chasm. Follow this tunnel to another large hole, with breakaway platforms that have Red Orbs on the way down. At the bottom, drop through the hole there to get into a fight with two Behemoths. Luckily, both don’t spawn at the exact same time, so you’ll get to be alone with one for a few seconds, before the other interrupts your fun time. If you can manage to get rid of one (or close enough) before the other shows up, then you’re golden. Otherwise, you might want to bring out the big guns, in the form of Sin Devil Trigger (or regular DT), to even the odds.

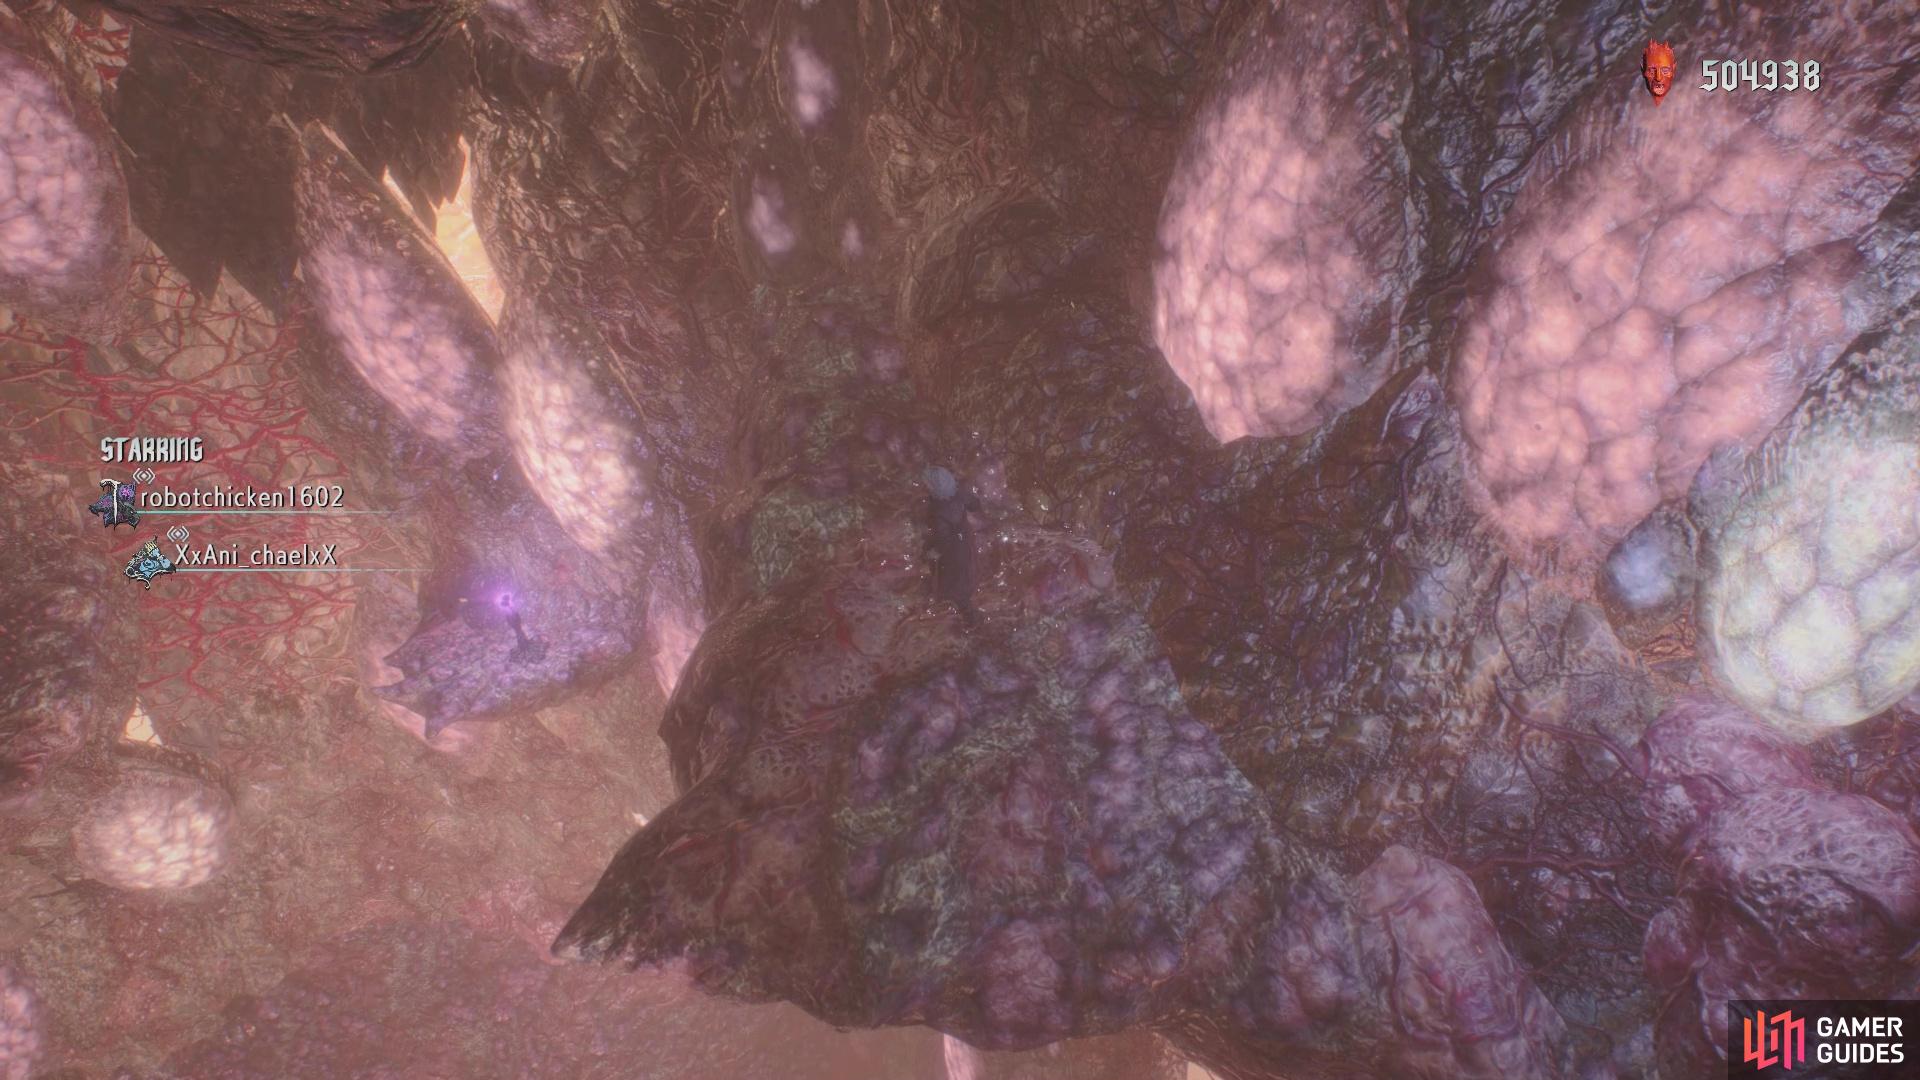
(1 of 2) You can find a Gold Orb in an alcove in the second big hole

You can find a Gold Orb in an alcove in the second big hole (left), You can use the Checkpoint feature on the menu to return to this split path (right)
There will be another big hole after this fight and about halfway down, you can find a large Red Orbs Cluster in an alcove. Continue all the way to the bottom, where you should see a Blue Orb Fragment directly across from you. A normal double jump and Trickster dash won’t quite make it, but there is another maneuver you can use to get more distance than that combo. This involves the Stinger sword move at the edge, which will actually launch Dante forward (Nero has the same thing with his similar move). Do that, double jump and then Trickster dash to get to the ledge with the Blue Orb Fragment.
The Giant Hole Path
At the split, start falling down the hole instead of opting to cross to the opening on the other side. There are a bunch of Red Orbs on the way down, should you want to collect them, but it’s nothing too much. At the bottom, you will have a battle against two Chaos and a Fury. Naturally, you will want to be very cautious with the Fury, but the Chaos should be eliminated first so you can concentrate on said Fury. If you’re comfortable with Royalguard and the timing of the blocks, then use that to defeat the Fury.
Once the enemies are annihilated, approach the exit and drop down to the first platform you see and then to the second. Looking around, you will notice an opening on the one side, with a large Red Orbs Cluster there. Ignore that for right now, but put it in the back of your mind, as you will be revisiting it shortly. Getting both of the secrets here will require the Highside skill for Cavaliere, but you should have purchased it already by now. From the second platform, look over the one side to spot a third with some white orbs on it.
Now, on the opposite side of where you landed, you should be able to spot a very small ledge with a Purple Orb Fragment on it, so hop down and grab it. With that in your collection, you’ll need to leap up to the adjacent platform a little higher up, then switch to the Cavaliere. Double jump towards the previous platform you were on earlier and start performing Highside (hold R1/RB, then back and Triangle/Y). After two of them, you should be high enough to use the Trickster dash to land on the platform. Do this one more time to get one ledge higher, where you can continue on the other path, to the Secret Mission.
(1 of 2) The Purple Orb Fragment is on a tiny ledge after the Chaos/Fury fight

The Purple Orb Fragment is on a tiny ledge after the Chaos/Fury fight (left), If you happen to fall, the Cavaliere can be used to gain great height to get back up the shaft (right)

Remember that ledge with the large Red Orbs Cluster? Use the Stinger to boost a long jump to get over there, then harvest some orbs from it. There is an opening behind it, so stand at the ledge that’s connected to it. Find the highest ledge underneath you and jump to it, then there will be one more right next to this. This spot has an alcove in it, so head inside to find the familiar red glow; turn around to spot the Secret Mission.
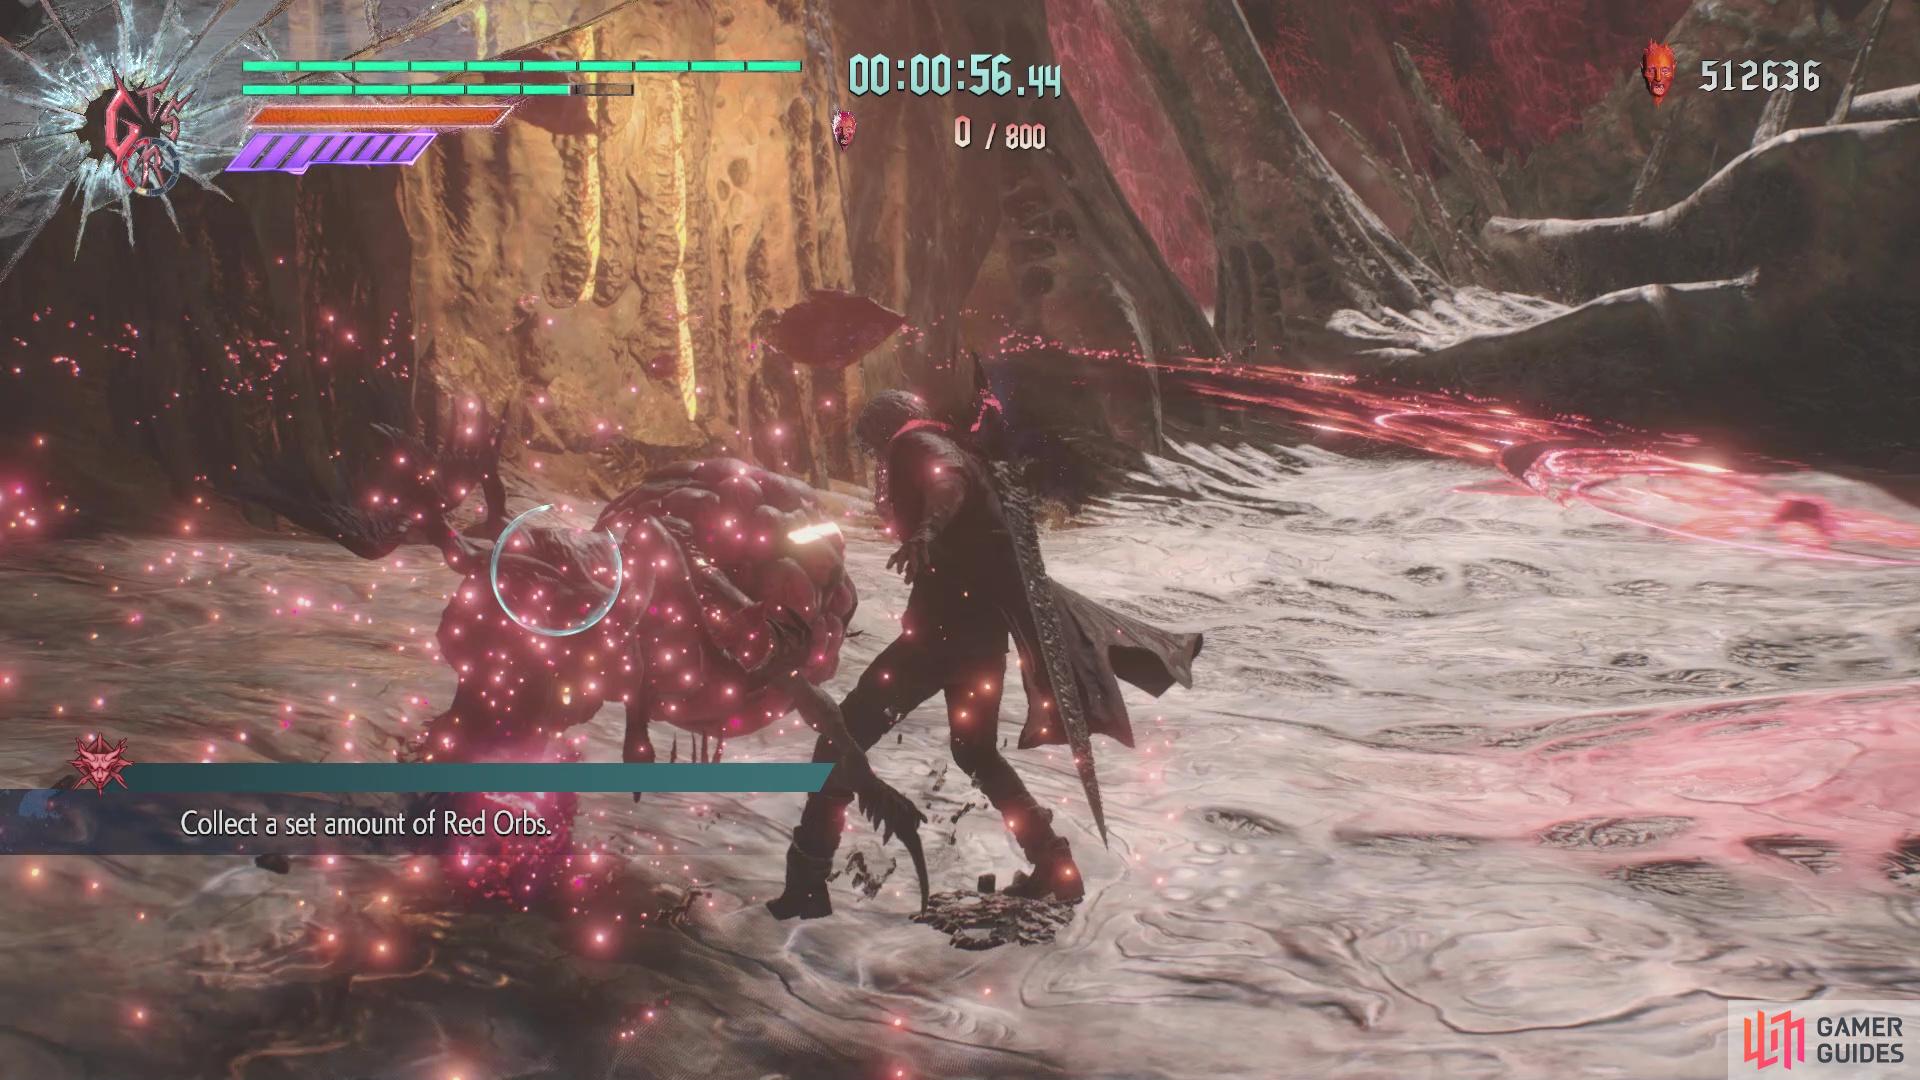
Secret Mission 12
This is definitely a weird Secret Mission, as the game simply tells you to collect a set amount of Red Orbs. However, the picture kind of gives you a hint at going about it. Once you’re in the Secret Mission, you find out you need to collect at least 800 Red Orbs, but your only enemy here is a single Empusa and you only have around 90 seconds to do this. The plan is to lure the Empusa to one of the small puddles of blood on the ground, which will turn it into a Red Empusa. When you’ve done this, switch to the Faust ranged weapon and the Gunslinger style. Now, use the style’s action (Circle/B) to perform Mad Hatter. Do this a few times to eventually defeat the Red Empusa and gain the necessary orbs to complete the Secret Mission, securing not only another Blue Orb Fragment, but possibly the Secrets Exposed trophy/achievement for finishing all Secret Missions.


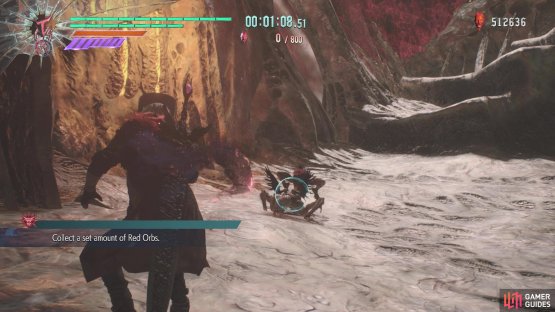

(1 of 2) Lure the Empusa to one of the blood pools to make it turn into a Red Empusa

Lure the Empusa to one of the blood pools to make it turn into a Red Empusa (left), then use Faust’s Mad Hatter Gunslinger skill to get the necessary Red Orbs (right)
As you continue your descent, there will be another giant hole with a bunch of platforma jutting out of the sides. However, you’ll wake up some Hellbats and these things are especially annoying, given that there’s no solid ground to work with in this area. So, the best thing to do is to just run away from them, as you don’t need to get rid of them. That’ll lead you to the next section, where the two major deviations will come together.
At this point, the two split paths will pretty much merge, so you are looking at similar walkthroughs now. Drop down the next giant hole and all the way at the bottom, there will be a fight with a Hell Judecca, Hell Caina and Hell Antenora. The scenery after this gets a little chilly and the next battle will throw two Nobodies and a Lusachia at you. The Lusachia should be your first priority, although the Nobodies will make it tough for you, plus the teleporting will get annoying, too. With them out of the way, it’s one final hole to descend, leading to a Divinity Statue, then the last drop will lead to the boss.
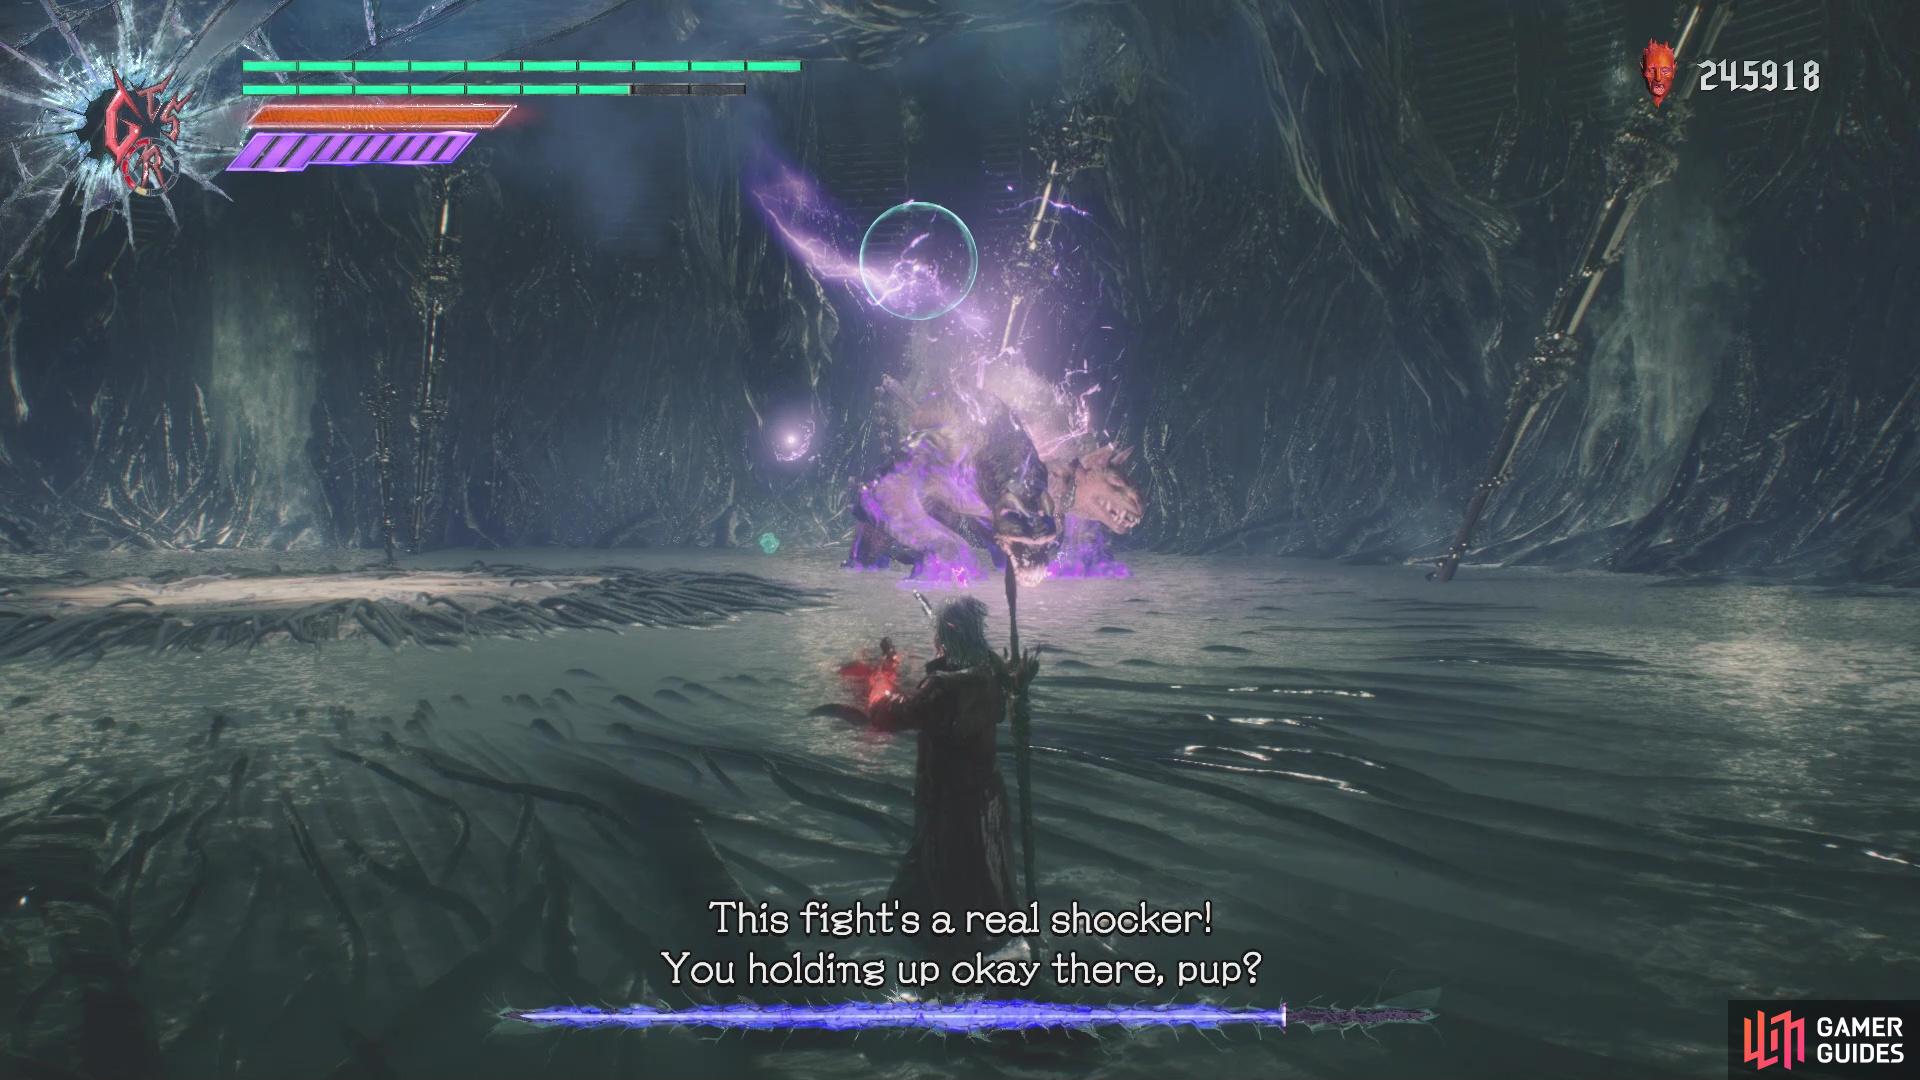
BOSS - King Cerberus
There’s no putting it mildly, but King Cerberus is definitely a tough boss. As should be obvious, he has three heads and each one corresponds to an element. He will start out with fire, though, then move onto ice and electric later on in the fight. The fire phase is fairly simple, as his strikes are all melee based, although they are quite quick. There is a lunge forward as Cerberus tries to chomp on your body, as well as a swipe with one of his front paws. Note that he can do several swipes in a row here, so always be careful of any follow ups. He can also do vertical swipes with one of his front paws.
At some point during the fight, Cerberus will switch elements by roaring and gaining an aura of that same element. You will want to get out of there as soon as possible, so switch to Trickster and dash your butt far away. This is because he’ll release a dome of energy that surrounds his body of that element. After fire will be lightning, which includes entirely new attacks. King Cerberus will let out some little balls of lightning that will track you, but these can be destroyed with a single hit from Ebony & Ivory. In addition to this, Cerberus will smack the ground in front of him, creating three fissures on the ground, extending from Cerberus and aimed at you.
These fissures will then shoot a small burst of lightning after a second or so, giving you enough time to dodge out of the way. Lastly, Cerberus can shoot a giant beam of lightning from its respective head. This sweeps across the arena, but it can be simply jumped over, so it’s easy to dodge. After the lightning head comes the ice one, so make sure you are far enough away to avoid its area-of-effect blast. One of the first things you will notice is that there are walls placed around the arena, which is to limit your movement. In this form, Cerberus can breath into the air and make ice chunks fall from the ceiling; keep moving to avoid these.


(1 of 2) You can shoot the little lightning orbs with Ebony & Ivory
You can shoot the little lightning orbs with Ebony & Ivory (left), Stun all three heads to knock Cerberus down for a few seconds (right)
Up close, you might see the middle head come down, where it will let out some cold air that spreads along the ground; you can jump over this attack. Lastly, you may see Cerberus charge up while in ice form, with him causing thin ice needles to fall from the ceiling. This doesn’t track you like the ice chunks, but the things actually are similar to the area-of-effect blast the boss does when switching elements. That means it will start out at the boss and move outwards a little bit from him.
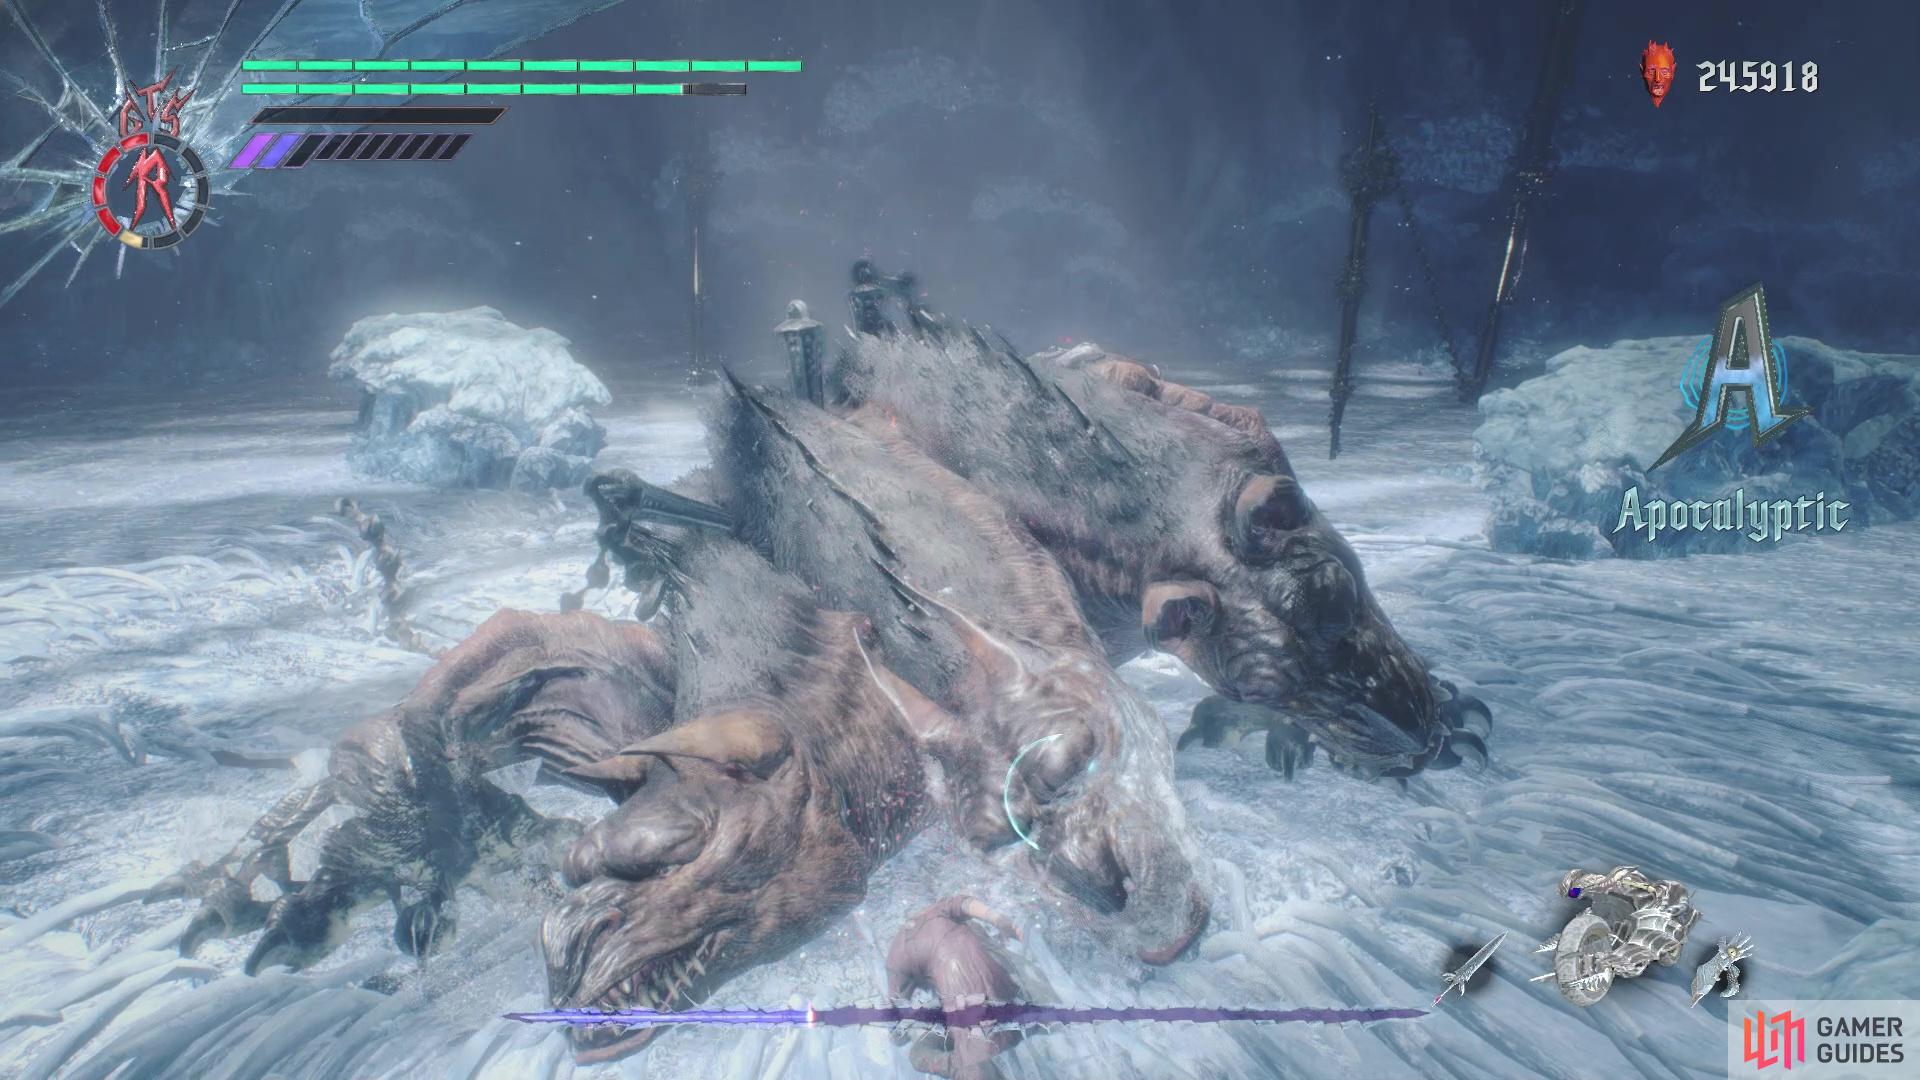
As for fighting King Cerberus, you probably want to keep Trickster on most of the time, as its dodge/dash maneuver is extremely useful in getting away from the element-changing blast. This will also help in dodging his melee attacks in all of his forms, as well as let you get in close. You can always switch to another style when attacking, but make sure you keep a itchy trigger finger ready to revert to Trickster at a moment’s notice. Aside from that, attacking while in the air and off to the side of Cerberus’ heads is the idea strategy for this boss battle. Apart from the ice attacks and the electric orbs, the majority of King Cerberus’ attacks are ground based.
There is a trophy/achievement associated with King Cerberus, called Obedience Training, which involves making the boss skip one of his elemental cycles. He will always start out with fire, then switch to electric and ice will be the last one, before starting with fire again. The best thing to do is target the middle head from the beginning, as that is his ice one. That’s because he will switch to the electric head after the fire one, so damaging the ice one makes more sense than going after the electric one first.

Obedience Training
Go on the offensive without relying on brute force in the Mission 16 boss battle.

10
No Comments