| Enemy | Species | Items |
|---|---|---|
| Andrealphus | Avian | Egg Paragon, Gigantavian Egg, Sylphstone, Gnomestone |
| Firmament Moloch | Avian | Wind Gem, Giant Bird Feather, Remex, Cashmere |
| Lizard Tyrant | Beast | Snakeskin, Lizardskin, Damascus Steel, Fire Gem |
| Royal Sphinx | Beast | Blank Disk, High-Capacity Blank Disk, Moon Pearl, Meteorite |
There’s not a whole lot special about the enemies in this area, other than they are all level 140, so depending on where you finished the previous main area, you might want to do some grinding on Metal Scumbags to get to the appropriate levels for the bosses (who are also at level 140). The only enemies you really need to worry about in the area are the Andrealphus and Royal Sphinx. The former is annoying because of its movement, while the Royal Sphinx can be deadly with its Crystal Ray attack. Overall, though, there’s nothing special about these enemies.
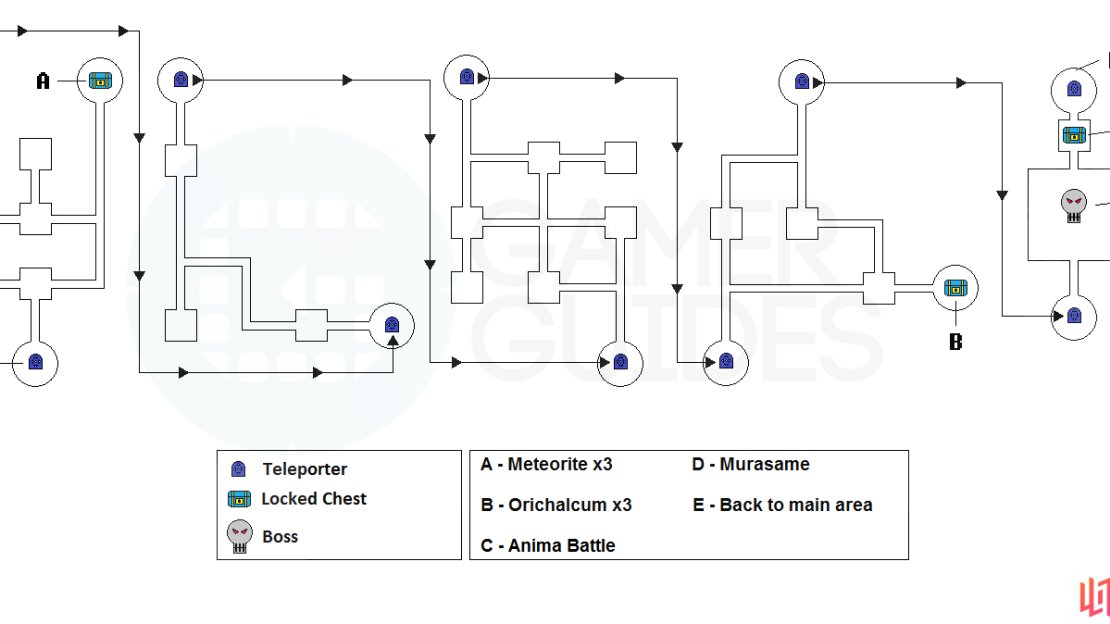
Terpsichorean Interlude I
Map of Terpsichorean Interlude I
BOSS: Boy oh boy, this is definitely a challenging battle, as you are pitted against clones of your entire team, minus Relia, so you will be up against six foes at once. They are all level 140, of the humanoid species, and have HP ranging from around 1 million to almost 2 million (on Galaxy). Things move very quick at the beginning, and it’s possible that your team will get wrecked in a matter of seconds, without you even knowing what happened to them.
The easiest way to tackle this battle is to put Dead Man Walking on either your primary damage dealer or Miki. If you do the latter, then try to equip her with roles that draw the attention of the enemies to her, such as Princess and Instigator. If you don’t want to use Dead Man Walking, then you’re going to want to create some nice armor that will have four factors of -10% damage from humanoids.
To do this, you’ll need two Mystic Robes and four Mythril Meshes, all of which can be bought from the merchant inside of the Alcazar of the Golden Age. You will also need to synthesize a bunch of Elemental Leathers, seven for each character, so a total of 42, unless you want to make some armor for Relia, too (six Wires should do the trick easily). You will also want to craft four Dojikiri-Yasutsuna for each of the characters, so 24 in total (requires Meteorite x3, Coal x4 and Bloodstained Cloth x2; Coal can be bought from Santa).
Once you have everything, take a random armor with four augment slots that are all blank and put the Dojikiri swords on it, then augment that to the Mythril Mesh/Mystic Robe. That should leave you with seven free slots to augment the Elemental Leathers, which should boost defense to about 400 and 38 in all resistances, except for Light and Dark. That should be more than enough to survive against the clones, especially if you create a tank by adding Warrior Slayer (-50% damage from humanoids, with the addition -40% from the Dojikiri on your armor); Princess and Instigator will keep them on that character.
One of the first things you will want to do during the battle is get rid of Anima Miki, as she is the biggest bane during the battle. The reason for this is that she has a huge heal that can restore a mega chunk of the enemies’ health, so the quickest way to take her out is to use Reserve Rushes. Come into the battle with a level four or five Reserve Gauge and spend three of those with Fidel, with Anima Miki as your target. You can quickly switch to Anne after that and spend the remaining gauge on her Reserve Rush, also against Anima Miki.
If that doesn’t take her out, then you will need to spend the majority of the time going straight after Anima Miki before she hopefully gets any heals out. Should she get heals off, then it’s going to be an uphill battle, as her heals are quite strong. Once Anima Miki is finished, your next targets should be Anima Fiore and Anima Emmerson, as they have long-range attacks and can be a hindrance. After that, it doesn’t really matter who you defeat next, although Victor might be a good candidate, since Bloodstorm Revolution can heal him a little bit.
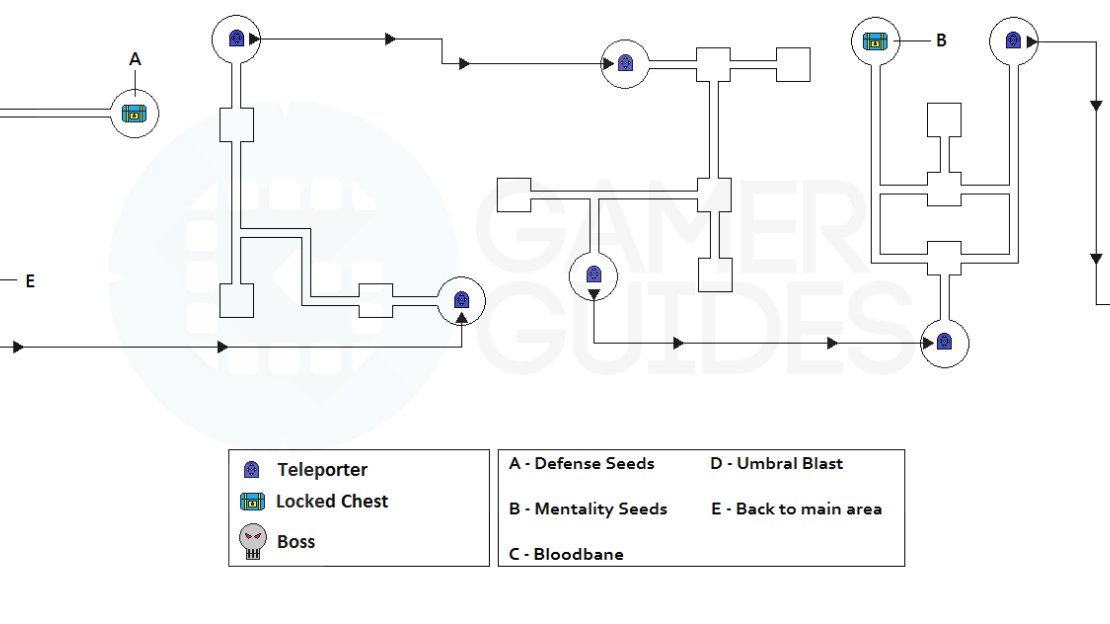
Terpsichorean Interlude II
Map of Terpsichorean Interlude II
BOSS: You might remember this boss as the Illustrious Chimera during the main storyline, but you don’t have to worry about any health regeneration this time around. This boss isn’t too bad, but it does have a lot of health and it will take a bit of time to whittle it down, especially if you only have one good damage source. One move that you will see a lot during this fight is Seething Inferno, where the Fiend will rise into the air, slam into the ground and then spin around as it comes out of the ground, dealing some major damage if all hits connect.
Depending on your characters’ levels and their defenses, your three main melee fighters should be able to withstand everything, although Anne might perish. As with almost any boss fight in this dungeon, your ranged characters should not even be near the boss (first thing you should do is move Emmerson, Miki and Fiore to the outer edges of the arena). Other moves include Soaring High, which is a backflip that will hit whoever is in front of the boss, an unnamed move where the boss will swipe its away across the arena, a fire breath attack and another move where it will just charge.
Setting up Victor as a tank is ideal here, with both the Instigator and Princess roles equipped on him, as well as anything that gives him health. With the right equipment and at around level 150 or so, he should be pushing close to 70,000 HP and it’s highly likely the boss will concentrate solely on him thanks to the above roles (Fidel and Anne will get some damage because of being in melee range). Have Miki concentrate solely on healing and this fight should be pretty standard. Note that the boss is a Corrupt-type, so you will either want to equip Mutant Slayer on Victor or one of your damage dealers.
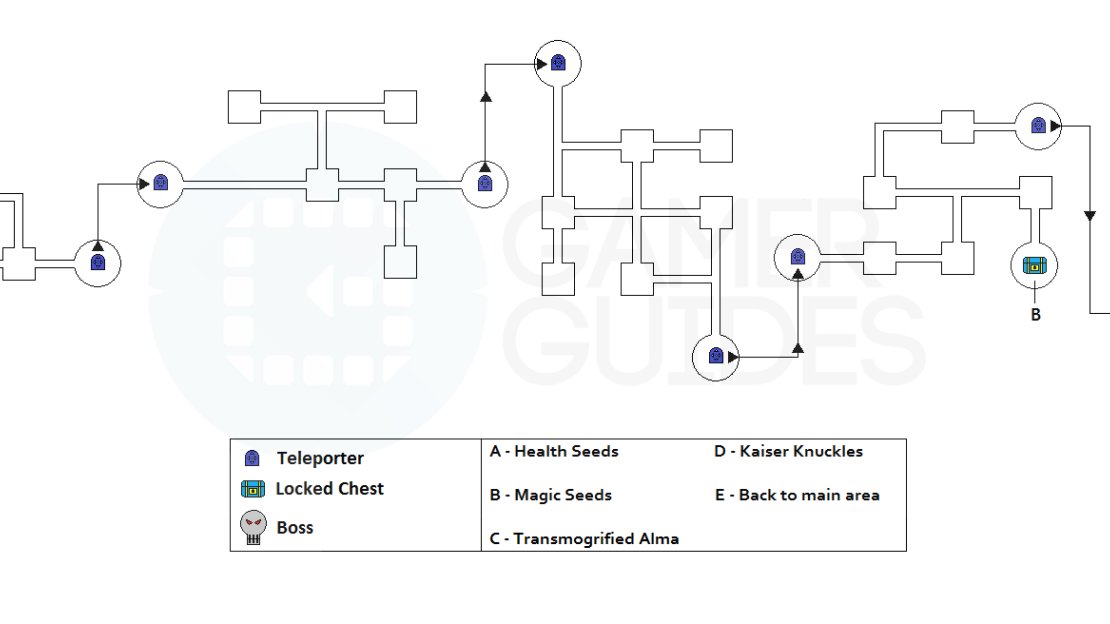
Terpsichorean Interlude III
Map of Terpsichorean Interlude III
BOSS: Bloodbane is a big dragon, similar to the Storm Dragon in the Cathedral of Oblivion, except he likes to use darkness spells. He has a little bit more HP than Bloodthirsty Fiend, so it will be a long and boring fight. One thing that should be noted is that Bloodbane is not susceptible to any normal status ailments, so if you’ve been using a Stun build on anyone, there’s no point in this battle. However, the DEF and MEN debuffs from the Daemon role work, as does Sacred Pain.
For attacks, Bloodbane will use darkness skills, such as Shadow Needles and Vampiric Blade. The former can do some nice damage, while the latter just siphons your MP, so it’s nothing to worry about short of your melee attackers having low MP. Bloodbane also has access to Sacred Pain, which might be a bit annoying if you’ve been building resistances with some equipment. There’s a fire breath attack, as well as a spinning tail attack, which is just about all Bloodbane has up his sleeve for attacks.
As a dragon, Bloodbane is of the avian-type and thusly, someone should be equipped with Raven Slayer (likely someone who is attacking to boost your damage). The Victor tank build described in the Bloodthirsty Fiend battle works here, too (Princess and Instigator roles to keep Bloodbane glued to him). At the beginning of the battle, move your ranged characters away from the boss and then start switching on to the full-fledged damage. Note that unlike the Storm Dragon, Bloodbane does not absorb darkness attacks, so you are free to use them if you want, although Fiore’s tend to put her in harm’s way.
Terpsichorean Interlude IV
Map of Terpsichorean Interlude IV
BOSS: There is absolutely nothing different to this battle from when you fought him as the final boss of the main story, except you don’t have to worry about the invulnerability periods. That means you are free to go all-out from the beginning of the battle. That being said, Alma must have taken a page out of Bloodthirsty Fiend’s book, as he likes to spam a particular move over and over. In this case, it is Ogrefall, which is pretty much the same move as Seething Inferno, as the actions are the same and it does do a big amount of damage to your characters.
One of the more annoying aspects of the fight is that some of Alma’s skills can inflict various ailments on your party. Seraphic Rebuke can inflict Silence, which is a big no-no if it lands on either Miki or Fiore, and Baleful Winds, which can put Fog, Freeze and Silence. You should be quick to get rid of these with items or if Miki isn’t afflicted, with her Cure Condition skill. Aggravation is similar to Sacred Pain, but it hits your entire party, and Acceleration, a skill that slows down your party.
The biggest thing with this battle is that you don’t want it to go on too long, because Alma has a skill called Annihilation that lives up to its name. He will precede this with Initialization, which is your cue to either move as far away as possible, or stick Dead Man Walking on someone like Miki. The usual Victor tank strategy will work here, too, but you might want to put God Slayer on Victor to keep him alive, just in case (Transmogrified Alma is a deity). If you see Alma use Angel Feather, quickly dispell it with Void.


No Comments