
| Enemy | Species | Items |
|---|---|---|
| Ancient Guard | Machine | Silver, Gold, Platinum, Meteorite |
| Grim Reaper | Corrupt | Bloodstained Cloth, Ghost’s Soul, Nereidstone |
| Metal Scumbag | Machine | Silver, Platinum, Mythril, Faerie Embroidery Thread |
| Netherphantom | Corrupt | Crystal, Amber, Light Gem |
| Vicious Cloud | Plant | Gerel Secretion, Gelatinous Slime, Alchemist’s Water |
Welcome to the second main area of the Maze of Tribulations and it is here where you will do most of your grinding, whenever you need to do it. Before getting to that, the most dangerous enemy is probably the Netherphantom, solely because of its Trinal Spur skill that can kill characters in the blink of an eye. The Ancient Guard cannot be staggered from your attacks, but it’s not very dangerous otherwise.
The true star of this main area, and the one enemy you will be truly grinding on for the rest of the game, is the Metal Scumbag. When you normally fight these foes, you will notice that your attacks don’t deal much damage, which is because they have 9999 DEF and MEN. The only way to really put a hurting on them is to either have a high attack or intelligence (6-7k should be good), or to have the Scumbag Slayer weapon equipped to someone. This is a Level 6 Smithery recipe (Meteorite, Wooden Stick x3, Mana Ribbon and High-Strength Adhesive) and can be equipped by anyone, with it dealing 99,999 damage to Scumbags (Metal ones only have 100K HP).
The reason you want to grind Metal Scumbags is because they give you around 32,000 EXP each! There are numerous places where you will encounter three Metal Scumbags in a fight, so that’s almost 100K EXP as a base, before you factor in food, accessories or Roles that boost it. The best place for this is in the northwest area (Indra’s Peregrination IV), as you will encounter three Metal Scumbags and an Ancient Guard in the very first room; use the Ocarina to respawn them. With the Altruist and Miser roles, you can use these enemies to get metric tons of SP and Fol, too!
Indras Peregrination I
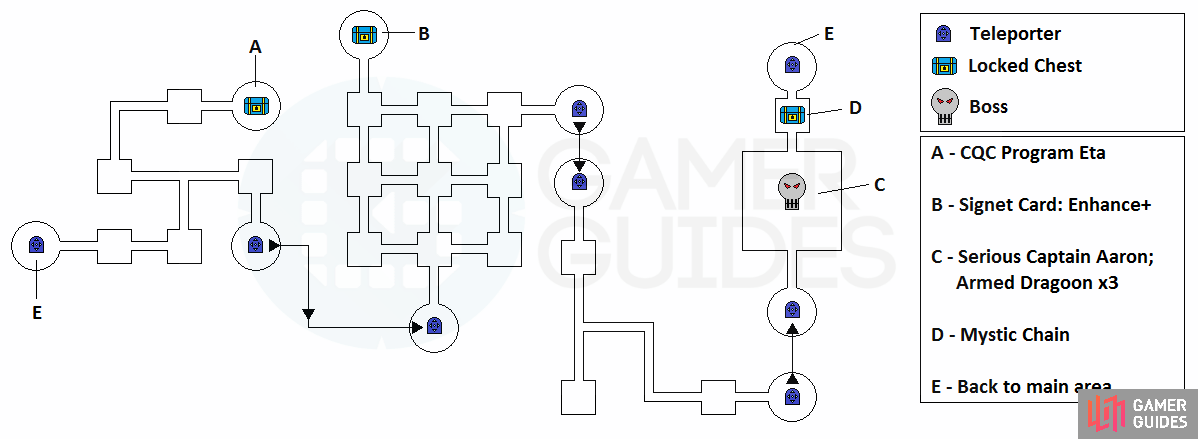
Map of Indra’s Peregrination I
BOSS: Captain Aaron is accompanied by three Armed Dragoons, each of which has around 550,000 HP. You should remember these things from when you protected Anne outside of that one facility, and they haven’t learned any new moves since then. Flamethrower is a short-ranged attack that can deal some decent damage if your characters get caught in it. Shoulder Missile sounds exactly like its name, with the Dragoons launching three of them against a single target (with splash damage). Cannonade is an energy ball attack where the Dragoons will launch a big ball of energy right in front of them that explodes. Its most dangerous maneuver is called Semiconductor Laser, where it shoots a laser at the ground straight ahead and then arcs it into the air.
On his own, Aaron isn’t much of a threat. He does know a few healing Signeturgies available to him and he might use them during the battle, so don’t be surprised if you see his health bar jump up significantly. Aaron is equipped with a gun, so he is able to hit you from afar with his normal attacks. He also knows a few other Signeturgies, mainly Earth Glaive and Terra Hammer, with the latter being the more dangerous of the two.
As usual, you should try and move Miki, Emmerson and Fiore away from the enemies at the beginning of the battle, but this might prove difficult because of there being four enemies. The first thing you will want to do is get rid of the Armed Dragoons as soon as possible, as they are the ones doing the most damage. Equip one of your damage dealers with the Machine Slayer role, preferably someone like Emmerson, since he can hit more than one of the enemies with Crescent Wings and not be in danger of getting pummelled.
Indras Peregrination II
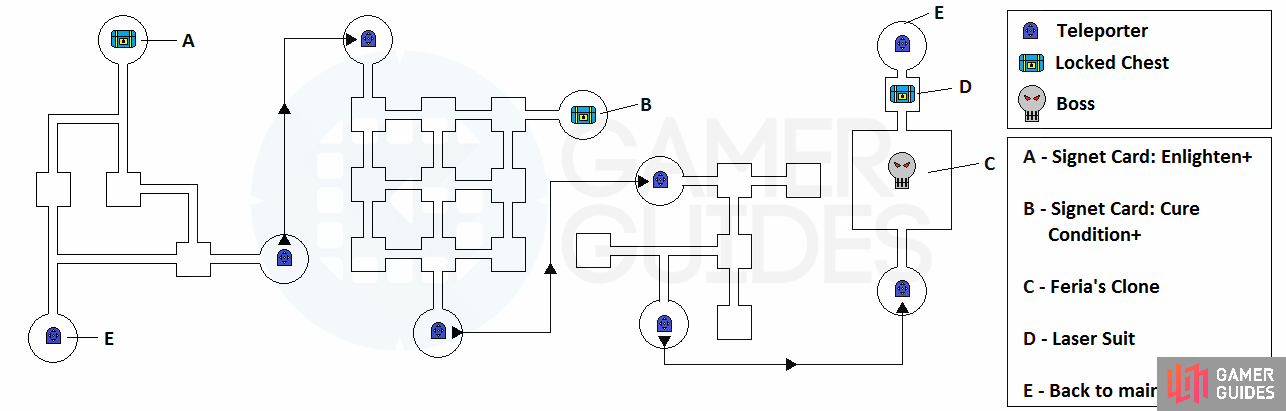
Map of Indra’s Peregrination II
BOSS: You should remember this battle, as it is pretty much the same as inside the Alcazar of the Golden Age. First and foremost, Feria’s Clone is considered a Humanoid, so make sure you have Warrior Slayer equipped to someone, probably your main damage dealer. Revolution is a skill that takes a while to charge up, but it does some heavy damage, with it possibly even one-shotting some of your weaker characters. Tenacious Beam seems similar to Revolution, but it does far less damage than it.
You might notice that Feria’s Clone can buff herself with Angel Feather, so you will want to cast Void with Fiore to remove those. Expulse is something the Clone does to just push your melee characters away from her, and it can do some decent damage in this battle. As with the previous battle, you want to keep an eye out for Oppressive Effulgence, which tends to only hit melee characters. If it doesn’t kill them, it has the possibility to silence them.
There have been reports of her using some of the bigger signeturgical spells, like Extinction or Deep Freeze, but through ten or battles, they were never seen. However, they are mentioned just as a warning in case you do see them. Overall, the battle with Feria’s Clone seems to be rougher on your melee characters, especially if she sticks to them throughout the fight. Therefore, if they keep dying, maybe it’s better to put Warrior Slayer on one of them.
Indras Peregrination III
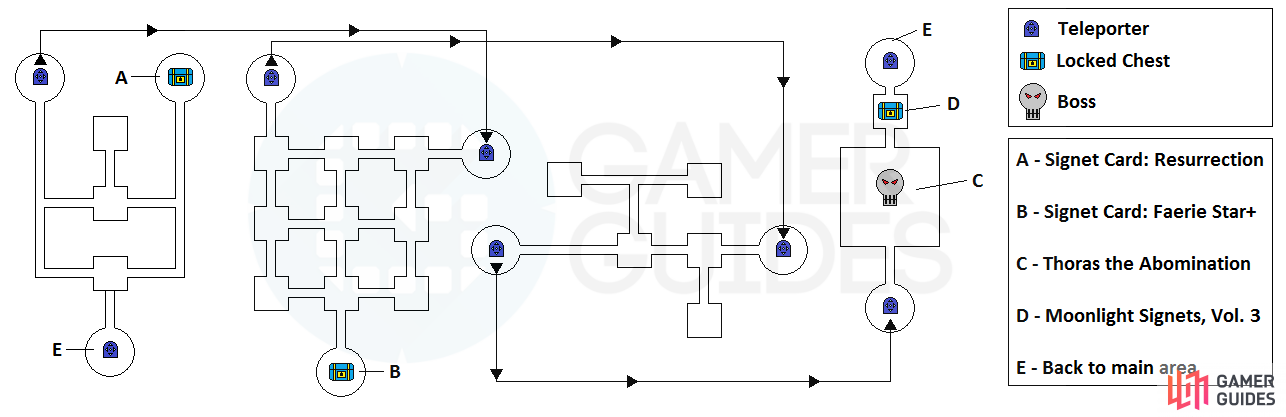
Map of Indra’s Peregrination III
BOSS: The battle against Thoras is the exact same as when you fought him during the main story, with one little caveat, which is that he’ll begin using all of his skills from the very beginning. He has a lot of signeturgy under his belt, including Enhance (which should be removed with Fiore’s Void), Divine Wave, Sunflare, Tornado and Dark Devourer. All of the spells are dangerous in one way or another, so be especially careful when you see the boss start throwing them out.
In addition to the above spells, he also has a physical move called Flagellant Tendril Furor. This move only hits in front of him, but it will knock whoever it hits backward, as well as breaking their guard. If you remember, Thoras moves quite slow and this should be taken advantage of in the battle. He is considered a plant species, so equip someone with the Plant Slayer role to either reduce damage or enhance your damage dealer’s numbers. There isn’t really much else to this battle, as you’ve already fought him before and should know what he’s capable of.
Indras Peregrination IV
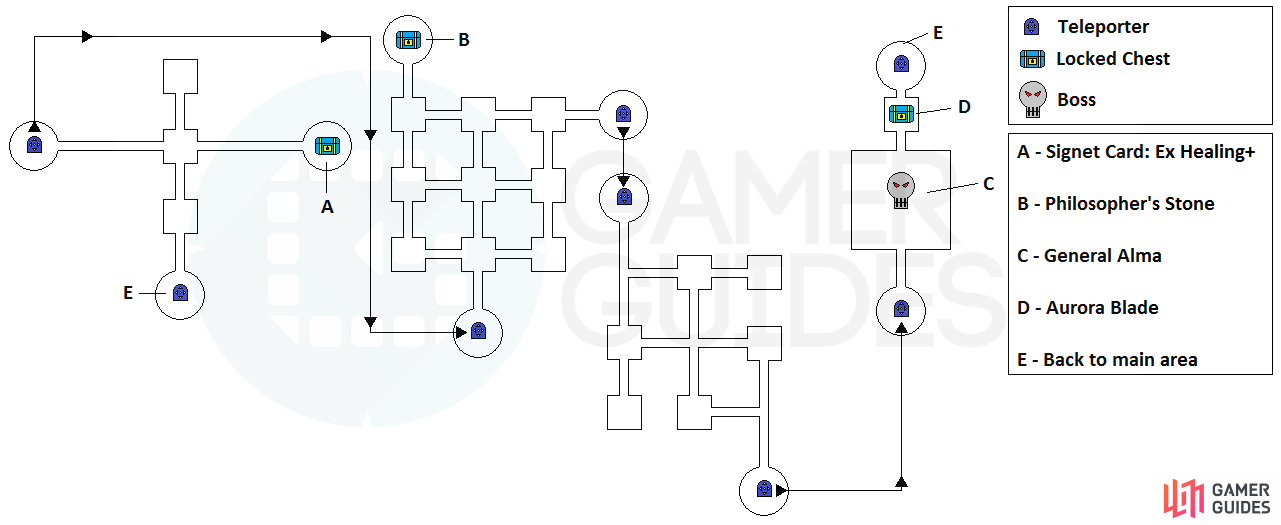
Map of Indra’s Peregrination IV
BOSS: The fight with General Alma’s signeturgical form is the same as in the main story, except you don’t have the needless waiting around for the part where you don’t do any damage to him. All of Alma’s attacks are mainly physical, so pure defense is the way to go here. Divine Bullet is similar to Fidel’s Abyssal Gate, where he’ll charge up the move, teleport and do the attack shortly after that. If he’s targeting your controlled character, you can simply move to the side to avoid the attack.
There are two major problems with this battle, called Bosom Blow and Hammergeddon. The former can occur naturally, but it’s also Alma’s counter to you using weak attacks. Although you can’t control all of the characters at the same time to make them not use weak attacks, you can do it for the one character you are controlling. Not only does Bosom Blow do some decent damage to characters in range, but it also knocks them down. For Hammergeddon, Alma jumps into the air and crashes down, causing some major damage.
Ground Wave can be blocked, plus it doesn’t do that much damage, so there’s nothing to worry about there. Bloody Blight is an uppercut that knocks whoever it hits onto the ground, and Transitionary Shock doesn’t really do much damage either. Overall, the refight with General Alma isn’t too bad and the only move that really needs pointed out is Hammergeddon. Remember that he is a humanoid in this battle, so equipped Warrior Slayer will help in chiseling away his massive amounts of health. At least you don’t have to fight any other forms after this.
No Comments