Messing with MyCastle XIII
You can build an Ice Sculpture, which is just cosmetic. Yeah, not much in the way of new stuff. As for upgrades, however, you can improve the Traveler’s Plaza and your resource-generating buildings up to their maximum level, which allows you to meet even more players and gives you an even higher chance of harvesting more resources, respectively. You can also maximize your Hot Spring, which allows even more NPCs to float around together.
More interestingly, if you upgrade your Hot Springs to level three, then fight any random battle, Izana will show up at your castle immediately afterwards and join the fight. You remember him, kind of… weird… duke? Whatever, he’s an already-promoted Onmyoji, so he shouldn’t need any work to bring up to snuff. Just equip a scroll and a rod and he’s good to go.
Sevenfold Sanctuary
| Location | Objective |
|---|---|
| Sevenfold Sanctuary | Rout the enemy. |
| Enemies |
|---|
| Swordmaster |
| Master of Arms |
| Hero |
| Berserker |
| Spear Master |
| Mechanist |
| Master Ninja |
| Great Master |
| Enemies |
|---|
| Sniper |
| Maid |
| General |
| Basara |
| Adventurer |
Turns out Leo wasn’t lying; the gift he gave you take you right to Notre Sagesse, home of the Rainbow Sage. After asking and ignoring the advice of a local, you’ll set out in search of the chromatic geezer. As the Old Man in town warned, the trip here may have been easy, but following in the steps of Xander will be perilous.
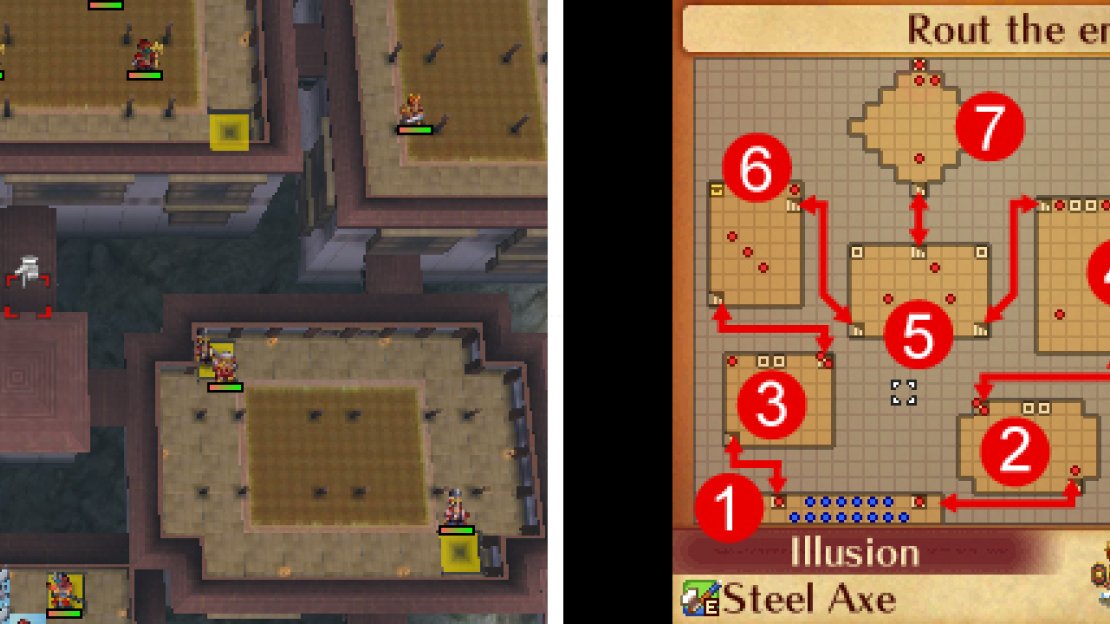
Map of Chapter 19, with added detail to help navigation (left).
If you haven’t promoted your characters yet, you will officially be under-powered for the this mission, which pits you against a variety of promoted units. You’ve been encouraged to see to promoting your characters (preferably after hitting LV 20 in a basic class) since Chapter 15, so hopefully you’re ready for this fight.
As mentioned earlier the units in this level are quite varied. Basically, pretty much every non-flying, unmounted class in the game will show its face here. You’ll face varied weaponry and units that can heal others. Thankfully, most everyone will either have weak Resistance or weak Defense. This calls for a varied force of your own, but unlike last map you need not feel compelled to bring along too many fliers or mounted units. You don’t really need much movement due to the cramped quarters you’ll find yourself in.
Speaking of the terrain, in this map you’ll start out on the southern end of the map, with a crazy stair thing ahead of you. There are no terrain impediments this time around, but the map is split into seven small rooms with stairs that lead to other chambers, which are numbered on the included map. In the bottom-most room (Room #1) the stairs are blocked by some fodder for your troops. Once done, you’ll have to split your forces, as the eastern stairs lead to an eastern room (Room #2) while the western stairs take you north (Room #3). Using the Stairs won’t end your turn, and you can continue to move after using them if you have movement range leftover (i.e. if a 6-tile character takes 4 tiles to get to the stairs, they have an additional 2 tiles of movement range leftover in the new room)
The stairs in Room #3 lead to Room #6, where you’ll encounter unarmed Adventurers who only have staves. Joining them are Snipers, one of whom will drop a Chest Key that you can use in the chest in this room, or you can just get a Ninja. Your reward for looting this chest is a Hexing Rod .
On the eastern side of the map, you can take some stairs from Room #2 to Room #4, where a lone Hero awaits at the southern end of Room #4. At the northern end are Masters of Arms, one of which will drop a Silver Club , while the other yields a Silver Katana . Again, the Hero drops a Chest Key , and you can use this key to open a chest from which you’ll obtain a Wane Festal .
Both Room #6 and Room #4 lead to room #5, albeit arriving on opposite sides of the (rather large) room. Make sure your units are grouped and ready to enter in all at thes ame time. Once your party is reunited in Room #5 with all the enemies dead (and new loot obtained!), mass near the stairs to the north (which lead to Room #7) and make sure your units are all healed up and ready to go.
Room #7 is guarded by a Berserker with a rather high Attack score, but he’s only got a handful of Hit Points and paltry Resistance, so send in a magic-user to put him down. Once done, your remaining foes include Swordmasters (use magic), a Spear Master (who drops a Bolt Naginata ), and Generals (use Armorslayers or magic, or Sting Shuriken). All in all, straightforward, especially if you charge through the stairs with ranged units, then engage later with melee units and make use of tag team attacks.
Defeat all the foes plus the boss and the Rainbow Sage will reveal himself, and give you a rather anticlimactic training session. He’ll follow this by inspecting some choice weapons you possess before giving you even more prophecies to work with. Oh boy, vagaries!

No Comments