
Messing with MyCastle X
Only one upgrade this time, you can upgrade your Arena to LV 2, which allows you to raise the stakes on your betting by fighting two consecutive battles per visit. The first battle wages one item to win two, while the second will wage two items to win four, but you don’t fully heal between fights, so be wary.
Near Palace Macarath
| Location | Objective |
|---|---|
| Macarath Palace | Rout the enemy. |
| Enemies |
|---|
| Dark Mage |
| Sorcerer |
| Fighter |
| Hero |
| Outlaw |
| Knight |
| Strategist |
Some exposition will occur (seems like you have to be pitching a perfect game to keep your head in Nohr!) after which Takumi will make a scene, which forces you all to take a rather dangerous detour. Another old friend will surprisingly show up to help, only to be thwarted by Garon’s under-performing pitcher, looking for a little redemption.
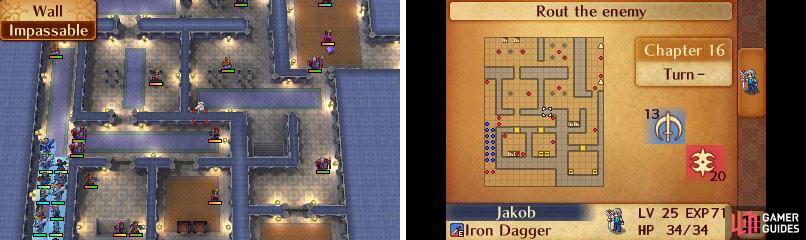
Map of Chapter 16.
This battle is the opposite of the last one in many ways. You’re fighting inside a palace this time, with many a narrow hallway and doorway to slow you down, so maneuverabilty and speed aren’t really necessary as much as brute force. The Norhians have slightly higher Attack than the doggies last battle and more varied weaponry, but they lack the high Critical and Avoid rates, making this battle less prone to randomness, which is good.
You’ll be facing your normal staple of Nohrian enemies, including Knights, Fighters, Outlaws and Dark Mages, whose Attack values range from the low to high 20s. Breaking the monotony are Heroes (high Hit Points, noteworthy Critical and Avoid rates), Strategists and Sorcerers. Since two promoted units and the boss, Iago , are all magic-users, bringing along some blue weapons comes highly recommended. Ninjas especially will serve you well, as they can attack from a range with Shurikens and open locked doors and chests, saving you the need to worry about picking up random keys enemies on this map hold (and they have high Resistance). Hinoka may also serve you well.
There are no Dragon Veins in this map, instead you’ll be dealing with Turrets (27. Turrets), namely Fire Orbs, which can be used by Tome-wielding units. Sadly, the two Fire Orbs on this map are in the north-eastern most room with the boss and his pet Dark Mage, and they’re more than willing to use these devices to make your journey east more harrowing. Fortunately, the Fire Orb can only target one unit in its area-of-effect at a time (although adjacent units may be affected), and it does little damage, when it manages to hit at all.
Start out the fight (which will be very linear, thanks to the map layout) by dispatching pairs of Knights (use ranged attacks) and a Hero to the north, who will kindly drop you a Chest Key , which you shouldn’t need so long as you brought some Ninjas. Speaking of which, after your first turn two Outlaws to the east should open two nearby doors, allowing a Fighter and a Black Mage to join the fray.
Dispatch the weaklings and work your way north, where you’ll confront two more promoted units; a Sorcerer and a Strategist. Just lead with a Ninja, Hinoka, or another high-Resistance unit and they should suicide themselves on you. Along the way you’ll gain a few 3,000G drops, a Tiger Spirit , a Great Club , and another key you hopefully don’t need. Speaking of which, be sure to send a Ninja into the eastern of the two rooms near the start to find two chests, the eastern of which contains a Goddess Icon (Permanently increases Luck by 4) while the western one contains a Silence staff.
After this you will be within range of the Fire Orb, which is a paltry threat at best, and eliminate the weaklings around Iago. If you want to mitigate what little damage the Fire Orb does, stagger your units so none are directly adjacent to each other (this risks you getting more damage since you no longer are paired, however, so perhaps you might want to defensively pair your units here). Be sure to move a Ninja south of Iago to claim two more chests (east; 10,000G , west; Arms Scrol l), then deal with Iago. Like most bosses, he’ll just stand around until you move into his laughably small movement range, giving you the initiative. Prey upon his low Defense.
Iago will use some mean, mean words to cause your protagonist to doubt their allies before exiting the stage, after which you’ll tend to your sick and wounded. Flora, having recently received some abuse from her friendly Nohrians, decides she wants to go home, which just so happens to be a good strategic move for you, as well. How convenient.
No Comments