Plains of Eternity - upon arriving go northwest to enter the Nomad Camp. On the wooden platform before the stairs leading into the chief’s house, check out two treasure spheres for a Grimoire Hat , and 600 gil.
| Category | Items |
|---|---|
| Accessories | Delicate Ember Ring, Durable Ember Ring, Delicate Frost Ring, Durable Frost Ring |
| Special | The following items unlock after you reach AF01X Yaschas Massif: Durable Metal Armband, Durable Serenity Sachet |
| Special | The following items unlock after you reach AF200 Augusta Tower: Durable Guardian Amulet, Durable Auric Amulet, Durable Watchman’s Amulet, Durable Hero’s Amulet, Durable Saint’s Amulet, Durable Zealot’s Amulet |
| Special | The following items unlock after you reach AF4XX Academia: Durable Sniper’s Eye, Durable Twist Headband, Durable Bloodguard |
| Special | The following items unlock after you reach AF500 Academia! Durable Obsidian Choker, Durable White Cape, Durable Pain Dampener |
| Special | The following items unlock after you defeat the final boss: Delicate Collector’s Catalog, Durable Collector’s Catalog, Delicate Hermes Sandals, Durable Hermes Sandals, Delicate Ribbon |
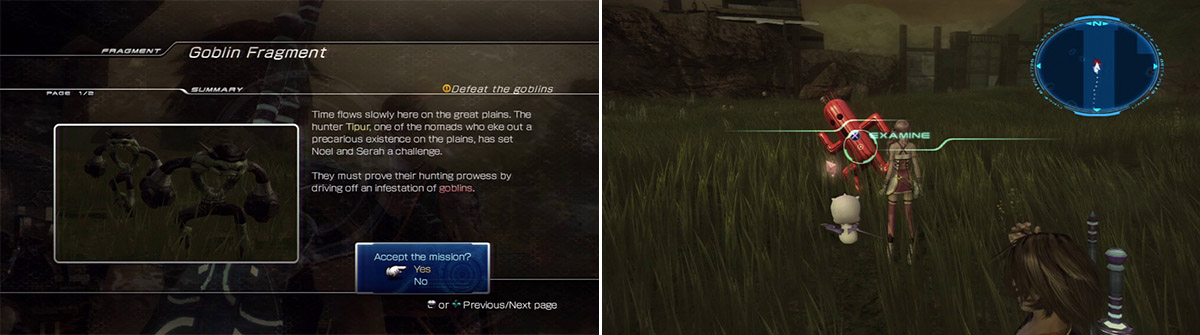
Goblin Fragment quest (left). What an odd Cactuar Stone (right).
Talk to the nomad chief Tipur to obtain map of Archylte Steppe, and then he troubles you with some enemies that are haunting the Steppe. Choose to accept the quest to defeat the goblins. Go south from the Nomad Camp into the Plains of Eternity to the yellow “!” on the map and several enemies will spawn. You know they’re the right ones when a caption “Target located!” pops onscreen. Skin them all to accomplish the quest and get AF??? ARCHYLTE STEPPE FRAGMENT - Goblin Fragment (01/12) + 300CP !
Check the red Cactuar stone nearby and you’ll be warped back to the nomad settlement along with the AF??? ARCHYLTE STEPPE FRAGMENT - Crimson Crystal (02/12) + 300CP ! This Cactuar stone can be activated in any weather conditions. Different weather, you ask? Just keep playing. Talk to the nomad chief, and now he wants you to talk to the girl tending the sheep just outside his house.

Woolly Stone fragment quest (left). One of three sheep you need to examine for the quest item (right).
Talk to Myta and she mentions that outside the nomad settlement on grassy fields in the Plains of Eternity there are three big sheep grazing in the grass. Your task is to pluck their wool by approaching them and pressing X (get Rough Wool , Fluffy Wool , and Thick Wool ). Once you nab all three, return to Myta for AF??? ARCHYLTE STEPPE FRAGMENT - Woolly Stone (03/12) + 300CP ! Talk to her again and now you can mess with the weather control device in the chief’s house.
Talk with the girl nearby for instructions on how to operate it - basically you flip two levers between up and down positions. Here’s the weather conditions:
a) left down, right down - sunny weather
b) left down, right up - stormy weather
c) left up, right up - windy weather
d) left up, right down - rainy weather
Flip both levers down to make sunny weather and Faeryl pops up in the east dead end of the Steppe in Sanctorium, along with Long Gui. Talk to Tipur for a Live Trigger: (A flan-devouring monster is behind the storm. What’s going on?), then flip the right lever to the up position to make stormy weather and remove Long Gui from the equation. Depart for the battle with Faeryl.
Boss Battle: Faeryl
Equip the following Paradigms:
-
RAV/RAV/COM (default)
-
SEN/SEN/SEN
-
MED/MED/MED
-
COM/COM/COM
Bleh, Faeryl is immune to several status effects that are very useful on bosses. So we’ll have to take a different approach with the paradigms listed above. At the start of battle Faeryl charges for one of its big attacks. Unleash one set of Relentless Assault and then switch to and wait for the boss to land to finish this particular attack.
Switch to to heal quickly, and then back to to stagger the foe. Upon achieving stagger, unleash two more sets of commands for a bigger chain boost, and then switch to for mega damage against Faeryl. As soon as Faeryl breaks out of stagger, it unleashes another big attack, so quickly switch to , and then to recover sustained damage.
Faeryl has an annoying tendency to draw you in close and then follow up by roasting you with flame breath, and it’s also keen on wind magic. After several rounds of fire, wind, heart, earth, water and Captain Planet, Faeryl readies to charge for its signature move, so wait in until it’s finished and repeat the process to finish off the boss.
AF??? ARCHYLTE STEPPE FRAGMENT - Black Hole Gem (04/12) obtained + 3500CP ! You can also claim a Live Trigger Cube that spawned nearby, and now we will gonand open all available treasure spheres you can reach at the moment.
The Sanctorium has one - on the ledge where Faeryl was parked, you can briefly see a treasure sphere rise up. Aim the moogle correctly and toss it on the ledge to get 8x Power Sliver .
Now go northwest into the Plains of Eternity to collect four treasure spheres. Three of them are just before the Nomad Camp and contain 2x Remedy, 3x Potion , and 8x Mana Droplet . Now go southwest from the Nomad Camp and go down into the ditch to find the last treasure sphere with 2x Fractured Horn . Now exit the ditch to the west into the Stonestump Wastelands.

Aiming for the Guardian’s Edge
Proceed west into another ditch and look up towards the southwest to spot a treasure sphere out of reach. Carefully aim your Moogle Throw and toss it to collect the Guardian’s Edge; [Critical: Shield II] a weapon for Noel. Exit the ditch and go south past the green Cactuar stone but don’t activate it just yet. Continue going south towards the ditch and find a hole in the rock wall. Toss Mog inside to get the Woolly Sheep Figurine from a hidden treasure sphere. Now park Serah in the south-most ditch to discover a concealed treasure sphere, so reveal it with R1 to collect a Single Horn . From this treasure sphere, go northeast to find 6x Vitality Droplet .
Now go southeast to enter the Grave Ridge - there’s a sealed crystal gate here. To release the seal, you have to find three green Cactuar stones in Archylte Steppe, activate them and then defeat three Gigantuars. You won’t be able to beat them yet so let’s move on. In the southwest corner of Grave Ridge is a concealed treasure sphere, so reveal it to pocket 9x Vitality Sliver . And then there’s the south dead end in Grave Ridge which has 8x Mana Bolt , and another concealed treasure sphere containing a Phoenix Down . By going northeast from your position you will see an elevated platform that seems impossible to reach, along with a treasure sphere on that platform. Toss the moogle at the platform to bag 8x Mana Chip . These are all the treasures you should collect for the moment - three more remain in Clearwater Marshes and the western-most area of Archylte Steppe, but we’ll leave those for later.
Leave to the Historia Crux and return to AF300 Sunleth Waterscape.
No Comments