

Head to the Imperial Museum / Defeat the Dark Dragon
Once you’ve finished up your lunch, head into the Imperial Museum (Leica District) to view a cutscene, then go over to the glowing object in the room ahead. After you’re done investigating, go down into the Museum’s Basement to find the Heimdallr Catacombs. Here you’ll want to go further down and take out the three enemies, then after the cutscene you’ll want to split everyone into the following groups.
| Team A | Team B | Team C |
|---|---|---|
| Juna (Leader) | Sara (Leader) | Rean (Leader) |
| Kurt | Jusis | Laura |
| Millium | Fie | Alisa |
| Elliot | Musse | Emma |
| Gaius (Sub) | Ash (Sub) | Machias (Sub) |
| Altina (Sub) |
- Explore Dark Dragons Nest 1 (Team C)

Dark Dragons Nest 1 Team C Map.
| Enemy | HP | Slash | Thrust | Pierce | Strike | Elemental Efficacy | Item Drop |
|---|---|---|---|---|---|---|---|
| Octofiend | 6958 | ☆☆☆ | ☆☆ | ☆☆☆☆ | N/A | E - 160, WA - 120, F - 80, WN - 100, TI - 80, SP - 140, MI - 100 | Clear Gelatin, Curia Balm |
| Evil Eye | 10658 | ☆☆☆ | ☆☆☆☆ | ☆☆☆ | ☆ | E - 100, WA - 160, F - 120, WN - 80, TI - 100, SP - 80, MI - 140 | Clear Gelatin, Hit 1 |
| Speculo I | 6956 | N/A | N/A | ☆☆☆☆ | N/A | E - 200, WA - 200, F - 200, WN - 200, TI - 200, SP - 200, MI - 200 | Tear Balm, U-Material |
| Speculo II | 6965 | ☆☆☆ | ☆☆☆ | N/A | ☆☆☆ | E - 0, WA - 0, F - 0, WN - 0, TI - 0, SP - 80, MI - 0 | EP Charge I, U-Material |
| Vampire Bat | 6957 | ☆☆ | ☆ | ☆☆☆☆ | N/A | E - 60, WA - 180, F - 140, WN - 100, TI - 100, SP - 80, MI - 140 | Hearty Powder, Battle Scope |
| Weed Beetle | 6952 | ☆☆☆ | ☆ | ☆☆ | ☆☆☆ | E - 120, WA - 80, F - 100, WN - 160, TI - 140, SP - 100, MI - 80 | Chitinous Shell, U-Material |
| Vargem | 17057 | ☆☆☆ | ☆ | ☆☆ | ☆ | E - 80, WA - 80, F - 80, WN - 80, TI - 140, SP - 120, MI - 200 | Reviving Balm, U-Material |
| Werewolf | 17063 | ☆☆ | ☆☆☆ | ☆ | ☆☆☆ | E - 120, WA - 80, F - 100, WN - 160, TI - 140, SP - 100, MI - 80 | Beast Flesh, Chitinous Shell |
| Star Lambda | 17064 | ☆ | N/A | ☆☆ | ☆☆☆☆ | E - 120, WA - 80, F - 100, WN - 160, TI - 100, SP - 80, MI - 140 | Teara Balm, U-Materiel |
| Hercules - Rifle | 54344 | ☆☆ | ☆☆ | ☆☆ | ☆☆ | E - 100, WA - 100, F - 100, WN - 100, TI - 100, SP - 100, MI - 100 | U-Material, Tearal Balm |
| Hercules - Greatsword | 54384 | ☆☆ | ☆☆ | ☆☆ | ☆☆ | E - 100, WA - 100, F - 100, WN - 100, TI - 100, SP - 100, MI - 100 | U-Material, Tearal Balm |
| Iglute Garmr | 46276 | ☆☆ | ☆☆ | ☆☆☆ | ☆ | E - 80, WA - 100, F - 160, WN - 120, TI - 100, SP - 80, MI - 140 | Aerial Dust R, Fortuna R |
| Ol-Gadia | 46376 | ☆ | ☆ | ☆ | ☆☆☆ | E - 120, WA - 80, F - 100, WN - 160, TI - 140, SP - 100, MI - 80 | Adamantine Shield R, Megalith Fall R |
| Lucifuge | 46294 | ☆ | ☆ | ☆☆☆ | ☆ | E - 80, WA - 80, F - 80, WN - 80, TI - 140, SP - 120, MI - 200 | Confuse II, Galion Fort R |
| Ginosha-Zanak | 46305 | ☆☆ | ☆ | N/A | ☆☆☆ | E - 120, WA - 80, F - 100, WN - 160, TI - 100, SP - 80, MI - 140 | Poison II, Petrify II |
After you’re done equipping your characters, proceed into the room ahead and go east to find a Chest that contains U-Material x5 inside, then follow the path along until you reach the intersection. Go east and take out the group of Hercules, then head to the next intersection. Here you’ll want to go through the vent to the east to find a Chest that contains a Aeolus Gem, then return to the open room and head north to find another Chest that contains a Celestial Balm. Finally, go north and step on the pad to view an event.
- Explore Dark Dragons Nest 1 (Team A)
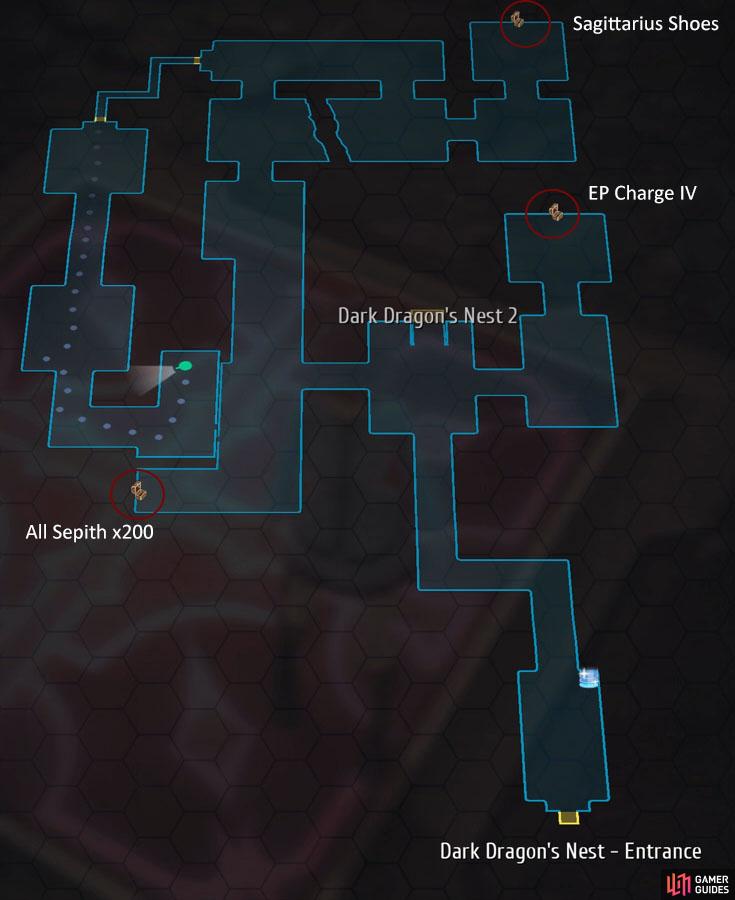
Dark Dragons Nest 1 Team A Map.
Switch over to Team A via the Arcus II and head north to reach the intersection, then go east to find a Chest that contains an EP Charge IV. Return to the intersection and go southwest to find a Chest that contains a All Sepith x200, then go to the northeast of the map to find another Chest that contains Sagittarius Shoes. Now head to the far west of the map and then go south to find a pad, step on it and then switch over to Team B.
- Explore Dark Dragons Nest 1 (Team B)
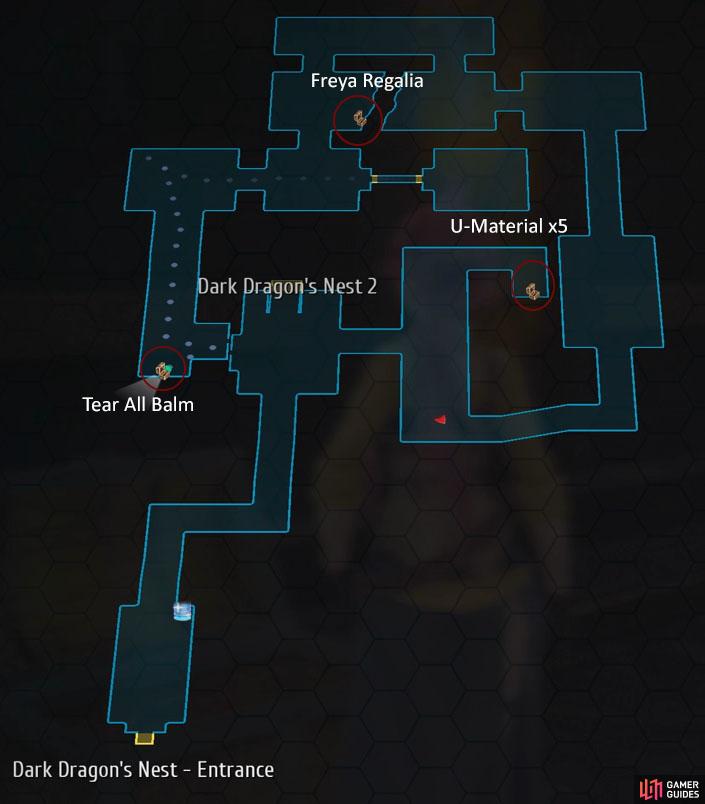
Dark Dragons Nest 1 Team B Map.
Follow the path along until you reach the intersection, then go northeast to find a Chest that contains U-Material x5, then go far south as possible and follow the path along until you reach a room that has a Chest that contains Freya Regalia. Now go east from the intersection to find the pad, step on it and go southwest to find a Chest that contains Tear All Balm.
Begin this section by controlling Team C first and head to the center of the map to find the Red Lever, then switch over to Team A and go to the northeast of the map to find the Purple Lever. Finally, switch to Team B and head to the northwest of the map to activate the Orange Lever.
- Explore Dark Dragons Nest 2 (Team C)

Dark Dragons Nest 2 Team C Map.
Once you’ve successfully activated all three levers, return to Team C and go to the center of the map to find a Chest with All Sepith x200 inside, then go to the west side of the map to find another Chest that contains Aquarius Shoes. Drop down and go east to find a Chest that possess a Ulyssess Regalia, then head to the northeast of the map to find a Chest that holds a Black Zemurian Ore Shard. Finally, go to the northwest to find a Chest that contains an EP Charge IV, then head north and switch to Team A.
- Explore Dark Dragons Nest 2 (Team A)
Dark Dragons Nest 2 Team A Map.
Head to the east of the map to find a Chest that contains a Tear All Balm, then go to the southeast of the map to take on a group of Hercules, now make your way over to the soutwest room to find a Chest the possess a Skanda Gem. Next up you’ll want to go to the west of the map to find a Chest that contains a Black Zemurian Ore Shard, then go to the northwest of the map to find a Chest that holds a Deep Ocher, this gives DEF/ADF+200 and prevents Seal, Mute, and Stat down.
Finally, go to the northeast of the map to find the last Chest of this area which contains U-Material x5, then go to the north of the map and switch to Team B.
- Explore Dark Dragons Nest 2 (Team B)
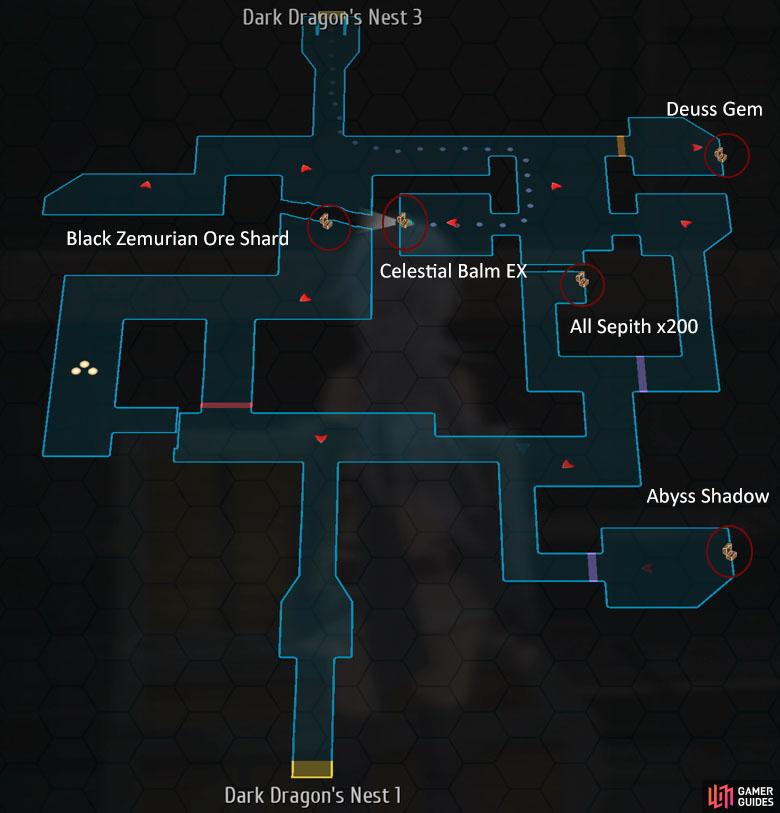
Dark Dragons Nest 2 Team B Map.
Go to the center of the map to find a Chest that contains a Black Zemurian Ore Shard, then go to the west to take out a group of enemies, now make your way to the southeast of the map to find a Chest that contains an Abyss Shadow, this gives SPD+20 and prevents Deathblow, Delay, and Vanish.
Head to the east side intersection and go west to find a Chest that contains All Sepith x200, then go to the northeast intersection and head west to find a Chest that possess a Celestial Balm EX. Finally, go into the northeast room to find a Chest that contains a Deus Gem, this gives EP+100/ATS+20/ADF+20 and cuts Arts Cost by 40% and make your way to the north off the map to go to Dark Dragons Nest 3.
- Explore Dark Dragons Nest 3 (Team C)
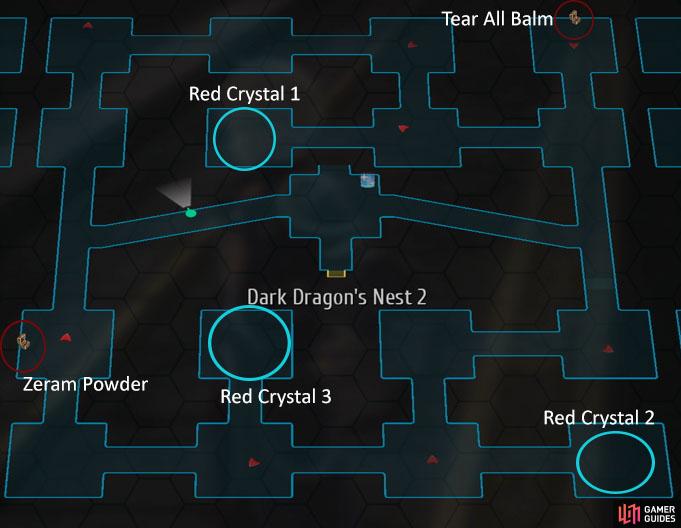
Dark Dragons Nest 3 Team C Map.
Once you’ve arrived at Nest 3, head west and then south to find a Chest that contains a Zeram Powder, then continue going south until you reach the first intersection. Here you’ll want to go north to smash the First Red Crystal, then head east of the intersection to destroy the second Red Crystal.
Go into the room before the second crystal and head all the way to the northeast of the map to find a Chest that contains a Tear All Balm, then go back into the room before the Chest and continue west to destroy the third Second Red Crystal.
- Explore Dark Dragons Nest 3 (Team A)
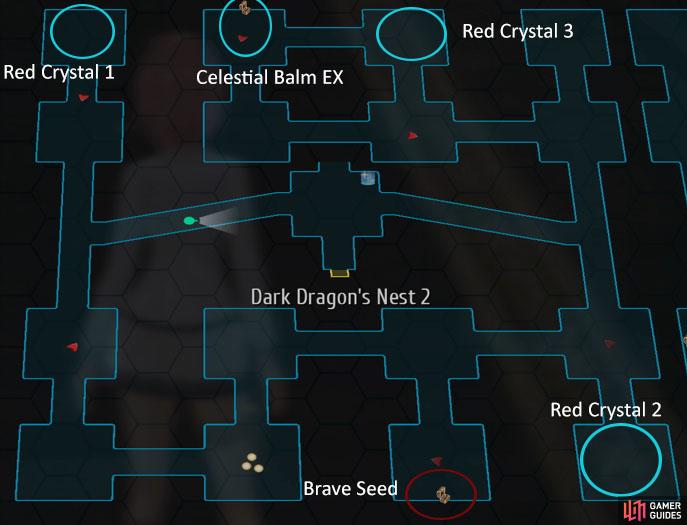
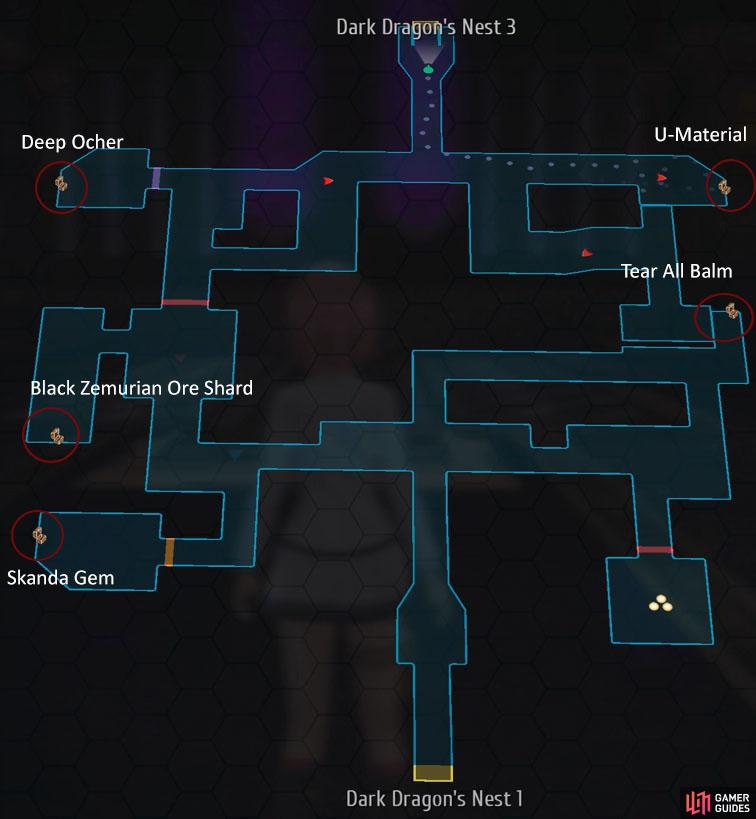
Dark Dragons Nest 3 Team A Map.
Switch over to Team A and then head to the north of the map to find the Fourth Red Crystal along with a Chest that contains a Celestial Balm EX, then go down the southeast of the map to find the Fifth Red Crystal. Finally, follow that bottom path along to find a Chest that contains a Brave Seed and then take out the group of enemies in the southwest room, now go up to the northwest to find the Sixth Red Crystal.
- Explore Dark Dragons Nest 3 (Team B)
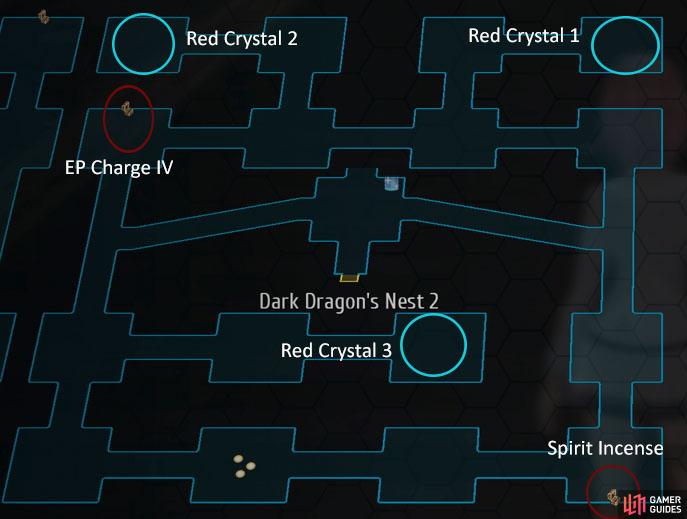
Dark Dragons Nest 3 Team B Map.
Switch over to Team B and go to the northeast part of the map to find the Seventh Red Crystal, then go to the northwest to find the Eighth Red Crystal, now go to the intersection and go west to find a Chest that contains an EP Charge IV. Head south to the next intersection and go east to smash the final Red Crystal and then follow the southern path along to the east to take out a group of enemies and to find a Chest that contains a Spirit Incense.
Finally, head north to enter the final area. Here you’ll need to take out three groups of enemies which are split between the three teams and then proceed north to face True Zoro-Argruga
Boss: True Zoro-Argruga
| Enemy | HP | Slash | Thrust | Pierce | Strike | Elemental Efficacy | Item Drop |
|---|---|---|---|---|---|---|---|
| True Zoro-Argruga (Phase 1) | 233000 | ☆ | ☆ | ☆ | ☆ | E - 100, WA - 100, F - 100, WN - 100, TI - 100, SP - 100, MI - 100 | N/A |
- Phase 1 - Get it to 70% HP (Team A)
Start this battle by scanning the boss, then activate Wind Blade to put a delay on his turn, now use Normal Attacks to take down a chunk of HP and then use any available S-Crafts before he takes a turn to get it past the 70% mark.
- Phase 2 - Get it to 40% HP (Team B)
Begin this portion of the battle by using Crazy Hunt which will give you Critcal 50% along with STR/SPD up and then use any Crafts that buff that character/party, such as Platinum Shield (Jusis) or Thunder Vortex (Sara). Once you’re all buffed up, continue using strong damage attacks until he summons some friends and then use any available S-Crafts to quickly take them out. Finally, reactivate Crazy Hunt if you haven’t already and continue using high damage Crafts to take him into the third phase.


(1 of 2) Make sure to heal up the party when the dark dragon uses Void Howl,
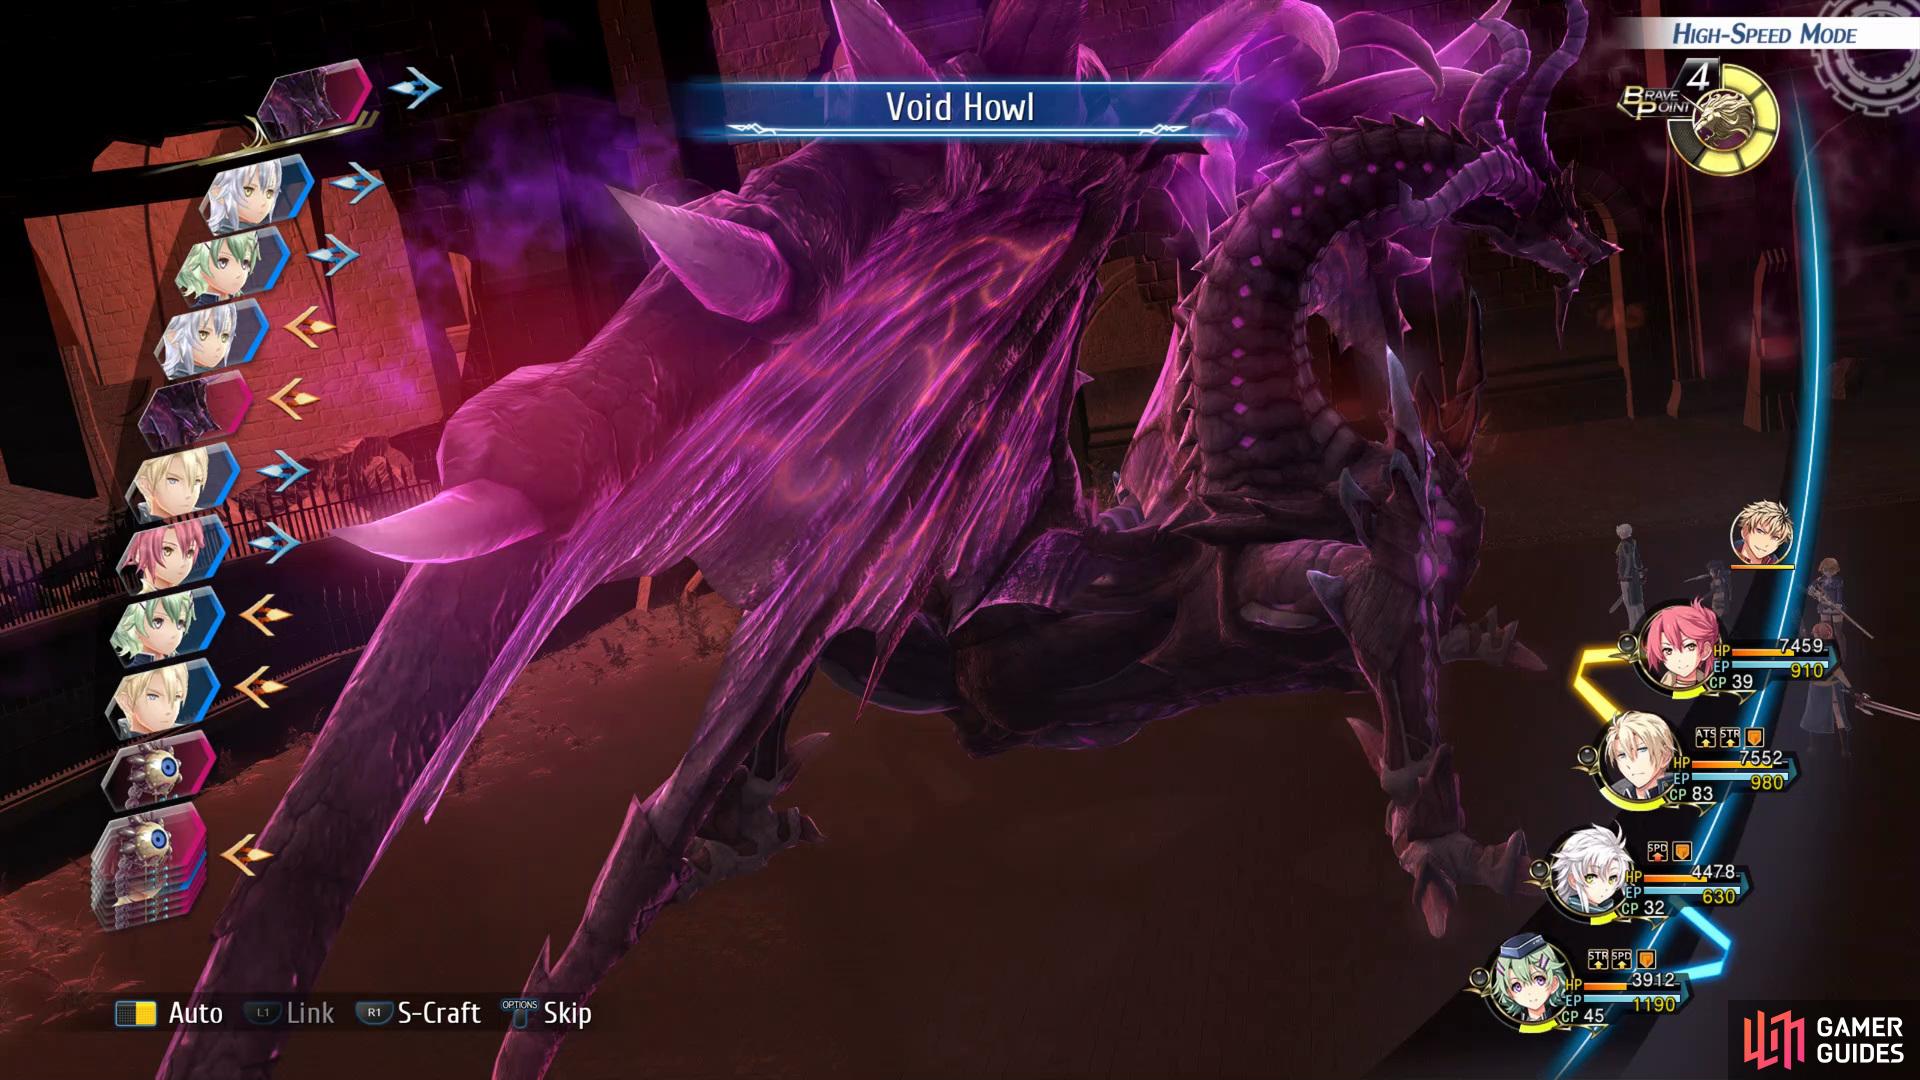
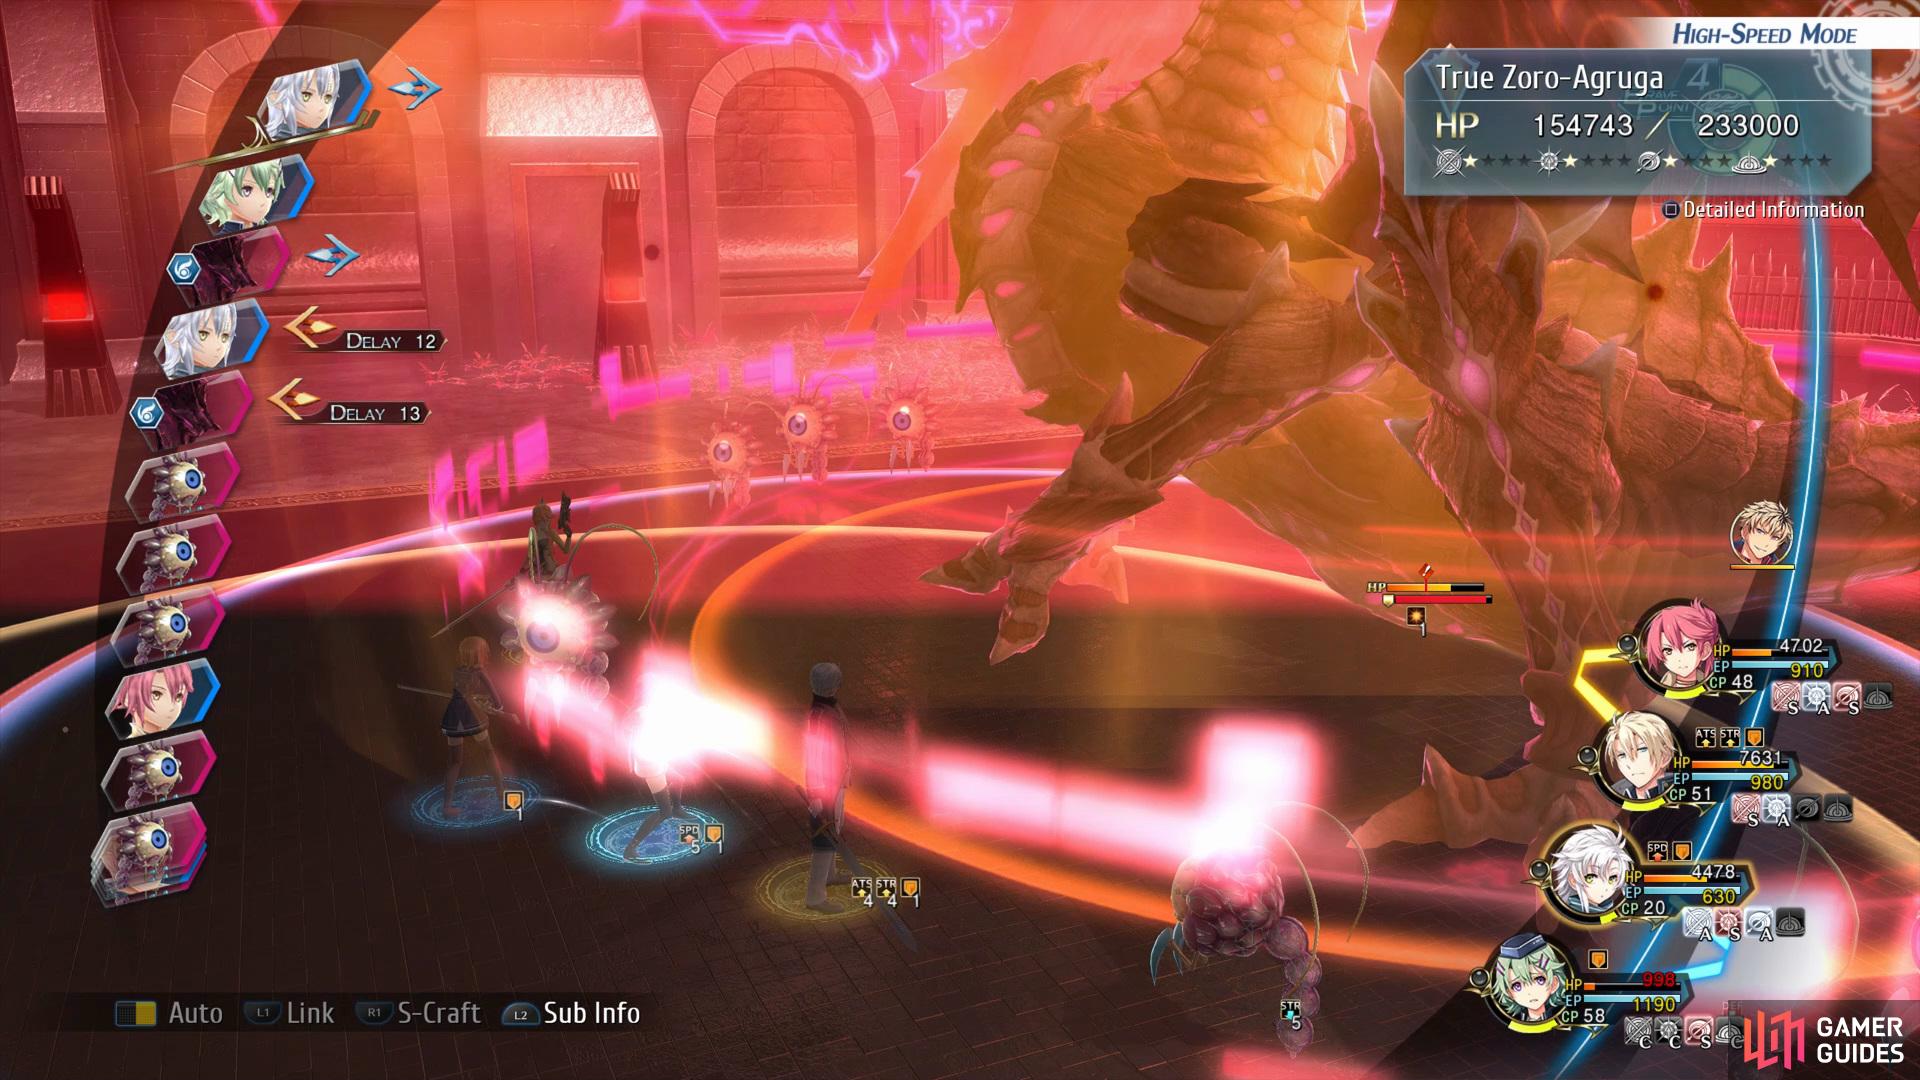
Make sure to heal up the party when the dark dragon uses Void Howl, (left), then use any S-Crafts to take out the summoned enemies. (right)
- Phase 3 - Get it to 0% HP (Team C)
For this Phase you’ll want to use Radical Design to increase your Break Damage by 150%, then work on getting him into the Break Status. Once you’ve achieved this you’ll use normal attacks until his next turn, then use Valiant Hearts which will increase your damage by 60% and use any available S-Crafts to finish him off.
- Phase 4 - Panzer Soldat Battle
| Enemy | HP | Positions | Head | Body | Arms |
|---|---|---|---|---|---|
| True Zoro-Agruga | 360000 | Normal Stance | ☆☆☆☆ | ☆☆ | ☆ |
| Charged Stance | ☆☆ | N/A | ☆☆☆ |

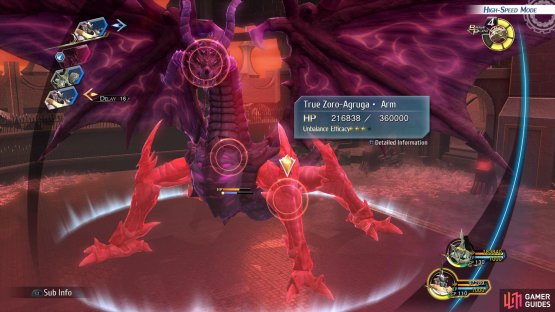
(1 of 2) When the dragon is in the normal stance you’ll want to focus on to its head,
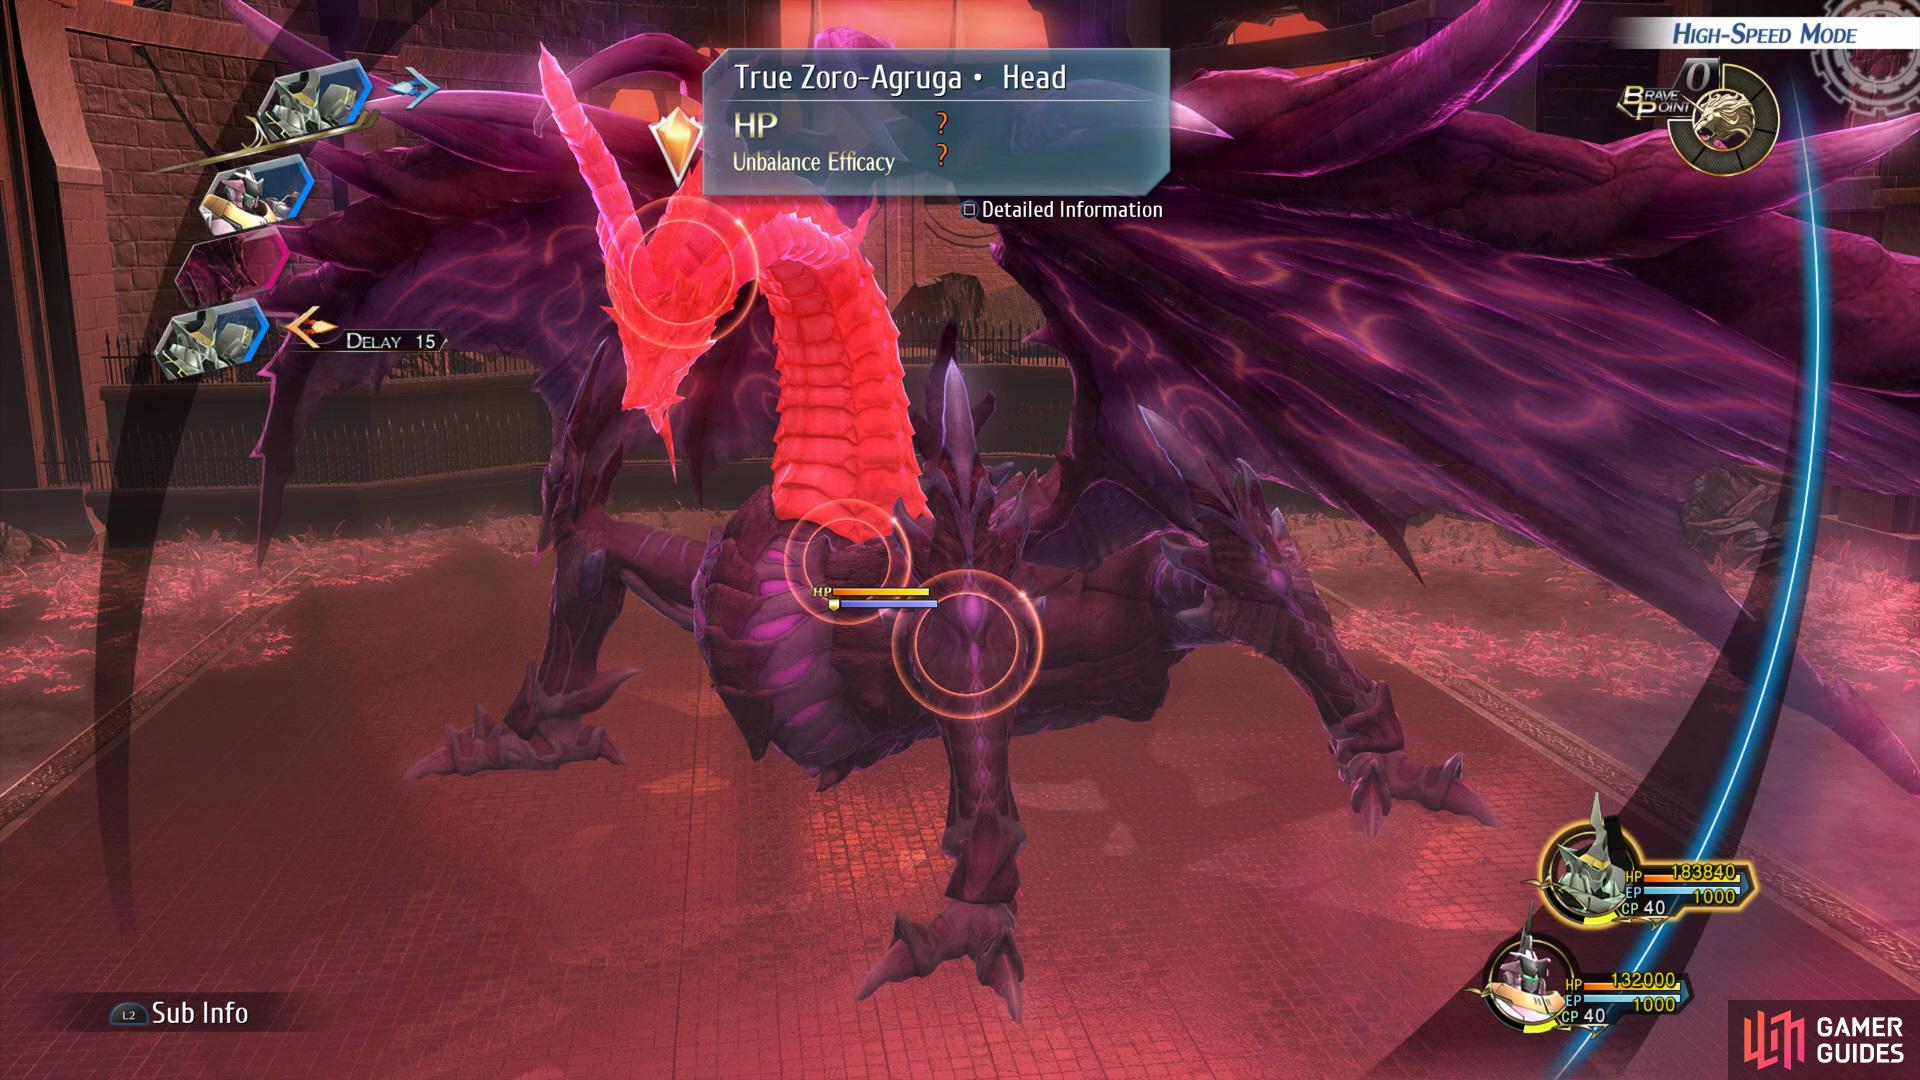
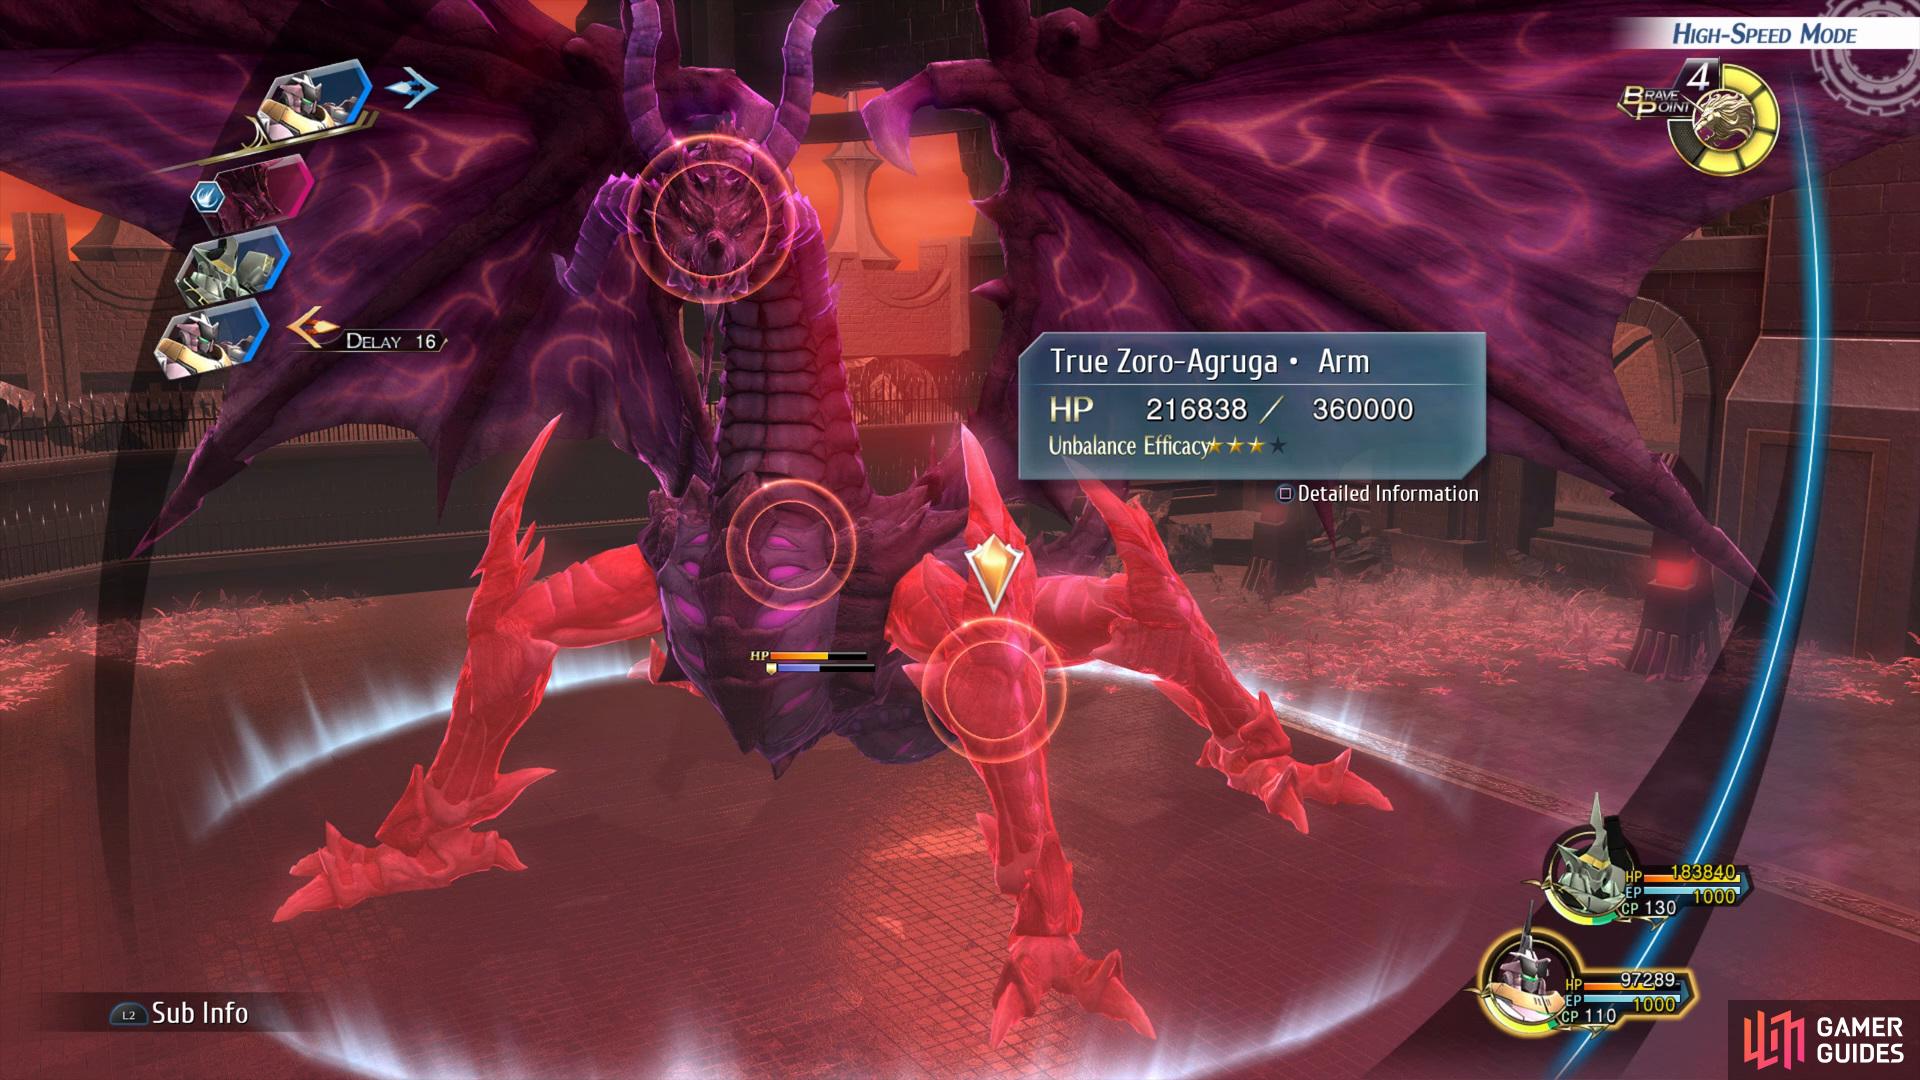
When the dragon is in the normal stance you’ll want to focus on to its head, (left), then when it goes into the charged stance you’ll want to focus on to its arms. (right)
The last phase of this battle is a quick Panzer Soldat Battle, here you’ll want to focus on his head when he is in the normal stance and then arms when he is in the Charged Stance. Once you’ve gathered 5 BP use the Unite attack to finish it off.
After you’ve defeated True Zoro-Argruga a cutscene will play out, then you’ll face Azure Siegfried
Boss: Azure Siegfried (Reduce HP to 30%)
Boss: Azure Siegfried
| Enemy | HP | Slash | Thrust | Pierce | Strike | Elemental Efficacy | Item Drop |
|---|---|---|---|---|---|---|---|
| Azure Siegfried | 72758 | ☆☆ | ☆☆ | ☆☆ | ☆ ☆ | E - 100, WA - 100, F - 100, WN - 100, TI - 100, SP - 100, MI - 100 | N/A |
Begin this battle by scanning him, then use Raging Fire along with Spirit Unification to buff all your stats. Now you’ll want to use your S-Craft to deal a large chunk of damage, then continue fighting him using low CP attacks such as Crimson Slash until you gain enough CP to use another S-Craft to put him into the Break Status. Finally, use a Normal Attack until his next turn and then finish him off with one final S-Craft.
No Comments