
One of the main features of Blades of Fire is collecting and forging the 35 weapons that are on offer throughout the adventure. The Spears category are all about making use of their superior Reach and Speed at the expense of higher damage output, while offering a great method of poking your enemies from range. Keep reading to learn how to unlock all five Spears along with the location of all of the Seneschals.
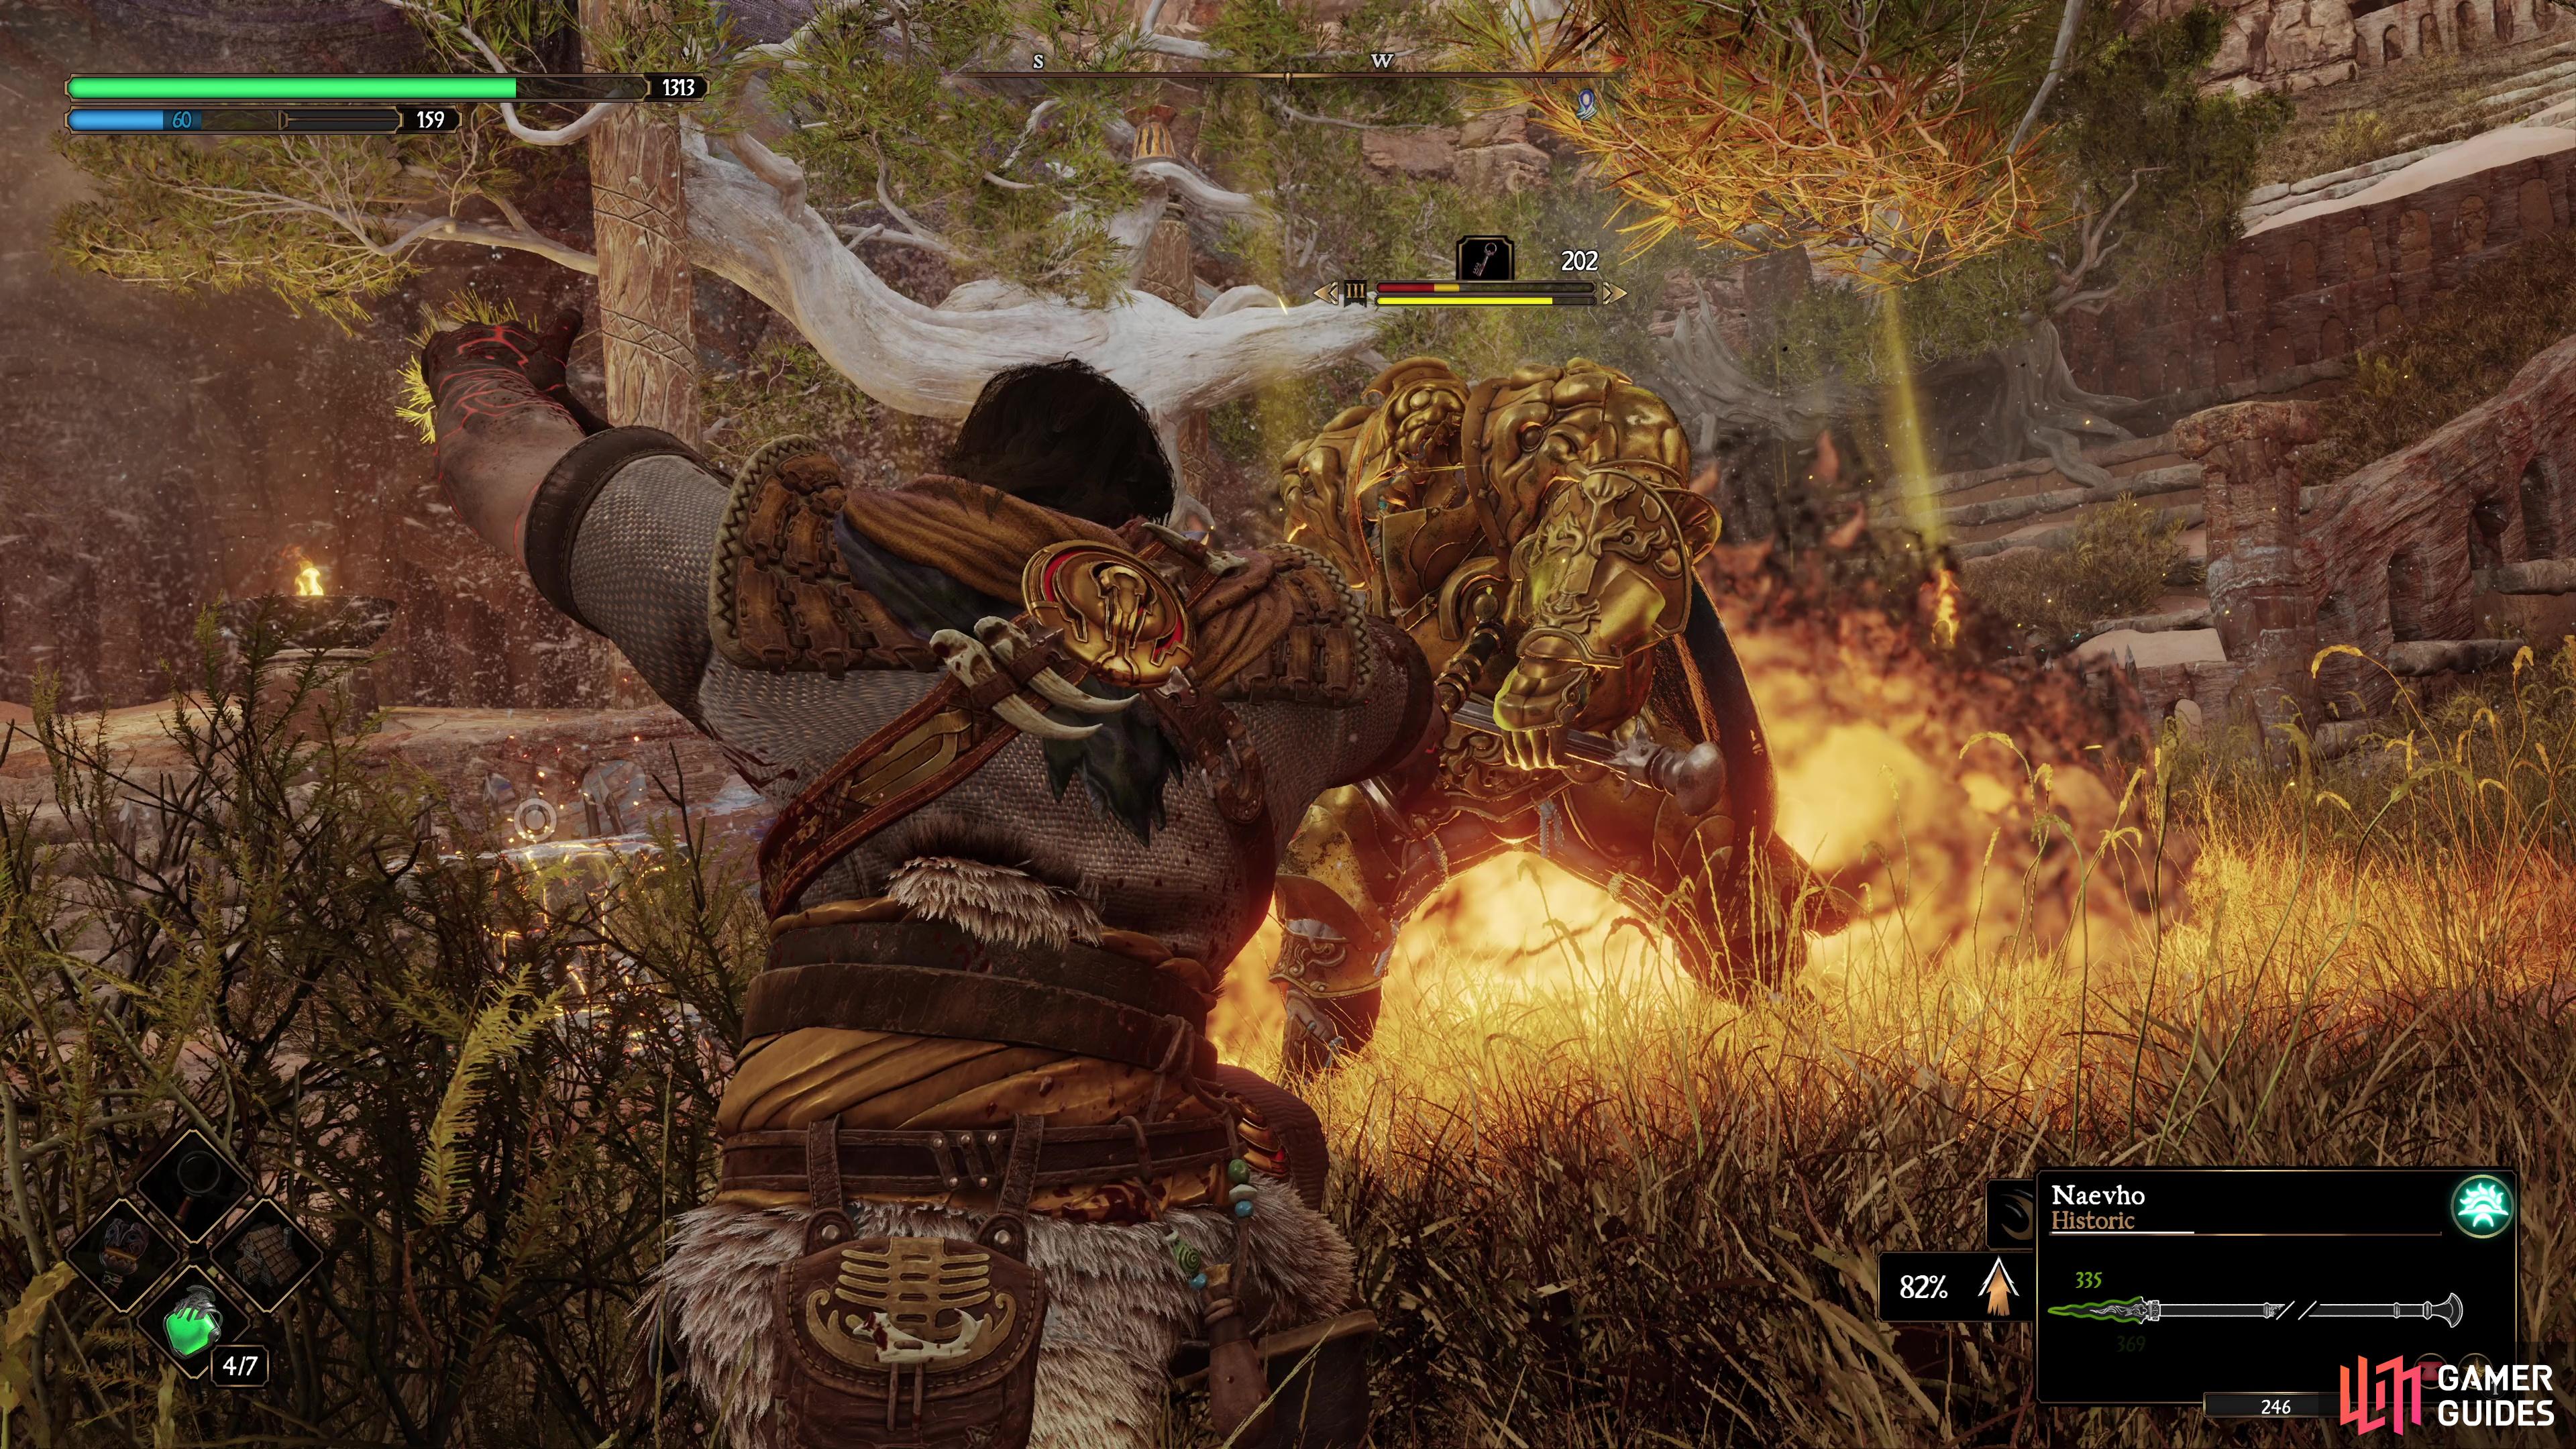
Spears in Blades of Fire allow you to strike at your foes from range.
Table of Contents
If you want to jump to a specific section, click on the links below.
| Quickjump |
|---|
| Spear Playstyle |
| Long Spear |
| Glaive |
| Boar Spear |
| Fauchard |
| Trident |
| All Spear Seneschal Locations |
Spear Playstyle
While you’ll be able to unlock your first Spear in the first area, Besacaar Hamlet, you’ll have to wait until much later in the adventure until you can unlock subsequent ones. This is a pity, as Spears are one of the better weapons in the game, especially when you want to prioritize safety by thrusting from range. The table below details the general stats of Spears, ranging from one (lowest) to three (highest):
| Category | Rating |
|---|---|
| Speed | 3 |
| Recovery | 2 |
| Advance | 2 |
| Damage | 1 |
| Stagger | 2 |
| Strike Area | 3 |
At a glance, you’ll notice the real benefits of Spears are in their Speed and Strike Area. Indeed, the Spear is the only category of weapons that matches the speed of the dual weapon types (Twins and Daggers). Outside of the Hyssop, none of the other weapon categories can reach the same Reach as the Spear and they often have high Penetration, making them useful weapons to use against armored enemies.
With that in mind, you’ll want to adopt a more cautious playstyle when using Spears, as they’re all about keeping your distance as much as possible and usually, if available, using a Piercing style against your foe. On top of this, Spears are often useful for their defensive capabilities too, with certain weapons being useful for both Blocking and Parrying. The first Spear you unlock in the game, the Long Spear, is one of the more useful weapons for much of the first region and we recommend you keep one in your loadout at all times.
When it comes to forging Spears, always make sure you go for maximum Reach and speed to make use of the main characteristics of the weapon. Damage is less important here, as Spears are naturally on the lower end anyway, but don’t neglect Penetration, especially on any Spears you use that have the Piercing style, these will become of the better ways of dealing with heavily armored foes.
Spear Unlocks
As mentioned at the top, there are five Forger Scrolls for you to find for the Spear category, and you’ll find the first of these during the first area of the game, Besacaar Hamlet. You’ll find each of these in the sections below with details on where you can find the enemies needed to complete the unlock condition.
| Weapon | Required Enemies |
|---|---|
| Long Spear | Defeat 5 Queen’s Soldiers with Spears |
| Glaive | Defeat 5 Setanzas |
| Boar Spear | Defeat 40 Rotspawn |
| Fauchard | Defeat 15 Royal Wardens |
| Trident | Defeat 60 Morlocks |
Long Spear
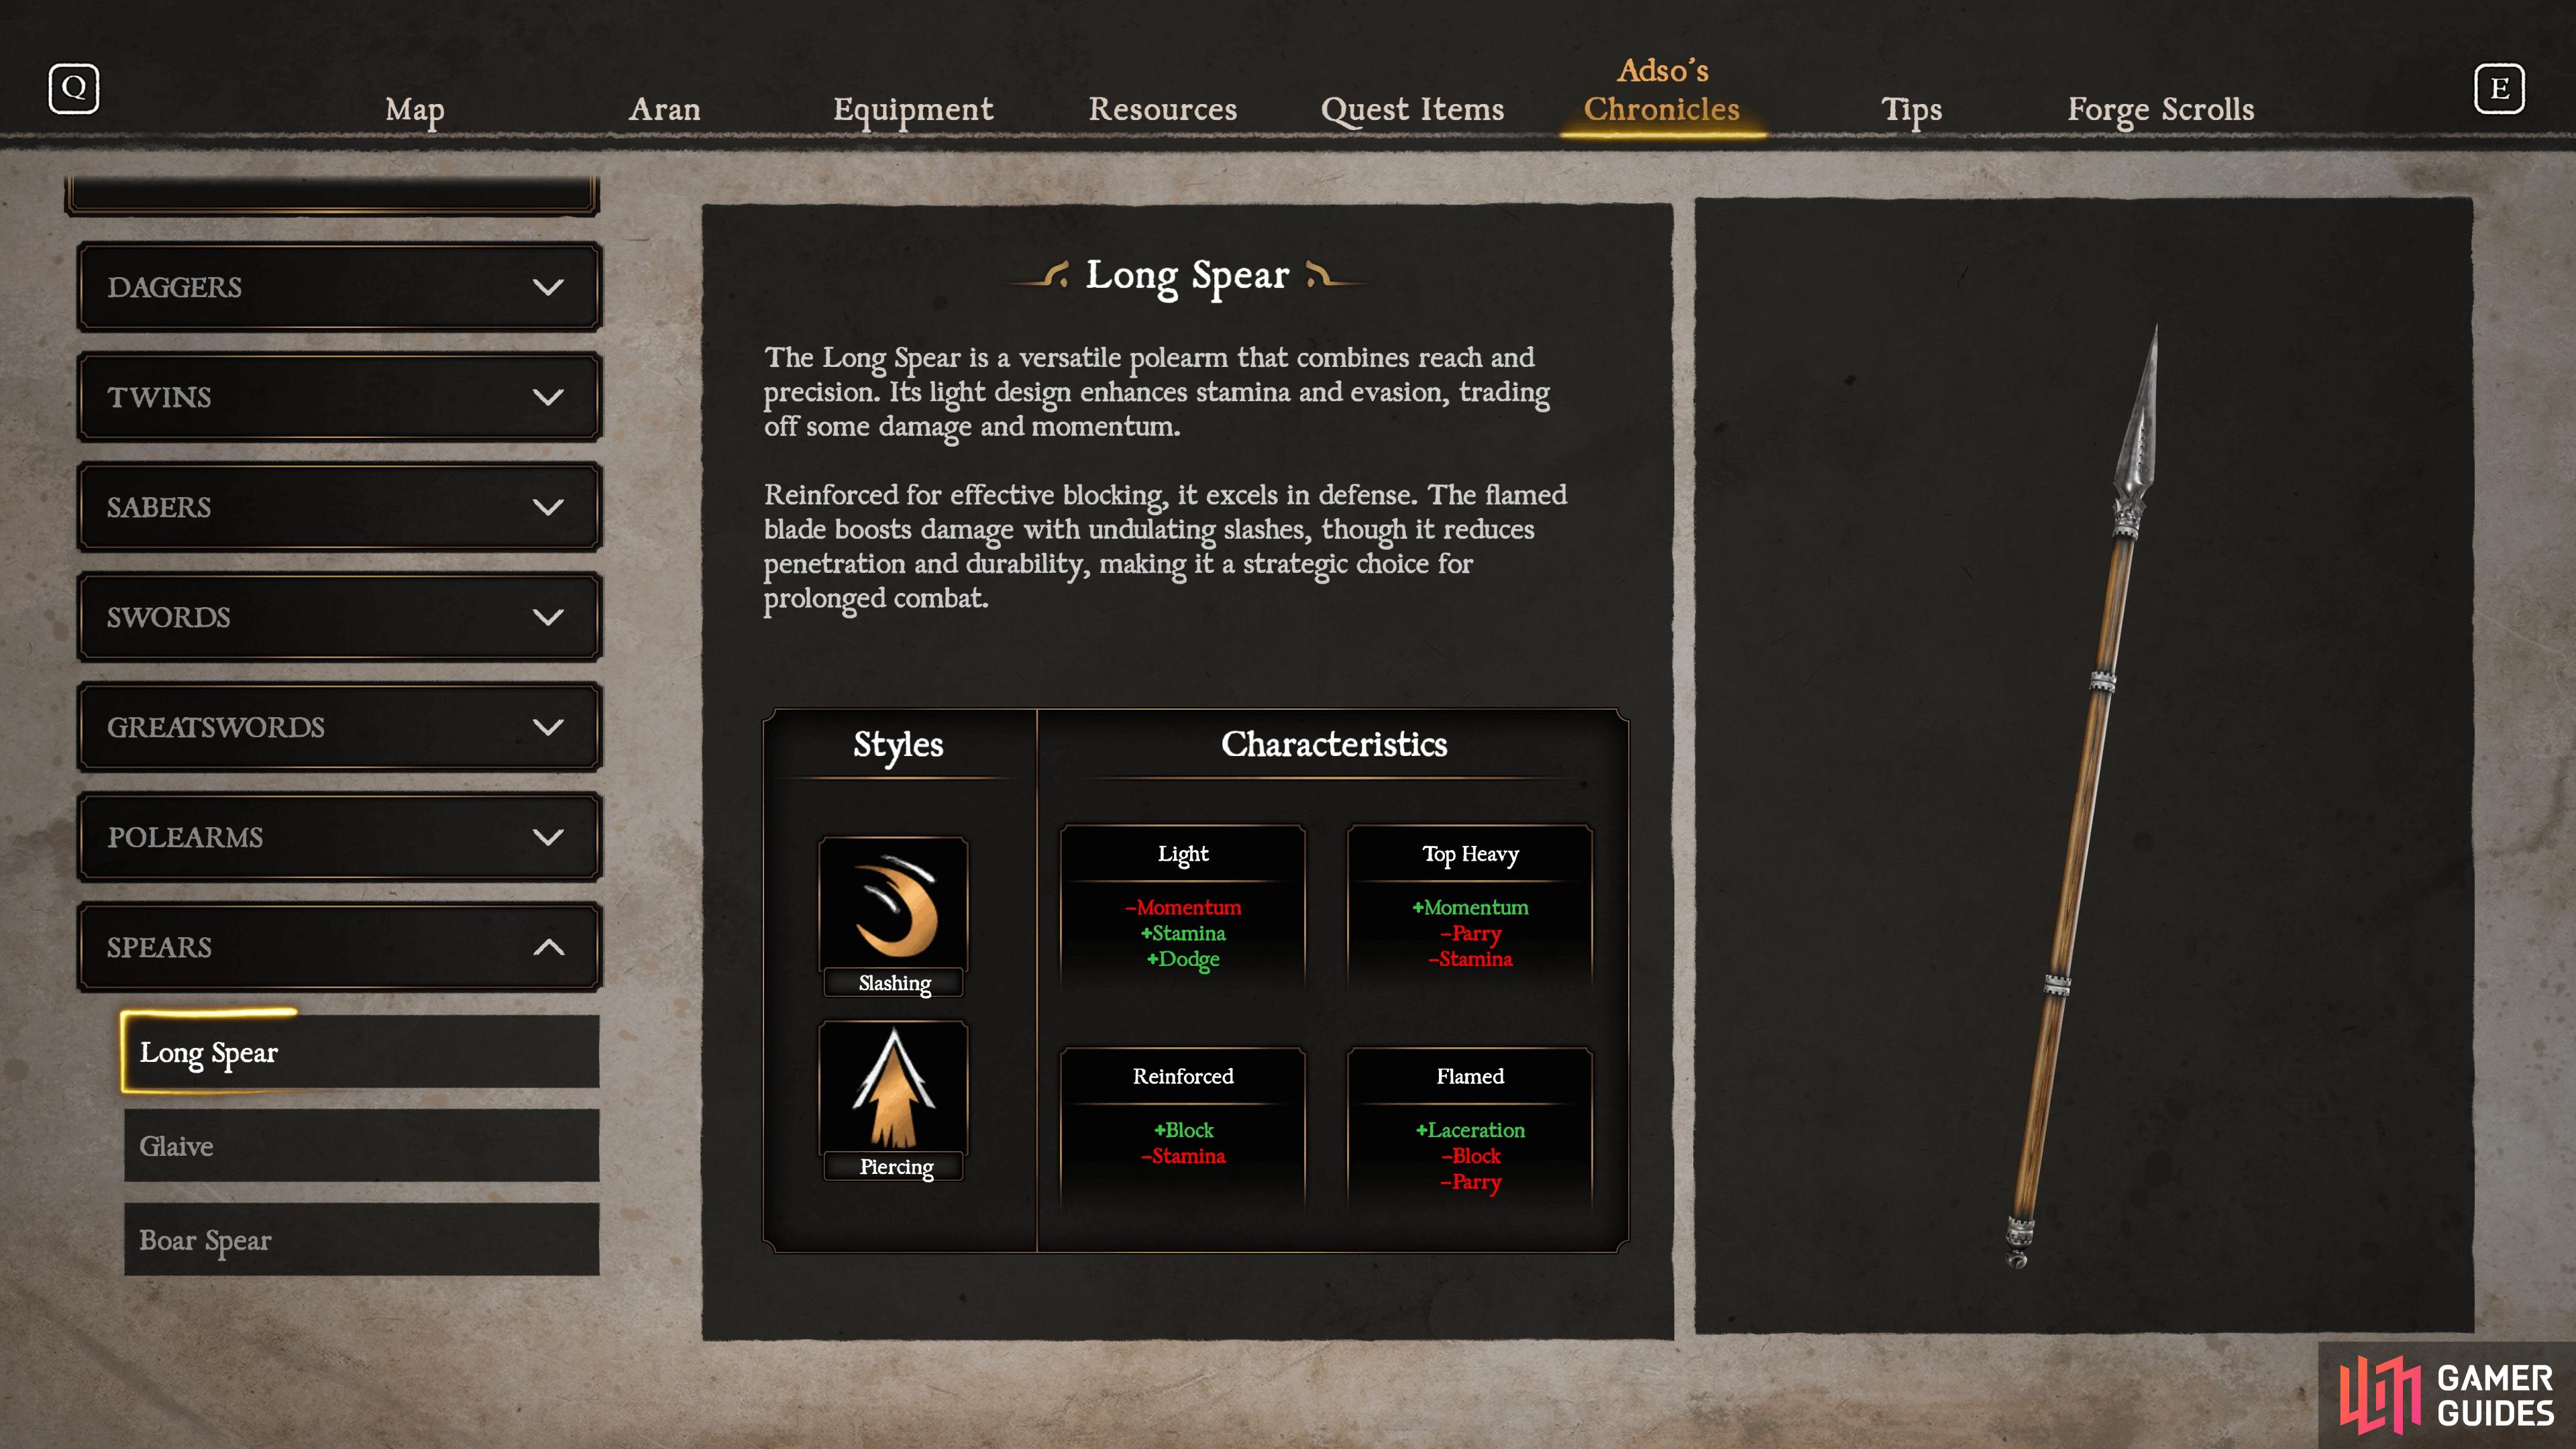
The Long Spear is excellent for the first region and one of your better sources of Piercing damage.
| Style | Characteristics |
|---|---|
| Slashing and Piercing | Light (-Momentum, +Stamina and Dodge), Top Heavy (+Momentum, -Parry and Stamina), Reinforced (+Block, -Stamina), and Flamed (+Laceration, -Block and Parry) |
As you explore the adventure’s first area, Besacarr Hamlet, you’ll find Queen’s Hounds all over the area, however, you’re looking for Hounds that are specifically wielding a Spear for it to count toward unlocking this weapon. Fortunately, you only need to defeat five of these, so as soon as you find one, make use a nearby anvil to make short work of this unlock condition.
The Long Spear is your first real weapon that you unlock that allows you to deal Piercing damage, and it will serve you well for a large portion of the adventure. Be sure to forge this with the largest Reach that you can (favoring the 80“ Reinforced once unlocked), and seeing as it already has high Speed, consider going with a Flamed Head for increased damage across the board. The Long Spear has a high Block rating, so this makes a useful weapon to wield for moments that may require a bit more of a defensive focus.
Glaive
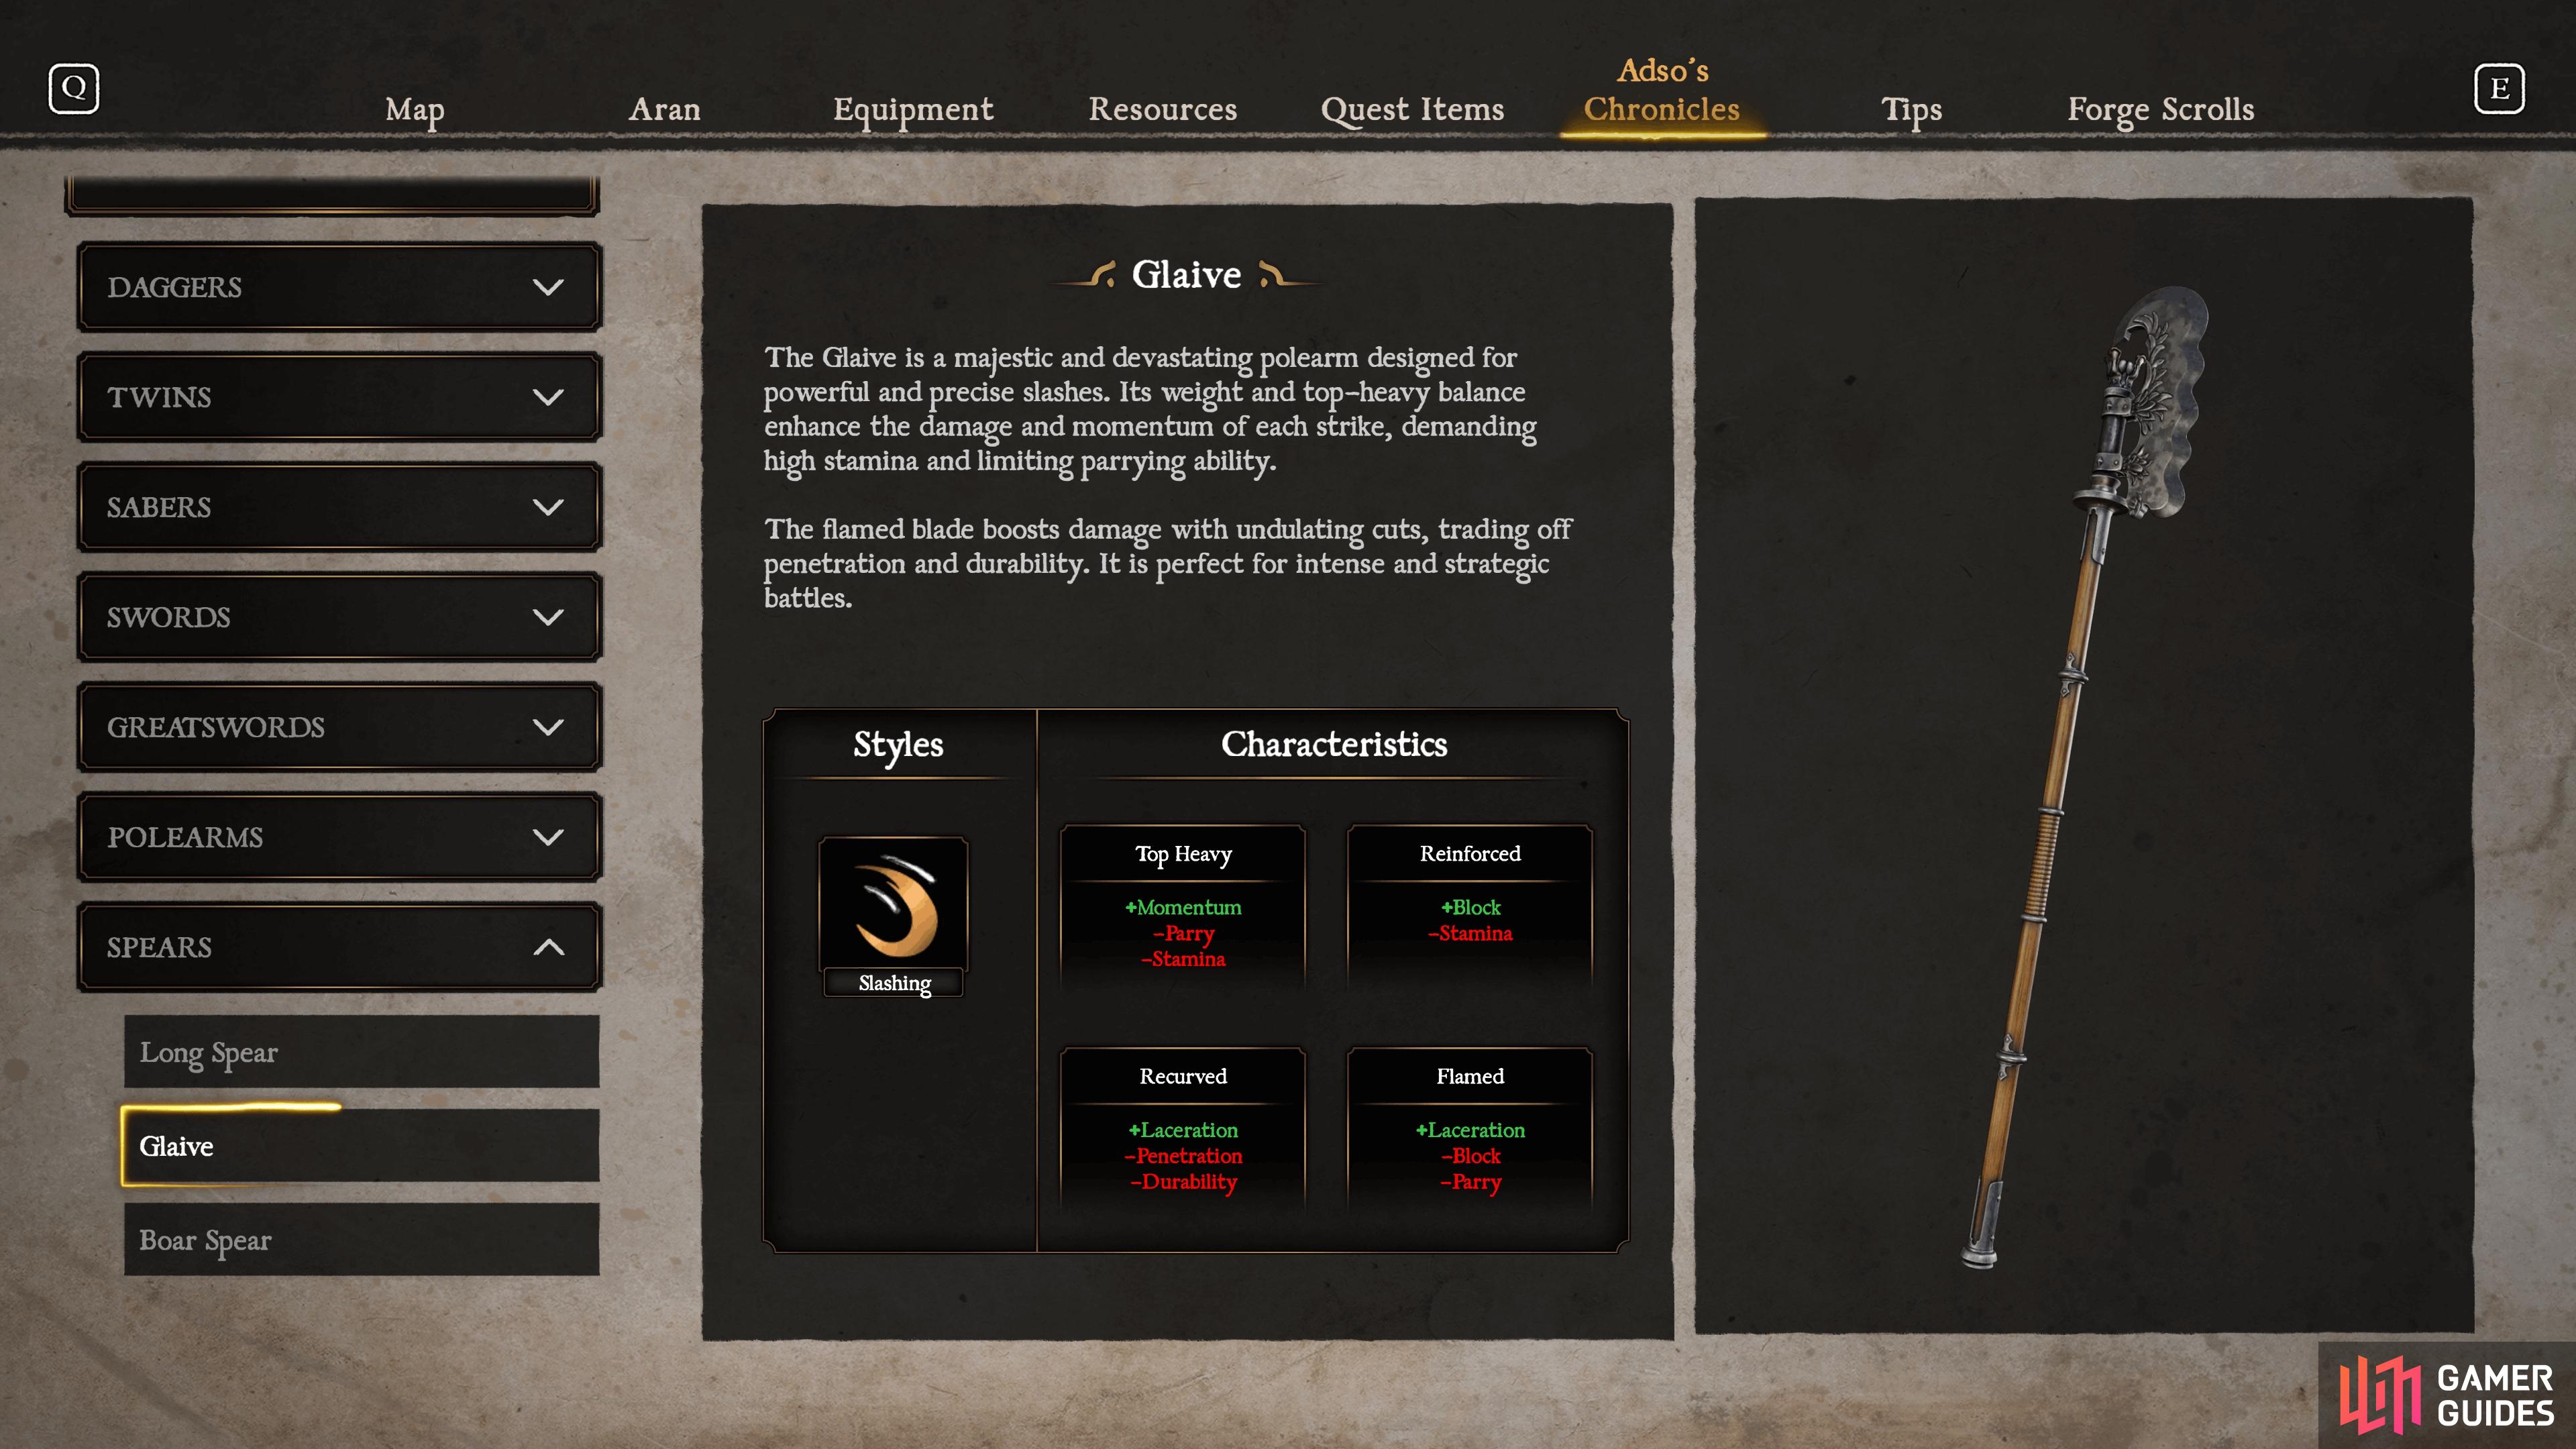
The Glaive is one of the more powerful Spears, sacrificing Piercing damage in the process.
| Style | Characteristics |
|---|---|
| Slashing | Top Heavy (+Momentum, -Parry and Stamina), Reinforced (+Block, -Stamina), Recurved (+Laceration, -Penetration and Durability), and Flamed (+Laceration, -Block and Parry) |
You’ll have to wait until quite some time before you can work on unlocking the next Spear, it’s not until the Doyen Graves near the latter stages of Aceides’ Domain to encounter your first Setanza, of which you’ll need to defeat five of them and they don’t respawn either. These are elite foes that wield magic at range and can take quite the beating. We’ve yet to find five in the first region in total, with only three being on offer. You can find the locations of Setanza’s below:
- Aceides’ Domain - Doyen Graves: Behind the ghost door nearest to the Funeral Bridge anvil
- Aceides’ Domain - Doyen Graves: Behind the ghost door just north of the Gazebo of Solitude anvil
- Aceides’ Domain - Doyen Graves: At the base of the northern tower. To reach it, you’ll need the Skeletal Key to unlock the gate east of the Flooded Tower anvil
- Tok’s Kingdom - Watchtower Domain: Found at the bottom of Tok’s Tower in the center of the area
- Tok’s Kingdom - The Eigon’s Abbey: After coming in from the courtyard to the west, you’ll find a Blazing Setanza near some Sacred Templars
The Glaive loses the ability to thrust by not having the Piercing style and instead focuses on the Slashing style. It has slightly lower max Reach (at 76“) and is a weapon that is purely focused on being one of the higher damaged Spears in the category, at the cost of Penetration. When forging a Glaive, focus on any parts that increase your Stamina too, as you’ll want higher Stamina to make use of the quick strikes this Spear has.
Boar Spear
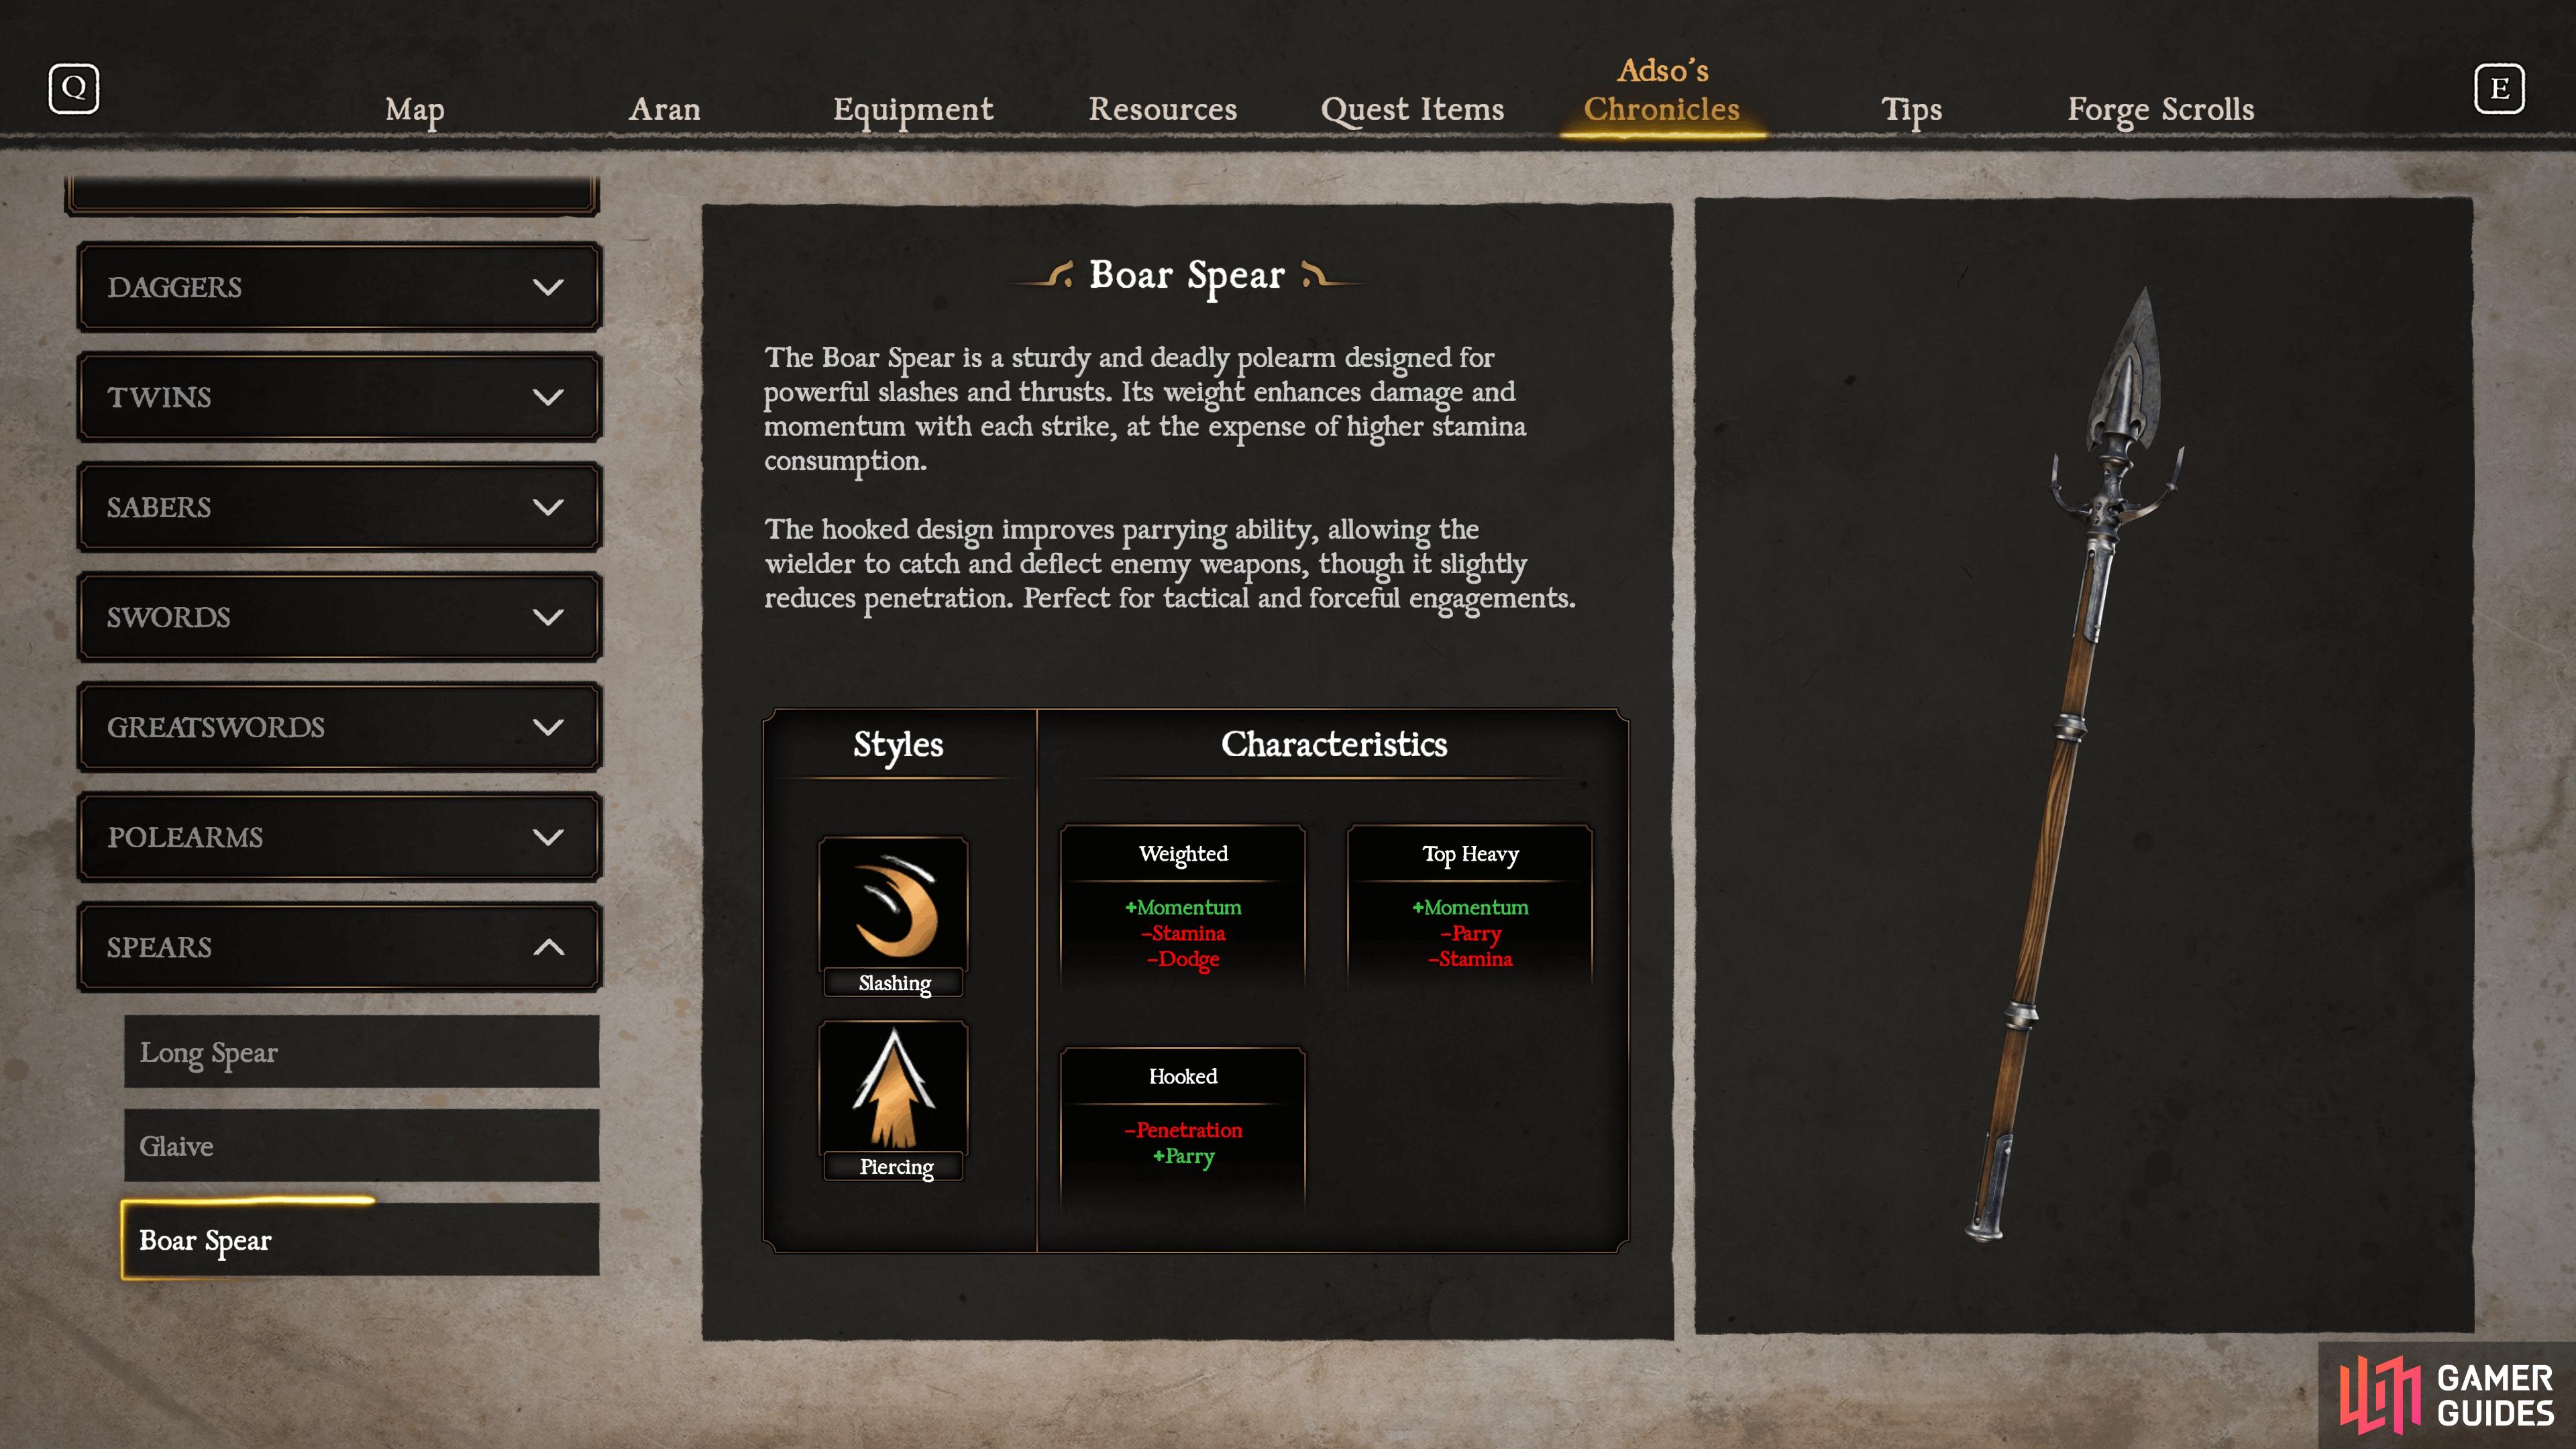
The Boar Spear is an excellent parrying weapon if you like that playstyle.
| Style | Characteristics |
|---|---|
| Slashing and Piercing | Weighted (+Momentum, -Stamina and Dodge), Top Heavy (+Momentum, -Parry and Stamina), Hooked (-Penetration, +Parry) |
Much like the Spear above, you’ll have to wait quite a while before you can get your hands on the Boar Spear as the Rotspawn that you need to defeat 40 of won’t appear until you reach The Iron Castle, the final area of Aceides’ Domain. Once there, you’ll find these blighted enemies throughout the castle, but look for areas that feature a nest as these will cause the Rotspawn to keep respawning until dealt with, allowing you to wrack up the kills easy enough without having to rest.
Much like the Long Spear, the Boar Spear features the Slashing and Piercing styles, while also having the same max Reach (of 80“). The Boar Spear is, however, heavier than the Long Spear, so expect to focus your forging on decreasing the higher Stamina Consumption. More interestingly, the Hooked characteristic does make the Boar Spear a great weapon for parrying, so focusing your efforts around that can make this one of the go-to Parry weapons in the game while maintaining Reach.
Fauchard
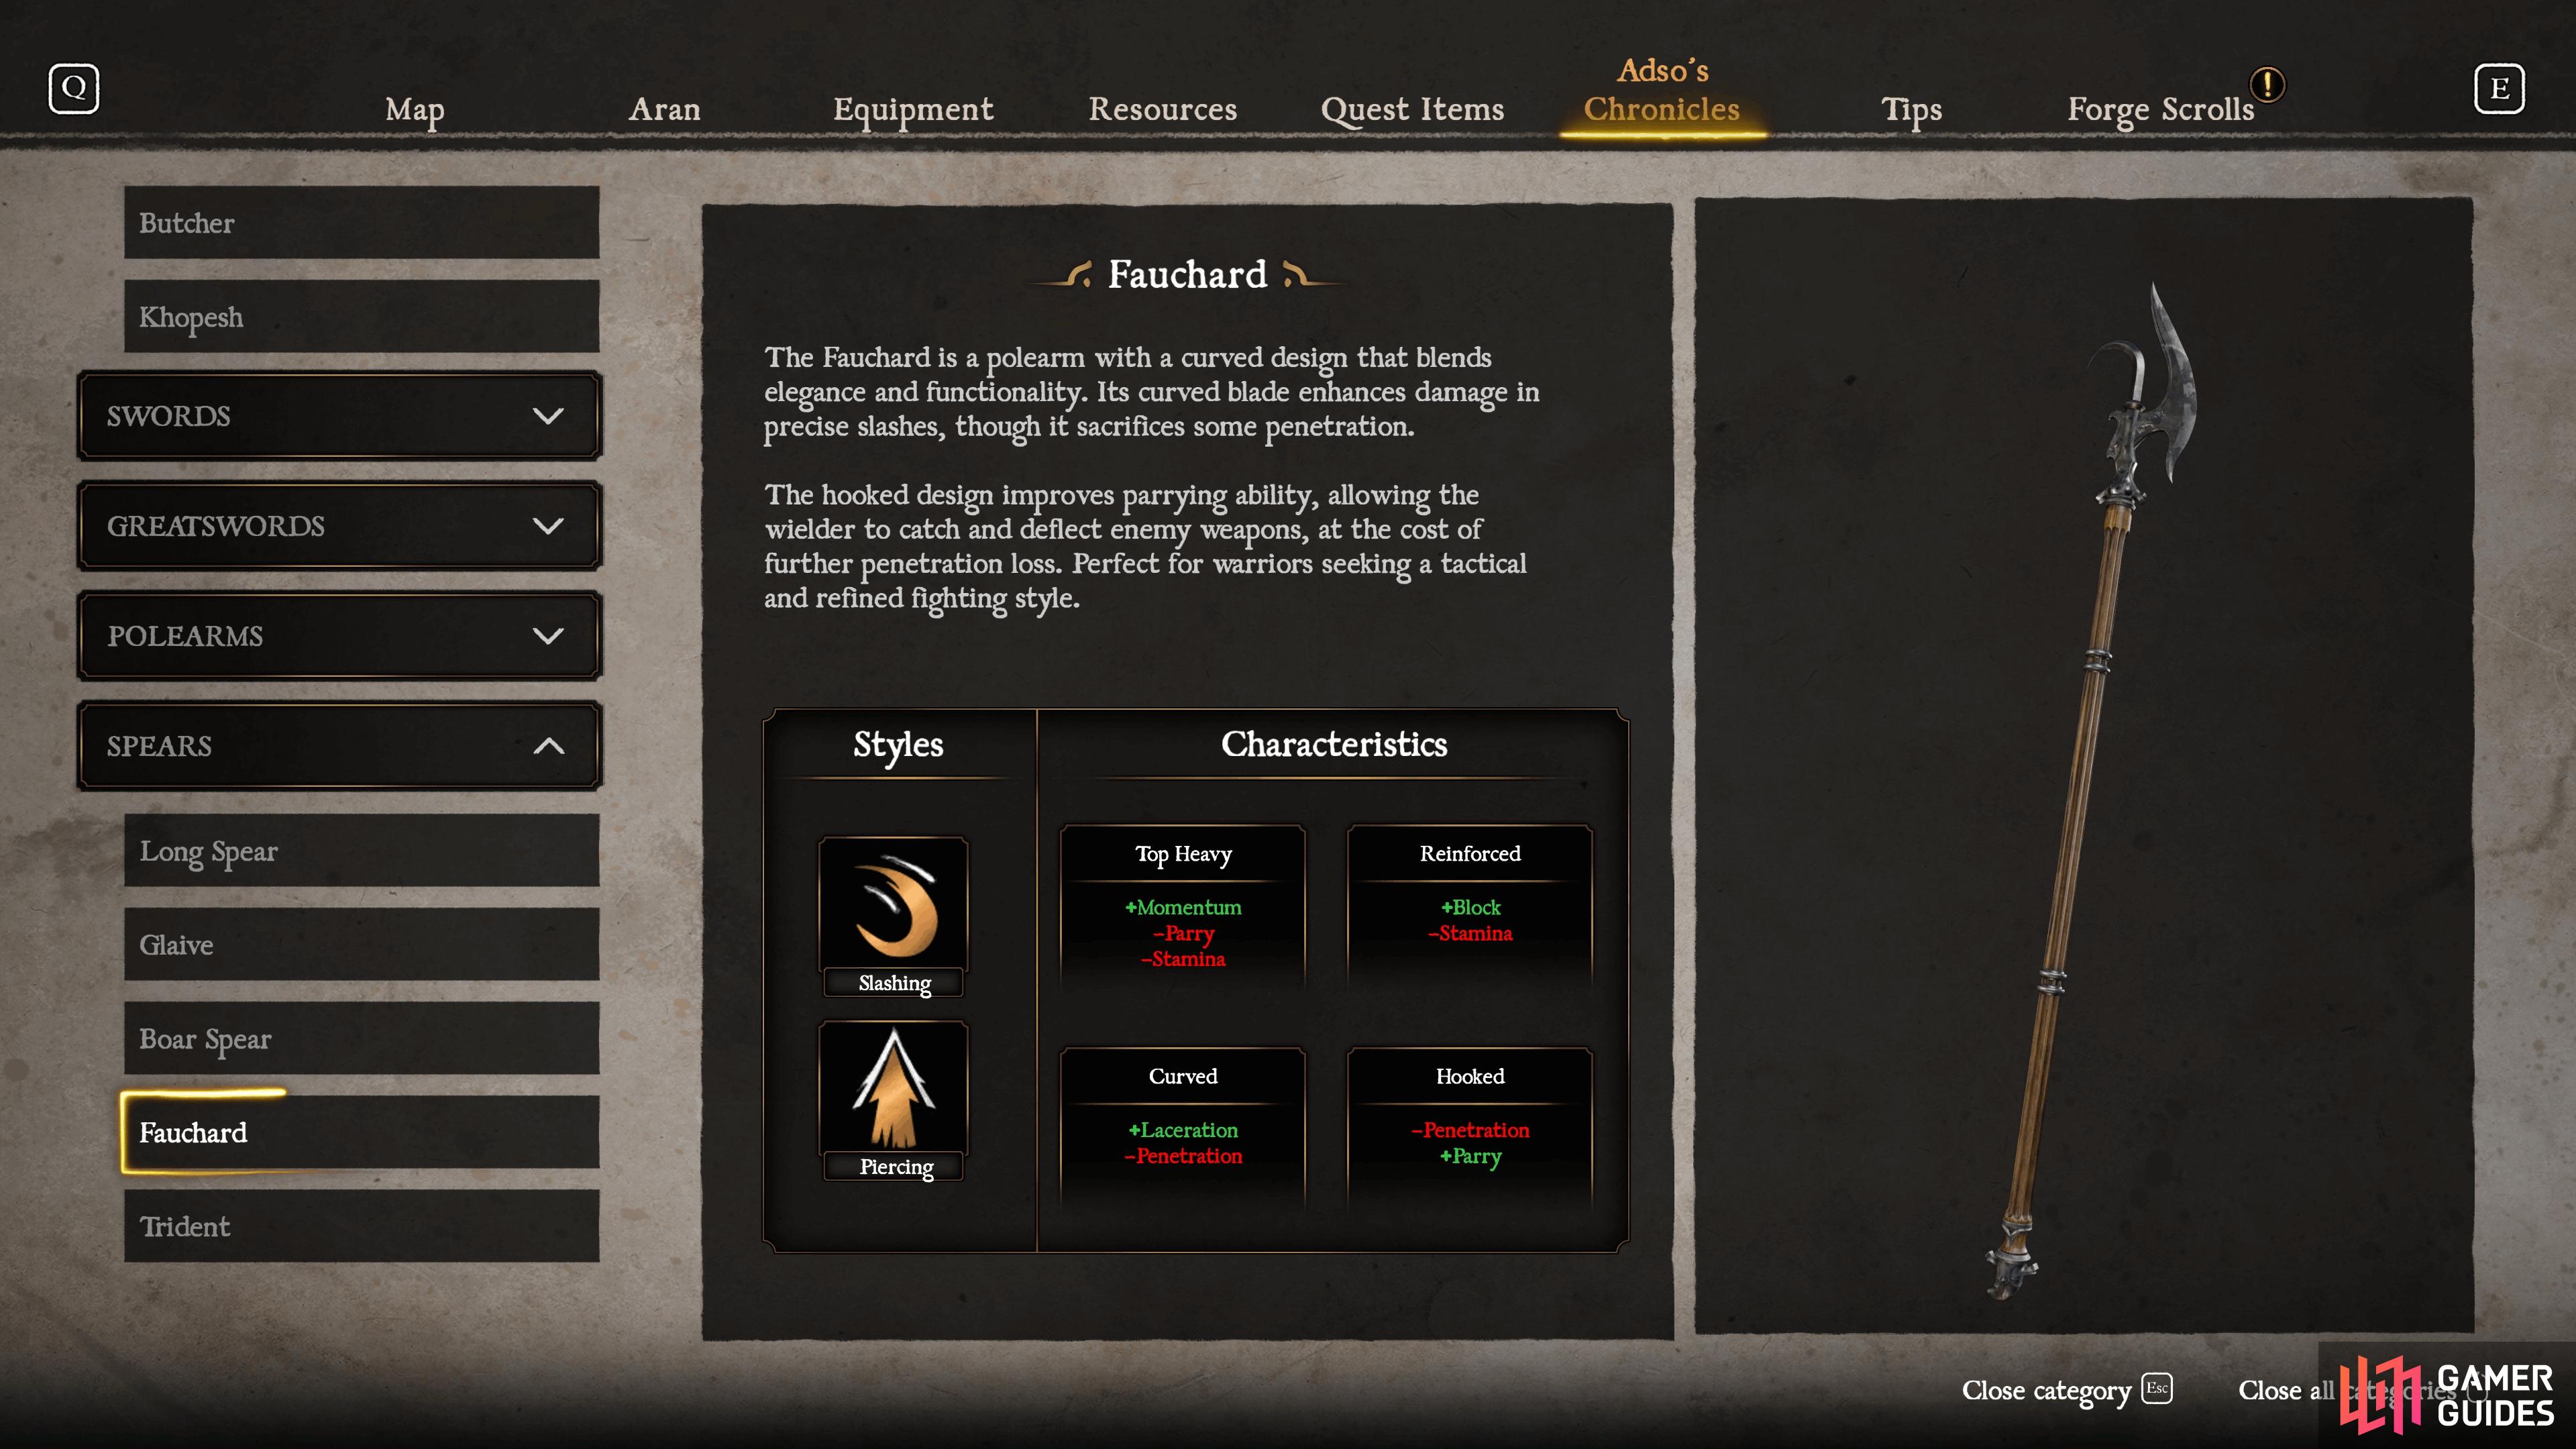
The Fauchard is a great defensive style Spear, serving as an excellent parrying weapon.
| Style | Characteristics |
|---|---|
| Slashing and Piercing | Top Heavy (+Momentum, -Parry and Stamina), Reinforced (+Block, -Stamina), Curved (+Laceration, -Penetration), Hooked (-Penetration, +Parry) |
You’ll have to wait until you reach Blade of Fire’s second chapter before you can begin working on unlocking the Fauchard, the Royal Wardens that you need to kill can be found in Tok’s Kingdom, the region that second chapter takes place in. For the most part, these difficult enemies can only be found one at a time, so you’re almost certainly going to have to grind them at a nearby anvil. For this reason, we recommend the Chasms of Despair anvil in The Roggs Mountains. After dealing with the Roggs that come down from the zipline, go outside to your right and then look up to your right to find a Royal Warden waiting for you.
Like the Boar Spear and the Long Spear, the Fauchard features both Slashing and Piercing, but where it truly shines is in its defensive capabilities. Featuring the Hooked characteristic, you’ll be able to truly spec this weapon for Parrying and Blocking, and should be where you focus your forging attempts around. The Fauchard suffers a bit with Penetration, so if that’s your goal with the Spear, you’re much better off switching to one of the other ones.
Trident
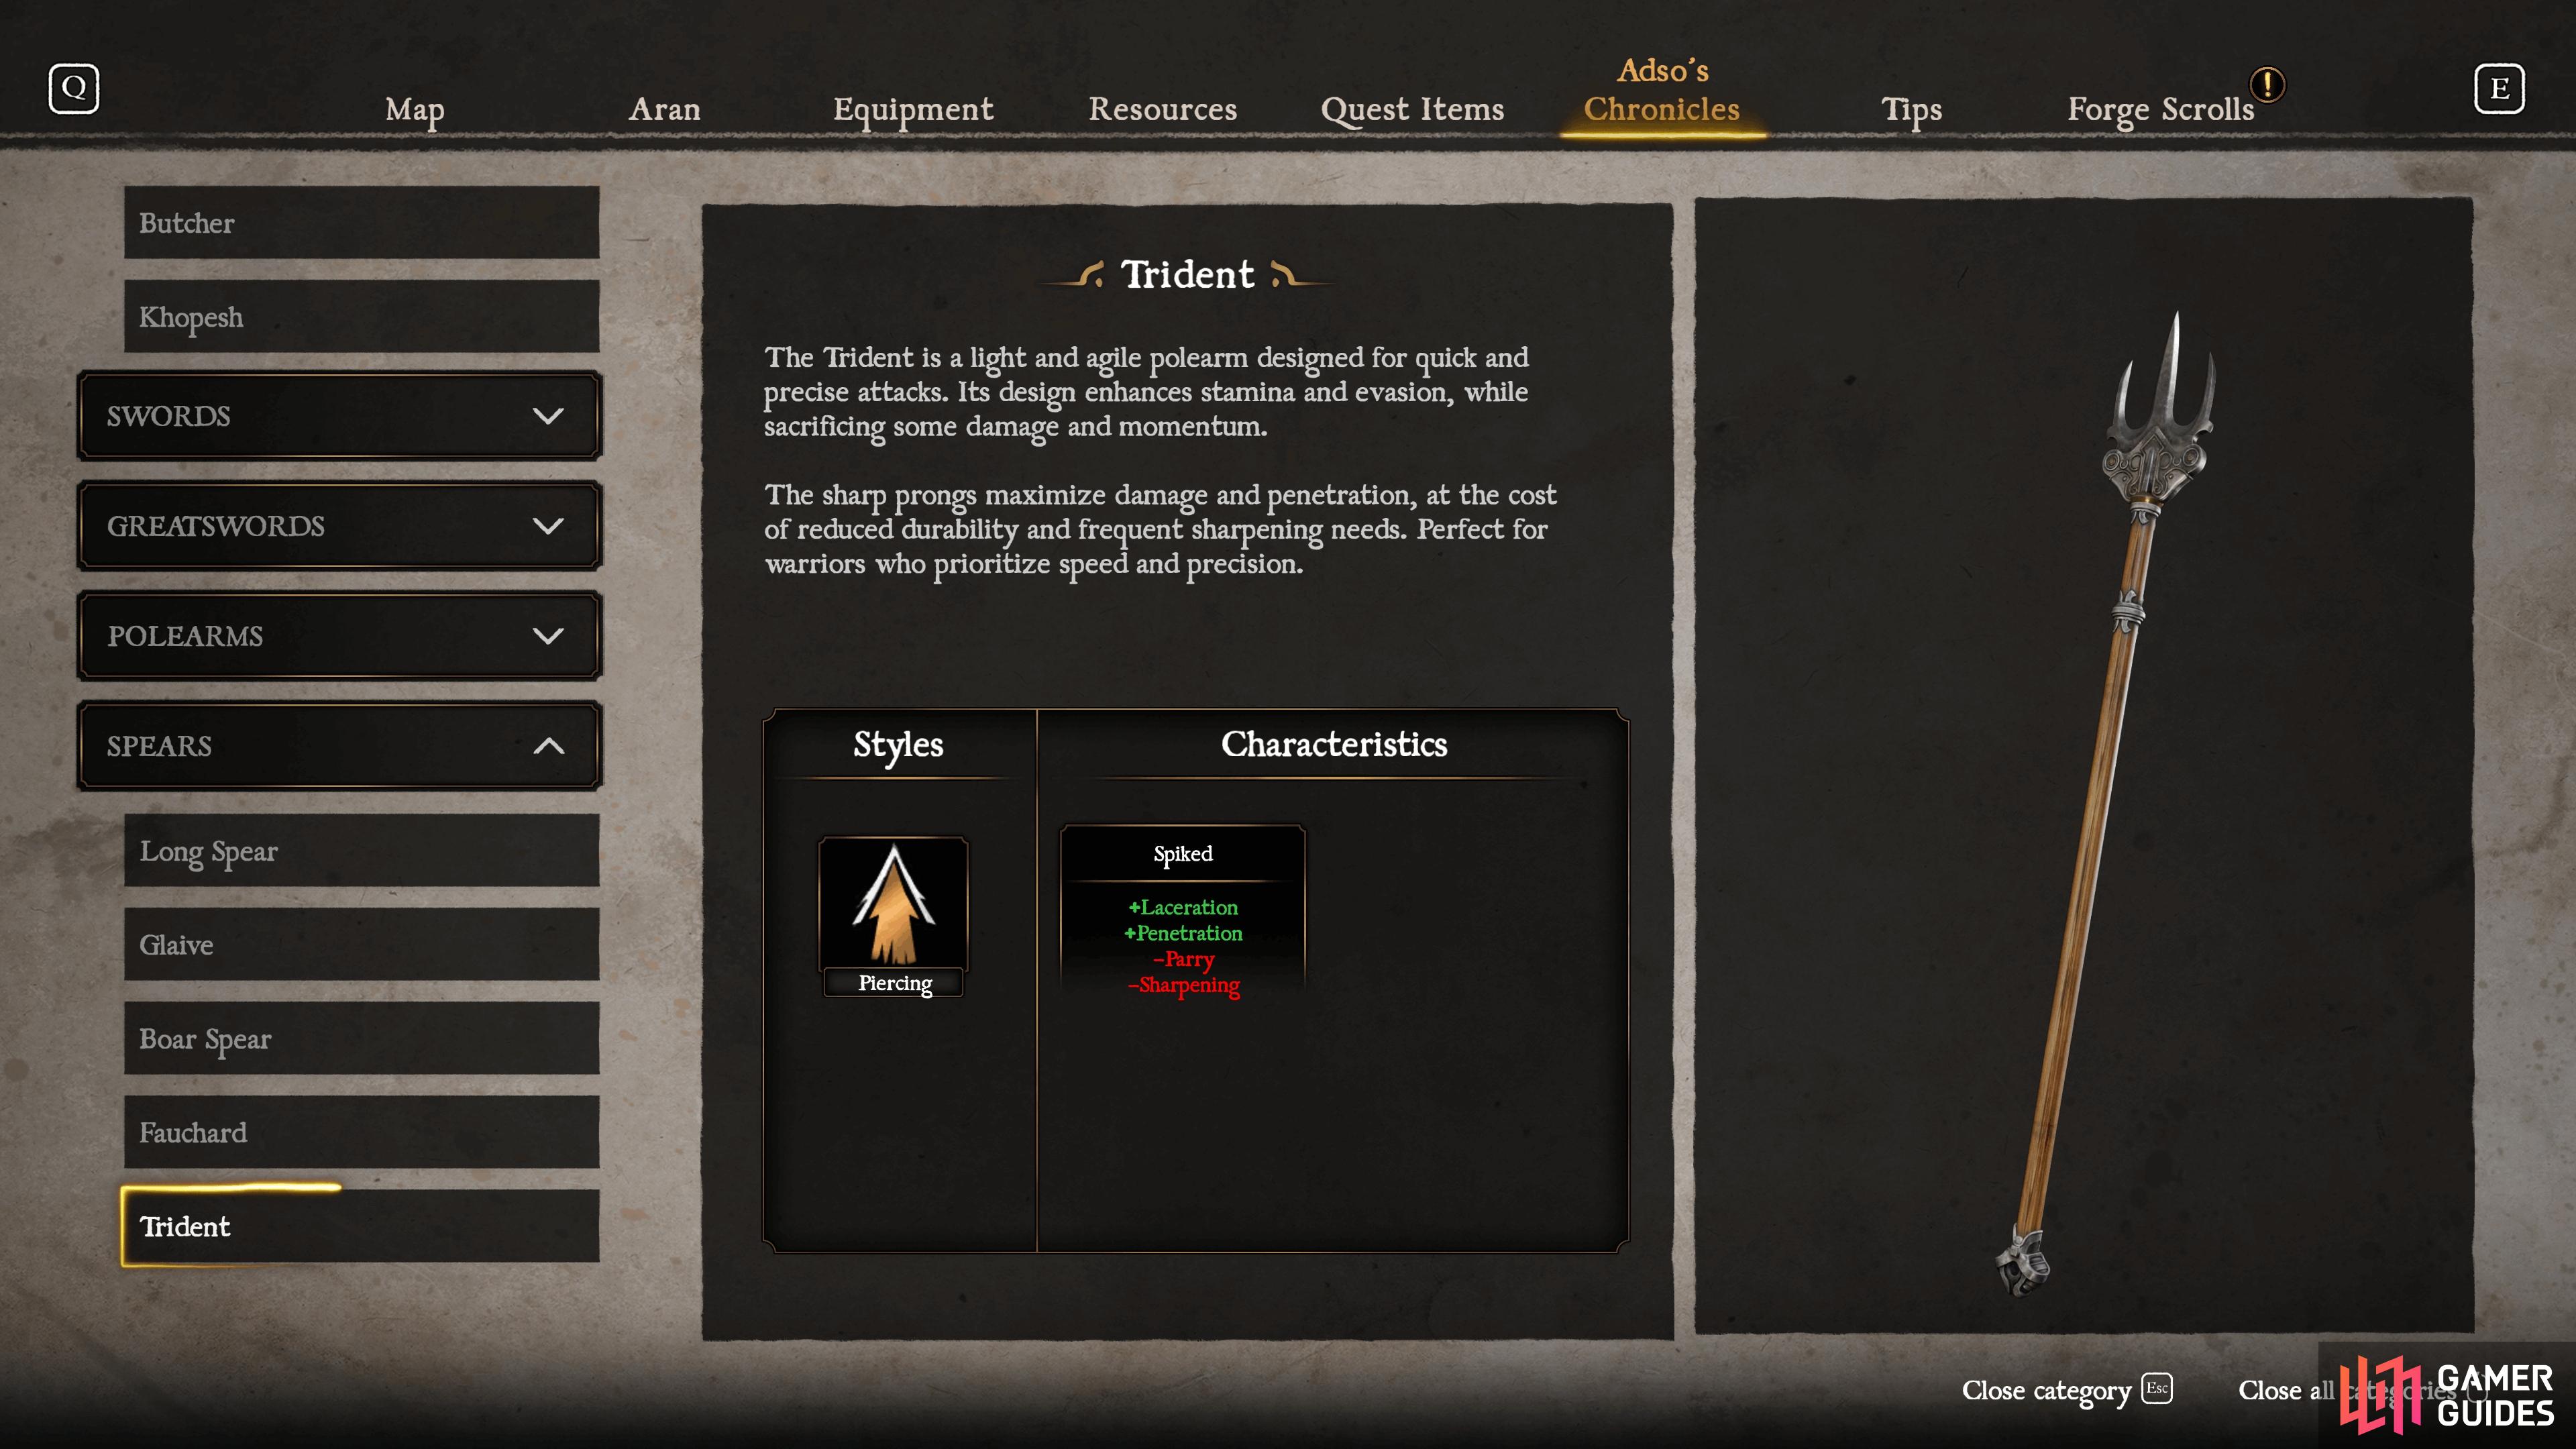
The Trident is one of the best weapons at dealing Penetration damage in Blades of Fire.
| Style | Characteristics |
|---|---|
| Piercing | Spiked (+Laceration and Penetration, -Parry and Sharpening) |
Just like the above weapon, you’re going to have to wait until you reach Tok’s Kingdom in Chapter 2 of Blades of Fire as you’ll need to encounter the Morlocks, of which you need to defeat a whopping 60 of them. These tricky customers can be found dwelling in areas without light, and you’ll find the perfect place at the Morlock’s Place anvil in The Roggs Mountains. The important thing to note about these enemies are the fact that if you don’t have a weapon with a Light Rune attached, they will instantly kill you, so don’t forget this. The anvil above will take you into a cave where you can quickly tallying up the kills, equip a weapon with a wide arc such as the Glaive and get to killing.
The Trident is a contender for one of the better Spears in the game, as it’s all about dealing massive Penetration damage to the enemy, which we’d argue is one of the more important stats to focus on. As such, when building this weapon, you should focus your materials on increasing this stat as much as possible while also giving it the longest Reach you can (at 80“). It’s also one of the quickest two-handed weapons in the game, but this does come at a cost at requiring Sharpening more often, so be sure that you don’t increase the cost of that too much.
All Spear Seneschal Locations
Throughout your adventure, you’ll encounter statues, known as Seneschals, that when presented with a weapon belonging to that type, will unlock a new part to make use of in the forging process. You can see on the Forger’s Scroll screen how many parts a weapon can unlock and you will only gain a part for the weapon presented. The table below will show you where to find all of the Spear Seneschals.
| Number | Location |
|---|---|
| 1 | Basacarr Hamlet - Dry Riverbed: Southeast of the anvil is a crack in the house that you can break through that leads to it |
| 2 | The Crimson Fort - Cellar Rooftops: Once back inside, go upstairs and follow the path to a large room, found on the right side of it |
| 3 | The Crimson Fort - Library Tower: After the cutscene, go back down the stairs to find it near the entrance (near the forger’s totem) |
| 4 | The Crimson Fort - Cellar’s Rooftops: Once you have the Lord’s Key, go back into the building ahead, down the stairs, and look for a gap on your left. Open the locked door to find the statue |
| 5 | Ancient Garden: Far south of the map (keep going southwest after crossing the bridge from Crimson Fort) |
| 6 | Doryen Graves - Well of the Skeletons: After going through the Cave of the Damned and coming back out, go forward (instead of left or right) to find a gap you can go through |
| 7 | Kar-Lethel Swamp - Angel’s Cliff: When going west through the path blocked by the golem, go around to the north of the large tree in the center |
| 8 | Tok’s Kingdom - The Eigon’s Abbey: Behind where you fight the Blazing Setanza |
| 9 | Tok’s Kingdom - Roggs Mountains: On the west side after taking a zipline over |
| 10 | Tok’s Kingdom - City of Curved Stones: After taking the zipline from Tok’s Tower in Watchtower Domain, go down the stairs to the left to go inside where you can find it |
There you have it; you now know everything there is to know about the Spear category of weapons in Blades of Fire. You can now deliver precise strikes from range to any enemy that may get the jump on you.
No Comments