
With seven weapon types and five weapons for each of them in Blades of FireThere is a lot to unlock in the game. As another feature, there are numerous parts for each weapon that can be unlocked for forging; this is done by finding and unlocking Seneschals. Read on to find out how to unlock all weapons for the Greatsword and where you can find the Seneschals for them.
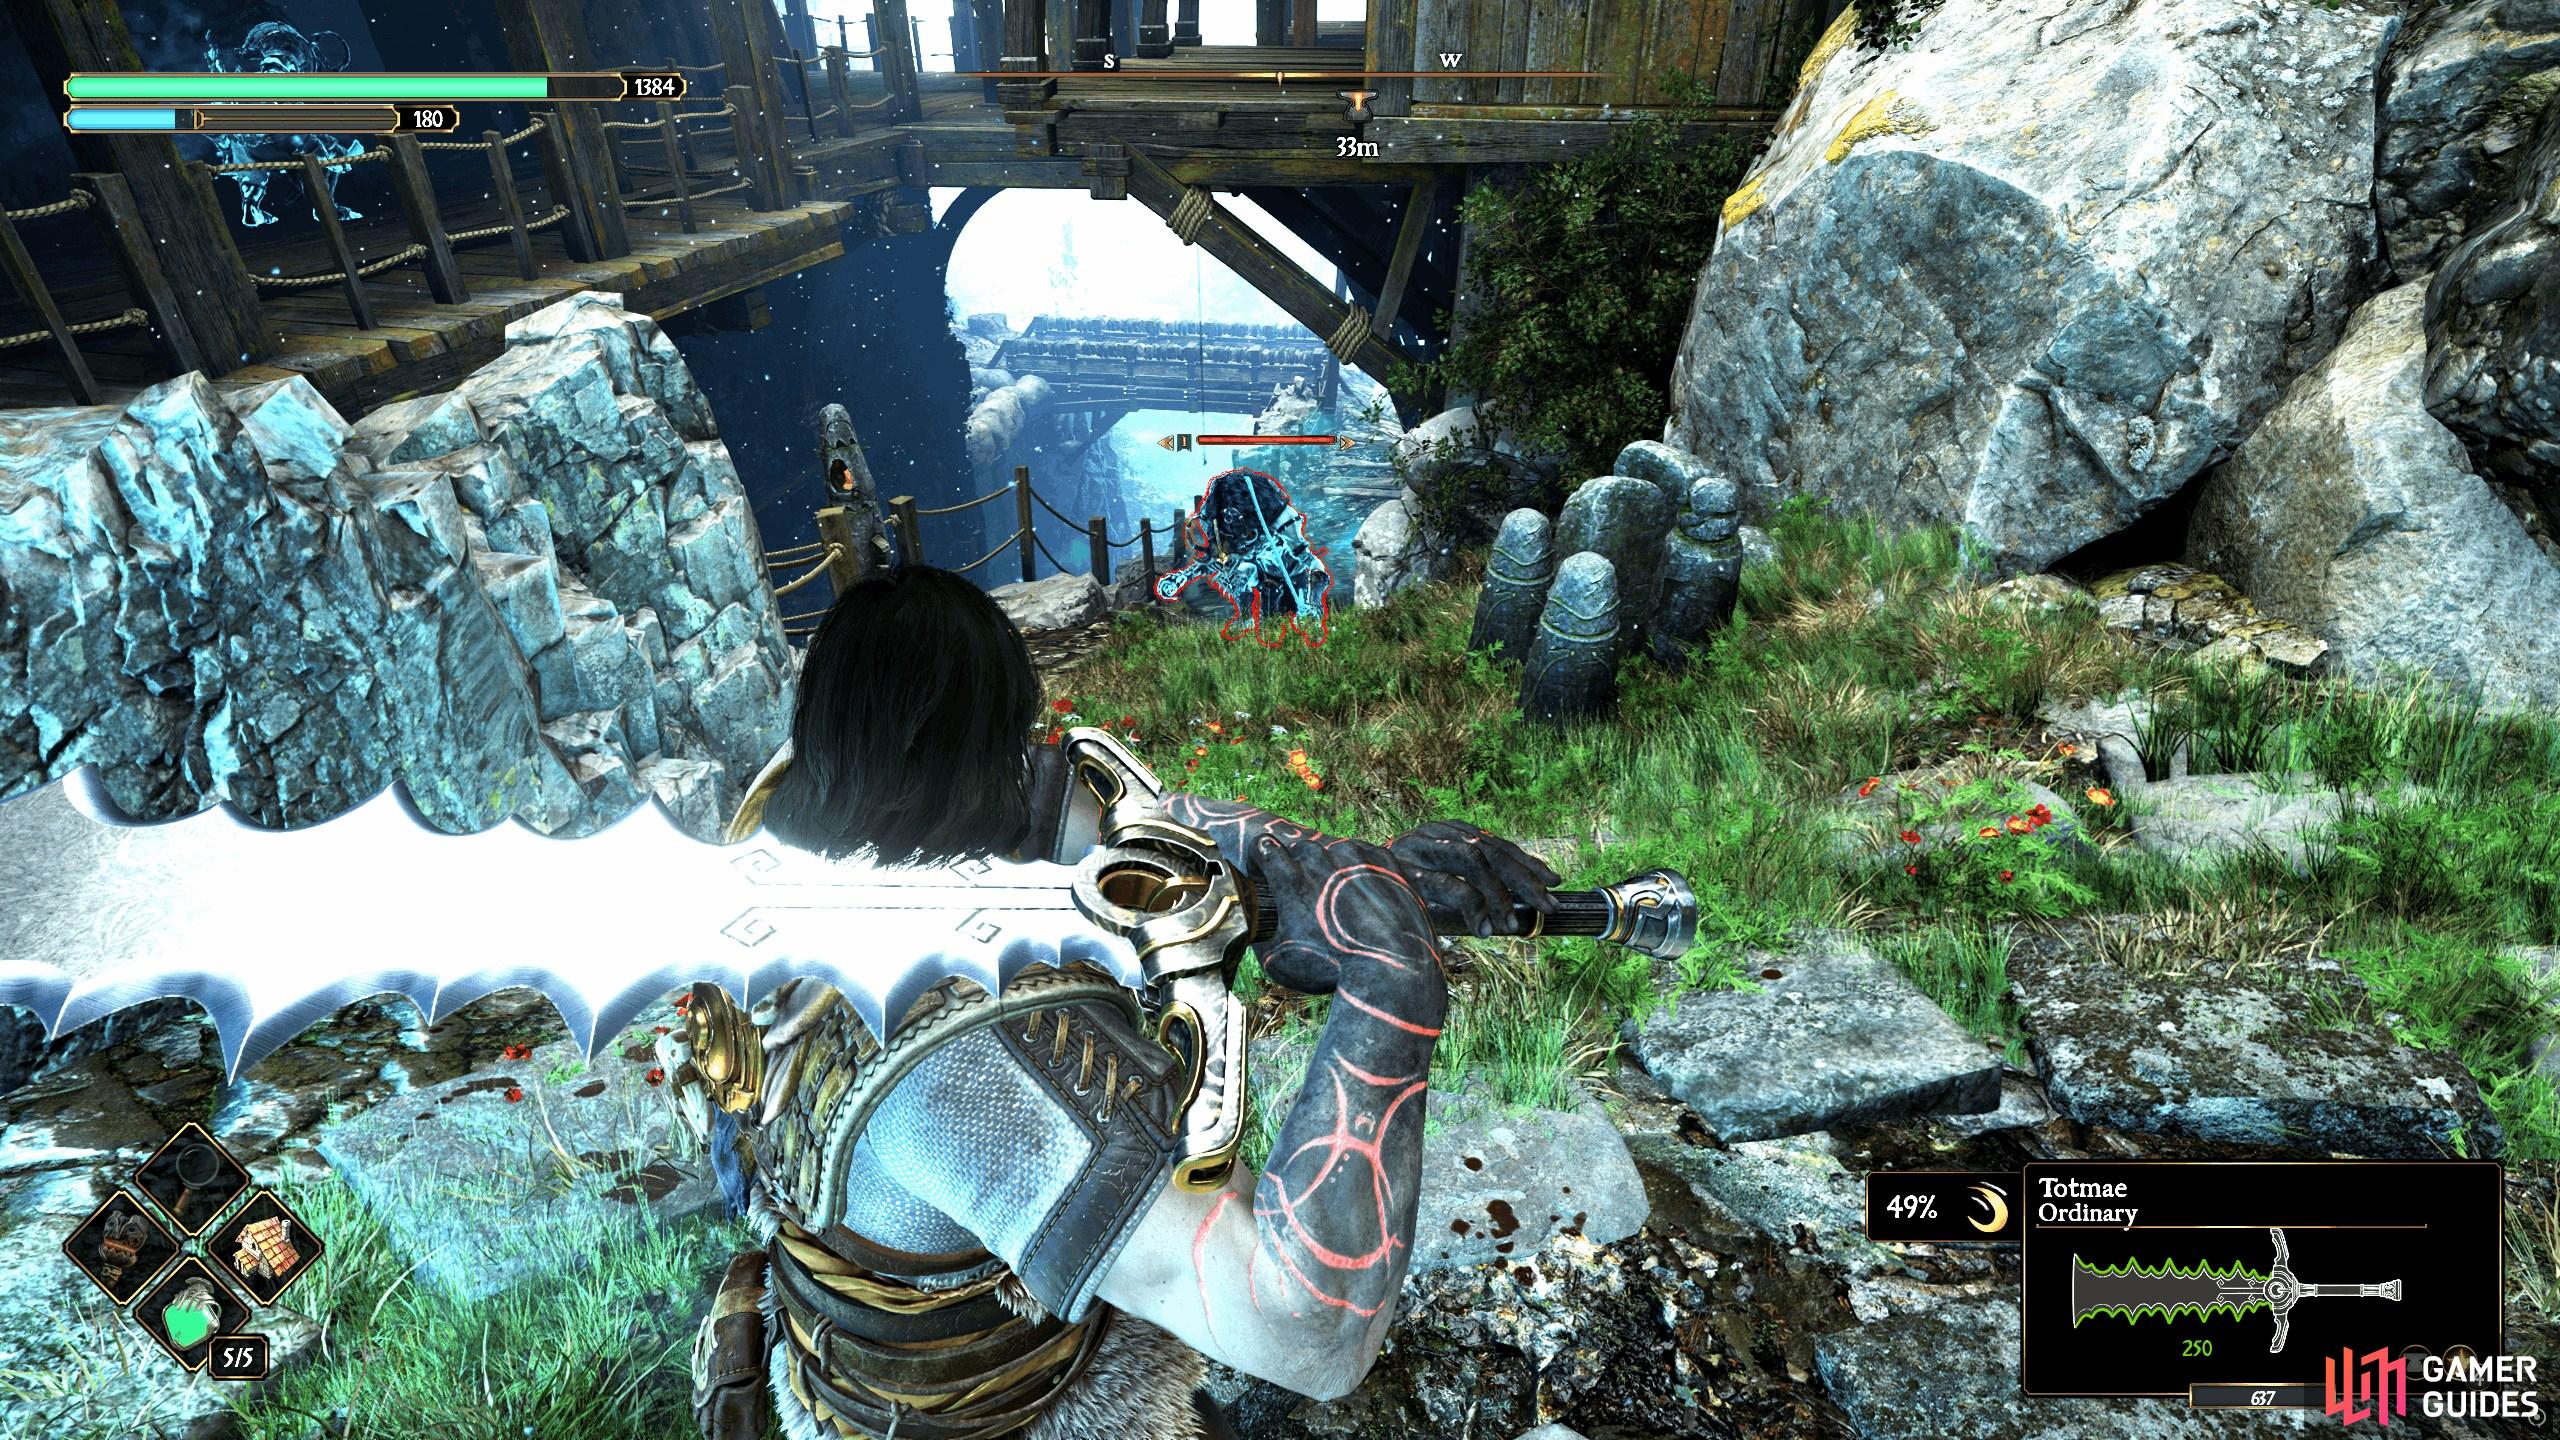
The Greatsword is a stagger machine, interrupting enemies during their attacks, allowing you to punish them with slow, hard-hitting attacks.
Table of Contents
If you want to jump to a specific section, click on the links below.
| Quickjump |
|---|
| Greatsword Playstyle |
| Claymore |
| Trollslayer |
| Flamberge |
| Great Falx |
| Eastern Greatsword |
| Greatsword Seneschal Locations |
Greatsword Playstyle
| Category | Rating |
|---|---|
| Speed | 1 |
| Recovery | 2 |
| Advance | 2 |
| Damage | 2 |
| Stagger | 3 |
| Strike Area | 3 |
All the ratings above are out of three, so as you can see, the greatsword is your slow weapon that staggers enemies with almost every hit. It has good reach due to its modest Advance stat and long blade, and deals above-average damage. Its main downside is its speed, but it’s quick enough to deal with what’s in front of you. The best way to play greatsword is to use charged thrusting attacks from a distance to stagger the foe and then follow up with a quick attack before retreating.
Greatsword Unlocks
There are five greatswords in total, each requiring you to defeat a certain number of enemies before you can craft it. Some of these enemies won’t be available until much further in the game, meaning you won’t be able to unlock some of these weapons until much later on. In the table below, you’ll find each greatsword you can unlock, as well as what enemies you need to kill for it.
| Weapon | Required Enemies |
|---|---|
| Claymore | Defeat 60 Putrids (Claymore Users) |
| Trollslayer | Defeat 5 Trolls. 1) Besacaar Hamlet 2) Besacaar Hamlet, 3) Crimson Fort. 4) Doyen Graves. 5) Doyen Graves. 6) Belitara’s Witchwood 7) Southern Hiss City |
| Flamberge | Defeat 60 Vexers |
| Great Falx | Defeat 10 Grilled Putrids |
| Eastern Greatsword | Defeat three Shunned Templars, all found in the Iron Castle |
Claymore
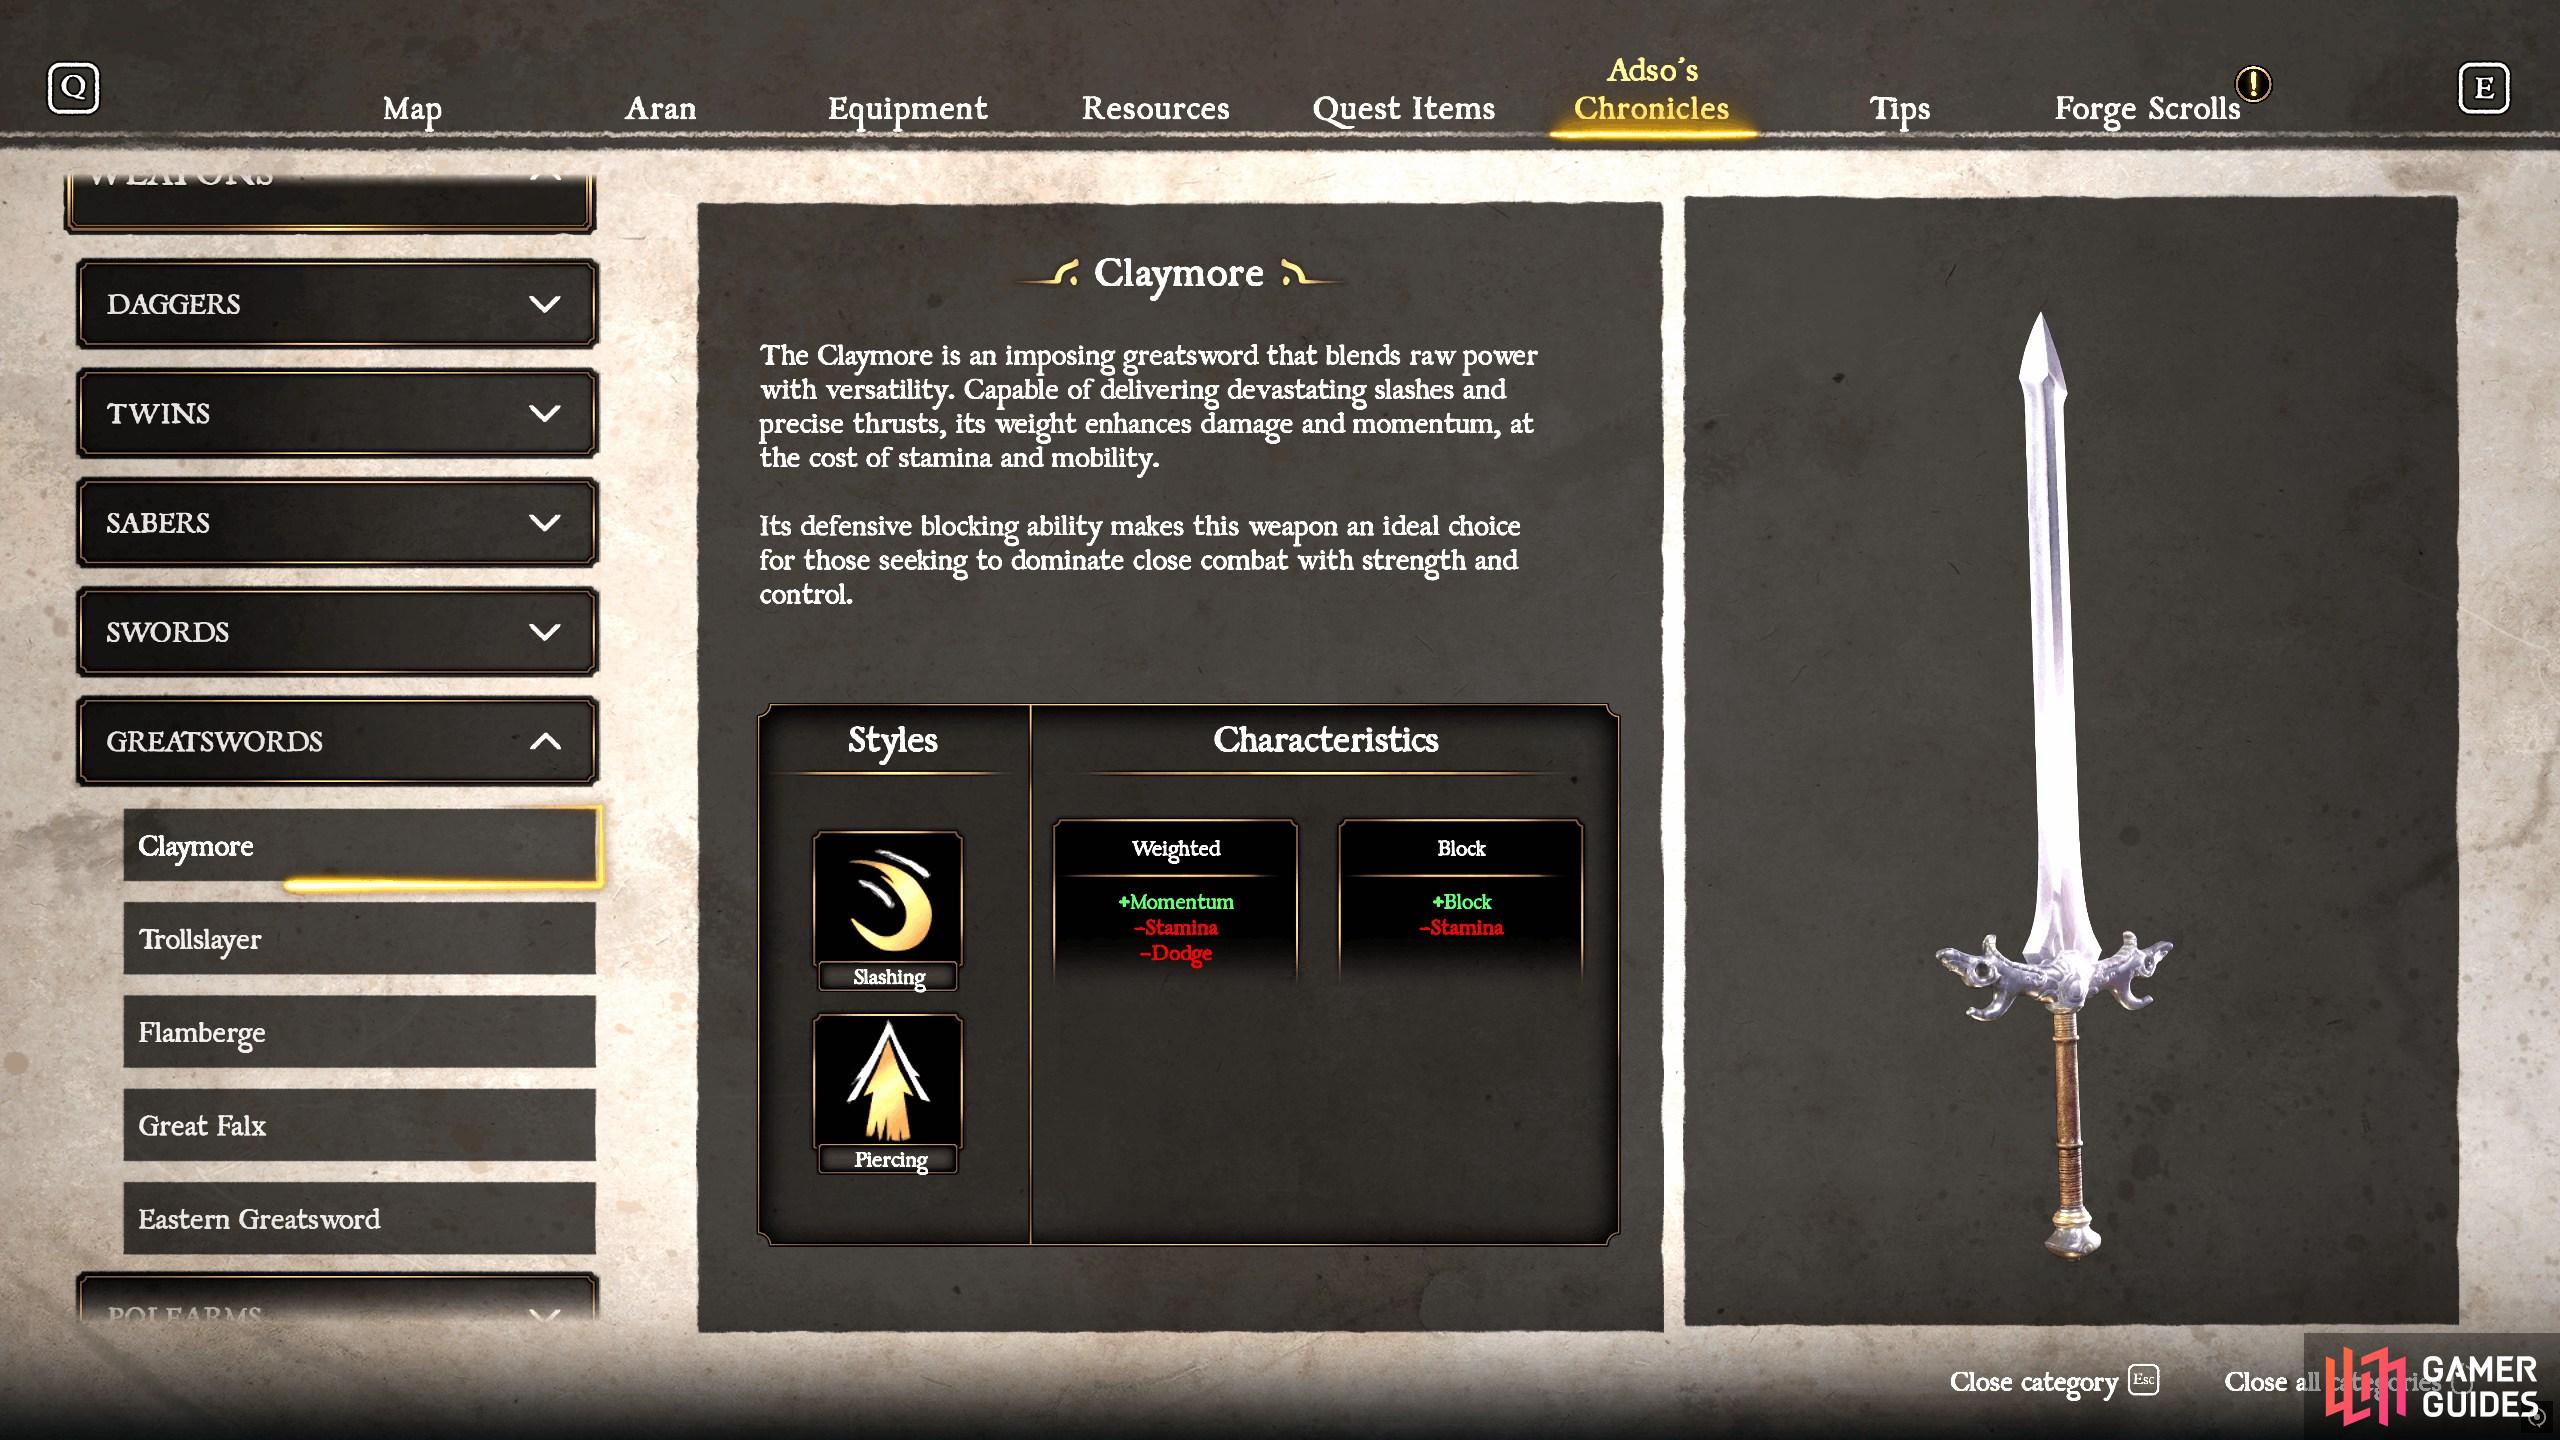
The Claymore is the first greatsword you’ll obtain. A bit on the slow side, but it offers great defensive ability with respectable damage.
| Styles | Characteristics |
|---|---|
| Slashing/Piercing | Weighted (+Momentum, -Stamina, -Dodge) Block (+Block, -Stamina) |
The Claymore is the first greatsword you’ll obtain, but it will be a while before you acquire one. It requires defeating 60 Claymore-wielding Putrids, and the best place to farm them is south of the Kar-Lethel Wall Anvil in The Hollow Plain. You’ll find plenty of them near the large gate you’ll need to open to progress further south. The Claymore is the perfect balance between offense and defense due to its powerful slashes and precise thrusts, while having a respectable block. Its downside is stamina cost and mobility. Here’s how we’d build our Claymore:
- Blade: 64“
- Cross Section: Concave or Concave Fuller
- Guard: Big
- Pommel: Medium
This will give you high damage and high block at the cost of durability and stamina. If the low durability worries you, select Concave as the Cross Section over Concave Fuller.
Trollslayer

The Trollslayer is the go-to weapon to take down those large, slow enemies where a hard-hitting weapon is what you need.
| Styles | Characteristics |
|---|---|
| Slashing | Weighted (+Momentum, -Stamina, -Dodge) Block (+Block, -Stamina) Flamed (+Laceration, -Block, -Parry) Spiked (+Laceration, +Penetration, -Parry, -Sharpening) |
Ironically, to acquire the Trollslayer, you’ll need to slay trolls. This will take a while to unlock as you need to defeat five trolls, and they don’t respawn, meaning you’ll need to find five separate trolls. You’ll encounter the first one in Besacaar Hamlet, near the aptly named Anvil, Troll River. The Trollslayer is best at taking down large foes, where high damage and high blocking is king. To offset this, it has limited Parrying ability, one style (Slashing), and low durability. Here is how we’d build our Trollslayer:
- Blade: 60“ Flamed
- Cross Section: Concave Fuller
- Guard: Big
- Pommel: Medium
Building it this way will maximize the damage it provides while giving you more than enough block to defend against a few attacks. Be warned that you’ll need to repair this often due to its low durability.
Flamberge
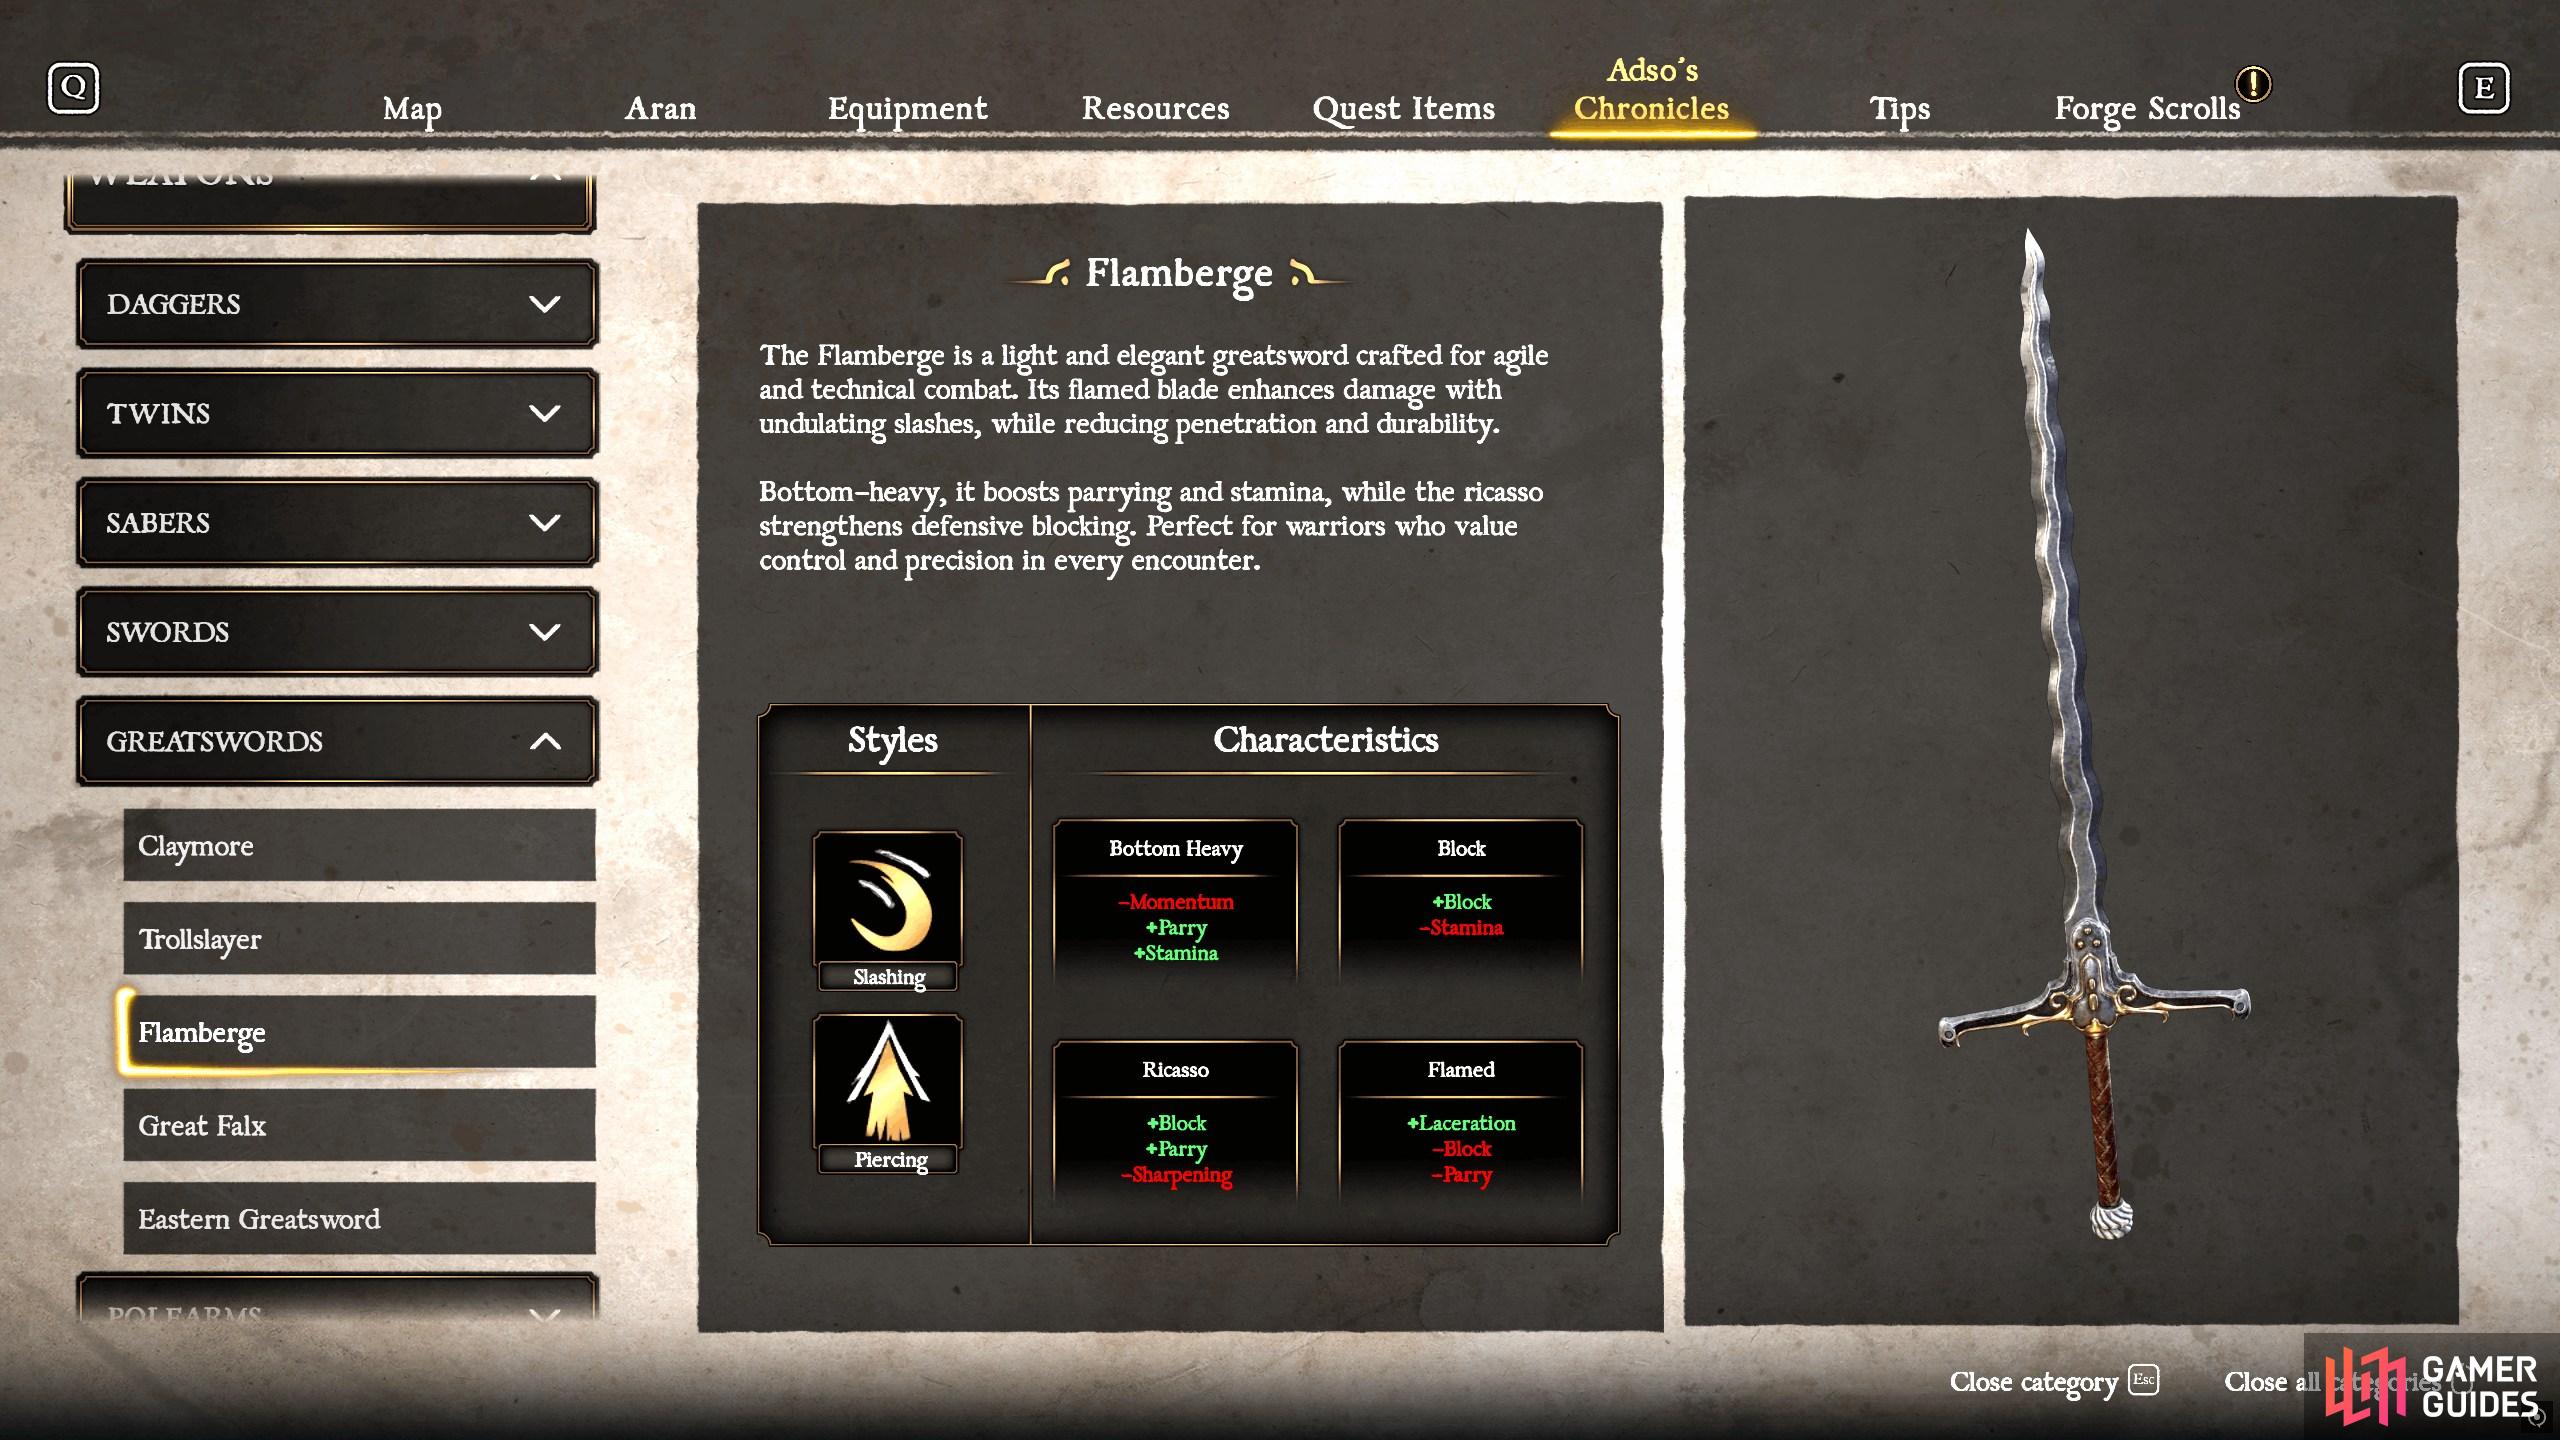
The Flamberge is a parrying monster while also having a great blocking stat, making it a great defensive weapon.
| Styles | Characteristics |
|---|---|
| Slashing | Bottom Heavy (-Momentum, +Parry, + Stamina) Block (+Block, -Stamina) Ricasso (+Block, +Parry, -Sharpening) Flamed (+Laceration, -Block, -Parry) |
To obtain the Flamberge, you’ll need to defeat 60 Vexers, which are commonly found in The Hollow Point and the Kar-Lethel Swamp areas. The Flamberge is a defensive greatsword due to its unique Ricasso characteristic, enhancing both Block and Parry. Due to its design, you can control the battle being up close, blocking and/or parrying until you create an opening, and then using its precision attacks to take them down. Here is how we’d build the Flamberge:
- Blade: 60“ Ricasso
- Cross Section: Convex
- Guard: Big
- Pommel: Medium
This will give you high Block, quick Parrying, decent attack, and modest Durability, which allows you to take full advantage of its defensive capability.
Great Falx
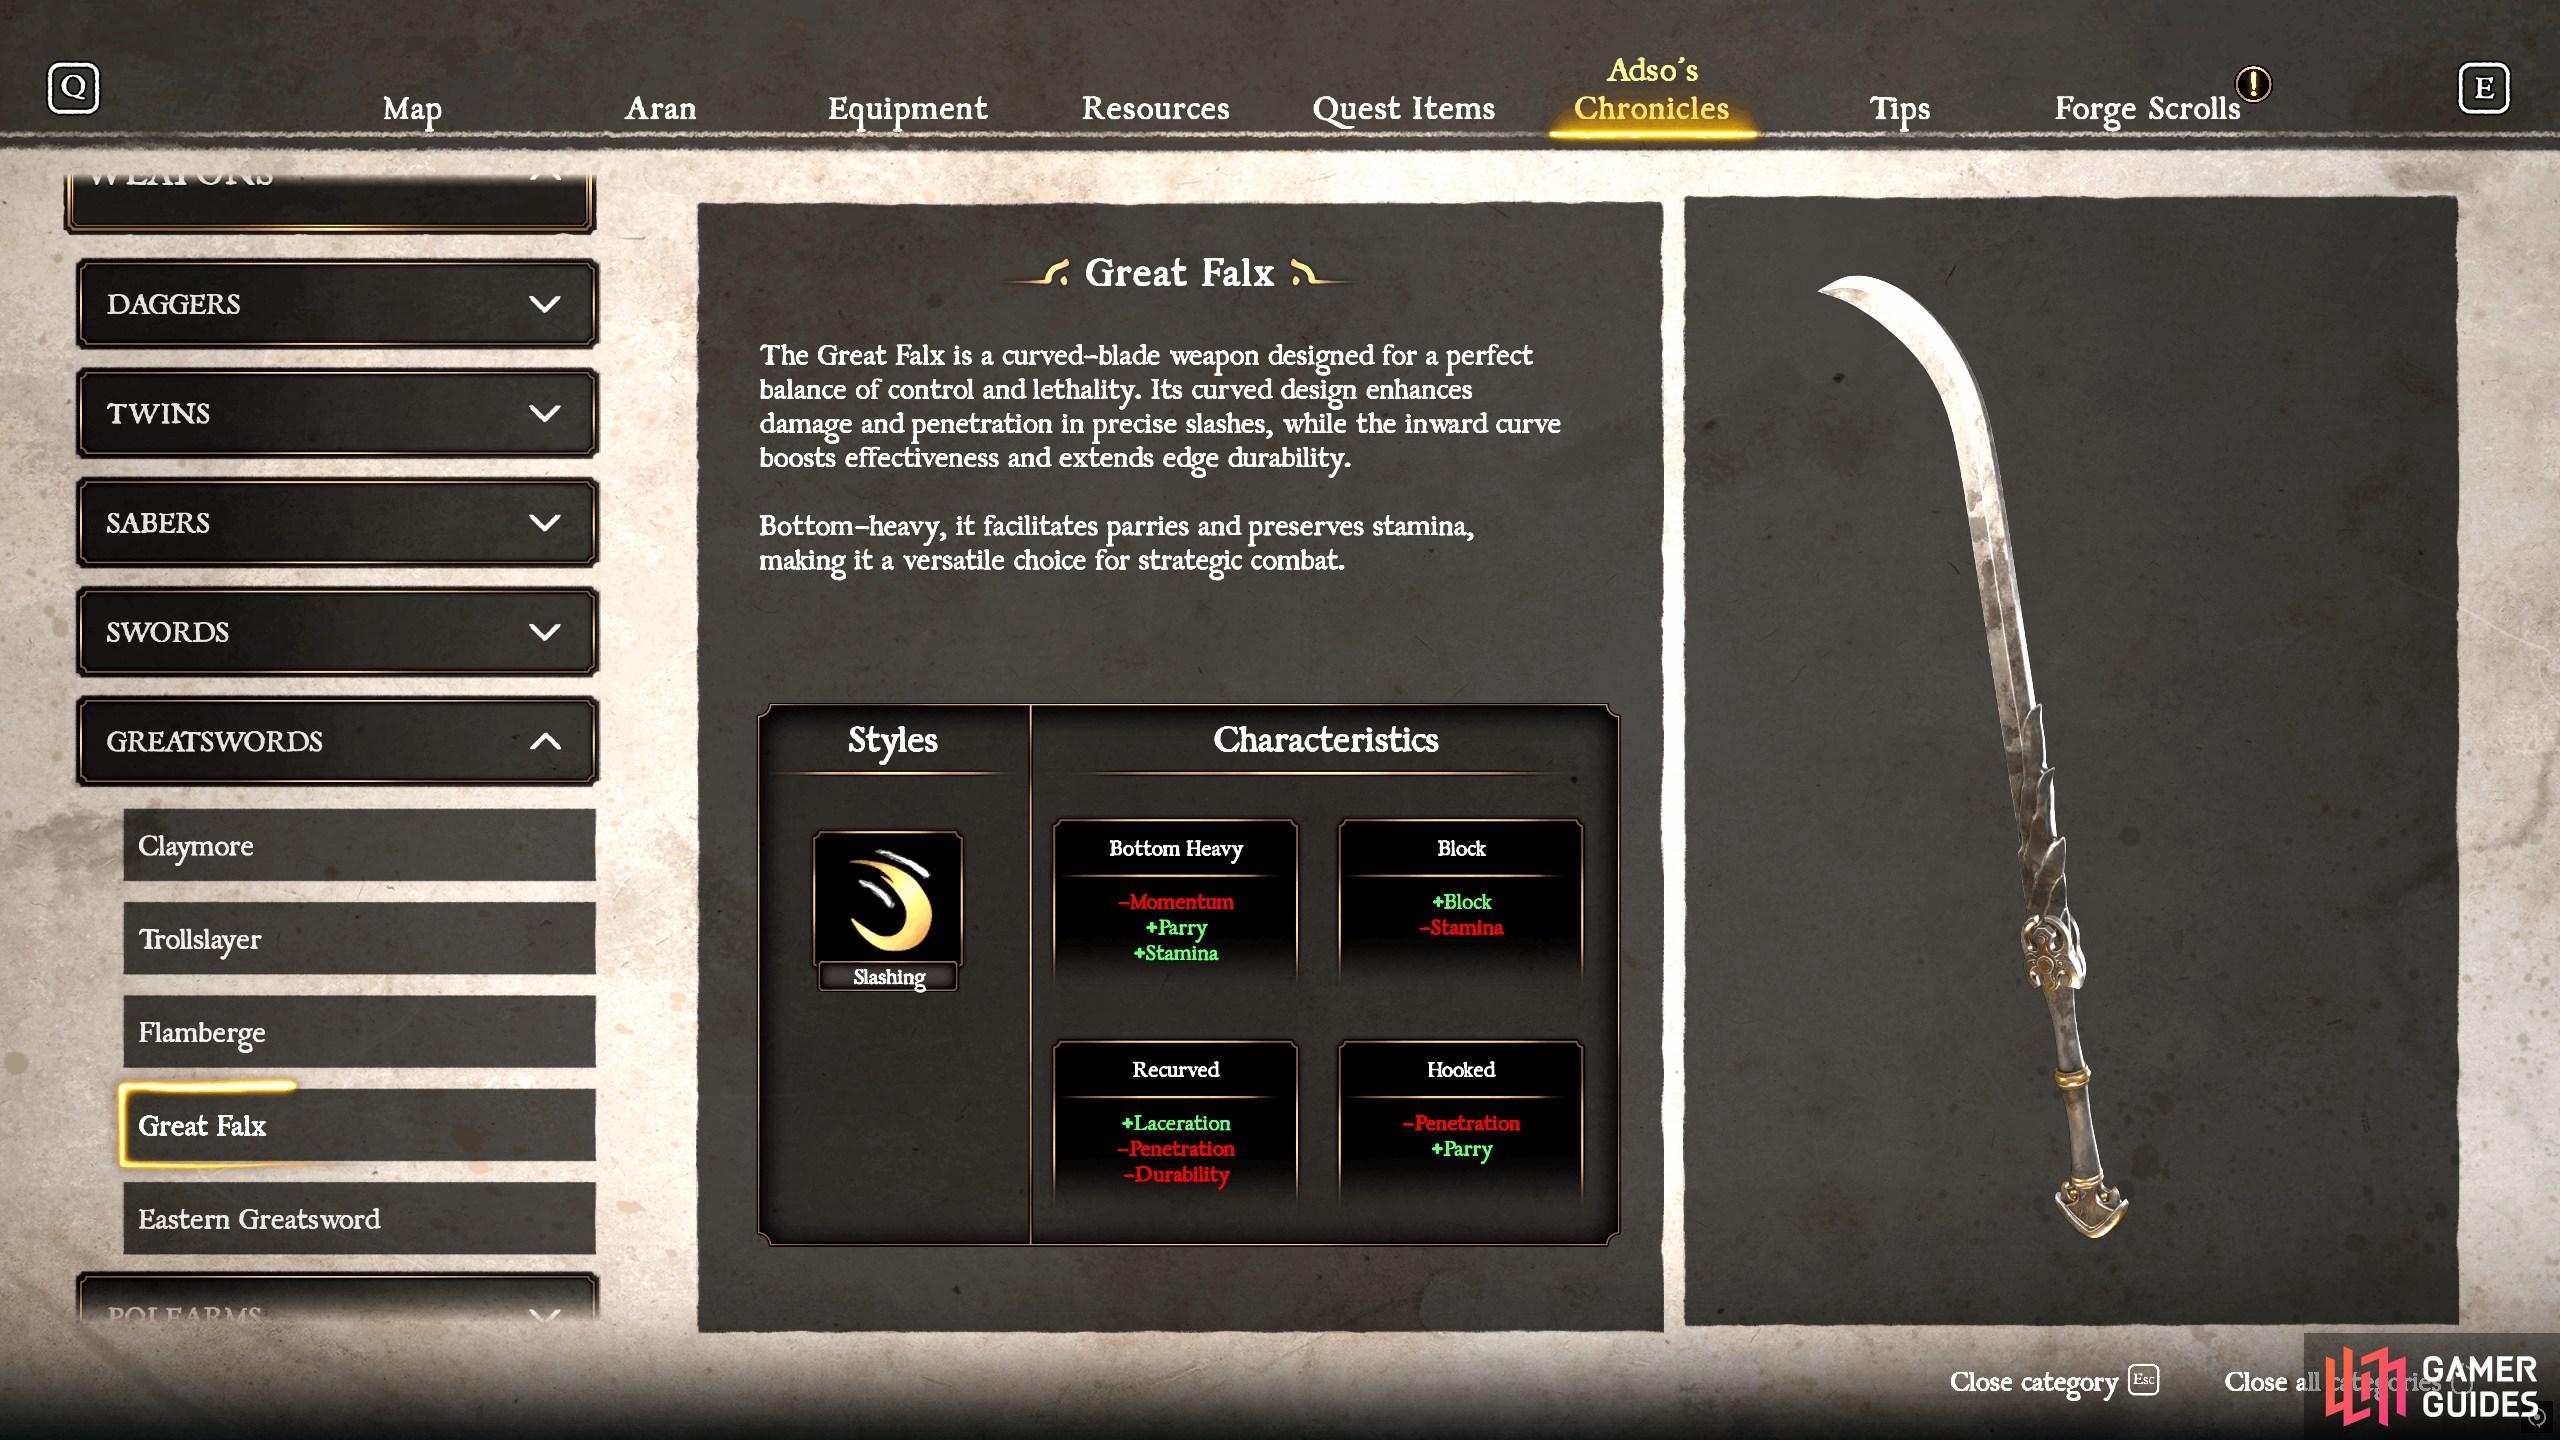
The Great Falx gives you quick horizontal slashing attacks that can take enemies down before they get a chance to attack you.
| Styles | Characteristics |
|---|---|
| Slashing | Bottom Heavy (-Momentum, +Parry, +Stamina) Block (+Block, -Stamina) Recurved (+Laceration, -Penetration, -Durability) Hooked (-Penetration, +Parry) |
Obtaining the Great Falx requires you to defeat Grilled Putrids. You’ll begin to fight them near the Cellar Anvil in The Crimson Fort, but you’ll find a lot more of them later on, especially in Dorens Grave. The Great Falx is one of the quicker greatswords due to it only having the slashing style. Due to its speed being the pro of the weapon, you’ll want to use quick slash attacks to take down your enemies. It also has respectable Parry speed. Here’s how we’d build the Great Falx:
- Blade: 64“
- Cross Section: Concave
- Guard: None
- Pommel: Small
This allows you to build it the way that the weapon should be used, for quick slashing attacks, while not reducing your parrying capability.
Eastern Greatsword
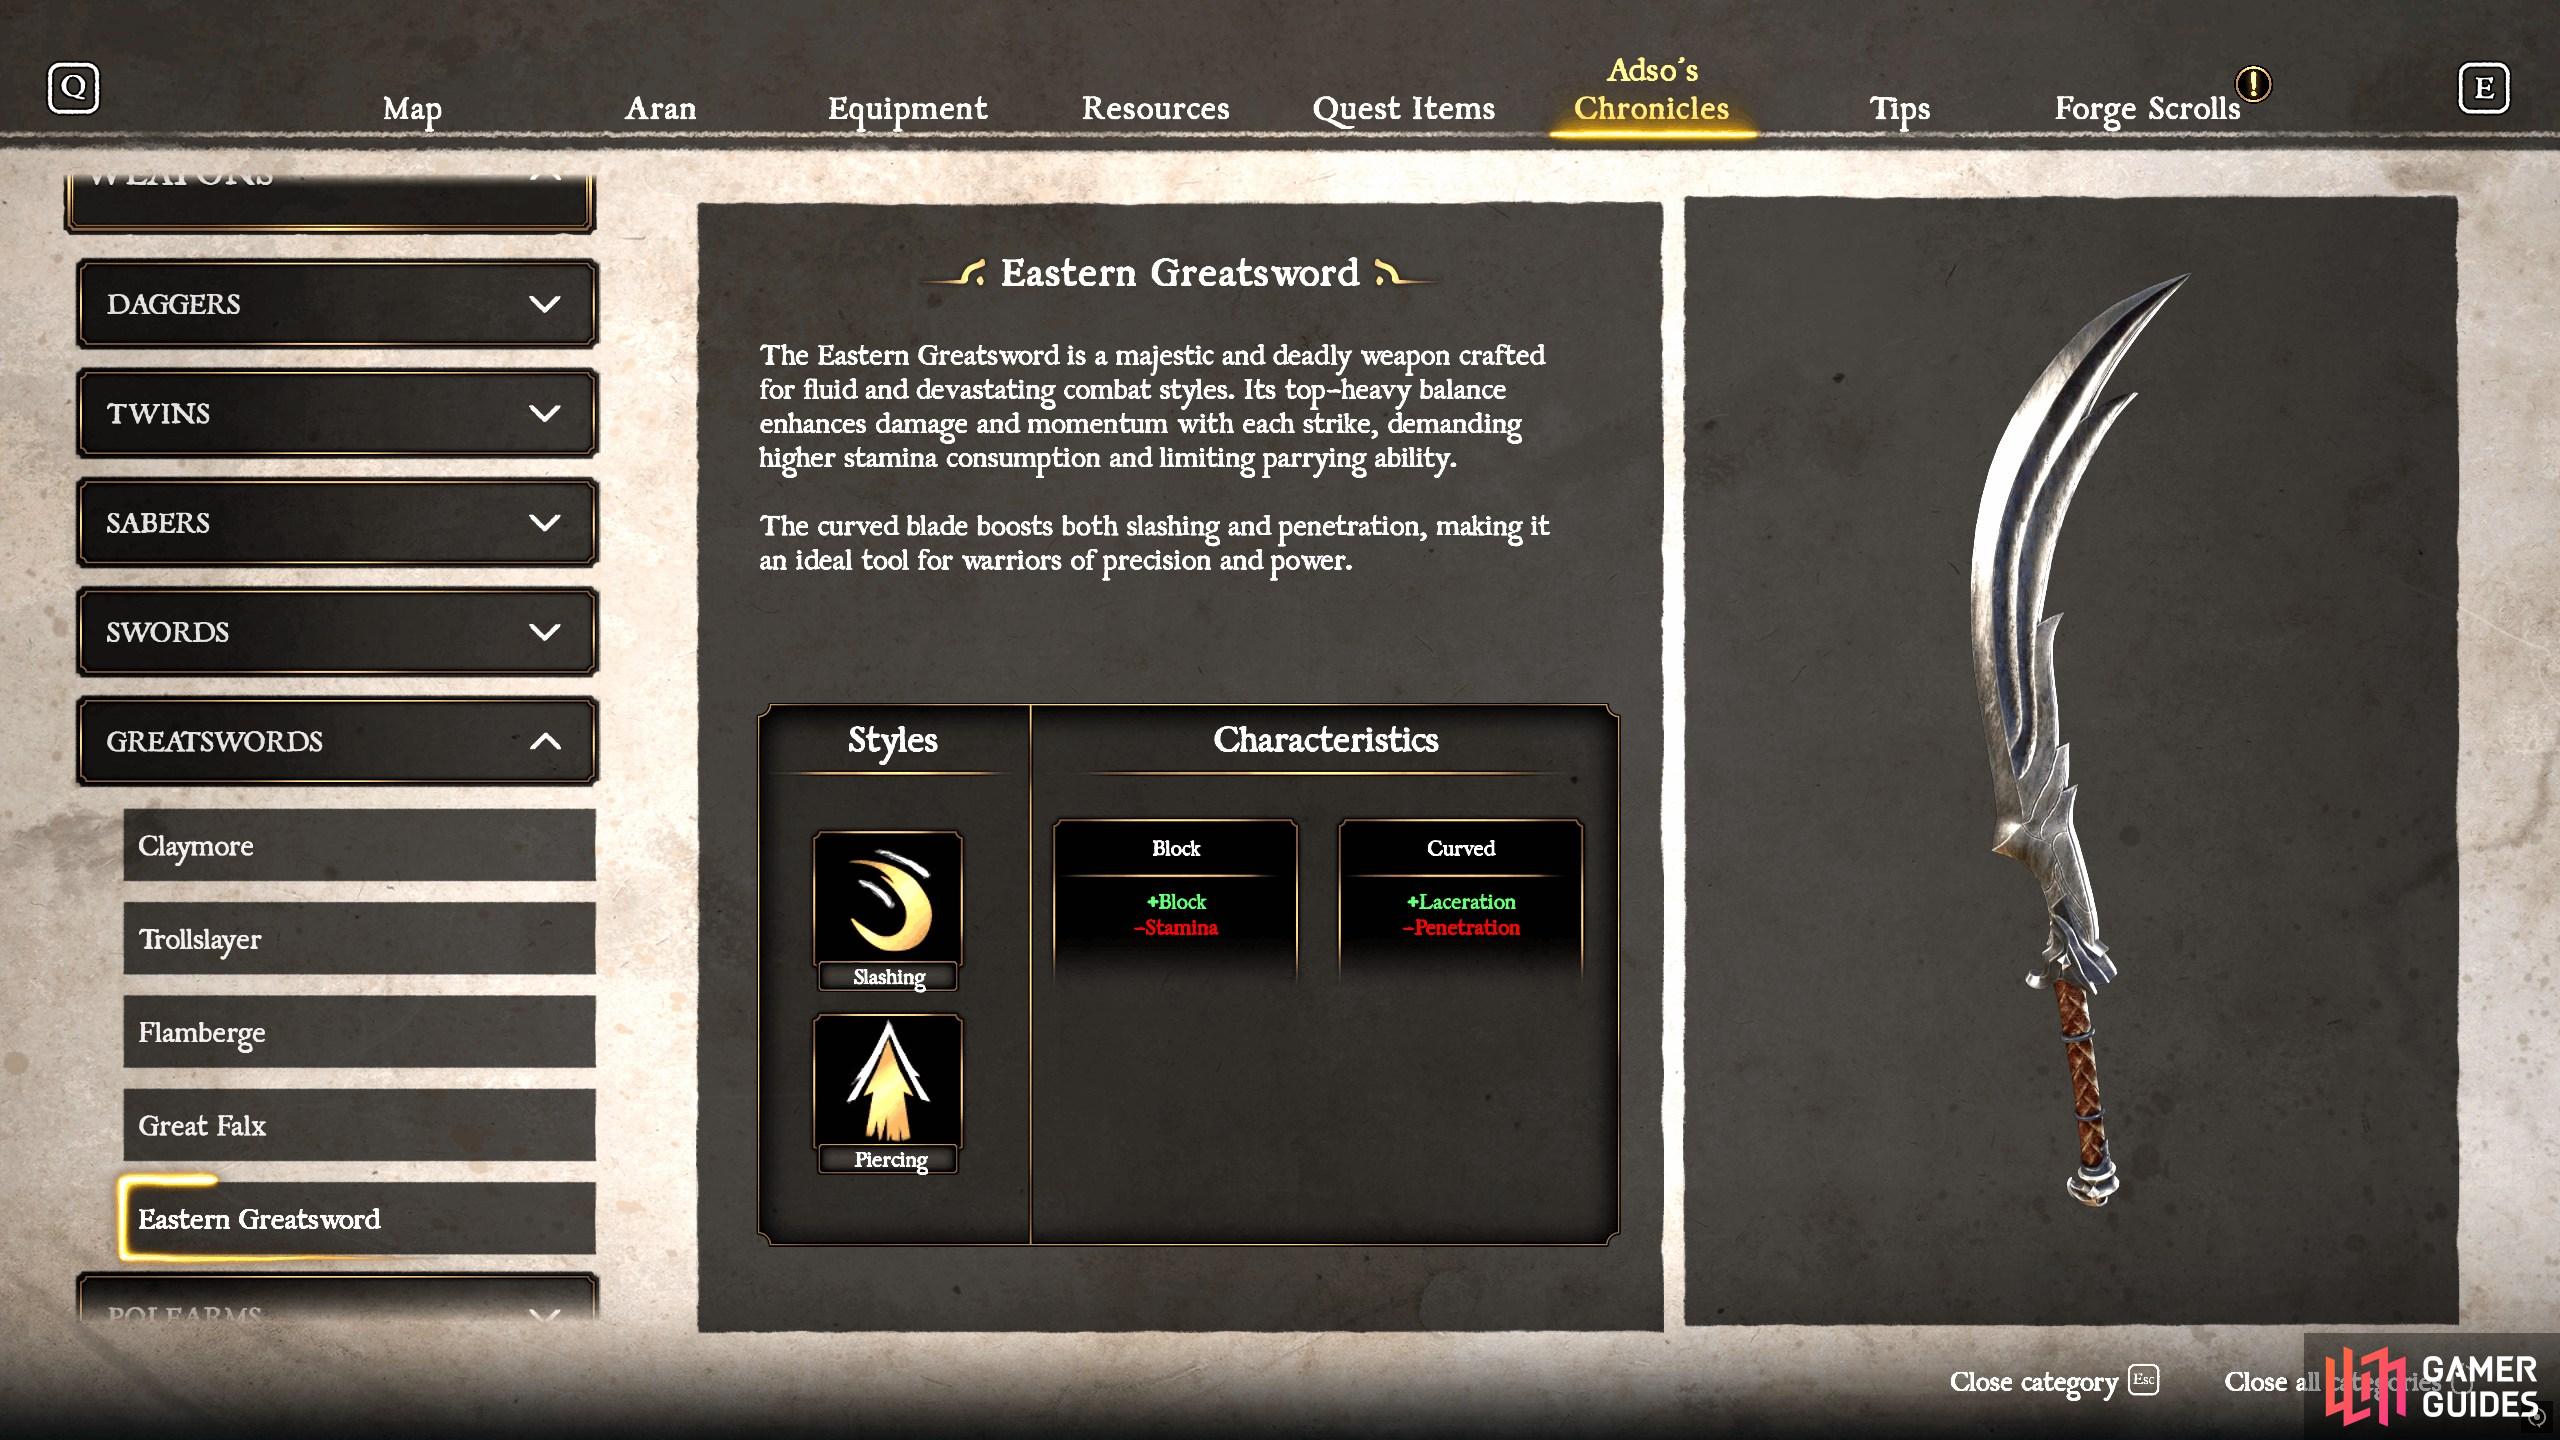
The Eastern Greatsword will give you quick high damaging slashes at the cost of poor parrying and high stamina cost.
| Styles | Characteristics |
|---|---|
| Slashing | Weighted (+Momentum, -Stamina, -Dodge) Top Heavy (+Momentum, -Parry, -Stamina) Block (+Block, -Stamina) |
The Eastern Greatsword can’t be unlocked until you reach the Iron Castle due to you needing to defeat three Shunned Templars, which you need to defeat as part of the story. Whereas the Eastern Sword is a Katana, the Greatsword variant is a Great Katana, giving you quick slashing attacks with high damage and precise thrusting attacks. Unfortunately, it has limited parrying ability and high stamina cost, which means you’ll need to make sure your attacks are well-timed. Here’s how we’d build the Eastern Greatsword:
- Blade: 48“ Curved
- Cross Section: Concave Fuller (Concave if you want more durability)
- Guard: None
- Pommel: Medium
Crafting it this way will maximize your damage while giving you some much-needed Stamina to extend how many attacks you can perform before recharging your Stamina.
All Greatsword Seneschal Locations
Throughout your adventure, you’ll encounter statues, known as Seneschals, that, when presented with a weapon belonging to that type, will unlock a new part to use in the forging process. You can see on the Forger’s Scroll screen how many parts a weapon can unlock, and you will only gain a part for the weapon presented. The table below will show you where to find all the Greatsword Seneschals.
| Number | Location |
|---|---|
| 1 | Besacaar Hamlet - Dry Riverbed Forge: Southwest corner from the Dry Riverbed Forge |
| 2 | The Crimson Fort - Cellar Rooftops: Once you re-enter the building, go right and follow the balcony to the end |
| 3 | Doryan Graves - Funeral Bridge: Drop to the river below and head left |
| 4 | Doyen Graves - Funeral Bridge: After crossing over the bridge, go through the gap in the wall, go southeast, and then back to the west to find it |
| 5 | Tok’s Kingdom - Serpents Amphitheater: In the tower northeast of Serpents Amphitheater, Anvil. You’ll be sent this way as part of the story. When you reach the tower, head outside and go around the balcony to find the statue |
| 6 | Tok’s Kingdom - Watchtower Domain: In the caves to the southeast |
| 7 | Tok’s Kingdom - Watchtower Domain: Behind the waterfall in the east of the Watchtower Domain |
| 8 | Tok’s Kingdom - Watchtower Domain: Enter Tok’s Tower in the room below his throne, go onto the balcony |
| 9 | Tok’s Kingdom - Southern Hiss City: Behind one of the gates in the arena area, south of the Anvil |
| 10 | Doyen Graves - In the ruined tower at the northwest tip of the river. You can open the grate with a crank. The handle is under the bridge to the south. |
| 11 | Tok’s Kingdom - The Abbey Gorge - Abbey Heights: Just to the west of the Abbey Heights anvil |
| 12 | Tok’s Kingdom - The Long and Winding Road - Return’s Crag: Right next to the anvil |
| 13 | Belitara’s Witchwood: When coming back via The Iron Castle’s southwest exit (requires Light Rune) found on top of the gate |
| 14 | The Egion’s Abbey - Catacombs: In the room where you need to hold down the coffin to stop them respawning. Near the Forge. |
That’s it for all the greatswords in Blade of Fire, and everything else you could want to know about the greatsword weapon type.
No Comments