
You can pick your own path in this Gym (or go through every path).
Local Trainers Pokémon
| Name | Money | Party |
|---|---|---|
| Ace Trainer | 1,680 |  Delcatty Lv. 28 Delcatty Lv. 28 |
| Ace Trainer Mary | 1,680 | Delcatty Lv. 28 |
| Ace Trainer Parker | 1,680 |  Linoone Lv. 28 Linoone Lv. 28 |
| Ace Trainer Lori | 1,680 | Linoone Lv. 28 |
| Ace Trainer George | 1,680 | Linoone Lv. 28 |
| Ace Trainer Jodie | 1,680 |  Zangoose Lv. 28 Zangoose Lv. 28 |
| Ace Trainer Burke | 1,680 | Zangoose Lv. 28 |
Prior to the Gym
With four Badges in hand, it is now time for you to fight the Petalburg Gym. The quickest way of getting there is returning to Lavaridge - assuming you left - and speaking with your rival, opting to go there together.
Otherwise, you can always take the lengthy way back, but it’s just much easier to do it this way without pointlessly weak wild Pokémon.
Once at Petaburg City, heal up and shop before entering the Gym proper. Particularly if you did some sidequesting.
Petalburg Gym
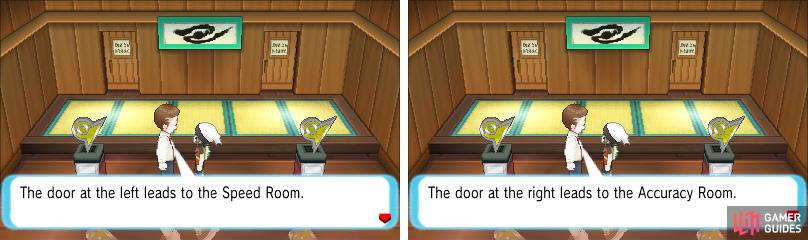
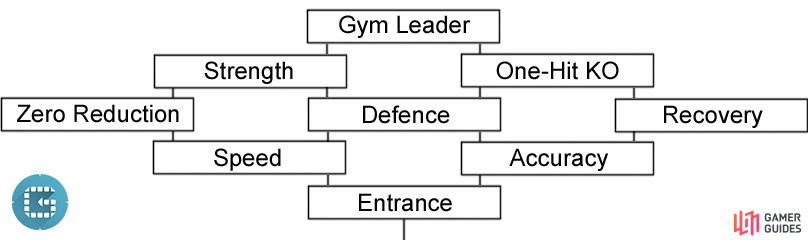
This Gym features much the same puzzle as it is in the original Ruby/Sapphire. You will proceed through several rooms. In each room, including the first, you will usually be able to go to two other rooms.
Each individual room - aside from the entrance and the Leader’s room - will feature a Pokémon battle in which your opponent uses some kind of battle item.
Wondering what’s around the corner? Check our handy guide to find out.
The first room you go to will have Delcatty, the second Linoone, and the third Zangoose, assuming you do them straight in that order, with the items used in each battle differing depending on the room it is in. You get a hint before the actual room is entered.
However, also note that you can always backtrack and defeat the other trainers if you so desire! We recommend beating all seven of them, backing out to heal, and then speeding along to the Leader.
The ultimate goal throughout the Gym, though, is really to just One-Hit KO all of the Pokémon here;  Blaziken,
  Hariyama,
  Machoke/
 Machamp, and
  Breloom should all be well-suited for this. Or just any powerful Pokémon. At the end, it’ll be time to battle your father.
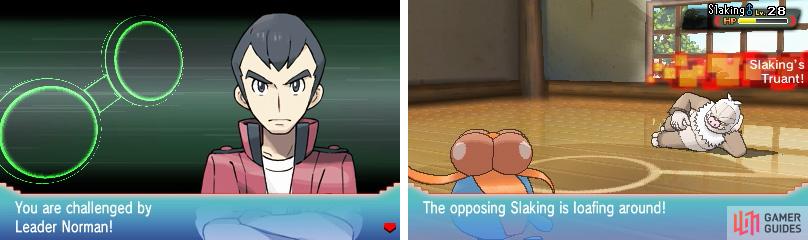
BOSS - Gym Leader Norman
| Pokémon | Type | Moves |
|---|---|---|
 Slaking Lv. 28 Slaking Lv. 28 |
Normal | Encore, Retaliate, Yawn, Feint Attack |
 Vigoroth Lv. 28 Vigoroth Lv. 28 |
Normal | Fury Swipes, Feint Attack, Retaliate, Encore |
| Slaking Lv. 30 |
Normal | Chip Away, Swagger, Retaliate, Feint Attack |
Rewards: $3,600; Balance Badge; TM67 (Retaliate)
In varying ways, this Gym is both the easiest and hardest thus far. Norman relies heavily on his Slakings, Normal-type Pokémon that have incredible Attack and Speed, but come with a fatal flaw; Truant, which prevents them from acting every second turn.
That itself should tell you a lot of your strategy in this battle. Hit them with something powerful the first turn, heal on the second (Revive if needed), then loop from there against the Slaking. Or continue your offensive on the second turn if healing isn’t necessary.
If you have Focus Punch on one of your Pokémon, that would be an excellent move to use on your second turn. Since you won’t be attacked, you’re talking about a powerful move with a guaranteed chance to hit!
Vigoroth is probably the main problem here, particularly due to Retaliate. Retaliate is pretty nasty when coming from him, especially given its STAB boost and the usual problem of a foe dying on the previous turn to double its power.
That’s a simple-to-climb hump, though; if you have a Rock or Steel Pokémon, switch to that to resist it, and then just plow away from there with your Fighting Pokémon, or just your Rock types.
The Rock/Steel Pokémon here will actually have a huge advantage since they resist most of the moves thrown around here, and those they don’t resist are too weak for anyone to care.
So, in summation? You can easily nuke Norman with Fighting Pokémon, or wall him with Rock or Steel (or both) Pokémon.
After the battle, Norman will hand over the Balance Badge , which will make Pokémon up to Level 60 - even if traded - obey you, and it will also let you use Surf out of battle.
You’ll also receive TM67 (Retaliate), a Normal-type move whose power doubles if one of the user’s Pokémon fainted last turn.
What awaits you now?
No Comments