The third chapter of Rogue Trader takes you to the mysterious lands of Commorragh, the home of the Drukhari. These sadistic elves drag you to their world between plains and subject you to a grueling challenge of makeshift weapons, missing companions, and plenty of arena scraps to partake in. To help navigate you through it, here’s a closer look at a full walkthrough for Chapter 3’s Commorragh and how to finish the Chapter.

A complete Chapter 3 Walkthrough for Commorragh in Rogue Trader, featuring all significant quests, choices, and companion locations to progress this linear act.
Commorragh Walkthrough in Rogue Trader
This Walkthrough will be split into different sections for all major quests in the chapter, so you can jump between the few you want using our table of contents.
- One Foot in the Grave
- Reunion & Companion Locations
- The Chasm: Side With Malice or Commissar?
- Arena Fight 2
- Arena Fight 3
- Puppeteer
- Escaping Commorragh and the final Boss
One Foot in the Grave
After the whole sentenced-to-death thing, you wake up in the Corpse Pile, where the mysterious Stranger comes to help. After getting back to your feet, you will need to run through a guarded Xeno street. Run left and get the cutscene with the beggar who gets killed. You’ll find a chain opens up with an athletics test to cross the gap and survive. Cross over and keep running left to avoid the guards. You’ll stumble into a human area, with NPCs called Shriekers. Keep going, and you’ll arrive at an area called the Pit.
Run inside and speak to a character called Malice, a snake creature. Go through the dialogue however you want and you’ll eventually pass out. You’ll wake up, and then find out how to get more help and repay the debt. This will give you the quest The Chasm and Reunion.
Reunion Walkthrough: Chapter 3 Companion Locations in Rogue Trader


(1 of 2) Yrliet is one of the first companions you can find by crossing the bridge from the Pit after Malice saves you.
Yrliet is one of the first companions you can find by crossing the bridge from the Pit after Malice saves you. (left), Your companions will appear throughout the chapter in various locations after certain triggers. Jae is one of them that requires the first Arena to be completed. (right)
After getting bamboozled, you’ll lose access to companions you selected to come to the Aeldari Voidship. You’ll find a few characters in various locations throughout the land. Most companions will only start spawning after you’ve completed certain trigger points in the storyline, typically after you’ve decided what to do with Malice and the Commissar. In addition, some of the conditions are slightly different as to when you get the companions back. We’ve got a list of how to get each companion here if you’re interested. We attempted this by doing two different companion sets and found a few consistencies, but there may be one or two comps where some change around ever so slightly.
There are two recruitable companions in the form of Ulfar and ![]() Marazhai in Chapter 3, and we have walkthroughs on how to get them in the list below too.
Marazhai in Chapter 3, and we have walkthroughs on how to get them in the list below too.
-
 Abelard is always in a dream state by the Athletics check jump on the left side of the Mangled Sector. You must pass either a Coercion or Persuasion test to bring him to his feet. If you fail them, you can acquire a
  Stimm by killing the Ugly Beggar, an NPC that spawns near the other Beggars before the Mangled Sector Lift behind the debris. Alternatively, you can wait for the Tervantius to give your loot back and use your own Stimm stockpile on Abelard later on if you have any left.
 -
 Argenta is normally near the Commissar in the Mangled Sector, which you see right at the start of the Commoragh Walkthrough, as you’ll see in the next segment.
 -
 Idira Tlass,
  Heinrix van Calox, and
  Cassia Orsellio are typically locked in the Anatomical Opera, which is accessible after the first arena fight. Idira is in the lab, and you can recruit her immediately if you convince her or rip the device off her head. If not, you need to come back later, typically after the chaos of the second arena fight. Meanwhile, Cassia and Heindrix is typically locked in a box that you can’t rescue until after the second major arena fight. This is when the bridges upon up to the side of the Opera, and you can access the other areas.
 -
 Jae Heydari is normally in front of the Anatomical Opera after you defeat the first round of Arena fights. The trigger only fires after that event, and visiting this spot beforehand will not reveal her spawn until the trigger activates.
 -
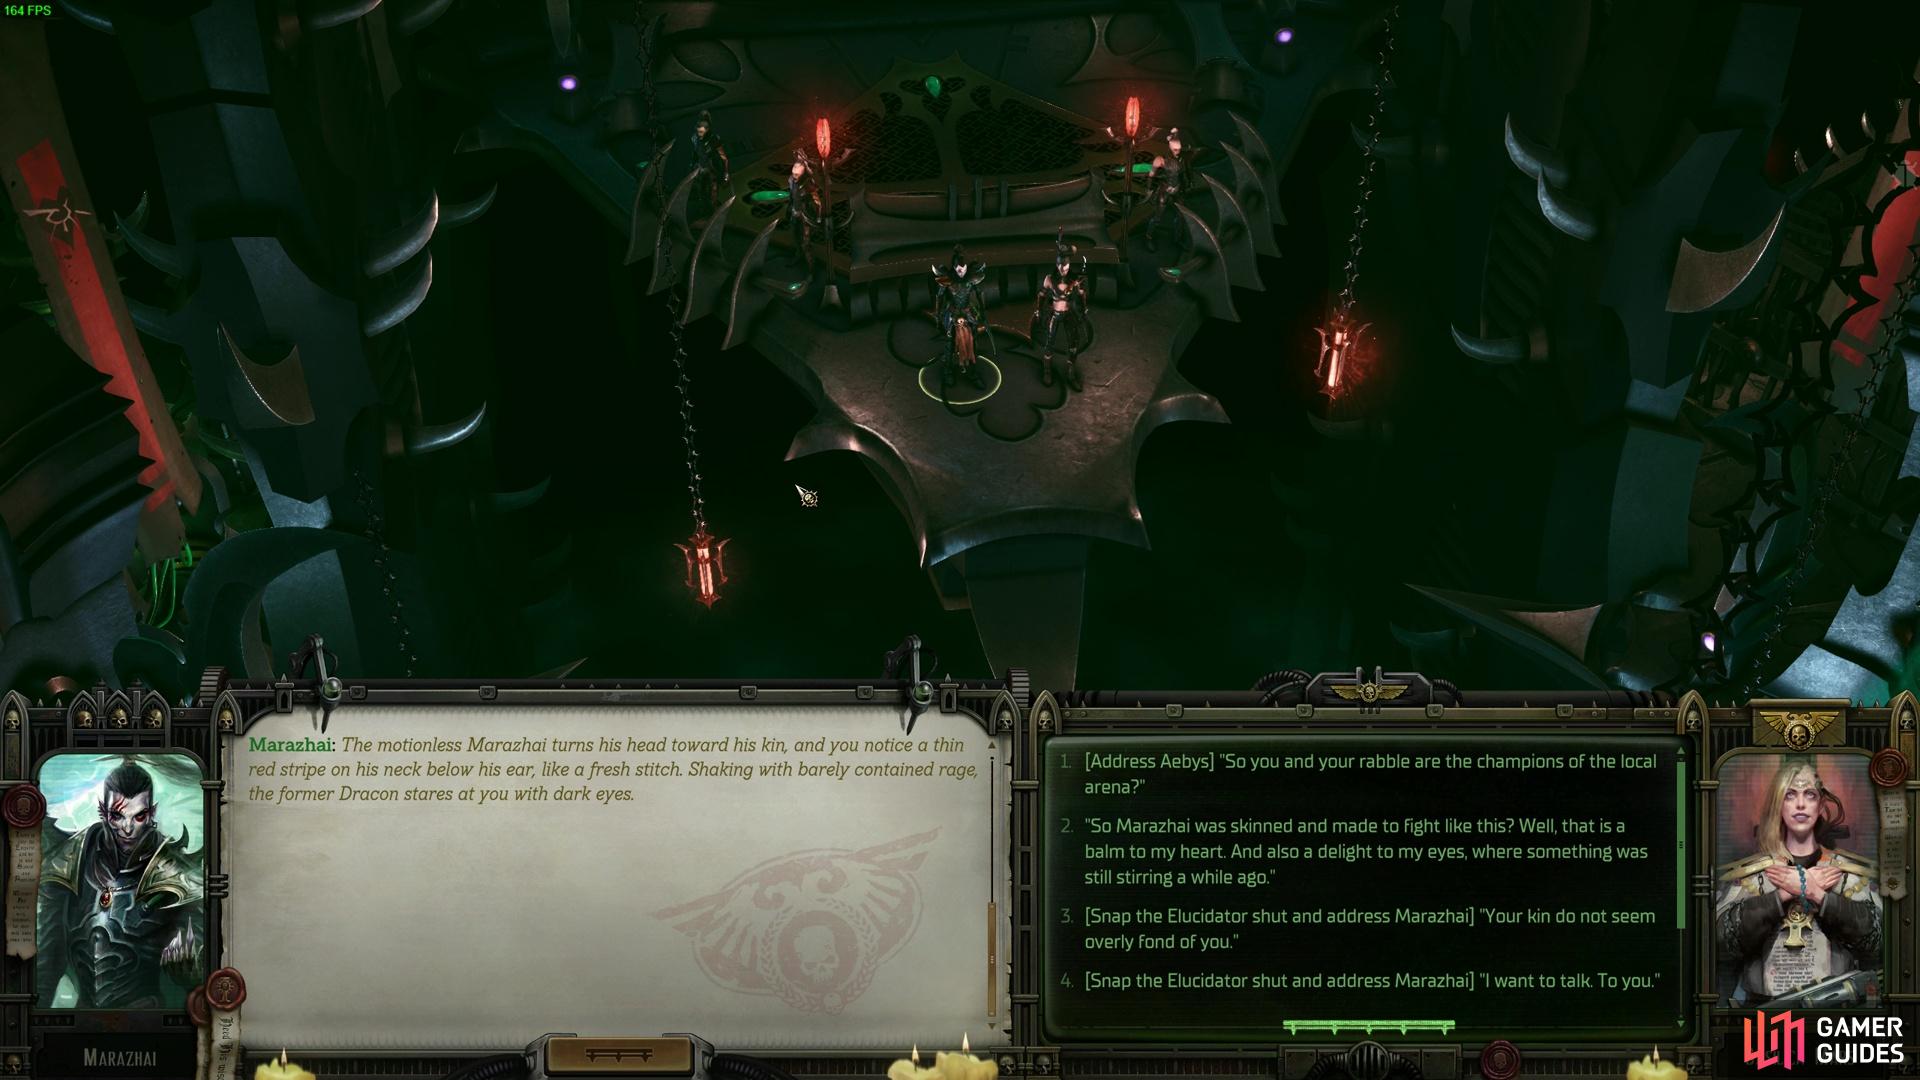
Marazhai isn’t exactly a companion you come into the act with, but one you can recruit. When you speak to him after the first Arena battle in the Anatomical Opera, let him ponder on the idea of joining you, and then you can ask him again when you face off against him in the arena to let him join your retinue. If you fail to ask him during your first visit to the Opera as part of the Chasm quest, you won’t get a second chance to ask him, and thus, he won’t be recruitable.
-
 Pasqal is lying on the floor near the beggars beside the Mangled Sector lift after you complete the first Arena fight. If you know where the Ugly Beggar is, then Pasqal is near enough next to him, experiencing more bugs in his system than I had playing through this chapter. Speak to the barely conscious cyborg and get him to stand up.
 -
 Ulfar is located inside a cage by the door on the inside of the Anatomical Theatre. Speak to Uulfar and exhaust the more friendly dialogue options and then go and speak to Tervantias. Select the dialogue option that you “want his time and are willing to pay for it”. You’ll hand over an item you picked up from the creatures in the first arena fight as payment. You can then ask him to release the Space Marine. After that, select the “Sure the loss of some Mon-Keigh could never impede the work of a great mind as yours” option. He will give you the key to free him and add him to your retinue. His gear is beside his cage too. Speak to Ulfar and give him the Dogmatic line when you ask him for help, or the line about killing Xenos. It’s that simple for a Space Marine.
 -
 Yrliet Lanavyss is often found at the crossroads of the Chasm level, which is directly in the center of the map. You’ll naturally bump into her after the Pit with Malice. You can either Kill her outright or ask her to get back to your party to help you escape as recompense.
While you’re here, this Chapter 3 Commorragh Walkthrough for Rogue Trader will not go into detail about you exploring the optional lootables that require Tech Use, Athletics or Demolition to access. Chances are one of your companions is running the Tech Use, Athletics, and Demolition skill checks to get the miserable loots in the Mangled and the Chasm areas. When you get those characters, feel free to run around and grab the loot anytime before the third Arena segment, as that is the lockout part of the exploration side of the chapter.
The Chasm: Chapter 3 Walkthrough - Rogue Trader
After speaking to Malice, he asks you to bring him the head of the Commissar. The Commissar is an Imperial Guardsman located in the Mangled District, which you can access via the Mangled Lift on the far right side of the Chasm level. Head in that direction, and you should find Yrliet with a group of Drukhari. Rescue her or kill her if you want to. Keep in mind that Yrliet only has Aeldari Weaponry Proficiency unless you’ve built her differently. Therefore, she can’t equip any weapons other than use skills and throw grenades until you get your loot back later on in the quest chain. With that done, you now need to proceed to the Mangled Lift on the lower right side of the Chasm map. While you’re near the Lift, look for the Ugly Beggar and kill him, who should be among the NPCS in the immediate vicinity. You will get a few Stimms and you’ll also get the shoes back that you were wearing before you arrived in Commorragh. You can use the Stimms on Abelard in the Mangled District momentarily.
Once down there, you can either turn left or right. Going left brings you to an Athletics jumping spot where you can rescue Abelard, assuming you brought him with you. This is also the spot for an optional boss after you complete the first Arena battle, so note this location down.
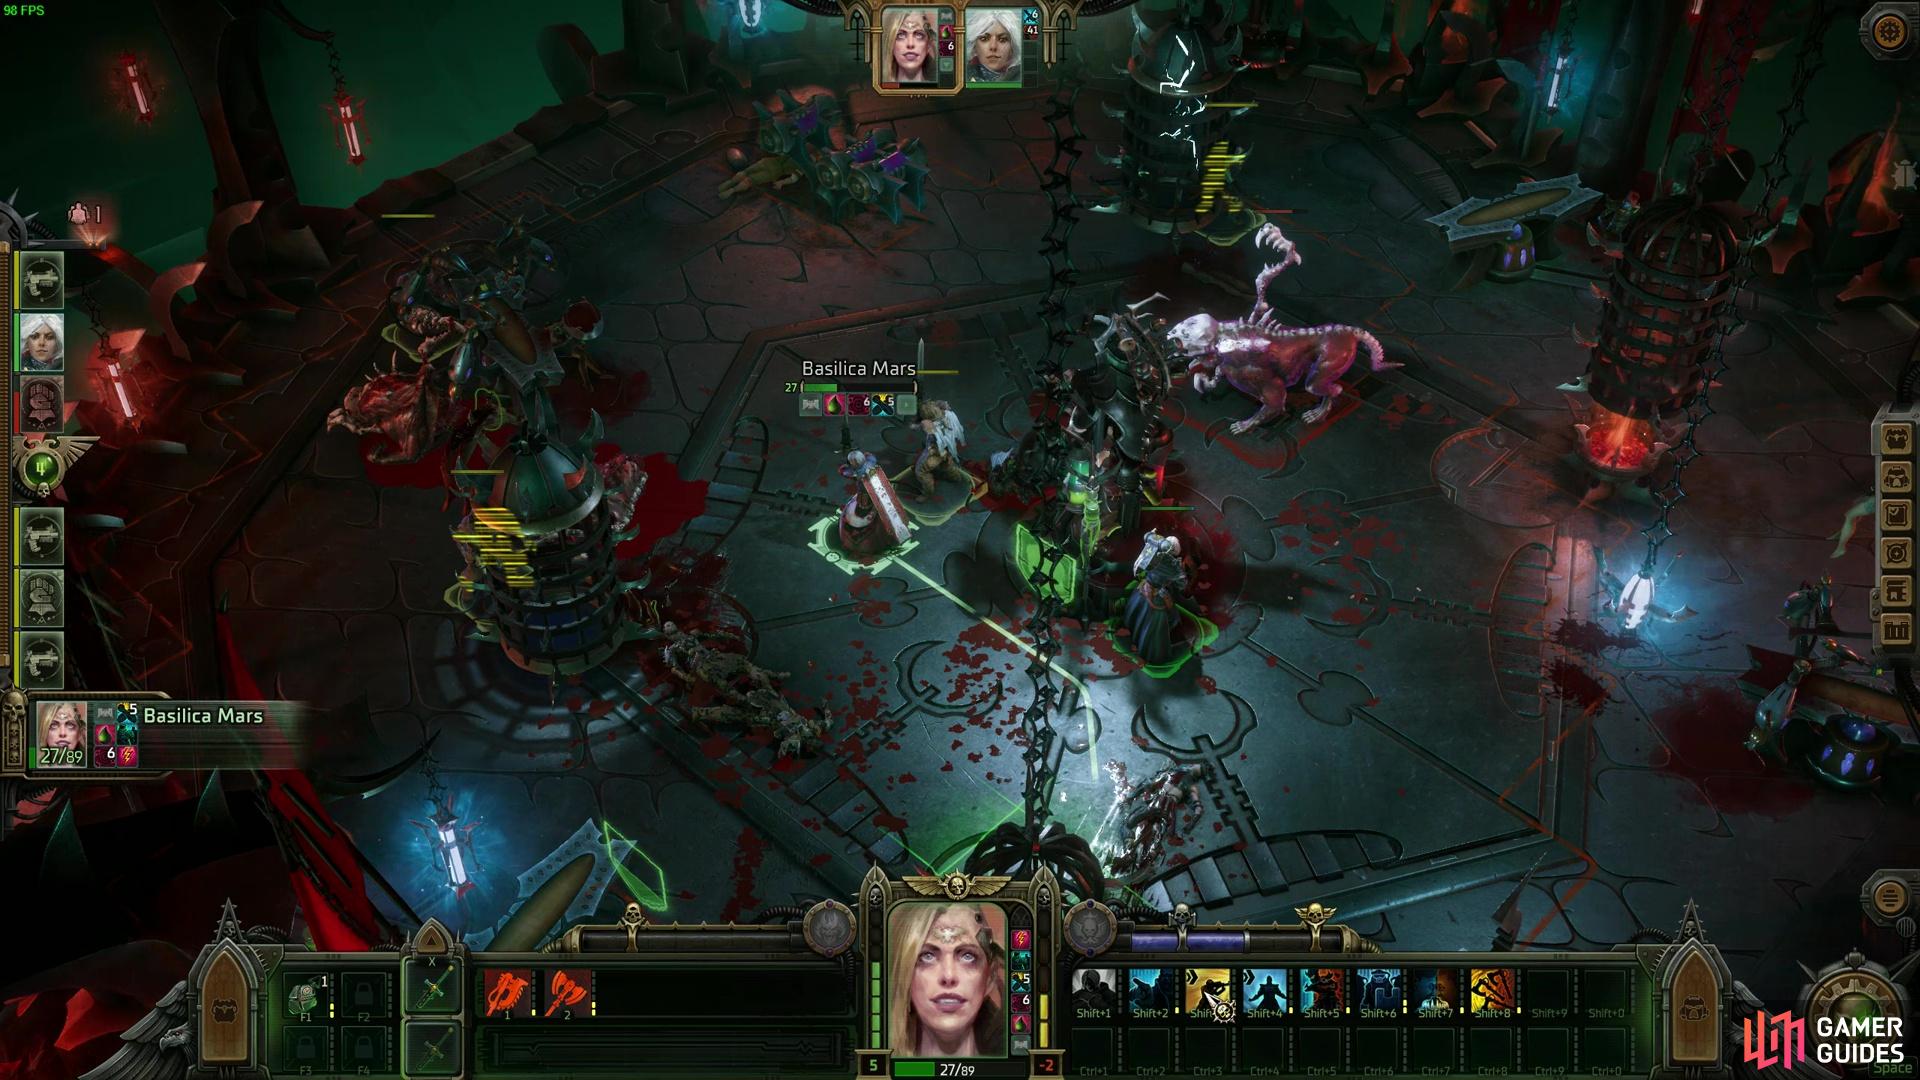
When you’re ready to continue to the Commissar, go to the far right side of the Mangled District. Turn right from the Mangled Lift and you can find the Commissar and Argenta. You now have a choice to kill the Commissar, but it poses a harder challenge with the several Zealots and IG guards, alongside the high health pool of the Commissar itself. You don’t have many good items at this point, so the Commissar is a much harder fight. If you agree to turn against Malice, you can return to fight him in the Pit instead.


(1 of 2) You can choose to kill the Commissar, but you will need to fight off his guards with no reinforcements.
You can choose to kill the Commissar, but you will need to fight off his guards with no reinforcements. (left), You can choose to fight Malice and take him prisoner after beating him, with reinforcements from the Commissar coming to help you. (right)
If you fight Malice, you must survive for three turns. If you survive for three turns, the Commissar’s reinforcements arrive to help you deal with the Shriekers and Malice himself. So, if you’re playing on Hard or Unfair, this is likely the option you want to go with. Hold out the best you can until the army arrives to make the fight drastically easier.
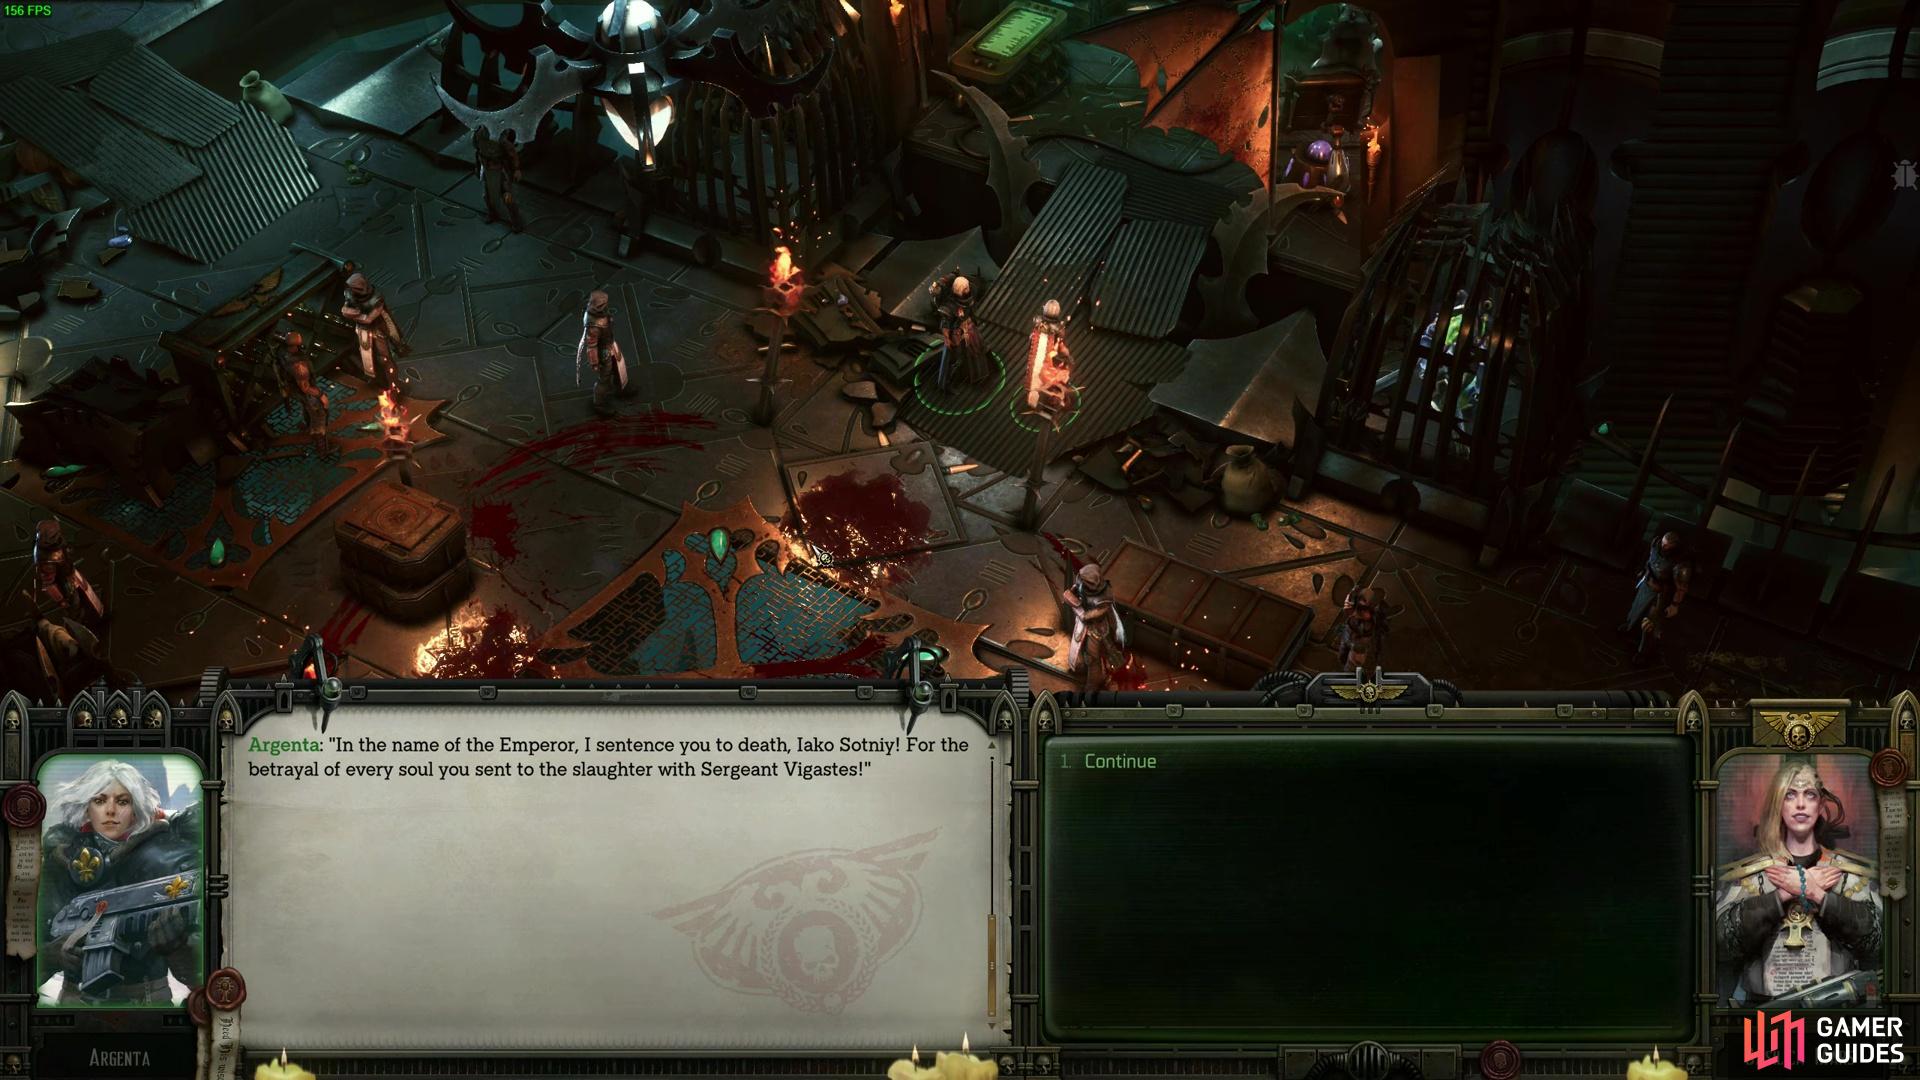
No matter the option, both will trick you and send you to the Arena, so it hardly matters which you pick. Also, you’ll find whoever you didn’t kill as part of the quest in the Pit later, and you can fight them and claim ownership of the Pit as your base of Operations for the future. If you killed Malice and let the Commissar live, you can select an option on your return and get your revenge. Pick option 4: Say nothing and do not interfere, followed by Option 1: ’Listen to me…. It should convince the guards to turn on him, and in the dialogue text you should get a Commissar Cap. Your fellowship characters are going to drool over that item.
(1 of 2) Defeat the Two Chimeras, then kill any surviving humans to escape the arena and get your revenge on those who tricked you.
Defeat the Two Chimeras, then kill any surviving humans to escape the arena and get your revenge on those who tricked you. (left), No matter who you sided with, they’ll throw you into the arena. You may return to the Pit and get revenge on whoever is left alive whenever you desire. (right)
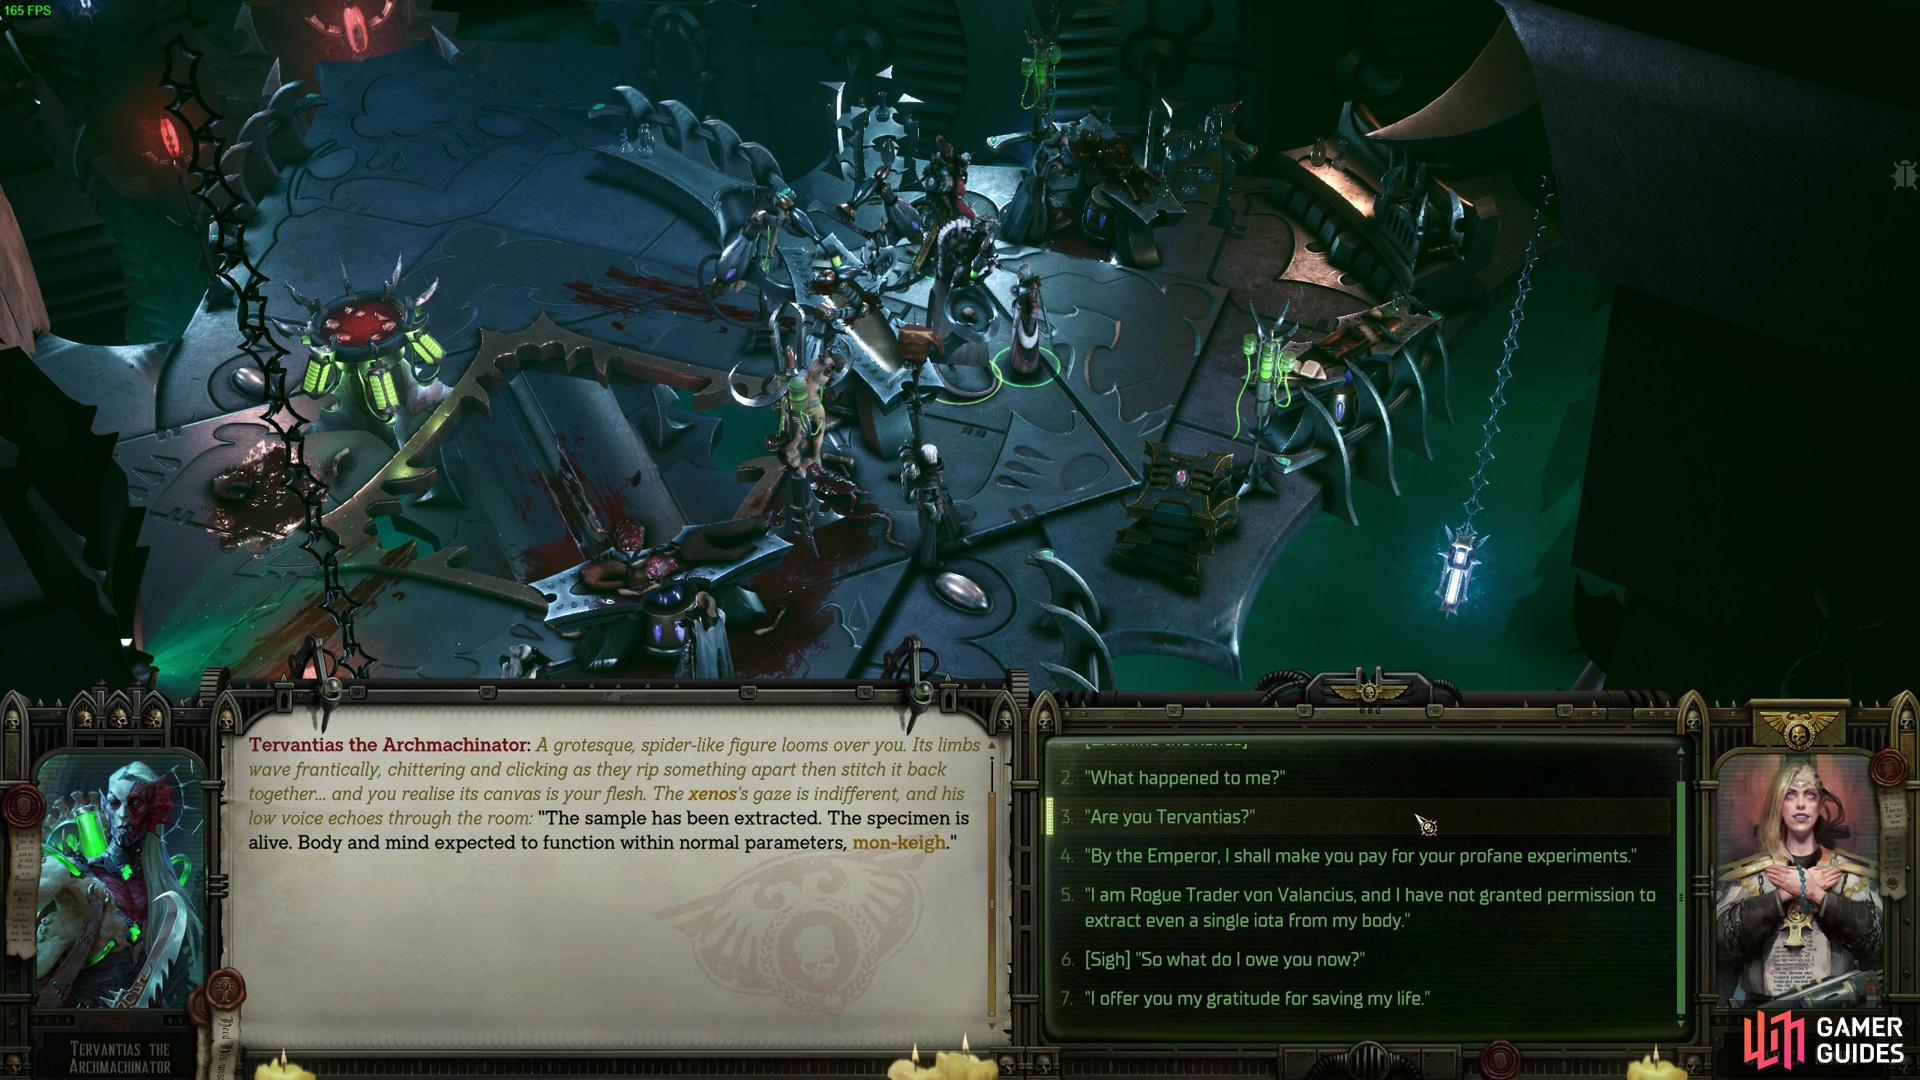
Once you’re in the arena, defeat some Chimeras and make your escape, but not before fighting the remaining human captives that have turned on you. On your return, the Stranger will arrive and give you a riddle. The riddle requires you to go to the Anatomical Opera, which is located on the top right corner of the Chasm map. Speak to the guard outside and ask him to let you in, and the boss will say yeah, sure, come on in. While there, you’ll be able to find a few of your companions, alongside Tervantias, the NPC you need to speak to for the main storyline quest. Go through the dialogue as normal, and accept the terms to get healed. You can give up Yrliet to get rid of the mind worm if you want. She won’t mind as she deserves it and stays in your party, assuming you didn’t kill her earlier for her betrayal.
You can also return to the Pit (if you have not already done so) and enact revenge on whoever you chose not to kill previously. You’ll then unlock it as your base of operations and assume command of the rebellious human forces on Commorragh.
(1 of 2) After beating the first arena battle, the Stranger will tell you to meet flesh man. In other words, go to the Opera in the top right of the chasm and speak to Tervantias.
After beating the first arena battle, the Stranger will tell you to meet flesh man. In other words, go to the Opera in the top right of the chasm and speak to Tervantias. (left), Speak to Marazhai after your chats with Tervantias, and you can proceed to the next arena fight. Some dialogue options will even set him up as a potential companion in the upcoming fight. (right)
With that settled, you now need to speak to Marazhai, who is on top of the platform in the Opera. Speak to him to progress with The Chasm questline. During this dialogue, you can select an option that implies you’ll let him join you in battle since he has been betrayed per the cutscene at the start of the Commorragh Chapter Walkthrough, and he will refuse it at first. If you don’t try to convince him during this dialogue, you won’t get the option to later. Once the conversation is over, you’ll also be able to get all your gear back in the Mon-Keigh Rubbish box. You’ll find that to the right-hand side of the Tervantias, so equip your characters instead of using the pure trash you’ve scavenged along the way. Yrliet can now also be useful; praise the Emperor’s light.
Second Arena fight
The second arena fight offers players some random fights between you and the Kabailtes in the city. The first wave contains the snake enemies who can attack twice using toxic weapons, some Drukahri melee units, and two snipers perched on the roof. Deal with them, and you’ll get another fight after.
When the second contestants enter the field, you’ll find Marazhai among them. Now is your chance to recruit Marazhai, but only if you spoke to him earlier about the offer being there. If you don’t present the offer then he’s just another enemy to fight here. If he does join your side, he’ll kill one enemy for you immediately. It doesn’t matter if he gets killed in this fight when he joins your side, as it’s only a temporary knockout. Defeat the rest of the enemies normally, then escape the arena and return to the Opera. Once you rescue Marazhai and chat to him after the fight, he’ll be waiting for a chat with you in the Pit. Go ahead and do this before continuing for a chance to get to know more about your companions and this wretched place.
Upon returning to the Opera, you will need to do a dialogue event with the weird flying creature you’ve been seeing around the place. You’ll die if you get extremely unlucky and fail all the roles. However, win some clutch ones, and the strange bird will die instead.
Enter the Opera and explore the terminals near the puzzle levers, and to the Opera’s sides where the assistants work. Once you activate all of these devices, you now need to return to the Pit when you next get a chance to do so, likely after you leave the Opera. You’ll need to sacrifice some of your Shriekers and other cultist followers near the big sacrifice ring in the Pit, which you can start by going to the Pit’s throne. With that done, you now have one final objective that you can complete when you make your way to the Tempest Reaving Tower. You’ll arrive on a map where you find Tervantias once again, where he’s talking about the device used to control and access the Webway Gate. During the conversation, you’ll have a special dialogue option that allows you to let chaos tap into it. Doing so will let the forces of Chaos in to invade the city. Honestly, they deserve it at this point.
On your return to the Anatomical Opera, you’ll learn that it has all gone wrong, and Tervantius is leaving for the tower. You, on the other hand, are going back to the Arena for another scrap. But before you set off, you are now free to explore the Opera hall, do some puzzles, get some loot, and rescue any remaining trapped companions you have. Also, once you’re done in the Opera, make sure to free any missing companions you might have missed. Feel free to double-check the Reunion section in the Complete Chapter 3 Commorragh Walkthrough for Rogue Trader again if you need a reminder on any you may have missed.
You’ll now be able to free the Psykers held captive in the Anatomical Opera House by visiting the other platforms you couldn’t access previously.
Also, remember to go and defeat the optional boss in the Mangled level, as you won’t get an opportunity to do so after this. It’s where we mentioned Abelard typically is on the left side of Mangled Sector over the Athletics check gap. It’s got some okay loot, and it is good practice for some of the enemy types still to come in Chapter 3.
When you do decide to leave the Opera, you’ll have a fight as soon as you exit. But that’s about it for surprises from this point onwards.
Third Arena Fight

You’ll go through a gauntlet of mini bosses until reaching Keykaross and her robot buff pet, the grand finale of the endless skirmishes this act brings.
When you’re ready to journey to the arena for the third time, you’ll fight a range of mini-bosses that you encountered through Chapter 2 and Chapter 3. Get your best builds, gear and consumable items ready and go from there. These typically range from numbers of Drukhari rangers, melee, Beastmasters, more Chimeras, and another Pain Engine boss. You’ll also encounter another named mob and its protective robot that shields her from damage once a turn. The first few fights are nothing you haven’t seen before, but the Pain Machines and the final fight are tricky.
The Strings of the Puppeteer Walkthrough and Escaping Commorragh
After the arena fights you’ll arrive at the tower, where you’ll reunite with your Opera suzerain, and some other strange Drukhari creatures. Almost as soon as you arrive, you’ll encounter two psycho sisters who have their tribe engage both you and the sisters. There are a few more Pain Engines, and if you didn’t rescue Ulfar already, he’ll be fully Power Armored up and be a neutral character in the fight.

Ulfar will have some greetings for you if you haven’t already saved him, and the Strangert will arrive to inform you of an escape route, kickstarting the Puppeteer quest to escape Commorragh.
The tricky part about this is that there are two snipers on elevated positions towards the far back door. The two sisters are mini-boss with the amount of Wounds they have, and there are a lot of shooters at the side and back of the room. Distribute your cover conservatively and deal with key threats the best you can. The enemies in this fight also love to Burst-Fire Drukhari weapons at you, so if you can stack enemies into funnel spots, chances are a lot of enemies die to friendly fire.
When the fight is over, and assuming you have Yrliet still in your squad, she’ll let you know she senses a way out with the return of the Stranger. This Stranger will hint there is a Farseer deeper in the Tower who you can rescue, and that will be your ticket through Commorragh’s Webway Gate to escape this Drukhari Debauchery forever. With that out of the way, clear up the area of its loot and cargo and then proceed towards the Terrace. Here there are a few more loot cargo and accessories to grab, and you can knick a bike and make it towards the Tower, where the main story enemies remain. It feels very Coruscant.
Reaving Tempest Spire
The remaining parts of the Spire are loot-filled areas, among well-guarded locations. You’ll arrive on a map known as the Reaving Tempest Spire, the heartland of the Drukhari elite of experiments and Kabalite leaders. If you have Marazhai in your party at this point, he will want to retrieve his items, which you’ll find naturally on the left side of the Reaving Tempest level where you find Tervantias. Check your map for notable loot sources, and you’ll run into it no problem. Get him to electrocute himself since he’s a sadistic shitlord. He’ll also ask you to allow him the killing blow on the final boss of the battle. This will appear as a Rumor type of quest. It is essentially a challenge for you to beat the boss with Marazhai actually getting the final attack on the boss to beat it.

Marazhai will ask you to go and look for his belongings on this tower, which you’ll find on the left side of one of the upcoming maps.
When you enter, you’ll find a large facility with pathways that go right and left. If you’re partaking in the Puppeteer quest, you’ll find a Farseer on the right-hand side, which you can use to escort to the Webway gate later on to escape this wretched place. However, the area is guarded by some Drukhari doctors and some slaves fighting for them. It’s not too hard of a fight, and range advantage with impressive accuracy will shred the foes. If you still have Yrliet around at this point, you get a bit more back story about what is going on in the entire chapter, but it’s not a big deal. There’s also a board game piece with a Farseer’s soul trapped inside it in this area, which you can later give to the Farseer that you rescue as part of the quest. It is part of a companion questline that starts here and concludes on the Voidship in case you’re wondering.

(1 of 2) The Farseer is trapped in a ball above that battlefield, and you must clear its defenders before freeing the Farseer for the Puppeteer quest.
The Farseer is trapped in a ball above that battlefield, and you must clear its defenders before freeing the Farseer for the Puppeteer quest. (left), Once the enemies are dead, interact with the machinery and set the Farseer free. He will be your guide to escaping Commorragh. (right)
Once the enemies are defeated, you can interact with the science equipment with the ball hanging from the ceiling with the glowing green cables. His will lower the Farseer you need. Get him to help you, and you can use him as your means of escape.
With that done, you can now move leftward as you loot and disarm the traps scattered everywhere. There’s a terminal you want to reach in the middle that will create a bridge to the other side of the map. When you’re on the other side, go far left and check the edge for the cargo. This is a special interaction with Marazhai, and if you select the option that asks him what it is, you get a few Xenospasm Grenades for showing curiosity and a bit of approval from Marazhai. With that done, continue along the path going to the top of the map, and you’ll find an elevator that brings you to a new level on the Reaving Tempest.
As you ride the elevator, you get into combat almost immediately. There’s some Drukhari dead ahead, and some ambushes on the far left and far right of you. Deal with them as appropriate, and ideally, split your party into two groups of three, and have one control each angle. These enemies are particularly low-wound for what you’ve been fighting, and some AoE blasts or Burst Fires will come in handy here. Your more specialized burst companions will do solid damage to the slave masters-type enemies in the packs when it’s safe to do so. You can also throw some grenades, which will easily clean them up.

(1 of 2) As you ascend to the second last part of the tower, you’ll have one more small fight to partake in.
As you ascend to the second last part of the tower, you’ll have one more small fight to partake in. (left), Upon reaching the new location of Tervantias, players can conclude his chapter and complete the special heretic quest here too. (right)
With the fight done, you’ll find Tervantias in his new lab move slightly further ahead. Speak to him and deal with him now you’re finally free from his shackles. Most playthroughs will move on as normal, but if you did the special heretics questline in Commorragh as alluded to earlier, you’ll now be able to enact the final stage of the quest and complete it here. If you did the exclusive Heretic quest earlier in the Chapter, you’ll have an exclusive option.
There’s some nice rewards around here. If you killed Tervanatias and his crew, you’ll have a few nice lootables. One of those juicy weapons is the ![]() Shuriken Cannon, which is a beauty of a gun for a Burst Fire character with Aeldari proficiency. It is essentially a better
Shuriken Cannon, which is a beauty of a gun for a Burst Fire character with Aeldari proficiency. It is essentially a better ![]() Heavy Bolter for the Burst-Fire,
Heavy Bolter for the Burst-Fire, ![]() Rapid Fire combo, so it’s well worth respeccing a Soldier with the Aeldari Proficiency skill and using that if you want to when you get back to the Voidship in the coming hour(s). There’s also a decent
Rapid Fire combo, so it’s well worth respeccing a Soldier with the Aeldari Proficiency skill and using that if you want to when you get back to the Voidship in the coming hour(s). There’s also a decent ![]() Biomancy staff on this level for any Biomancy Psykers like Heinrix called the Bloodrinker Staff. These are very noteworthy items to grab here for peaking some of your builds. The
Biomancy staff on this level for any Biomancy Psykers like Heinrix called the Bloodrinker Staff. These are very noteworthy items to grab here for peaking some of your builds. The ![]() Xenohide Gloves are also for Assassins or Vanguards with a weapon that has a form of Cleave attack. It combos very well with the
Xenohide Gloves are also for Assassins or Vanguards with a weapon that has a form of Cleave attack. It combos very well with the ![]() Assault Cloak you picked up from the previous map too. Otherwise, the accessories are not notable.
Assault Cloak you picked up from the previous map too. Otherwise, the accessories are not notable.
Once you’re done looting on this floor, it is time to ascend the tower one last time and face off against Yremeryss, the leader of the Kabal, and Marazhai’s somehow even more evil sister.
Beat Yremeryss and Complete Chapter 3 Walkthrough

Escort your squad back down the stairs and watch as the nemesis naturally funnel for your grenades, blast templates, Burst Fire and conal attacks.
This is quite a tough fight, with Yremeryss having anywhere between 600-1200 wounds, depending on difficulty. In addition, she has four Incubus guards, and four Grotesque creatures, who heal up passive damage every turn. This doesn’t even include the reinforcements of Kabalite Rangers and the Tortured Captors wielding Great ![]() Swords running at you on turns 2, 5, 7 and 10. If you last ten turns, those reinforcements become Incubus. Yeah, you’re essentially dealing with an enrage timer before you become the salad in their game of Fruit Ninja.
Swords running at you on turns 2, 5, 7 and 10. If you last ten turns, those reinforcements become Incubus. Yeah, you’re essentially dealing with an enrage timer before you become the salad in their game of Fruit Ninja.
If you fight the enemies on Ymereryss’ platform, you’re going to get swarmed and it is going to be tough. We recommend bringing the fight down the stairs, and dealing with the two Grotesques. This creates a nice funnel of everyone coming down the stairs for your Snipers and other DPS to get great cleave damage, or other AoE attack and Overpenetration hits on multiple enemies. You’ll also be able to take out the first two Grotesques at the bottom of the stairs in 2-3 turns. Eliminating that flank very effectively is a sure way to secure a good point to continue the fight away from all reinforcements and choke-holds.
When you beat the fight, there are a few decent and notable items for builds. The ![]() Mon-Keigh Hide Cape is decent for Arch-Militant builds.
Mon-Keigh Hide Cape is decent for Arch-Militant builds. ![]() Warlord’s Amulet is also a good defensive accessory in the necklace slot for
Warlord’s Amulet is also a good defensive accessory in the necklace slot for ![]() Intelligence builds, such as Operatives like Idira or Pasqal.
Intelligence builds, such as Operatives like Idira or Pasqal.
When the fight is over, you can now escape Commoragh and complete the Chapter 3 Walkthrough in Rogue Trader. When you get back to the ship you’ll have a few options, assuming Yrliet is still alive at that point, and if you brought Marazhai back with you. You’ll also get a briefing report on some of the things going on in the expanse, your crew’s interests and more.

 Sign up
Im not getting anything after selecting number 4, the fight just starts
So... how do you get the Commissars hat if you kill Malice? I have him imprisoned but if I execute the commissar he doesn't have it on his body.
I've updated the text. I wrote up the wrong choice from my footage. It has been corrected. Select option 4 - do nothing, and then option 1 when you get new options. My apologies for this.
Sorry mate, I wrote the wrong choice up in my footage. Joys of skipping through 4 hour long recordings and missing tiny moments. :| You need to select Option 4 - Say Nothing, and then 0ption 1 in the next dialogue option. Again, my apologies for the error.
I've tried literally ever option and it always triggers a fight, where he doesn't drop the cap as loot
After the 1st arena fight? I went back to the pit, met the Commissar again, choose option 3. "argenta execute this duplicitous scum" which leads immediately into a fight. I win the fight and the commissar is now locked up in a cage. When I go to the throne and survey surroundings option there are two options to execute him. Both the dogmatic and regular execute options don't give me the hat and it's not on his lootable body. I'm kind of at a loss here!
Hey pal. So i selected the dialogue option where you let Argenta sentence the Commissar to death when you return to the Pit from the arena, and when his men interfere, you make an announcement that the Commissar is a traitor. His men should turn on him, and in the dialogue box you get the Iem Received: Commissar Cap.
2 more replies