
The ![]() Li’l Cactus is a recurring character in the Mana series, with its first appearance being in Legend of Mana on the Playstation 1. In that game, it served as a recorder of events, but it wasn’t until the Trials of Mana remake that the little fellow became a collectible. Well, the Li’l Cactus returns as something to find in Visions of Mana, with there being a total of 38 to hunt down throughout the various regions.
Li’l Cactus is a recurring character in the Mana series, with its first appearance being in Legend of Mana on the Playstation 1. In that game, it served as a recorder of events, but it wasn’t until the Trials of Mana remake that the little fellow became a collectible. Well, the Li’l Cactus returns as something to find in Visions of Mana, with there being a total of 38 to hunt down throughout the various regions.

The Li’l Cactus is essentially the game’s main collectible, with one hiding in most of the areas.
All Li’l Cactus Rewards
Unfortunately, you won’t be able to start hunting for the Li’l Cacti as soon as the game starts, as even if you head straight to their locations, they won’t be there. You will have to wait until you clear the Etaern portion of the main story. After leaving Etaern and going to ![]() Rime Falls, there will be a cutscene and you’ll automatically collect your first Cactus. The rest of them after this one will be completely optional, but you do unlock rewards for reaching certain thresholds. It’s a good idea, too, as a number of the rewards are quite useful.
Rime Falls, there will be a cutscene and you’ll automatically collect your first Cactus. The rest of them after this one will be completely optional, but you do unlock rewards for reaching certain thresholds. It’s a good idea, too, as a number of the rewards are quite useful.
| Number Found | Reward | Description |
|---|---|---|
| 1 | Cactus Spoils | Displays the number of undiscovered treasure chests and elementite spots. |
| 5 | Cactus Savings | Grants a 10% discount at shops. |
| 10 | Cactus Skedaddle | Halves the time needed to escape from battle. |
| 15 | Cactus Super Savings | Grants a 20% discount at shops. |
| 20 | Cactus Smarts | Grants a 1.5x boost to EXP earned from battles. |
| 25 | Cactus Specialty | Grants a 20% discount on conversion rates at |
| 30 | Cactus Super Smarts | Grants a 2x boost to EXP earned from battles. |
| 38 | Cactus Souvenir | Gives the |
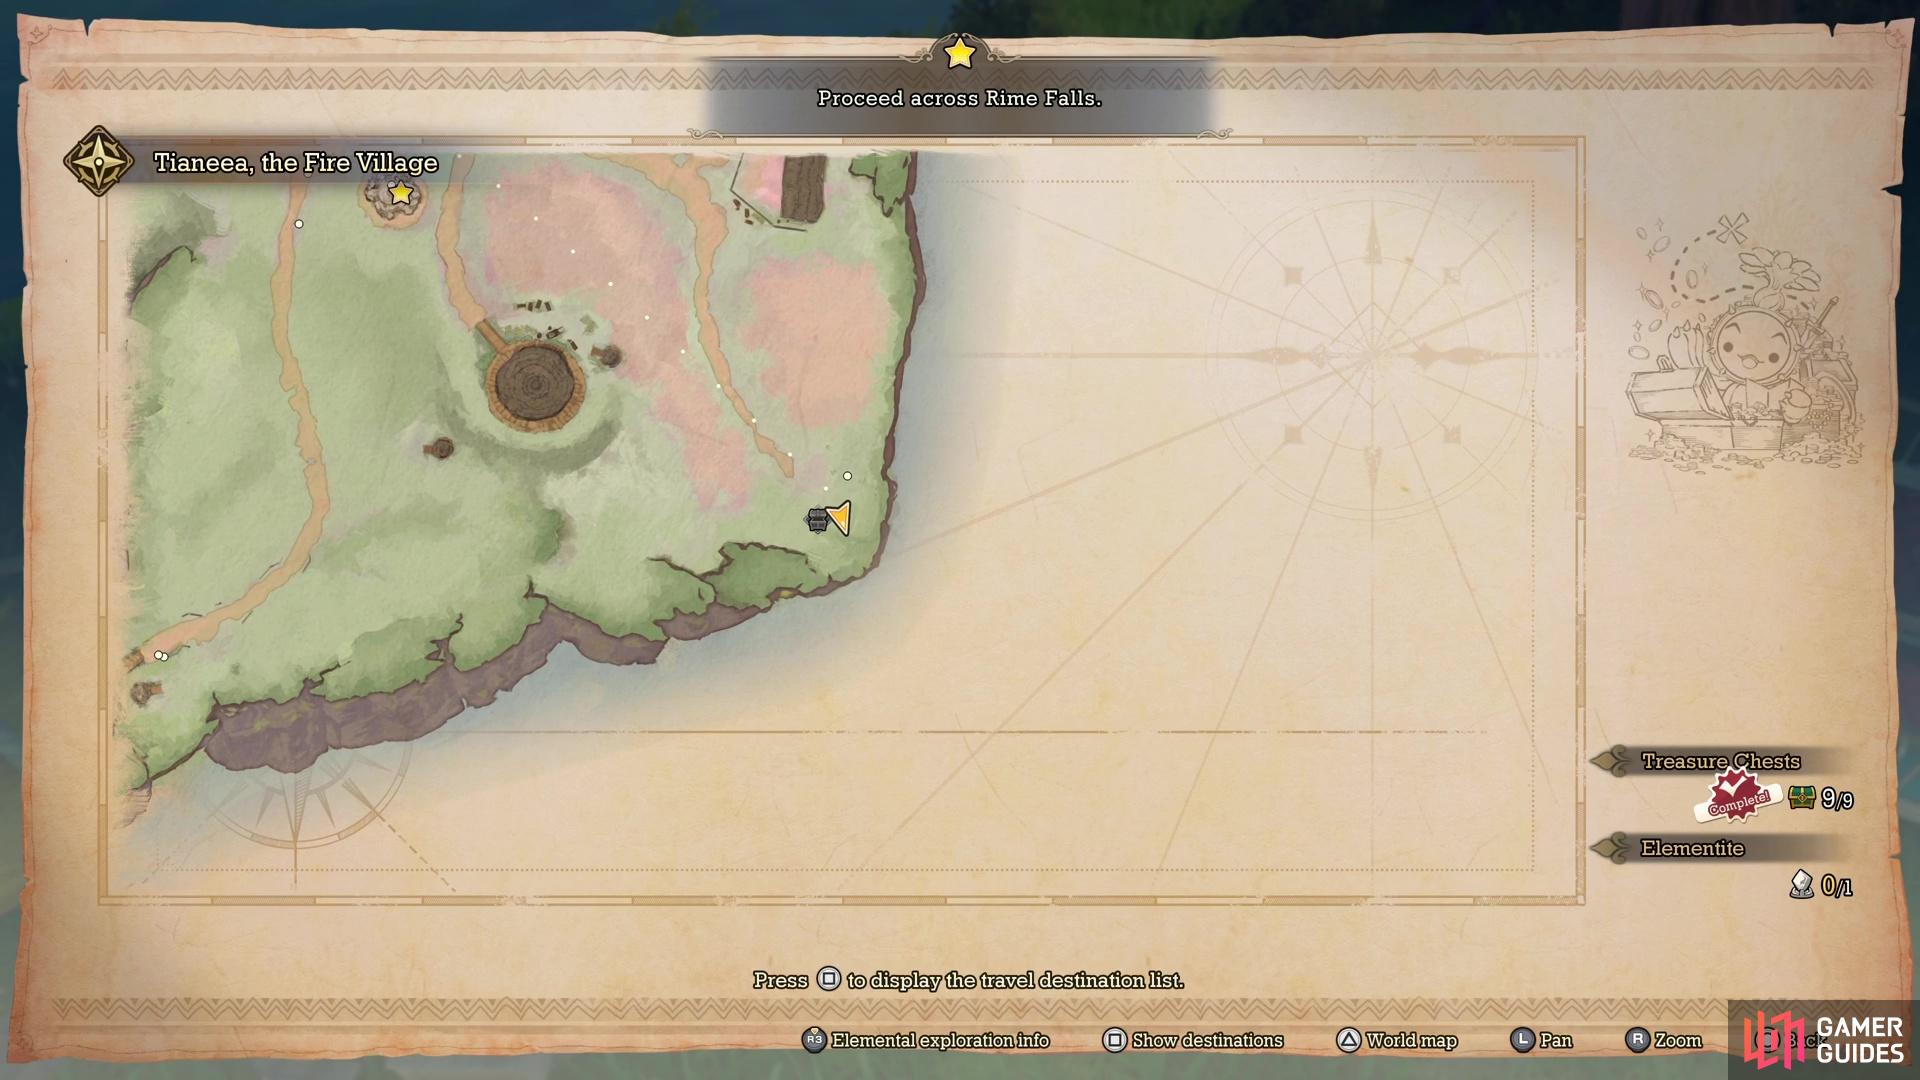
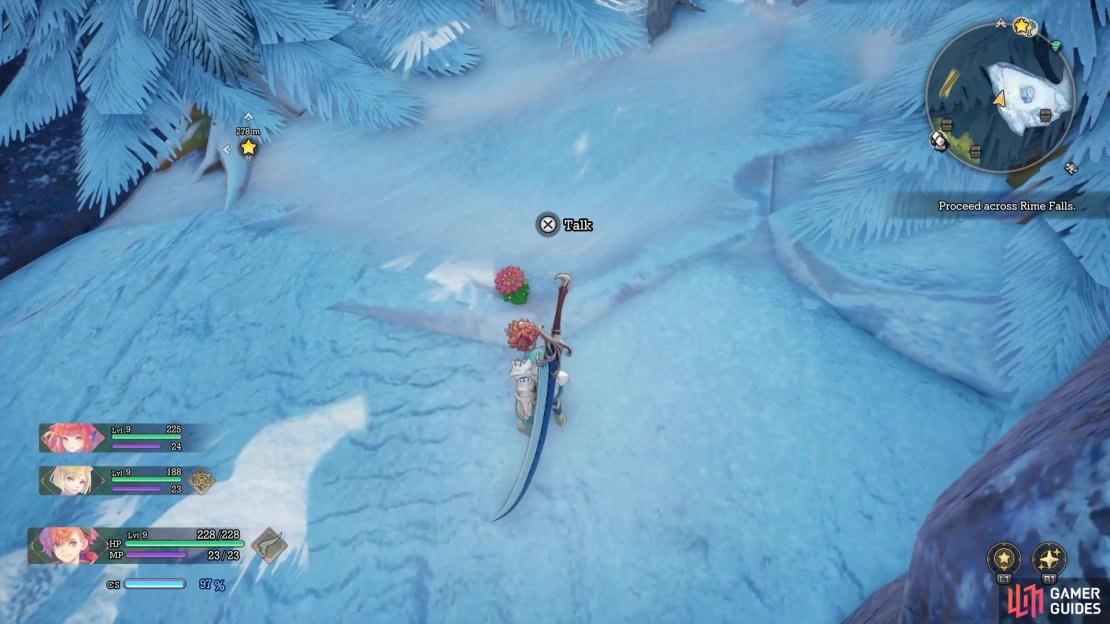
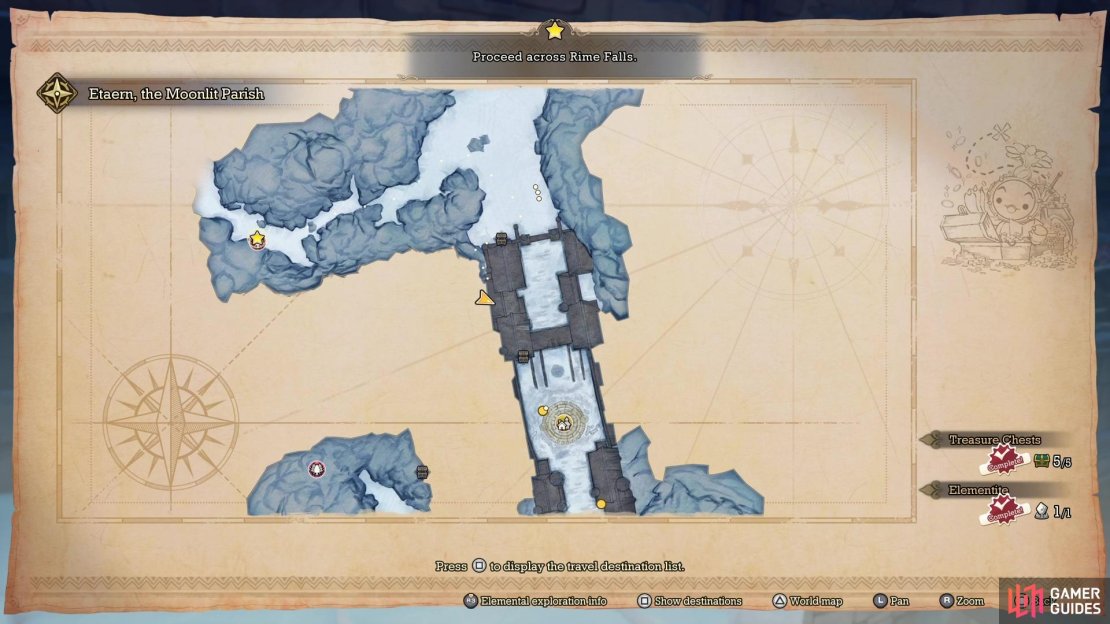
Lil Cactus: Rime Falls
- Map Marker
- Diary Entry: Farewell, Rime Falls
This one is automatically obtained as you play the main story. As soon as you enter this area after completing the story events in Etaern, you will witness a cutscene with the Cactus being frozen in a block of ice. It will fall and break free, registering it to your count as the first one.


(1 of 4) The location of the Li’l Cactus in Tianeea Village on the map.
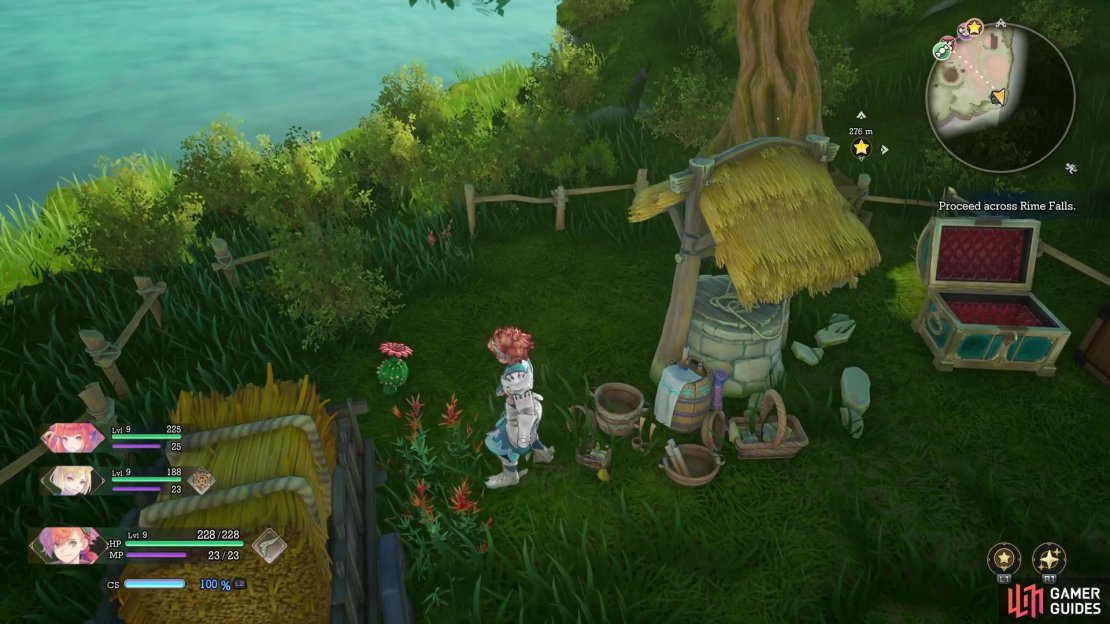
Lil Cactus: Tianeea
- Map Marker
- Diary Entry: The Warmth of Tianeea
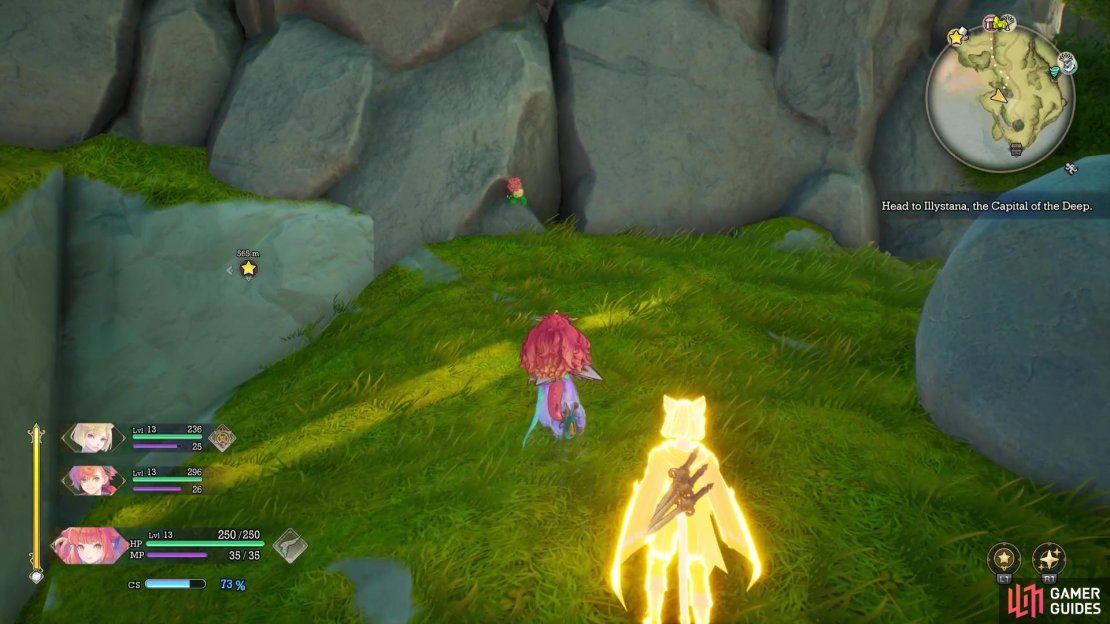
The one in Tianeea is kind of easy to find, as it will be located in the southeastern corner of the village. It will be sitting next to some carts that have some hay inside of them.
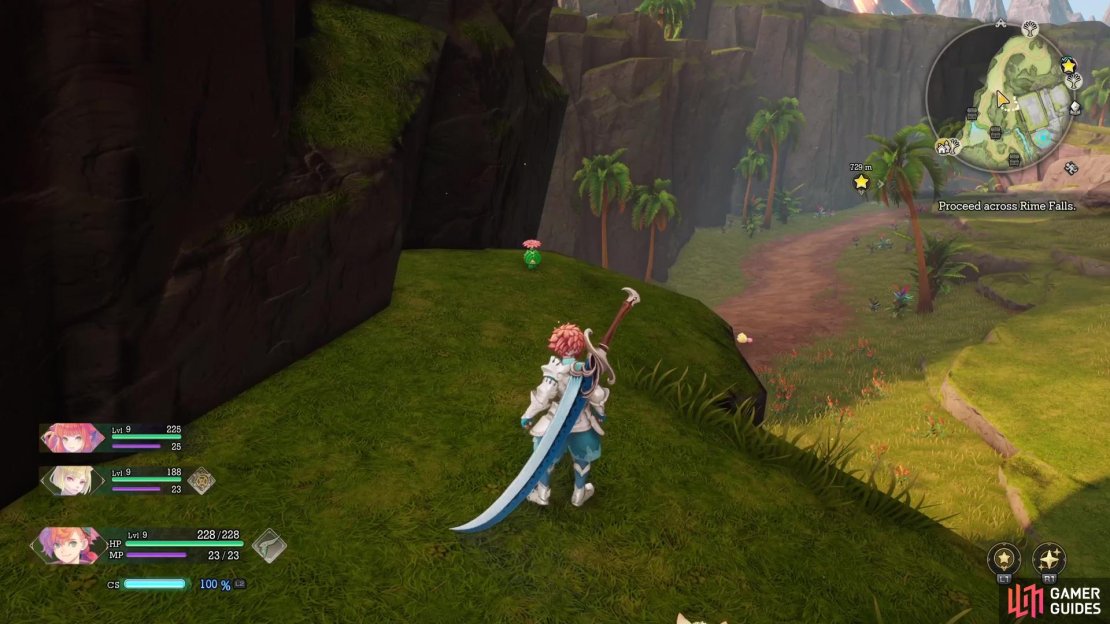
Lil Cactus: Charred Passage
- Map Marker
- Diary Entry: Camping in the Passage
You will find this Cactus close to the Ancient Ruins, which is the area in the center of the map with level 50 or so enemies inside it. Just west of the ruins is a rock formation that is a steady incline and reaches a point. Go up to this point, then look off to a lower ledge on the eastern side to find the Cactus.
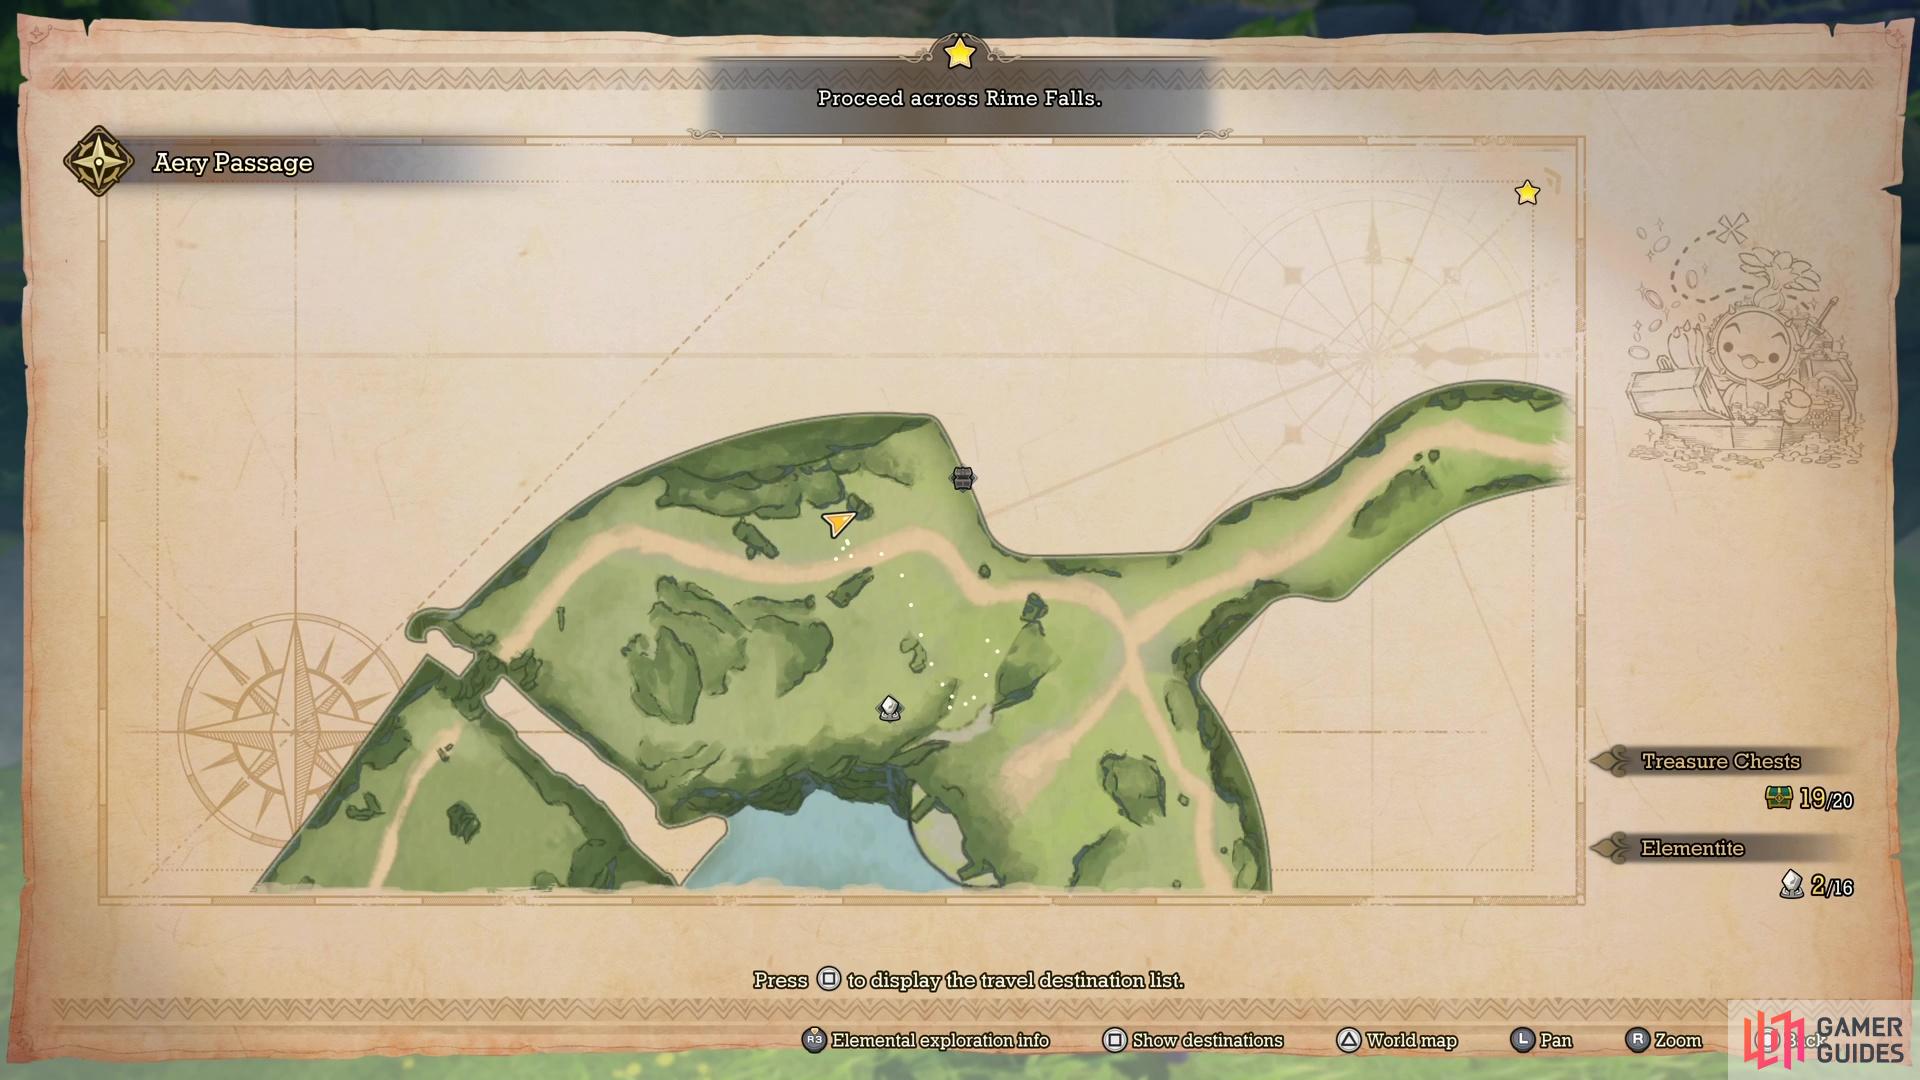
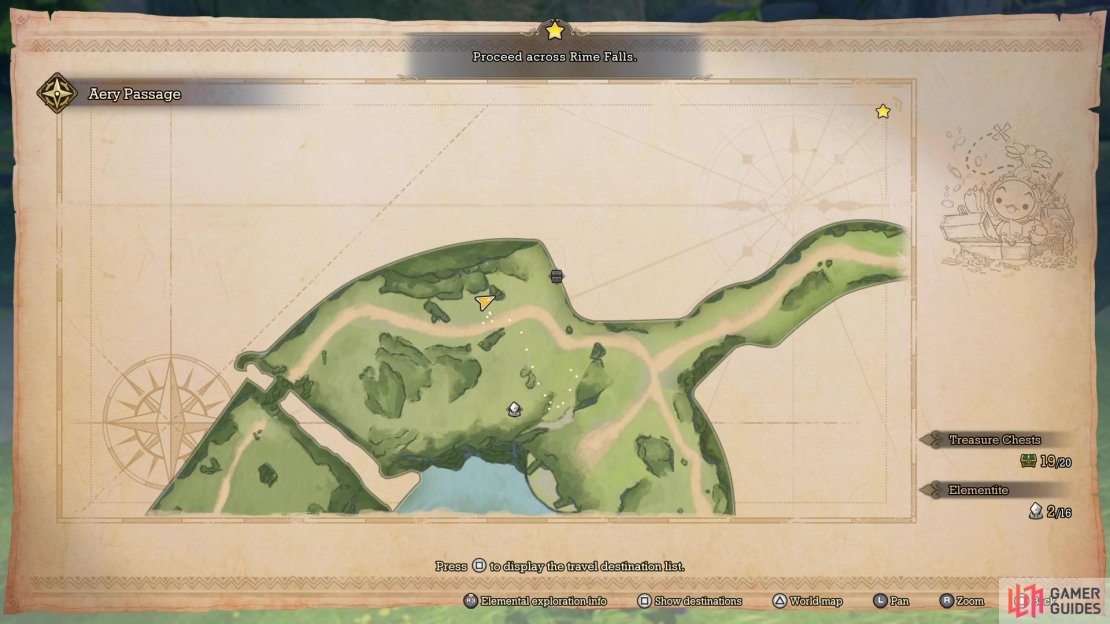
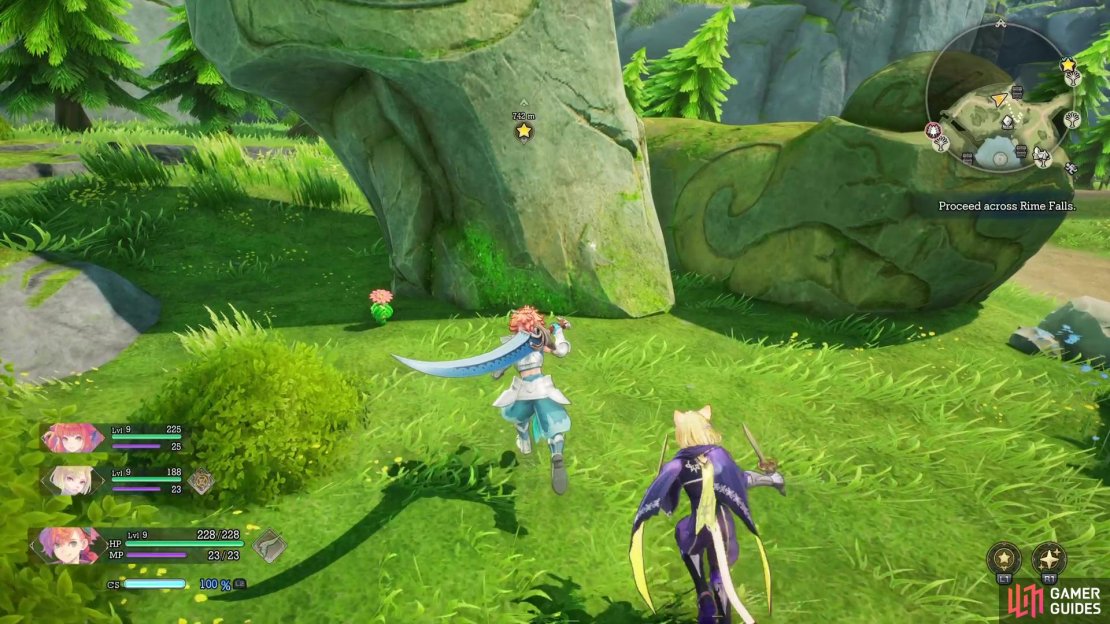
Lil Cactus: Aery Passage
- Map Marker
- Diary Entry: Something in the Air
Upon returning to this area, start from the ![]() Meridian near the exit to
Meridian near the exit to ![]() Charred Passage. Follow the path as designated on the map, until you see a large obelisk-like object. If you look at the base of this tall object, you will notice a chunk of it is missing. Look where that chunk is missing to find the Cactus.
Charred Passage. Follow the path as designated on the map, until you see a large obelisk-like object. If you look at the base of this tall object, you will notice a chunk of it is missing. Look where that chunk is missing to find the Cactus.
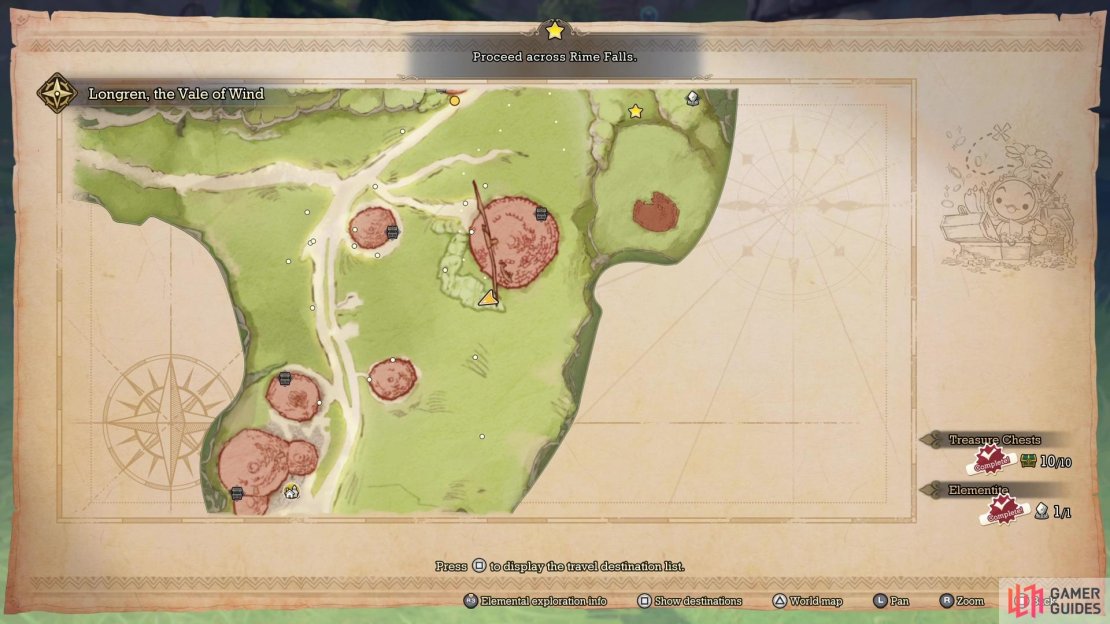
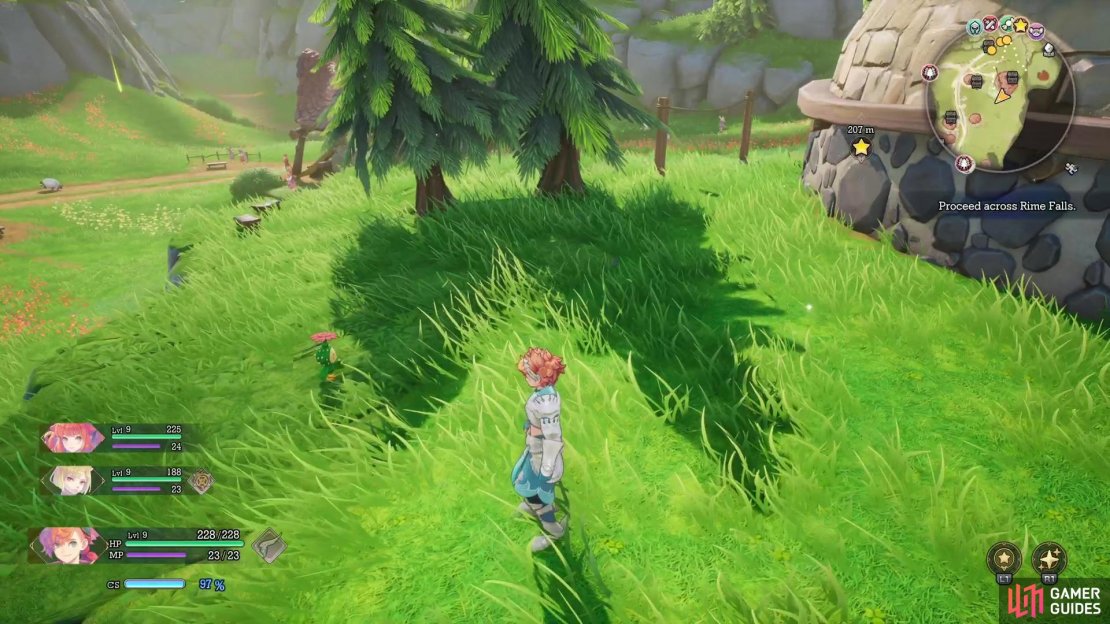
Lil Cactus: Longren
- Map Marker
- Diary Entry: The Mills in the Vale go Round and Round
To find the Cactus here, head on over to the large windmill found closer to the middle of the village, towards the eastern side. Look on the southern side, on the ledge portion, to find the Cactus just standing there.
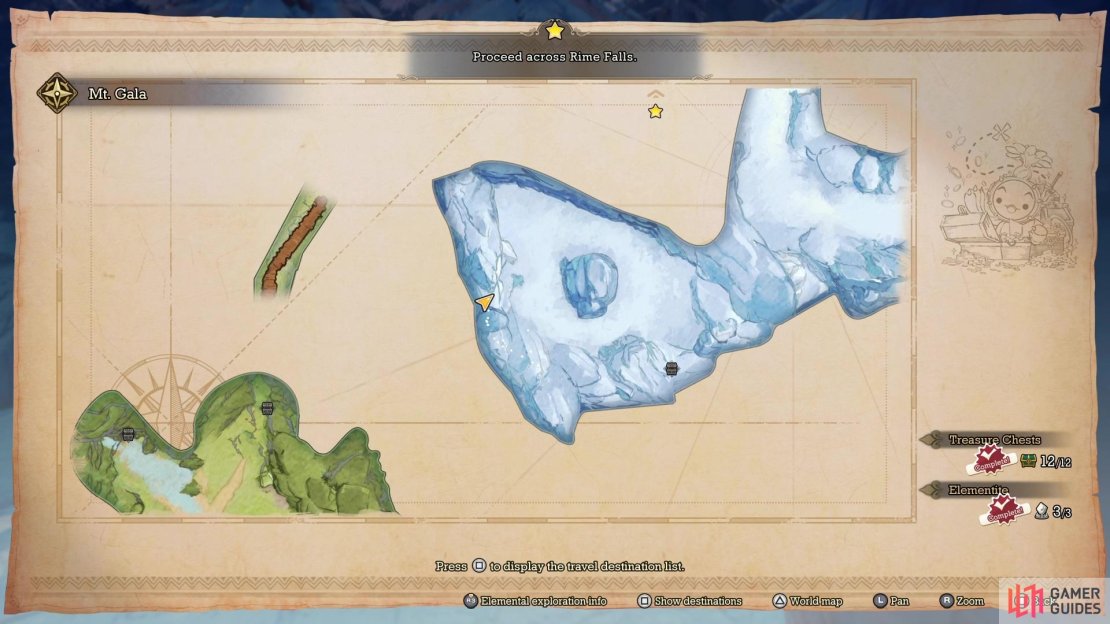
Lil Cactus: Mt. Gala
- Map Marker
- Diary Entry: The Gales of
 Mt. Gala
Progress through this area as normal, from the southern end, until you reach the first snowy section. As soon as you do, you should see some enemies right after jumping off the wind-supported floating platforms. From there, head straight through the trees and to the cliff’s edge on the western side to find the hidden Cactus.
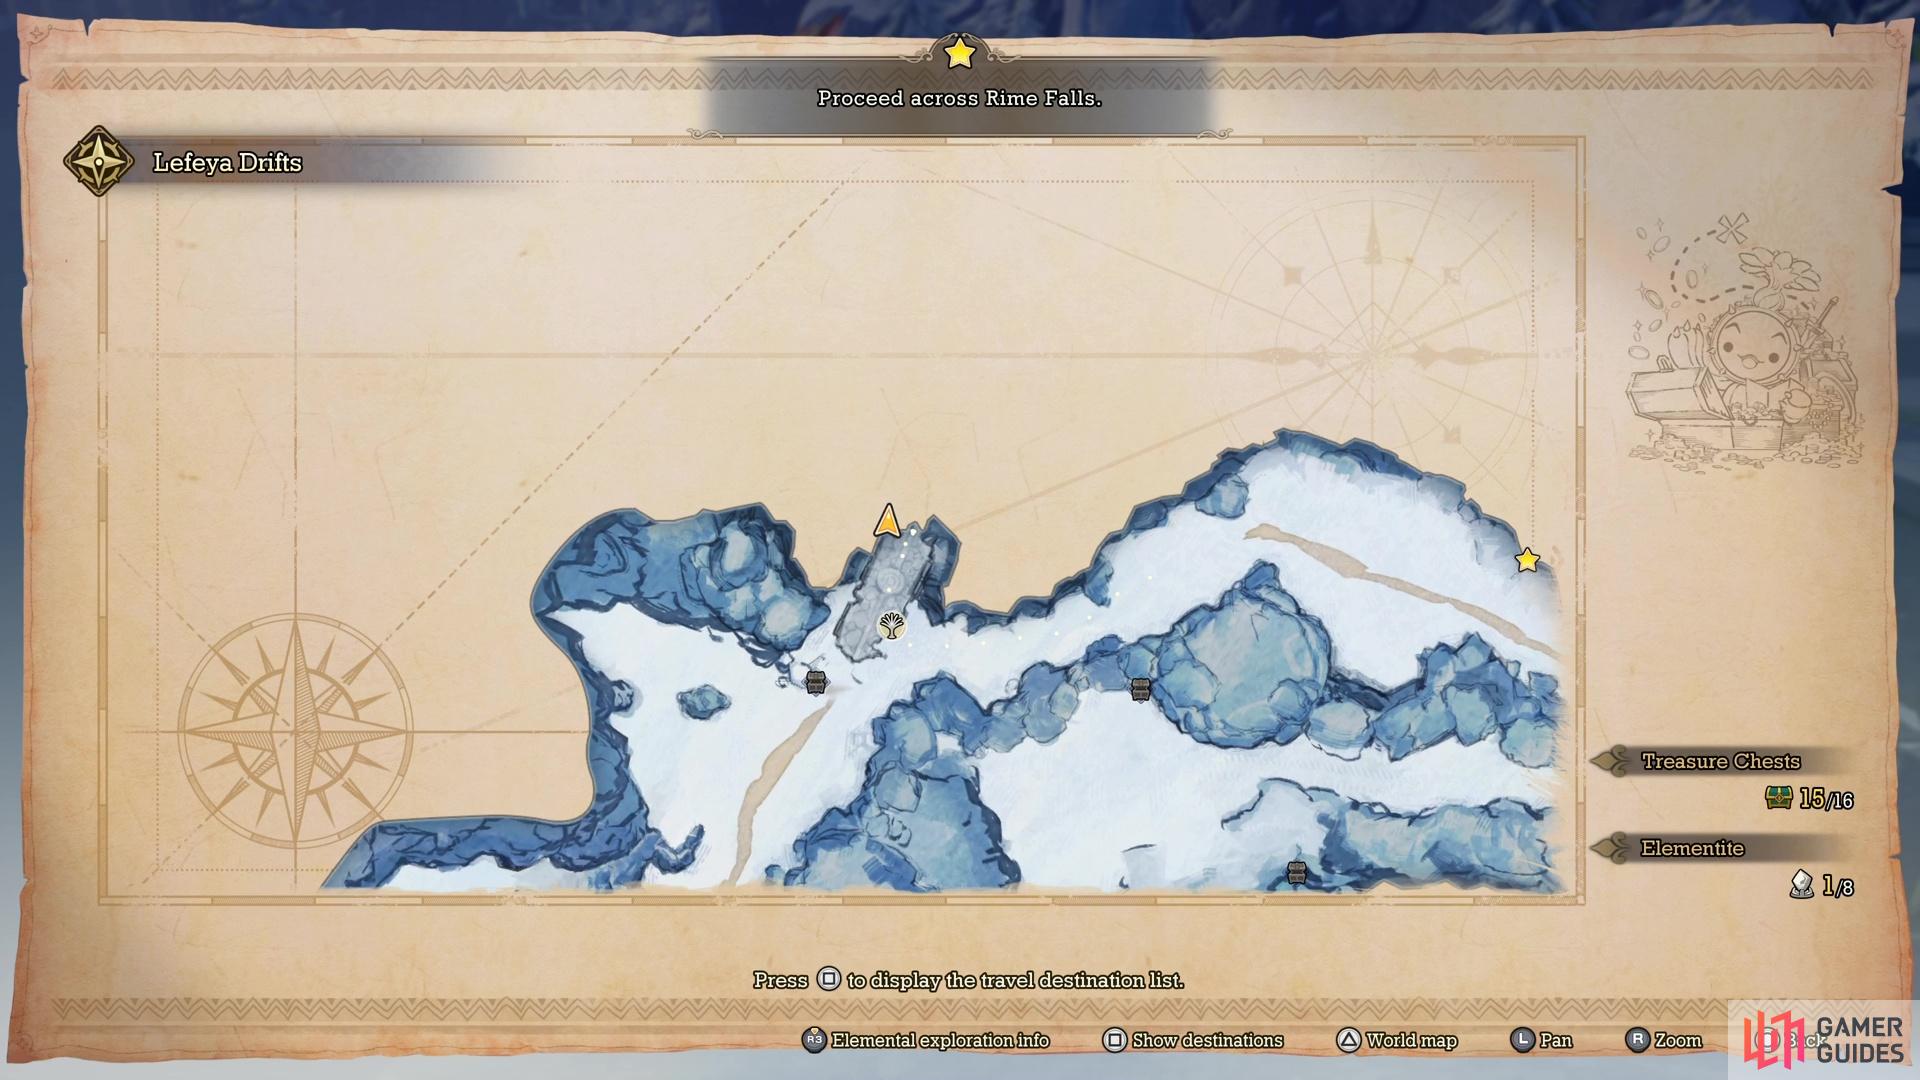
Lil Cactus: Lefeya Drifts
- Map Marker
- Diary Entry: Dumbstruck in the Drifts
The Cactus in this area can be found in the northwestern portion of the map. If you’ve thoroughly explored this area, then you remember there is a broken bridge in that section. This is also right next to a Meridian, so it’s even easier to find. The Cactus will be on the tip of the bridge, hanging onto the side, so get close enough to trigger the Talk prompt.
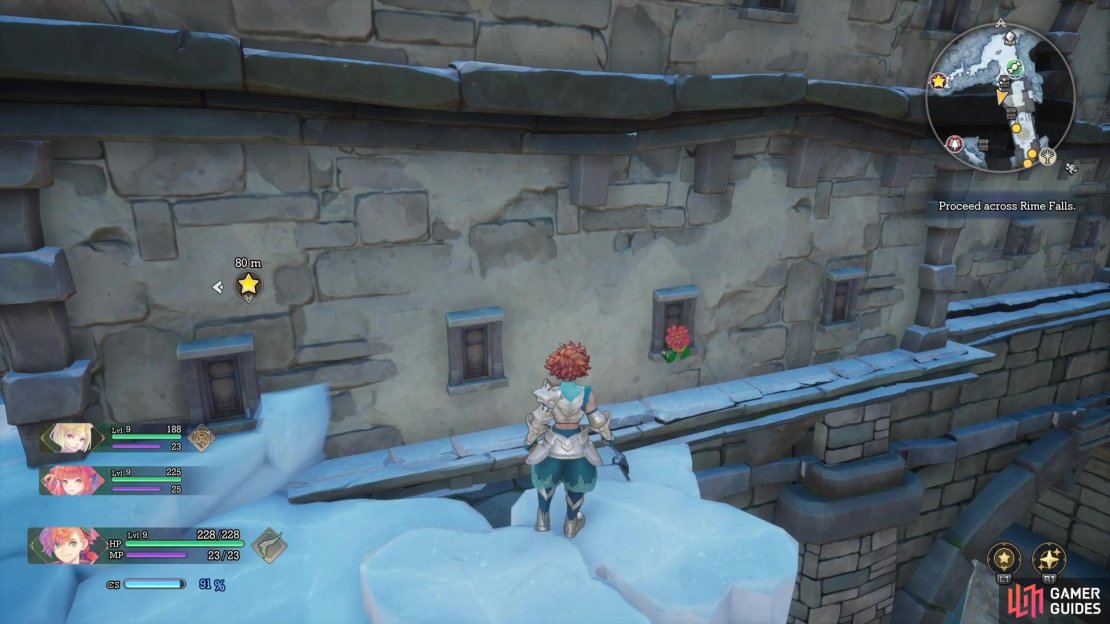
Lil Cactus: Etaern
- Map Marker
- Diary Entry: If You Could Turn Back Time
It’s better to come at this one from Rime Falls, so as soon as you unlock the Li’l Cactus in that area. From the back entrance to the town, head to the western side and you should see some ledges you can use as platforms. Follow these, along the outer wall, and you will see the Cactus stuck in the wall.

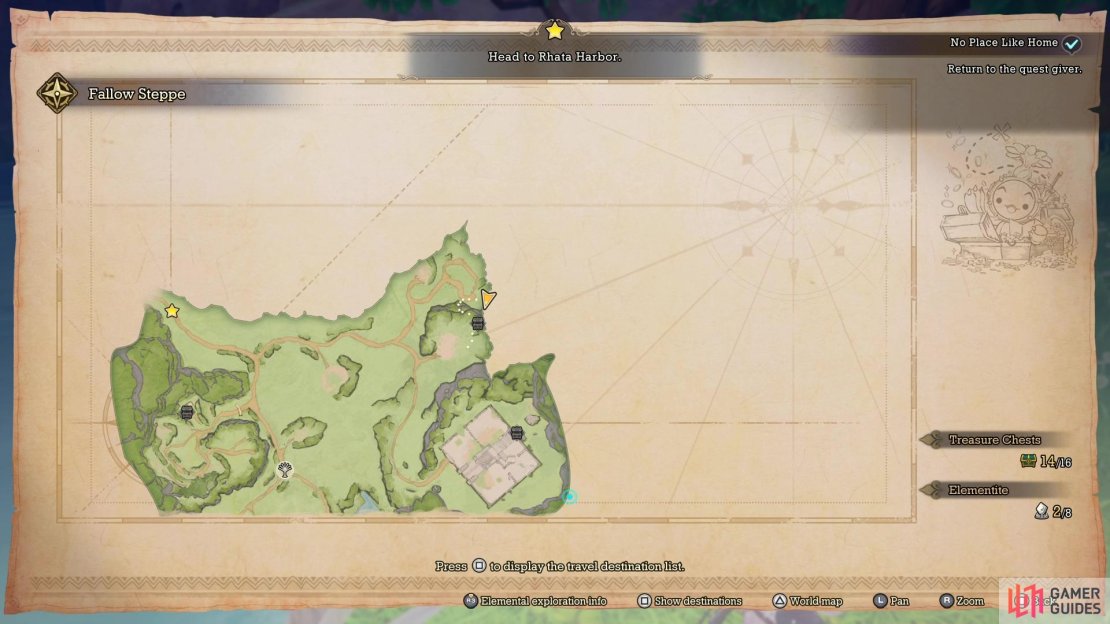
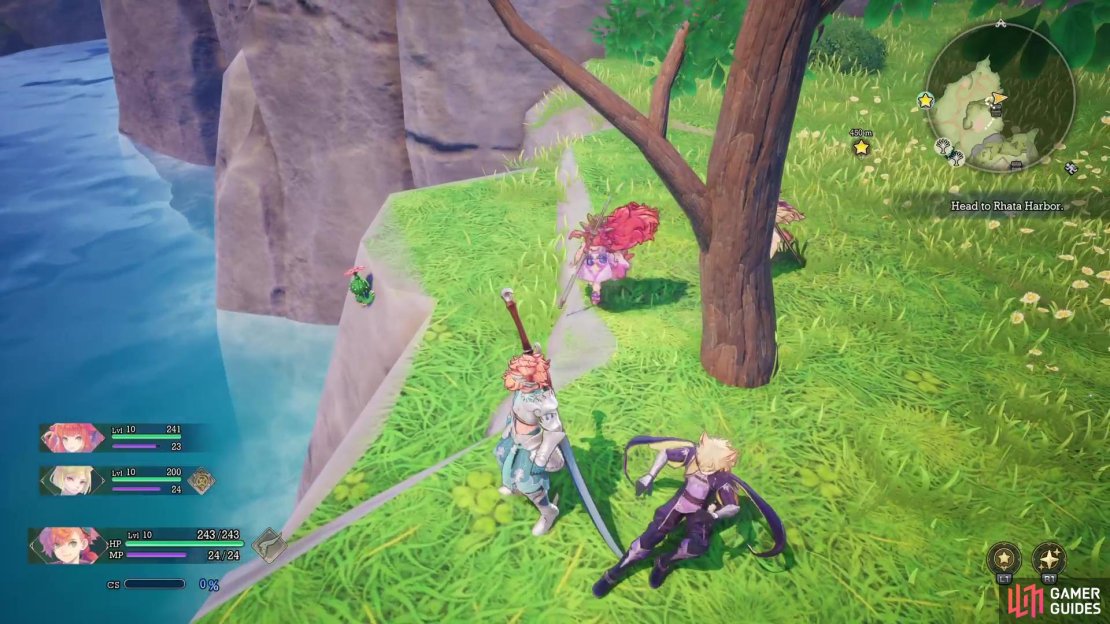
Lil Cactus: Fallow Steppe
- Map Marker
- Diary Entry: Hop, Steppe, Jump
Head to the northeastern tip of the zone, then start following the eastern cliff south. Once you reach the higher elevation on the map, you can look on the side of the cliff overlooking the water to find the Cactus hanging onto it.
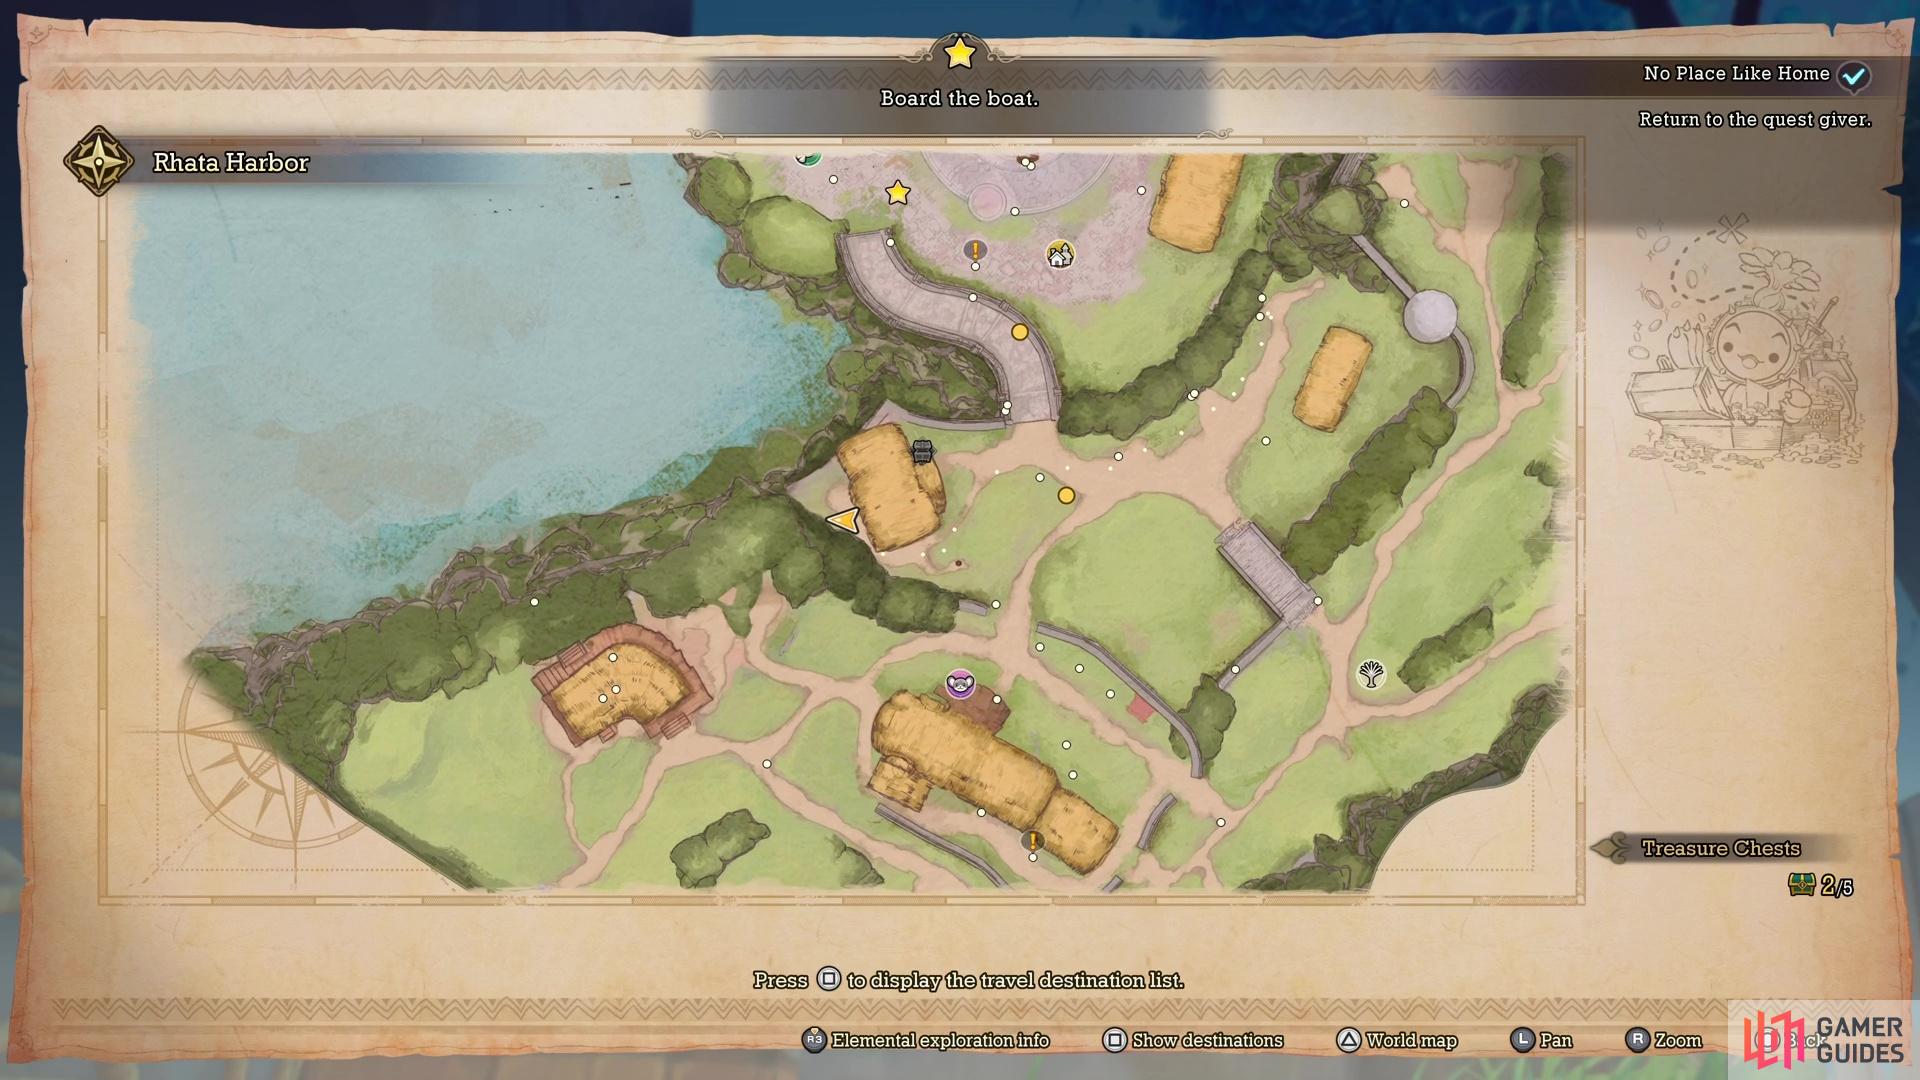
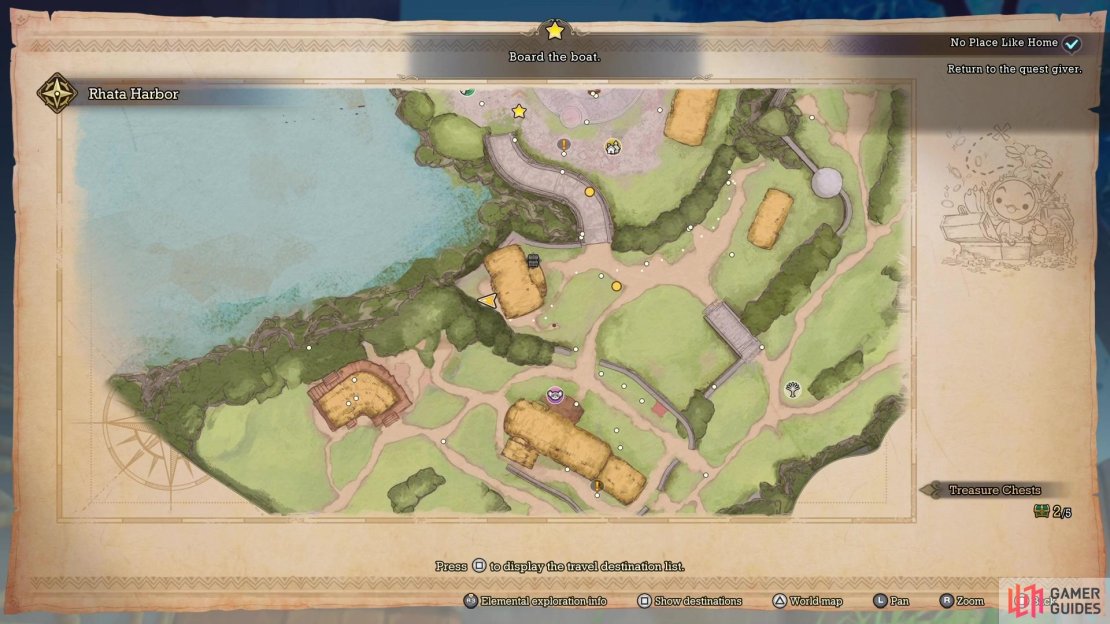
Lil Cactus: Rhata Harbor
- Map Marker
- Diary Entry: The Smell of the Sea Breeze
This one can be a little tricky to find, since it’s in a troublesome spot. When you reach the stairs that go into the central part of the harbor, where all the shops are located, you should see a house just west of the southern end of those stairs. This house will also have a chest on its northern side, so you know which one to go to. Head behind the house and look on the cliffside there to spot the Cactus clinging to it.
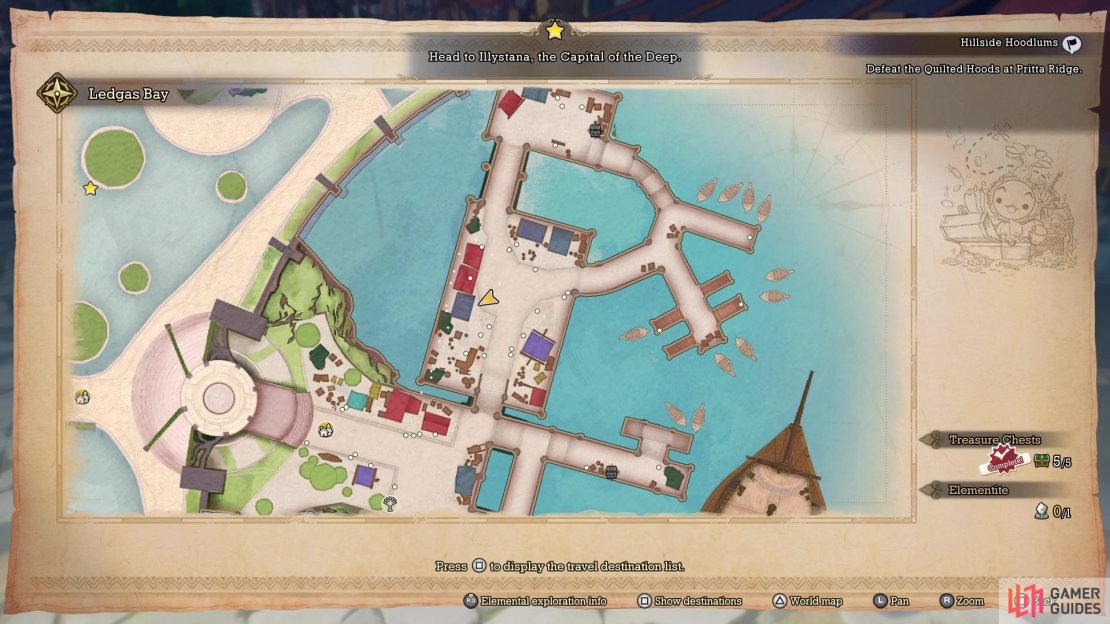
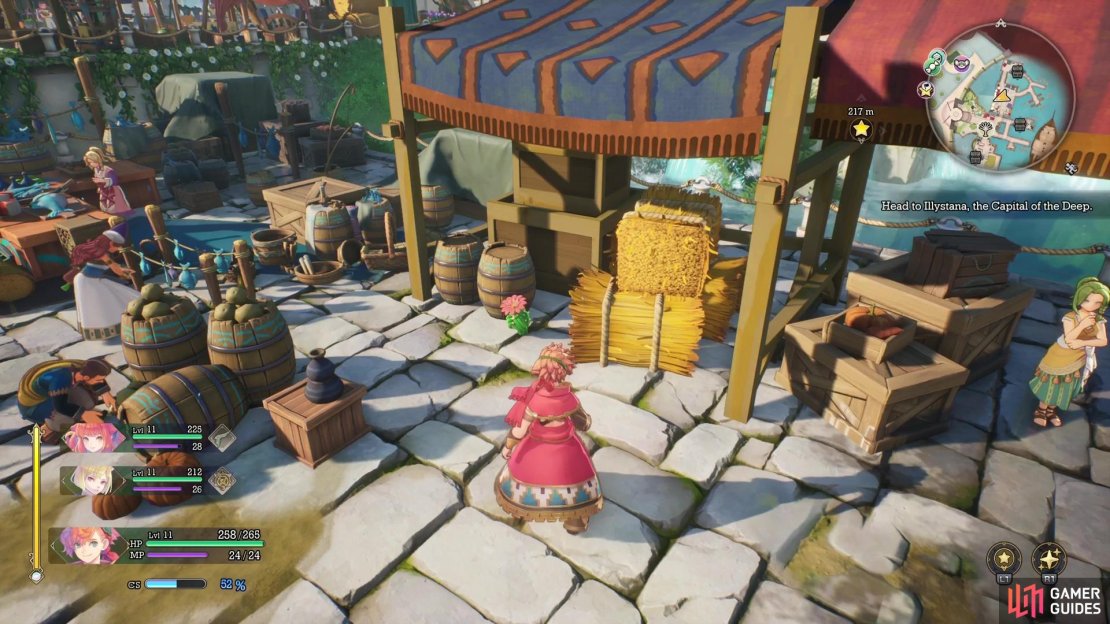
Lil Cactus: Ledgas Bay
- Map Marker
- Diary Entry: The Cactus That Sailed the Sea
![]() Ledgas Bay is comprised of two areas, a lower section that is the harbor, then an upper area that is accessible via an elevator. The Cactus will be in the lower portion, in the northern half of it. Look on the left side of the larger rectangular area here to find the Cactus, which will be underneath one of the stalls there, next to some hay.
Ledgas Bay is comprised of two areas, a lower section that is the harbor, then an upper area that is accessible via an elevator. The Cactus will be in the lower portion, in the northern half of it. Look on the left side of the larger rectangular area here to find the Cactus, which will be underneath one of the stalls there, next to some hay.


Lil Cactus: Pritta Ridge
- Map Marker
- Diary Entry: Pretty Pritta
In ![]() Pritta Ridge, go down to the southern tip, where you will find a lighthouse. Go down the stone steps and head north a little bit, while hugging the eastern cliffside. Not too far north will be the Cactus, embedded in the walls of the cliff.
Pritta Ridge, go down to the southern tip, where you will find a lighthouse. Go down the stone steps and head north a little bit, while hugging the eastern cliffside. Not too far north will be the Cactus, embedded in the walls of the cliff.
Lil Cactus: Illystana
- Map Marker
- Diary Entry: Welcome to the Capital of the Deep
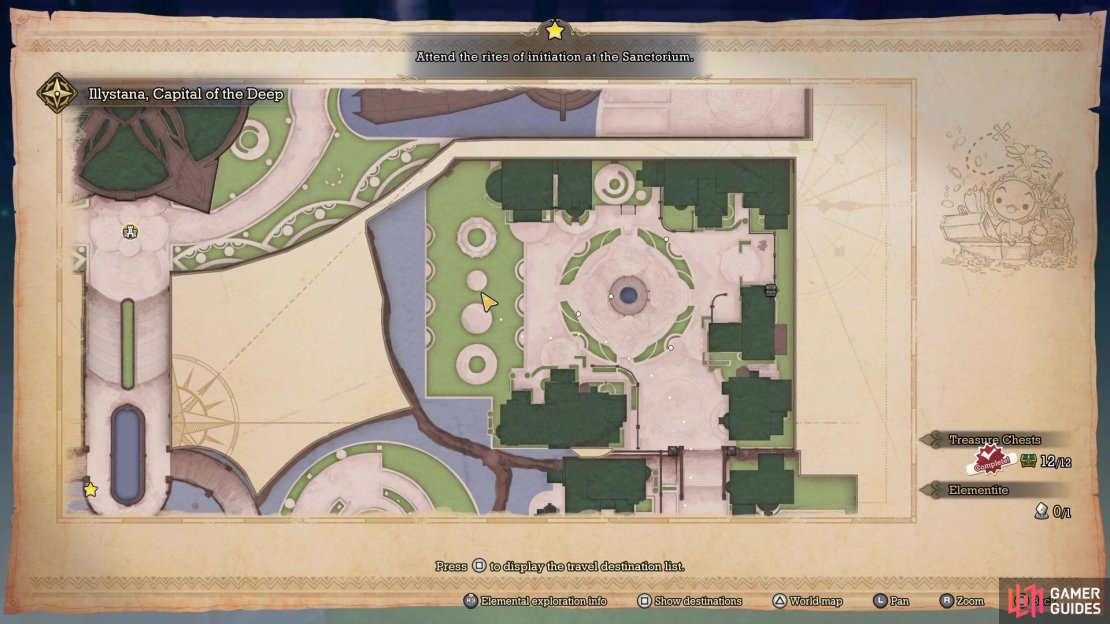
In order to find the Cactus in Illystana, head to the eastern section of the city. Once you’re there, go to the northern part and look for four circles on your minimap, which will be on the western side of that area. The smallest circle will have the Cactus sitting right there, so talk to it to put another notch on your belt.
Lil Cactus: Luka Ruins
- Map Marker
- Diary Entry: The Truth of the Ruins
You will have to come back to the ![]() Luka Ruins after completing the first story bit here, which results in you defeating the
Luka Ruins after completing the first story bit here, which results in you defeating the ![]() Fullmetal Hugger boss. Return to the ruins after beating that boss and fast travel to the Meridian, so you won’t have to redo the elevator. From the Meridian, head backwards to the elevator and look on the one pillar on the northern side to find the Cactus.
Fullmetal Hugger boss. Return to the ruins after beating that boss and fast travel to the Meridian, so you won’t have to redo the elevator. From the Meridian, head backwards to the elevator and look on the one pillar on the northern side to find the Cactus.


Lil Cactus: Ahrvet’s Pasture
- Map Marker
- Diary Entry: Problems in the Pasture
![]() Ahrvet’s Pasture is a fairly big area to explore, but there are some fields for farming on the western side. In the middle of those fields are some houses, one towards the north, one towards the east and one towards the southwest. You want to go to the last one on that above list, to the southwest. It will be south and a little west of the bigger building to the north (the one south of the bridge). Look on the northern side of the building for the Cactus.
Ahrvet’s Pasture is a fairly big area to explore, but there are some fields for farming on the western side. In the middle of those fields are some houses, one towards the north, one towards the east and one towards the southwest. You want to go to the last one on that above list, to the southwest. It will be south and a little west of the bigger building to the north (the one south of the bridge). Look on the northern side of the building for the Cactus.
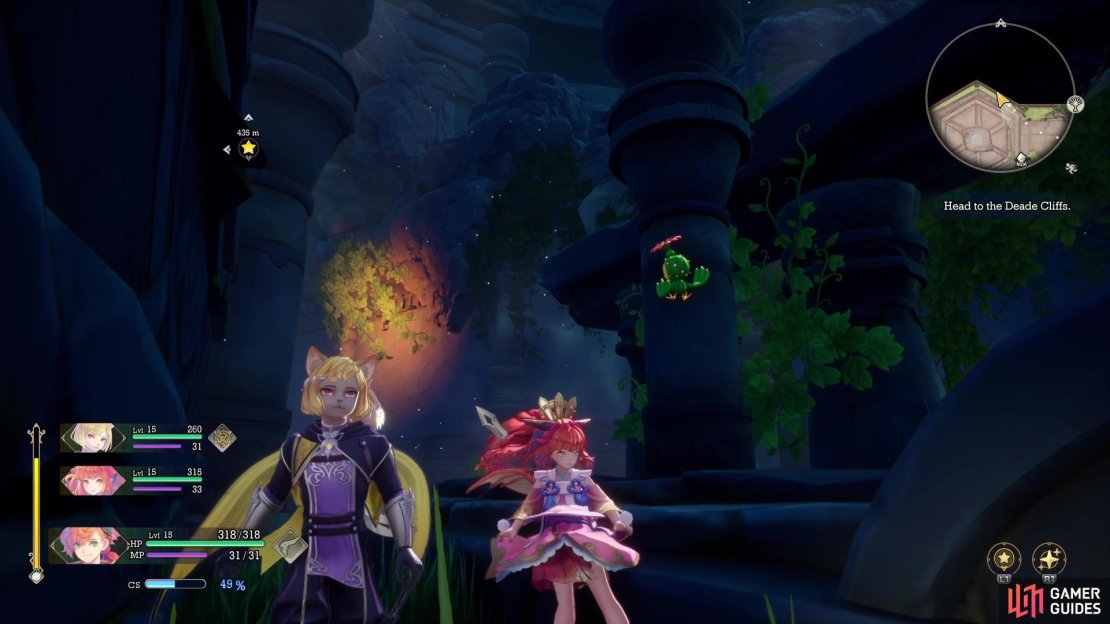
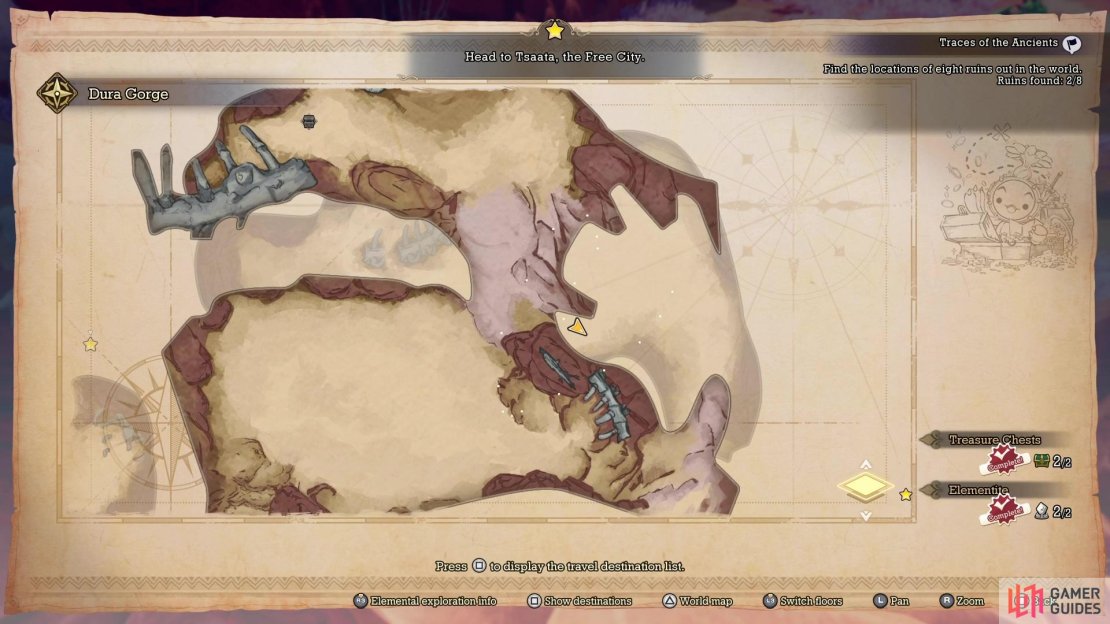
Lil Cactus: Dura Gorge
- Map Marker
- Diary Entry: Ancient Then, Ancient Now
![]() Dura Gorge is an area that is split into an upper half and a lower half; the Cactus will be found on the upper section. When you first arrive from Ahrvet’s Pasture, you will use the Wind Vessel to conjure a whirlwind that brings you to the upper part. Head south, east and then north, until you reach the second cave that has the water bubbles. Instead of going inside, walk along the bones at the cliff and look a little north. If you keep a sharp eye, you will see the Cactus hanging off the side of the cliff just north of those bones near the cave.
Dura Gorge is an area that is split into an upper half and a lower half; the Cactus will be found on the upper section. When you first arrive from Ahrvet’s Pasture, you will use the Wind Vessel to conjure a whirlwind that brings you to the upper part. Head south, east and then north, until you reach the second cave that has the water bubbles. Instead of going inside, walk along the bones at the cliff and look a little north. If you keep a sharp eye, you will see the Cactus hanging off the side of the cliff just north of those bones near the cave.
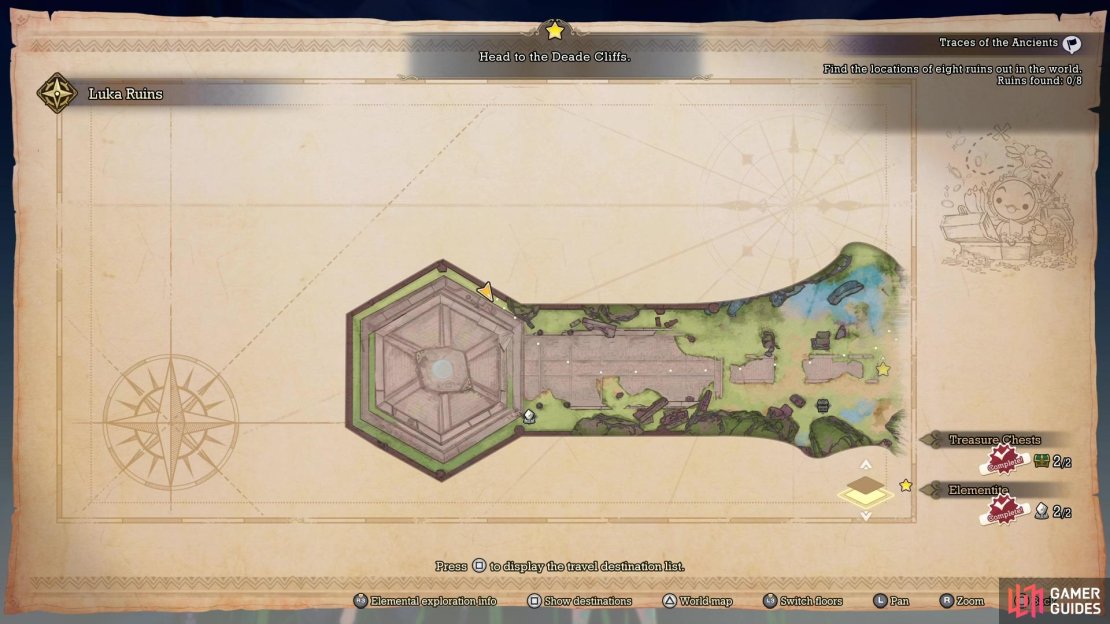
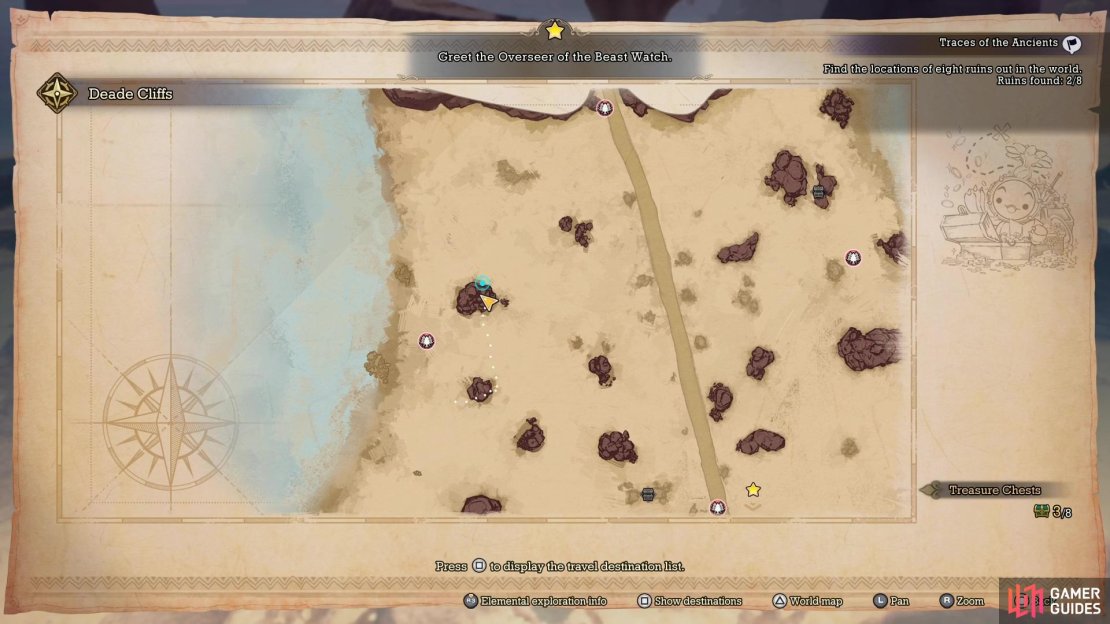
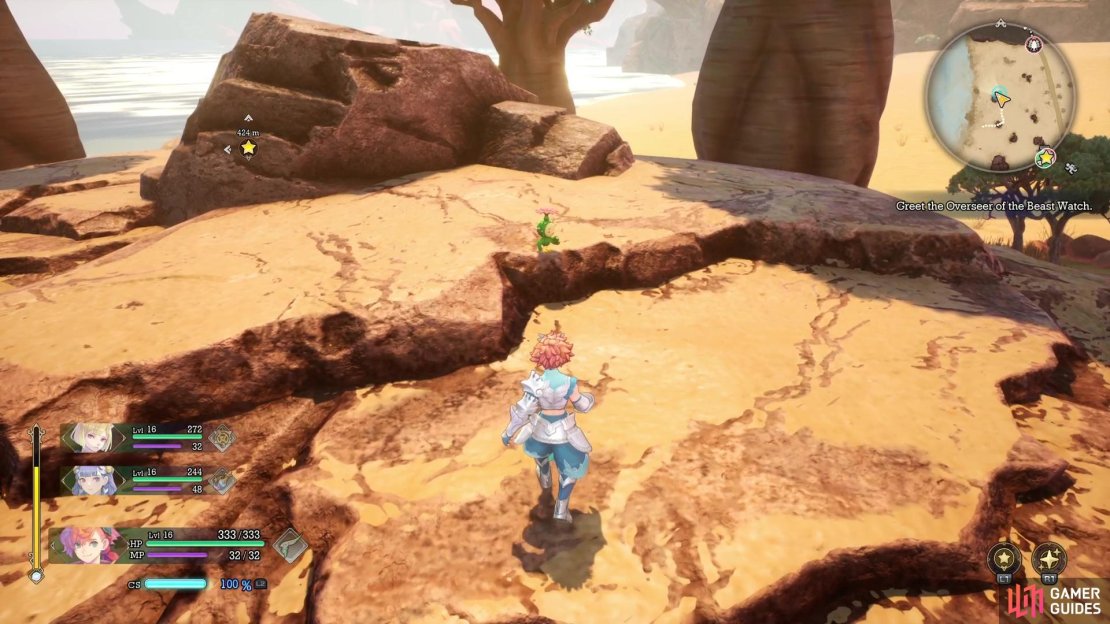
Lil Cactus: Deade Cliffs
- Map Marker
- Diary Entry: To Higher and Higher Heights
The ![]() Deade Cliffs will be the next place you visit after passing through Dura Gorge. The area is a bit wide open, with a bunch of rock formations strewn throughout, and a little outpost at the southern end. To find the Cactus here, head to the northwestern portion of the cliffs and look for the rock formation there. You will also find a chest here, so just go to the blue circle. The Cactus will be sitting on top of the rocks, so it’s not hidden or anything.
Deade Cliffs will be the next place you visit after passing through Dura Gorge. The area is a bit wide open, with a bunch of rock formations strewn throughout, and a little outpost at the southern end. To find the Cactus here, head to the northwestern portion of the cliffs and look for the rock formation there. You will also find a chest here, so just go to the blue circle. The Cactus will be sitting on top of the rocks, so it’s not hidden or anything.


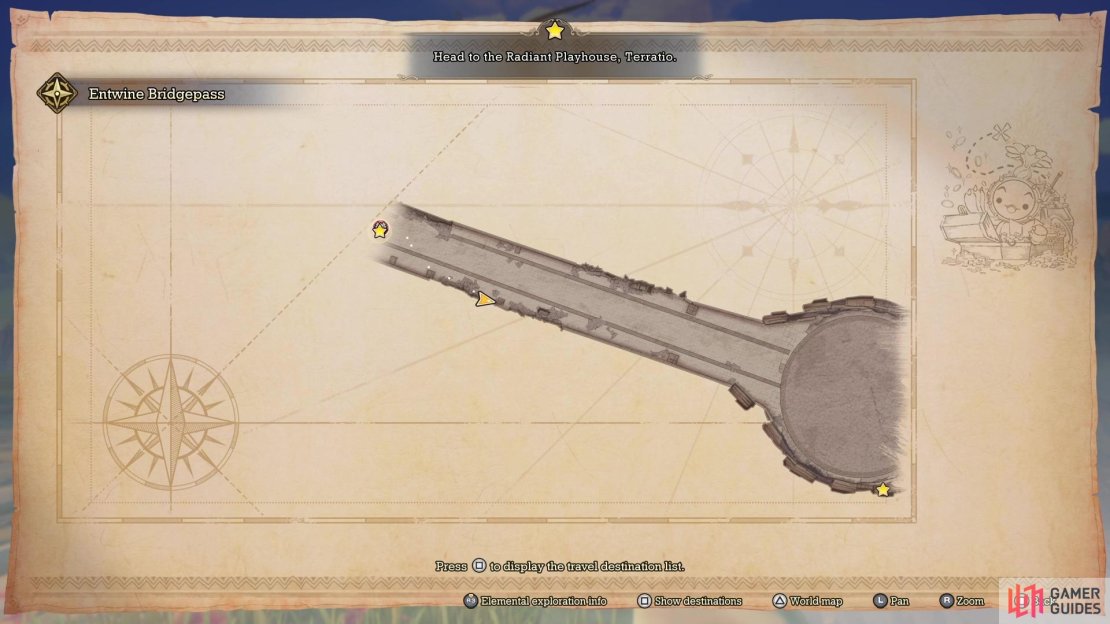
Lil Cactus: Entwine Bridgepass
- Map Marker
- Diary Entry: The Long, Long Bridgepass
![]() Entwine Bridgepass is nothing more than a big bridge that connects Ahrvet’s Pasture and
Entwine Bridgepass is nothing more than a big bridge that connects Ahrvet’s Pasture and ![]() Khaswia Moors. You come here after you aren’t able to get up the Daede Cliffs. The Cactus will be found more towards the Ahrvet’s Pasture side, on one of the broken pillars on the southern side.
Khaswia Moors. You come here after you aren’t able to get up the Daede Cliffs. The Cactus will be found more towards the Ahrvet’s Pasture side, on one of the broken pillars on the southern side.
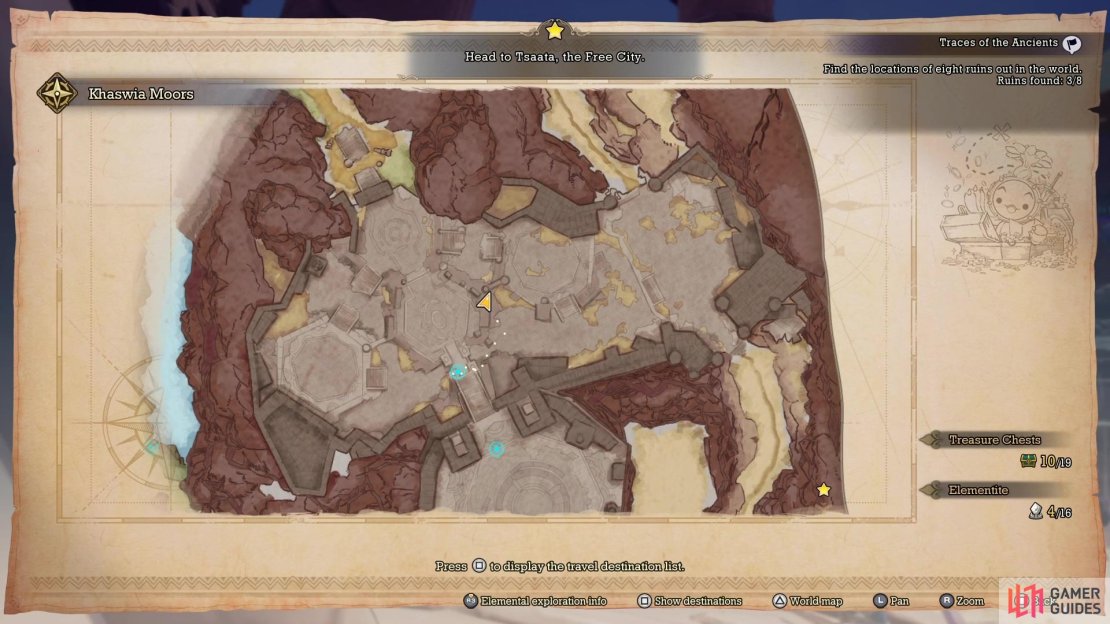
Lil Cactus: Khaswia Moors
- Map Marker
- Diary Entry: I Was Expecting Moor
To get the Cactus at Khaswia Moors, you will first need to find the Ancient Ruins in the area. They are located in the northern part of the region and they’re not that difficult to see, since they are similar to the other Ancient Ruins in previous spots. Of course, you want to be careful here, since the enemies here are in their 50s. If you enter the ruins from the southeastern entrance, look for the group of enemies that consist of ![]() Wormwoods and
Wormwoods and ![]() Fierce Faces. There is a fallen pillar right next to them, on its side, and the Cactus will be clinging to the side of it.
Fierce Faces. There is a fallen pillar right next to them, on its side, and the Cactus will be clinging to the side of it.
Lil Cactus: Free City of Tsaata
- Map Marker
- Diary Entry: Live Freely
The ![]() Free City of Tsaata will be your destination as you try to find a boat to reach Gudju. Once you’re in the city, head to the marketplace in the center of the town and then go west, up the hill. When you can begin moving south, look for an opening on the eastern side that brings you to a tall tower. That is your objective here, as the Cactus will be on the rocky wall on the southern side of the tower.
Free City of Tsaata will be your destination as you try to find a boat to reach Gudju. Once you’re in the city, head to the marketplace in the center of the town and then go west, up the hill. When you can begin moving south, look for an opening on the eastern side that brings you to a tall tower. That is your objective here, as the Cactus will be on the rocky wall on the southern side of the tower.
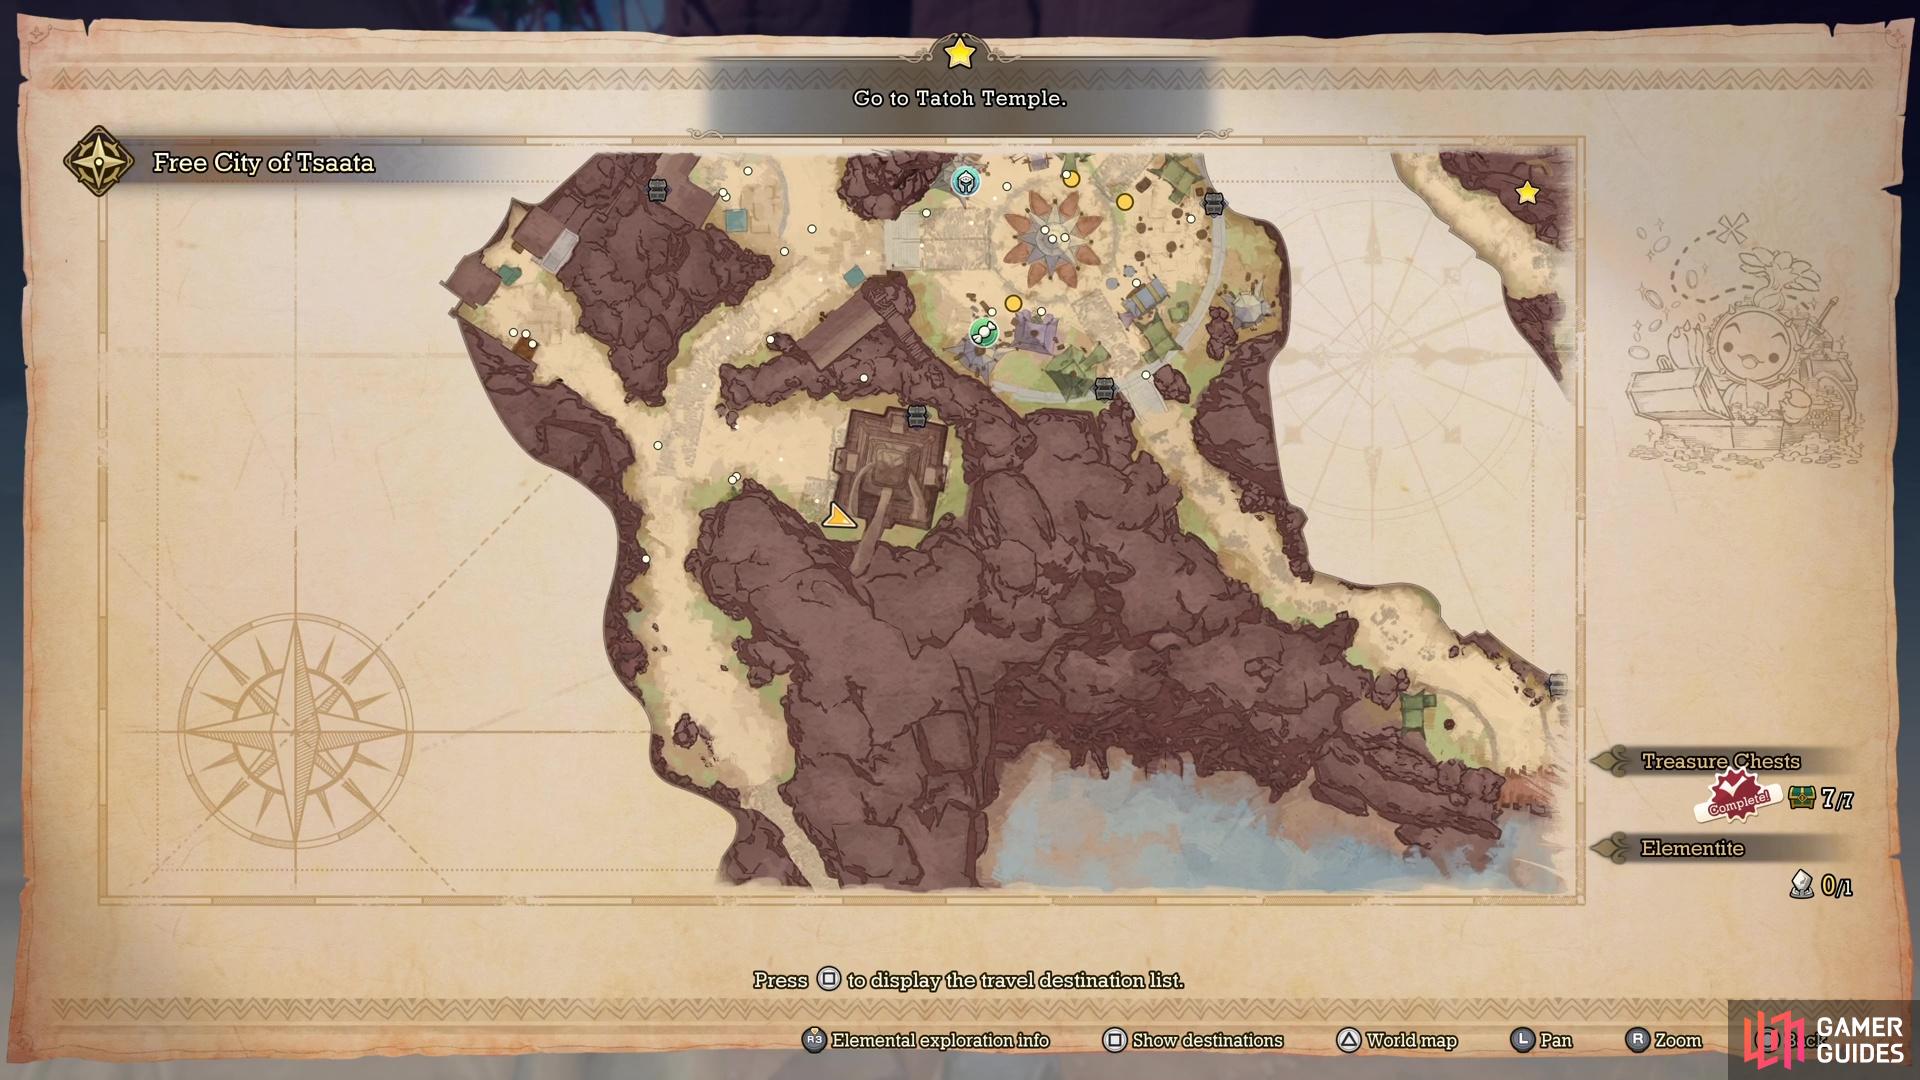
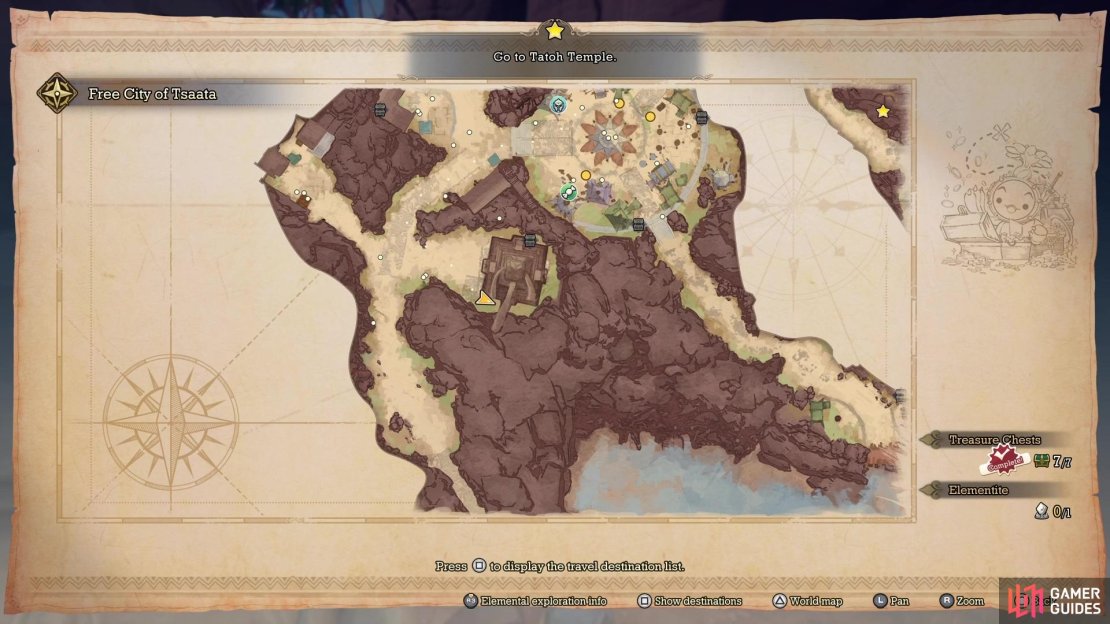
(1 of 6) The location of the Li’l Cactus in the Free City of Tsaata, on the map.
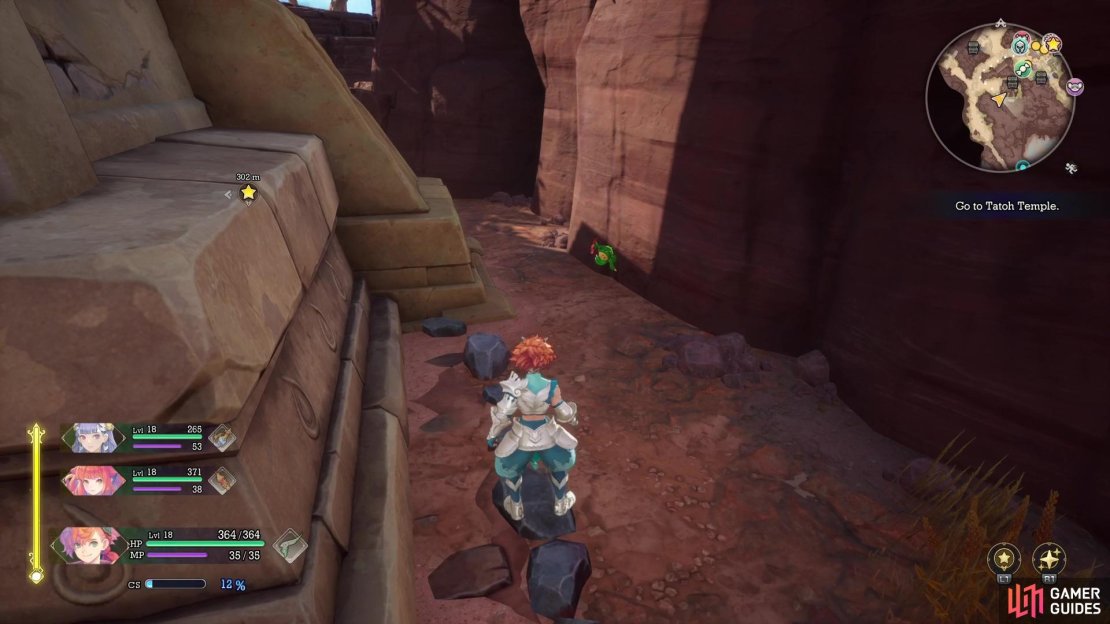
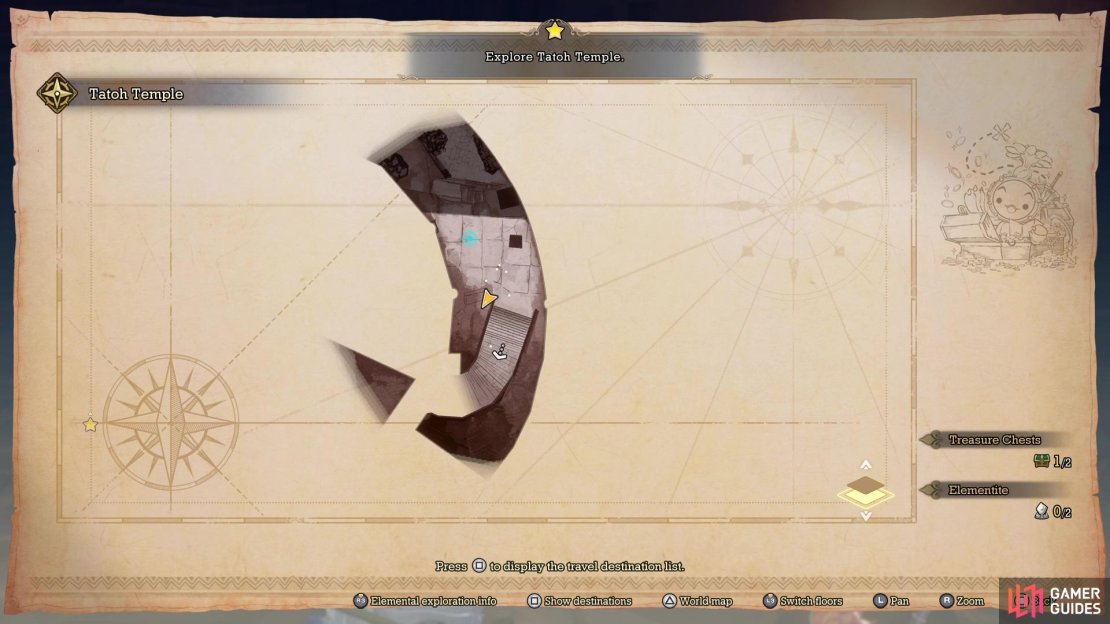
Lil Cactus: Tatoh Temple
- Map Marker
- Diary Entry: Turtle with a Temper
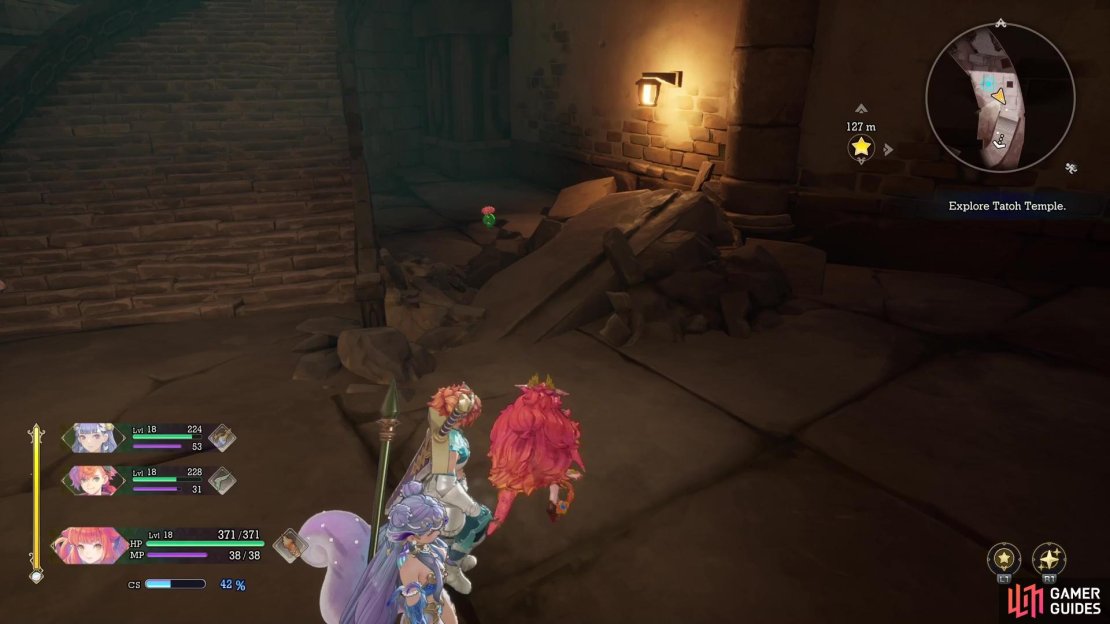
When you first arrive in ![]() Tatoh Temple, there will be some spiral stairs you have to go down to progress. At the bottom, you will receive the tutorial for the Turbotorch fire vessel exploration trigger. Instead of riding this, turn around and look next to the stairs to find the little Cactus.
Tatoh Temple, there will be some spiral stairs you have to go down to progress. At the bottom, you will receive the tutorial for the Turbotorch fire vessel exploration trigger. Instead of riding this, turn around and look next to the stairs to find the little Cactus.
Lil Cactus: Reignus Shrine
- Map Marker
- Diary Entry: Starry Shrine
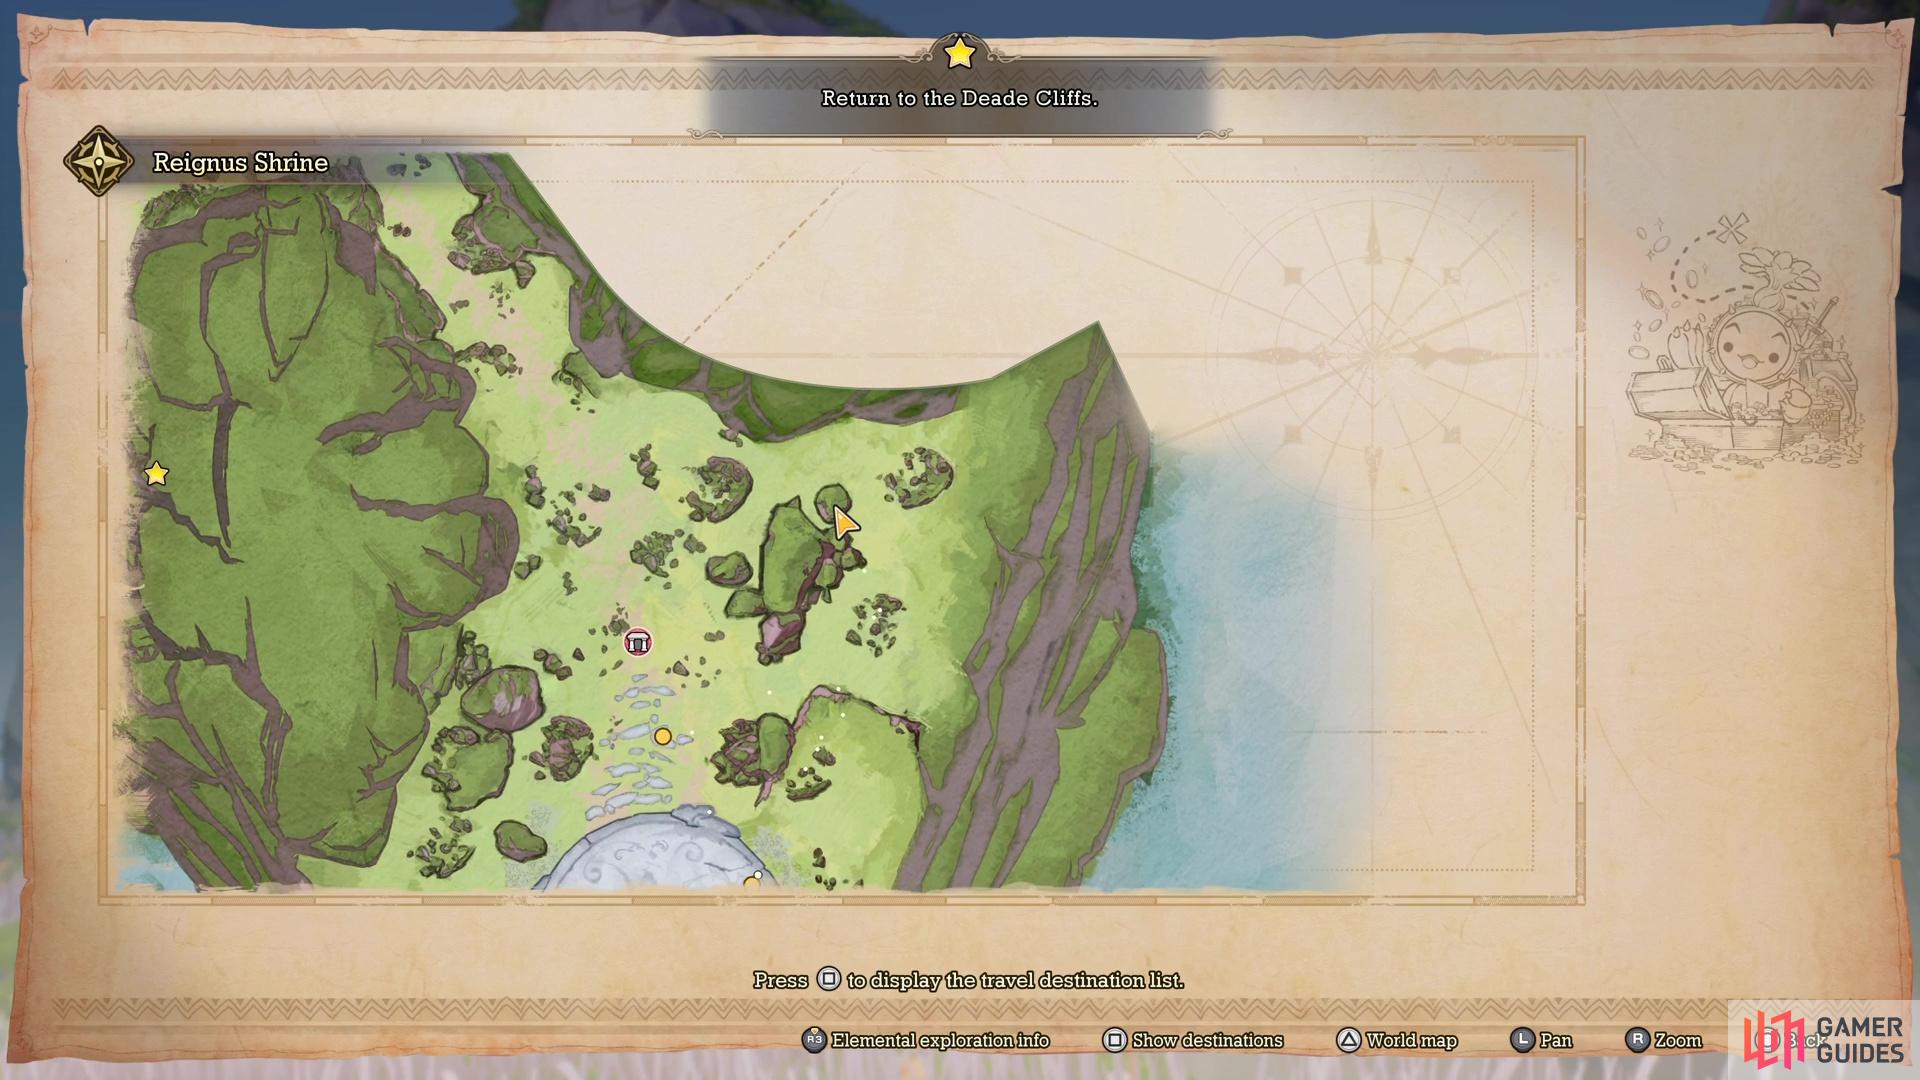
Your will first visit ![]() Reignus Shrine as part of the story, but you won’t be able to find this Cactus at that time, due to the game not allowing you to fully explore the area. Once you have access to
Reignus Shrine as part of the story, but you won’t be able to find this Cactus at that time, due to the game not allowing you to fully explore the area. Once you have access to ![]() Vuscav, ride him back to this location. Northeast of the location icon on your map will be some rocks and the Cactus will be hanging off of one of those.
Vuscav, ride him back to this location. Northeast of the location icon on your map will be some rocks and the Cactus will be hanging off of one of those.
Lil Cactus: Zawhak Desert
- Map Marker
- Diary Entry: The Sizzling
 Zawhak Desert
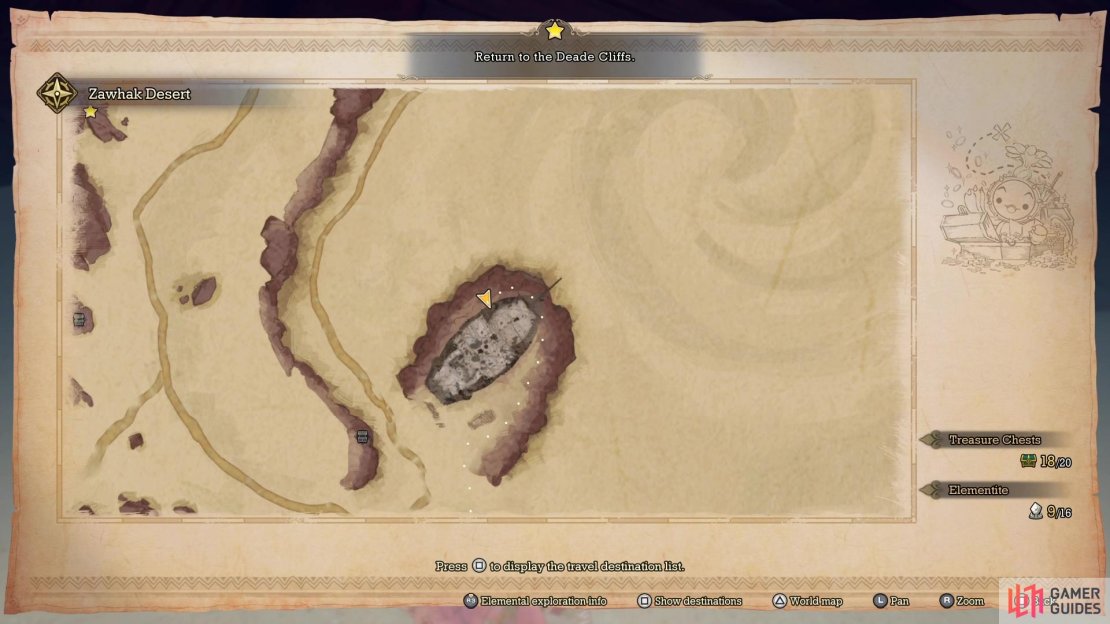
Zawhak Desert is the next area you visit after gaining access to Vuscav, your boat. It’s a pretty big desert, with some quicksand in the middle of it and a ship on a small strip of land. The Cactus will be in the sand, on the north/northwestern side of the ship. Note that this ship will move later on in the story, but the Cactus will still be in the same spot.

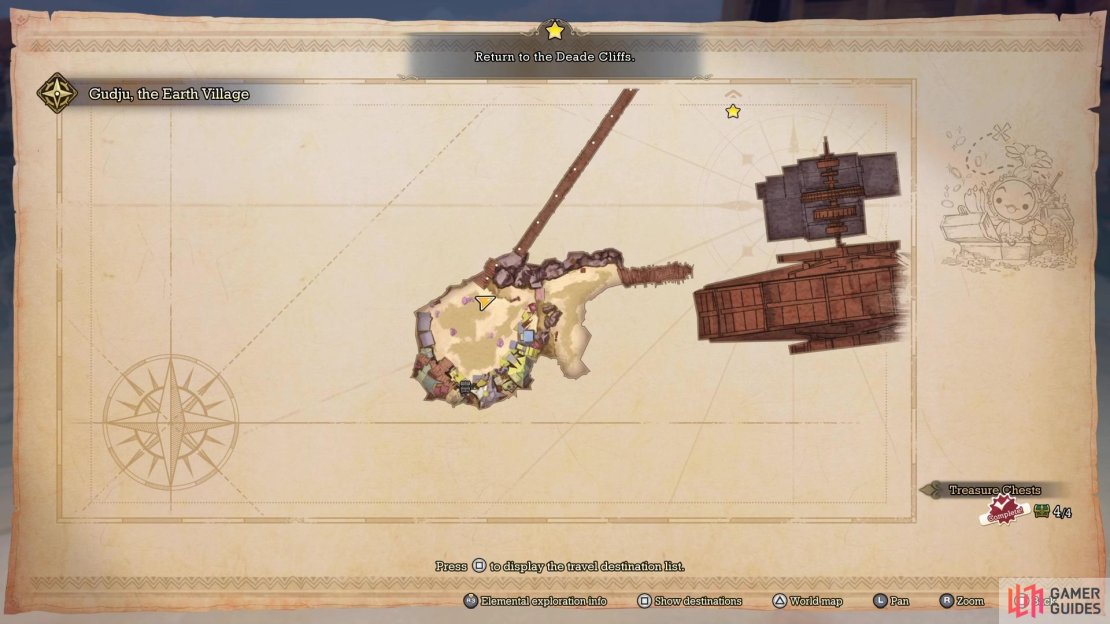
Lil Cactus: Gudju, the Earth Village
- Map Marker
- Diary Entry: Gudju Calm Down a Little?
Gudju Village is a little barren when you arrive at it, but it’s still inhabited by one of the Cacti. If you look at the map, you will see that Gudju is kind of split into larger landmasses that are connected by either bridges or smaller paths. Of particular note is a big rope bridge connecting the main entrance to a smaller area to the south. Head in that direction and as soon as you cross the bridge, look to the side to spot it cowering by some rocks.
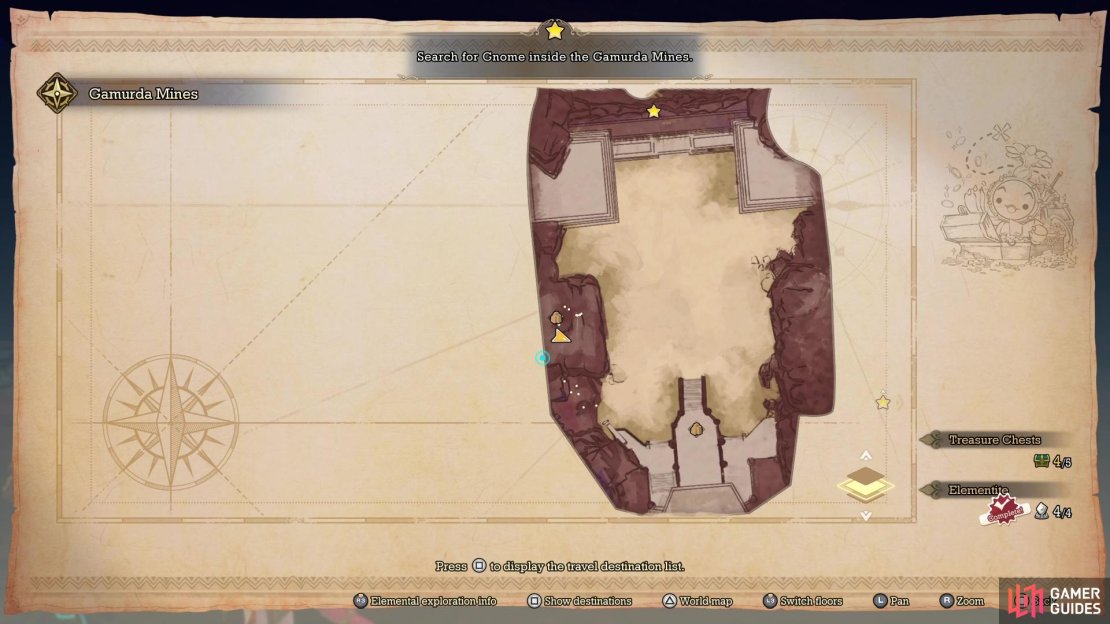
Lil Cactus: Gamurda Mines
- Map Marker
- Diary Entry: Dig Here,
 Dudbears
The Cactus will be inside of the actual mines, once you get done with the outside portion during the main story. There will be four small areas to explore inside the mines, with two sections going first (east and west), then the other two being accessible after those (north and south). Once you open the second two sections, go to the south portion. There will be a golem you can use to break open a side wall here, so do that to uncover a chest, as well as the Cactus clinging to the wall.
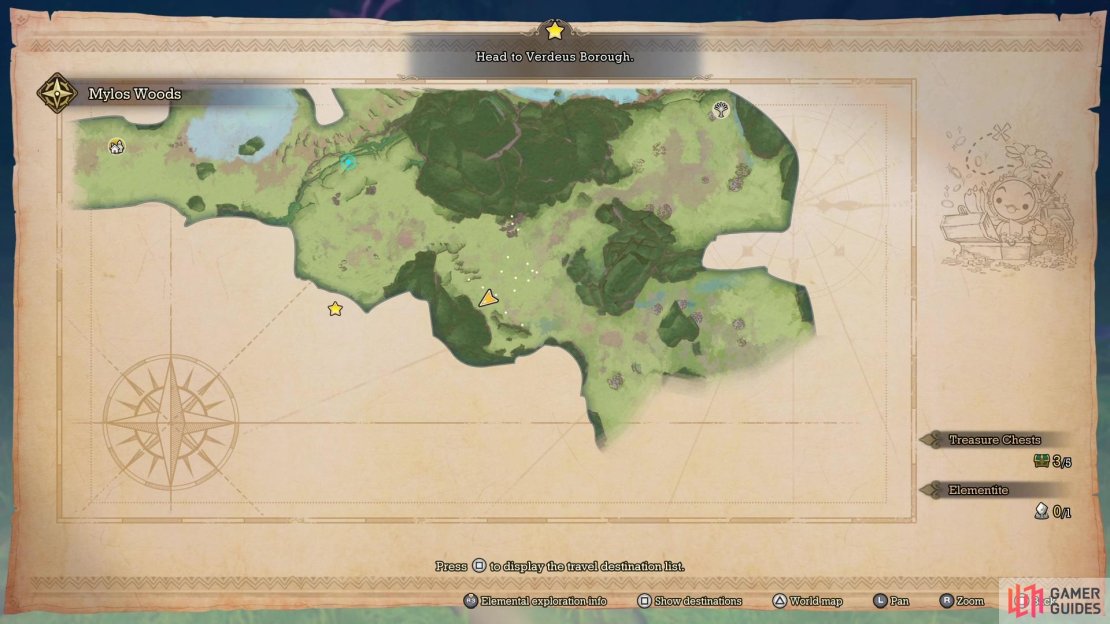
Lil Cactus: Mylos Woods
- Map Marker
- Diary Entry: Wood You Look at These!
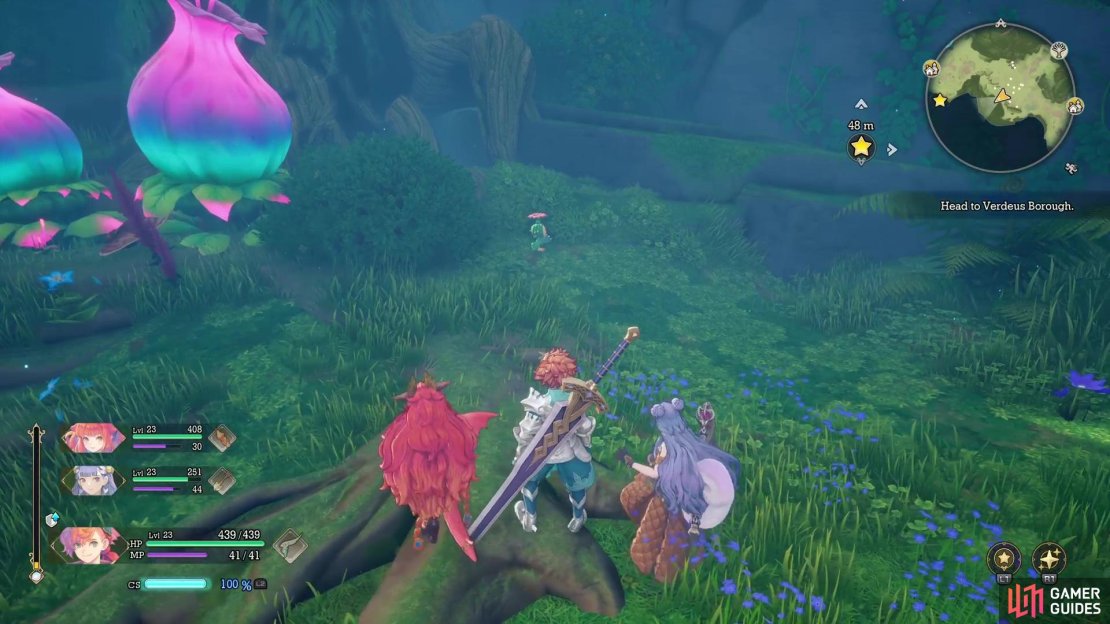
The Cactus will be in the first half of the woods, before you first reach ![]() Verdeus Borough. The whole gimmick to the first half is defeating sets of enemies that will destroy a nearby flower, as the exit is blocked by even larger flora. If you head to where the large flower is that’s blocking the exit, look to the west of it to find the Cactus just standing there.
Verdeus Borough. The whole gimmick to the first half is defeating sets of enemies that will destroy a nearby flower, as the exit is blocked by even larger flora. If you head to where the large flower is that’s blocking the exit, look to the west of it to find the Cactus just standing there.


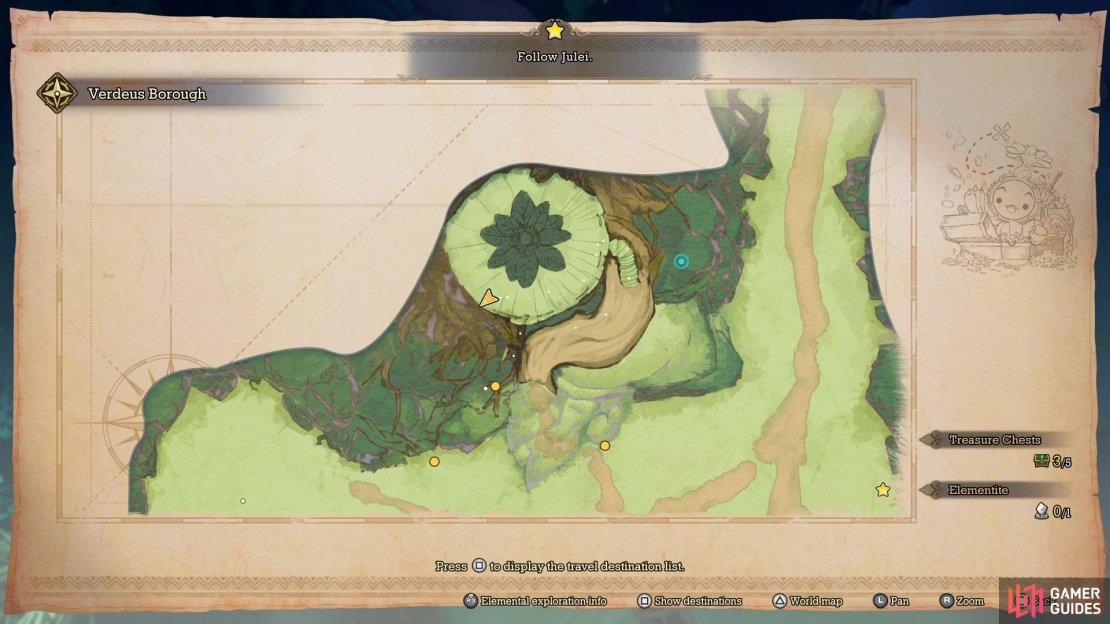

Lil Cactus: Verdeus Borough
- Map Marker
- Diary Entry: Sproutlings Are People Too
After passing through the first section of ![]() Mylos Woods, you will find yourself in the Sproutings’ home, Verdeus Borough. Once you have full reign of the area, go to the only real building in the main area and get to the top of it. Head on over to the western side of the ledge up there to find the Cactus hanging off of it.
Mylos Woods, you will find yourself in the Sproutings’ home, Verdeus Borough. Once you have full reign of the area, go to the only real building in the main area and get to the top of it. Head on over to the western side of the ledge up there to find the Cactus hanging off of it.
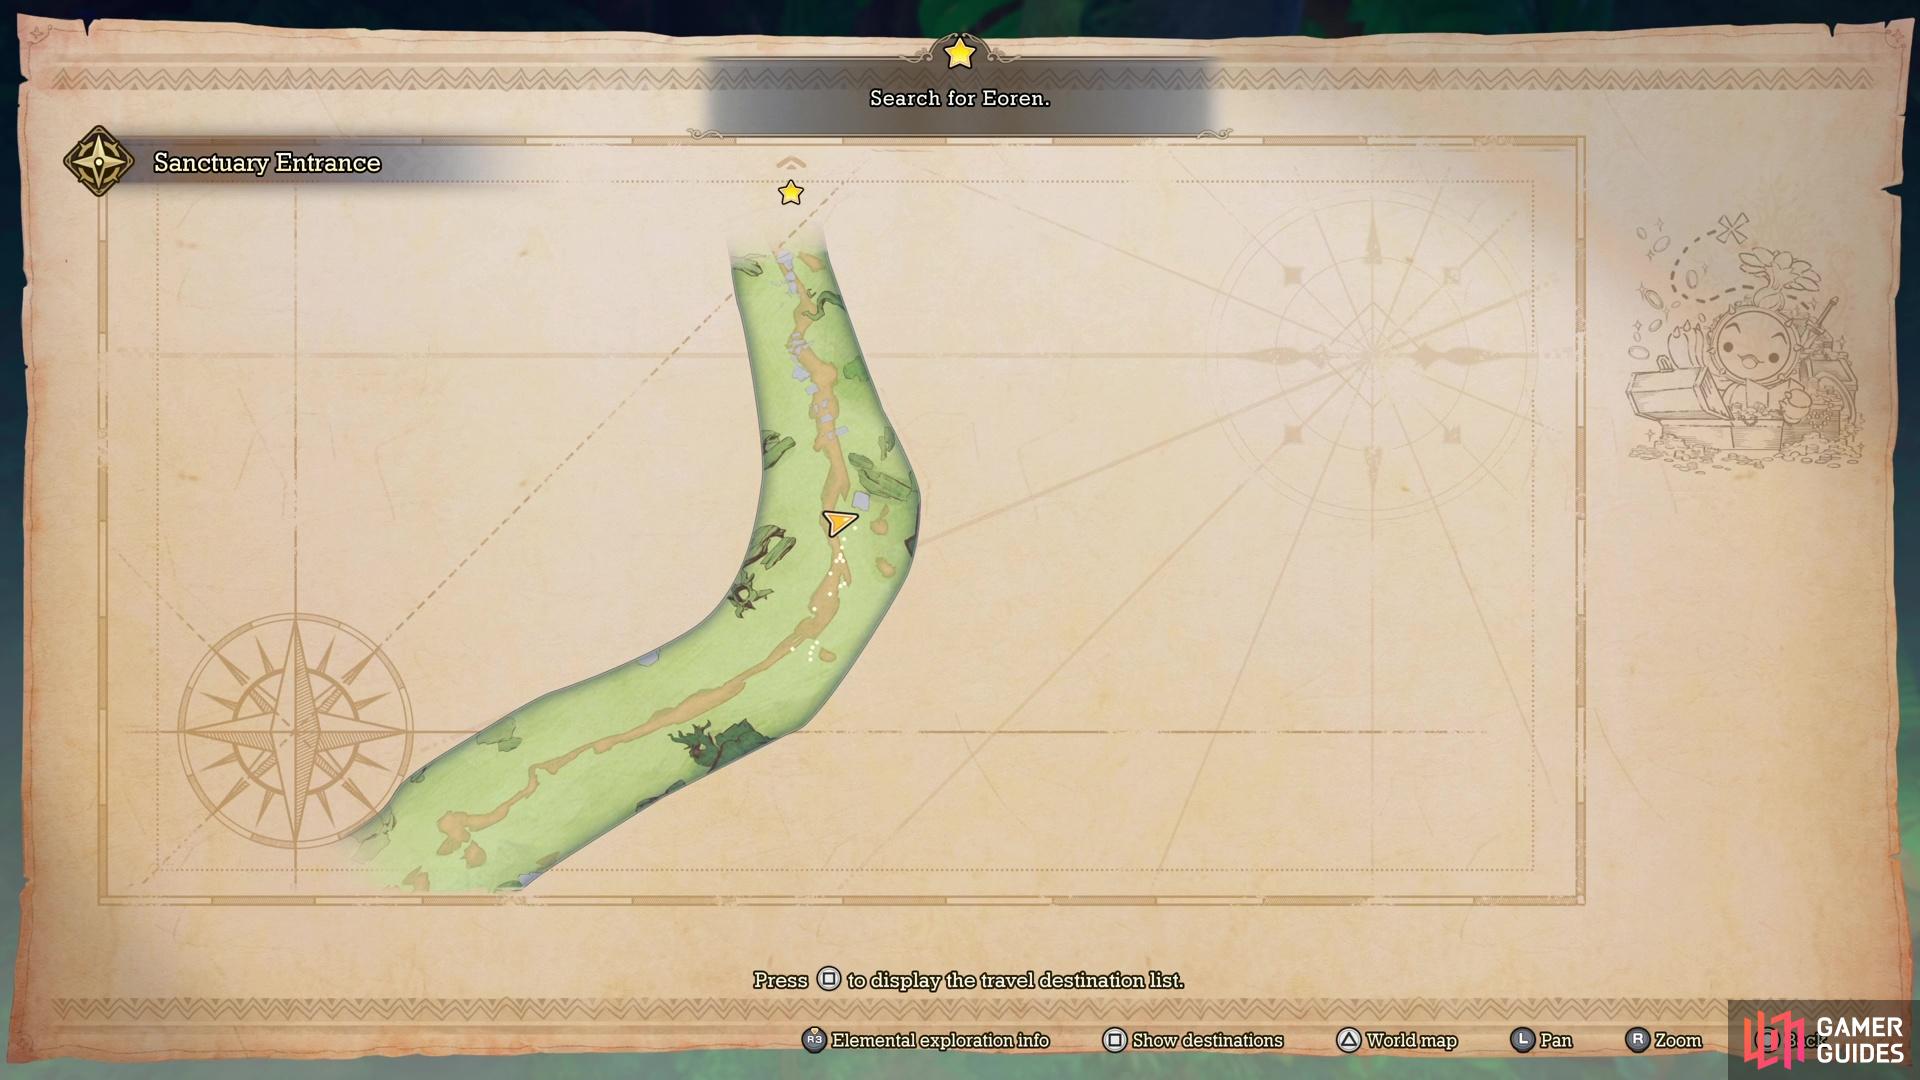
Lil Cactus: Sanctuary Entrance
- Map Marker
- Diary Entry: No Cacti Allowed?
You gain access to the ![]() Sanctuary Entrance after going through the second half of the Mylos Woods. This isn’t really a big area, but it does have a Cactus hiding in it. Not long on the trail, you will pass by a stone pillar on your right side. Stop right there and look at the base of the stone pillar to spot your Cactus.
Sanctuary Entrance after going through the second half of the Mylos Woods. This isn’t really a big area, but it does have a Cactus hiding in it. Not long on the trail, you will pass by a stone pillar on your right side. Stop right there and look at the base of the stone pillar to spot your Cactus.
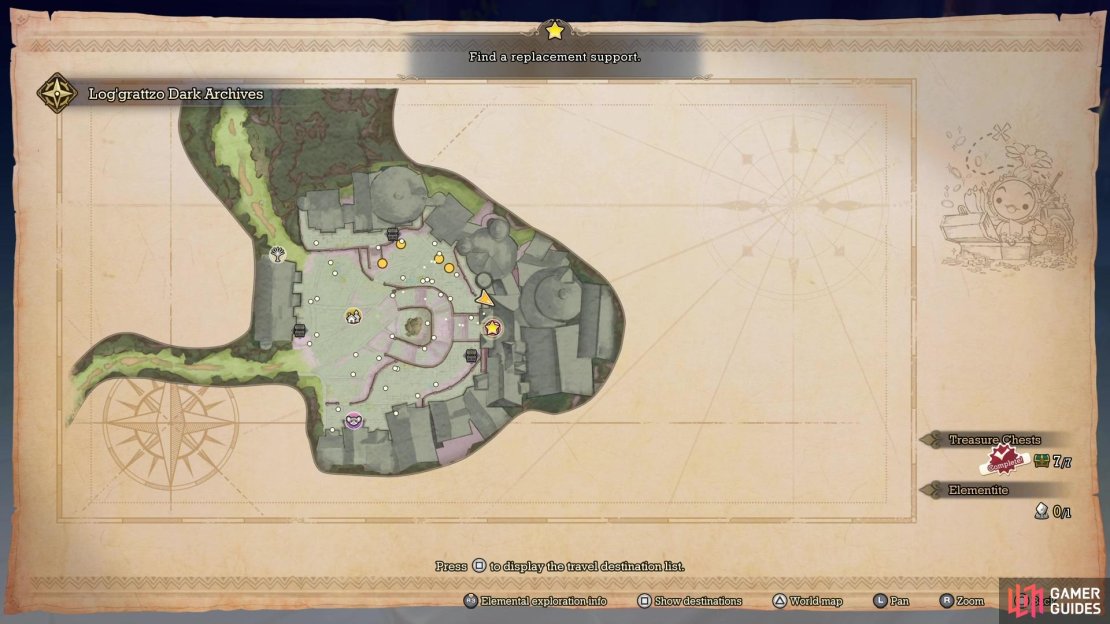
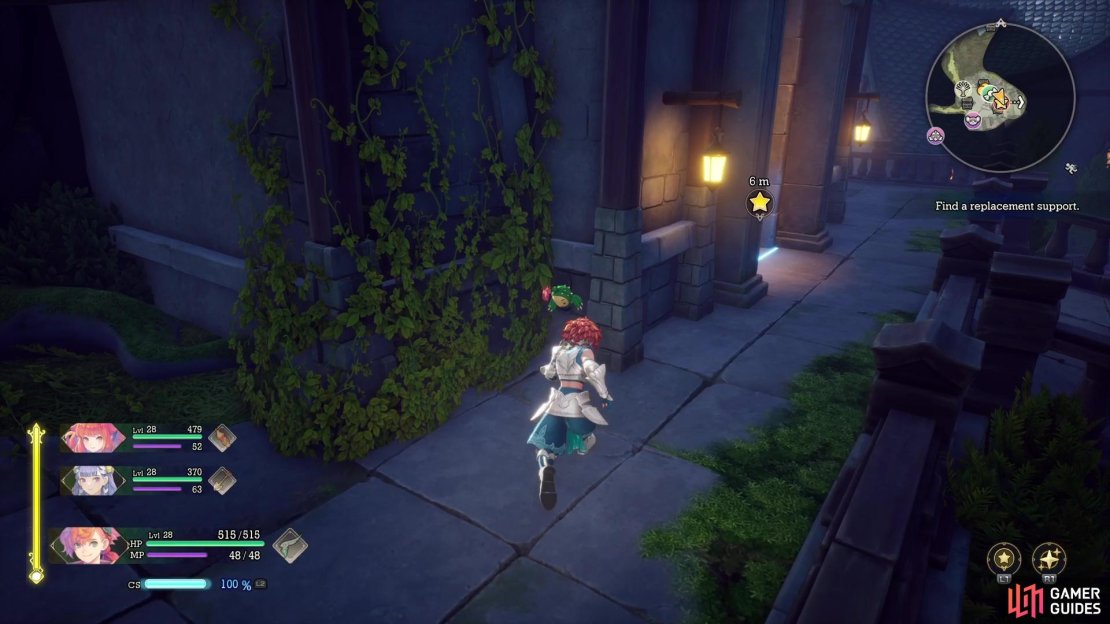
Lil Cactus: Log’grattzo Dark Archives
- Map Marker
- Diary Entry: Wisdom in the Gloom
Log’grattzo is the next stop after the events with the Benevodon of Earth. Upon arriving to the island, head up to the ![]() Archives, where you will meet
Archives, where you will meet ![]() Aesh. However, don’t go inside just yet and instead, look to the one side of the main doorway to find the Cactus inside of the wall there.
Aesh. However, don’t go inside just yet and instead, look to the one side of the main doorway to find the Cactus inside of the wall there.


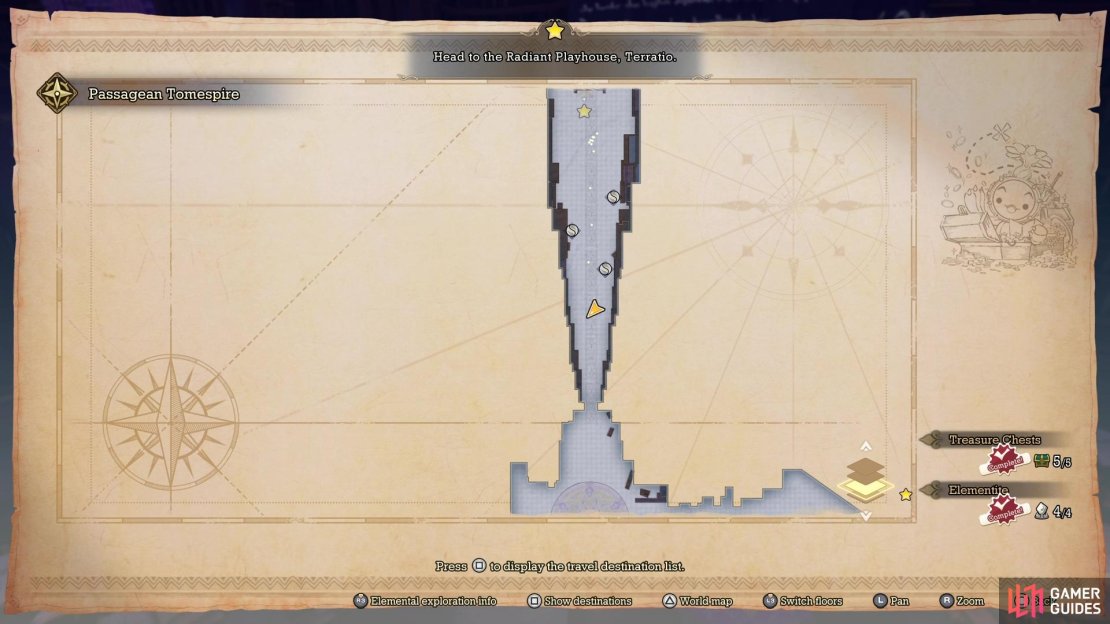
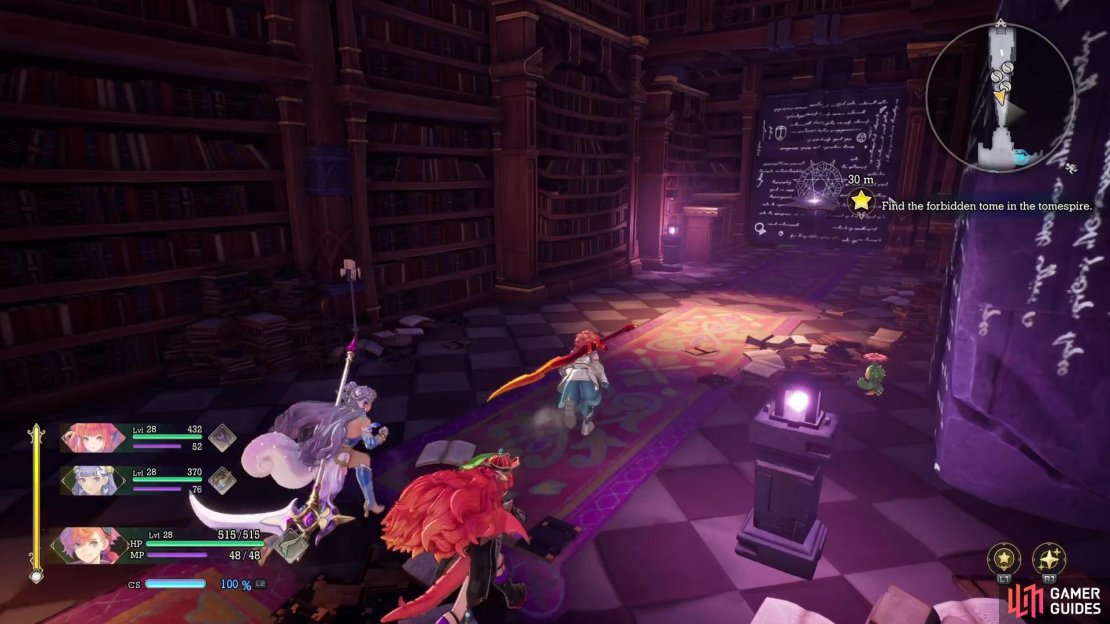
Lil Cactus: Passagean Tomespire
- Map Marker
- Diary Entry: Bunches of Books
![]() Passagean Tomespire is a dungeon that is found on the same island with Log’grattzo. When you first arrive in the dungeon, you will interact with some cube that teleports you to another area. As soon as you do this, you will pass through a long hallway. At the southern end of the hallway, you will find the Cactus sitting on the ground, next to some broken slab.
Passagean Tomespire is a dungeon that is found on the same island with Log’grattzo. When you first arrive in the dungeon, you will interact with some cube that teleports you to another area. As soon as you do this, you will pass through a long hallway. At the southern end of the hallway, you will find the Cactus sitting on the ground, next to some broken slab.
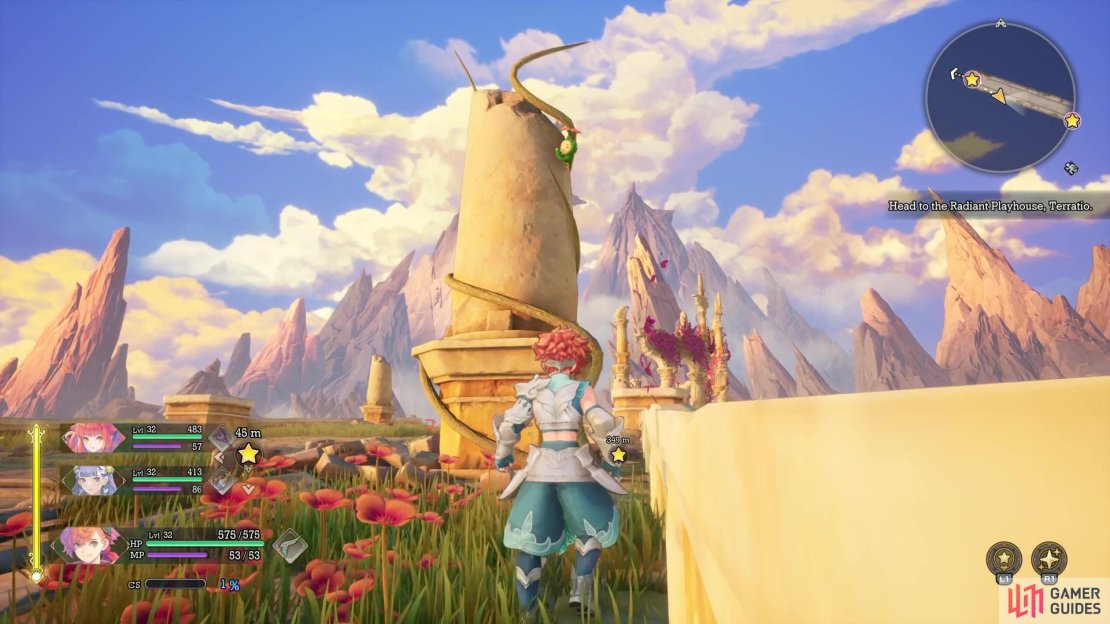
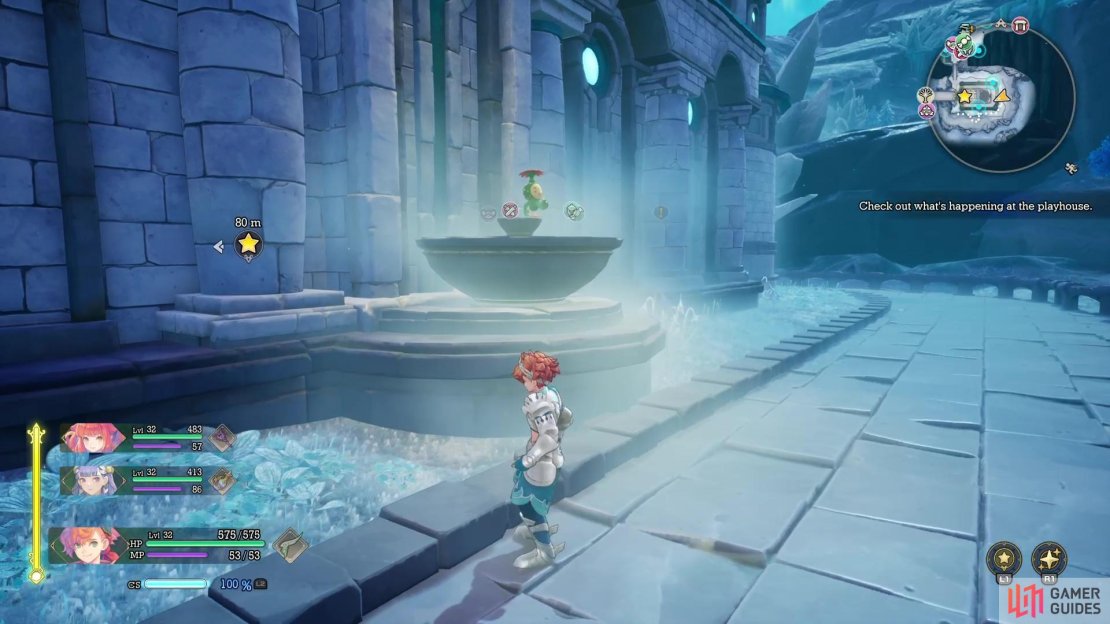
Lil Cactus: Radiant Playhouse Terratio
- Map Marker
- Diary Entry: The Spotlight’s on Me
If you thoroughly explore the area where the Radiant ![]() Playhouse is located, you might find this Cactus on your own. The main attraction on this island is the theater, so go to the front of it. Now, head around to the back wall of the theater (don’t go inside the place) and you will find a small fountain. The Cactus will be on top of that small fountain.
Playhouse is located, you might find this Cactus on your own. The main attraction on this island is the theater, so go to the front of it. Now, head around to the back wall of the theater (don’t go inside the place) and you will find a small fountain. The Cactus will be on top of that small fountain.
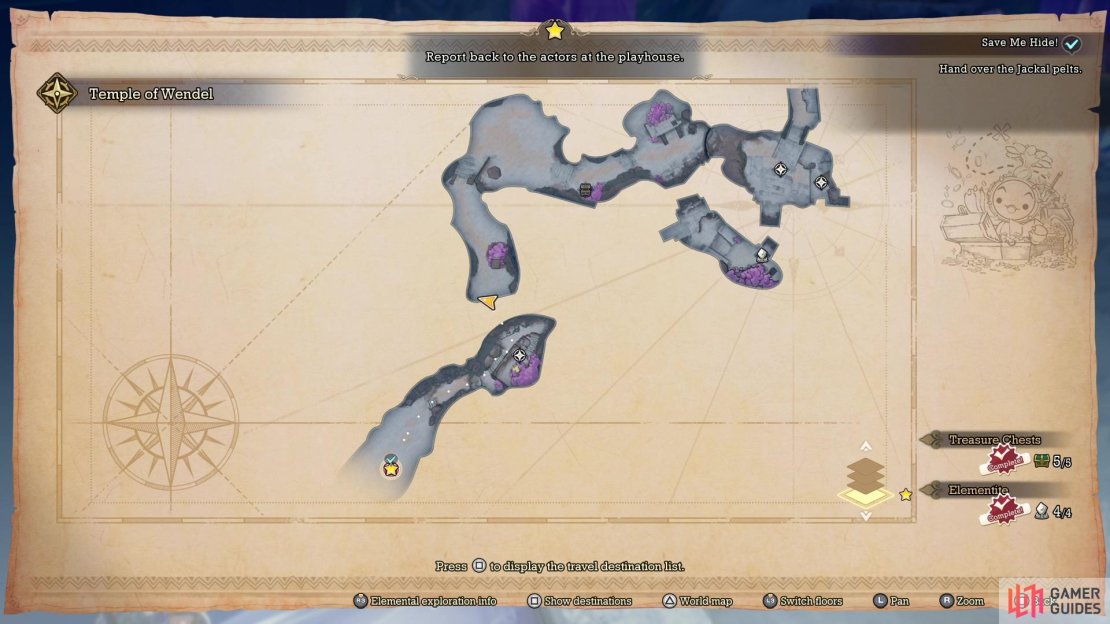
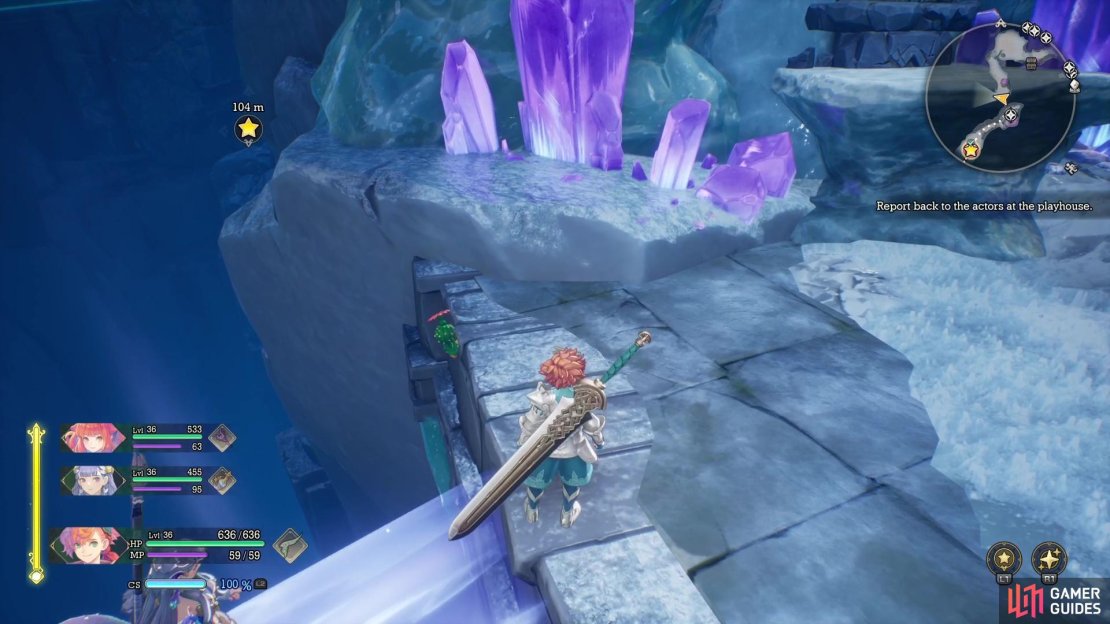
Lil Cactus: Temple of Wendel
- Map Marker
- Diary Entry: Over the Snow and Through the Temple
One of the gimmicks in the ![]() Temple of Wendel is using the Light Vessel to create lasers that bounce off of mirrors/objects to create light bridges. One of the first things you do in the dungeon is this, so make the bridge and cross it. Immediately after crossing the light bridge, look to the side of where it connects to spot the Cactus hanging from the ledge.
Temple of Wendel is using the Light Vessel to create lasers that bounce off of mirrors/objects to create light bridges. One of the first things you do in the dungeon is this, so make the bridge and cross it. Immediately after crossing the light bridge, look to the side of where it connects to spot the Cactus hanging from the ledge.
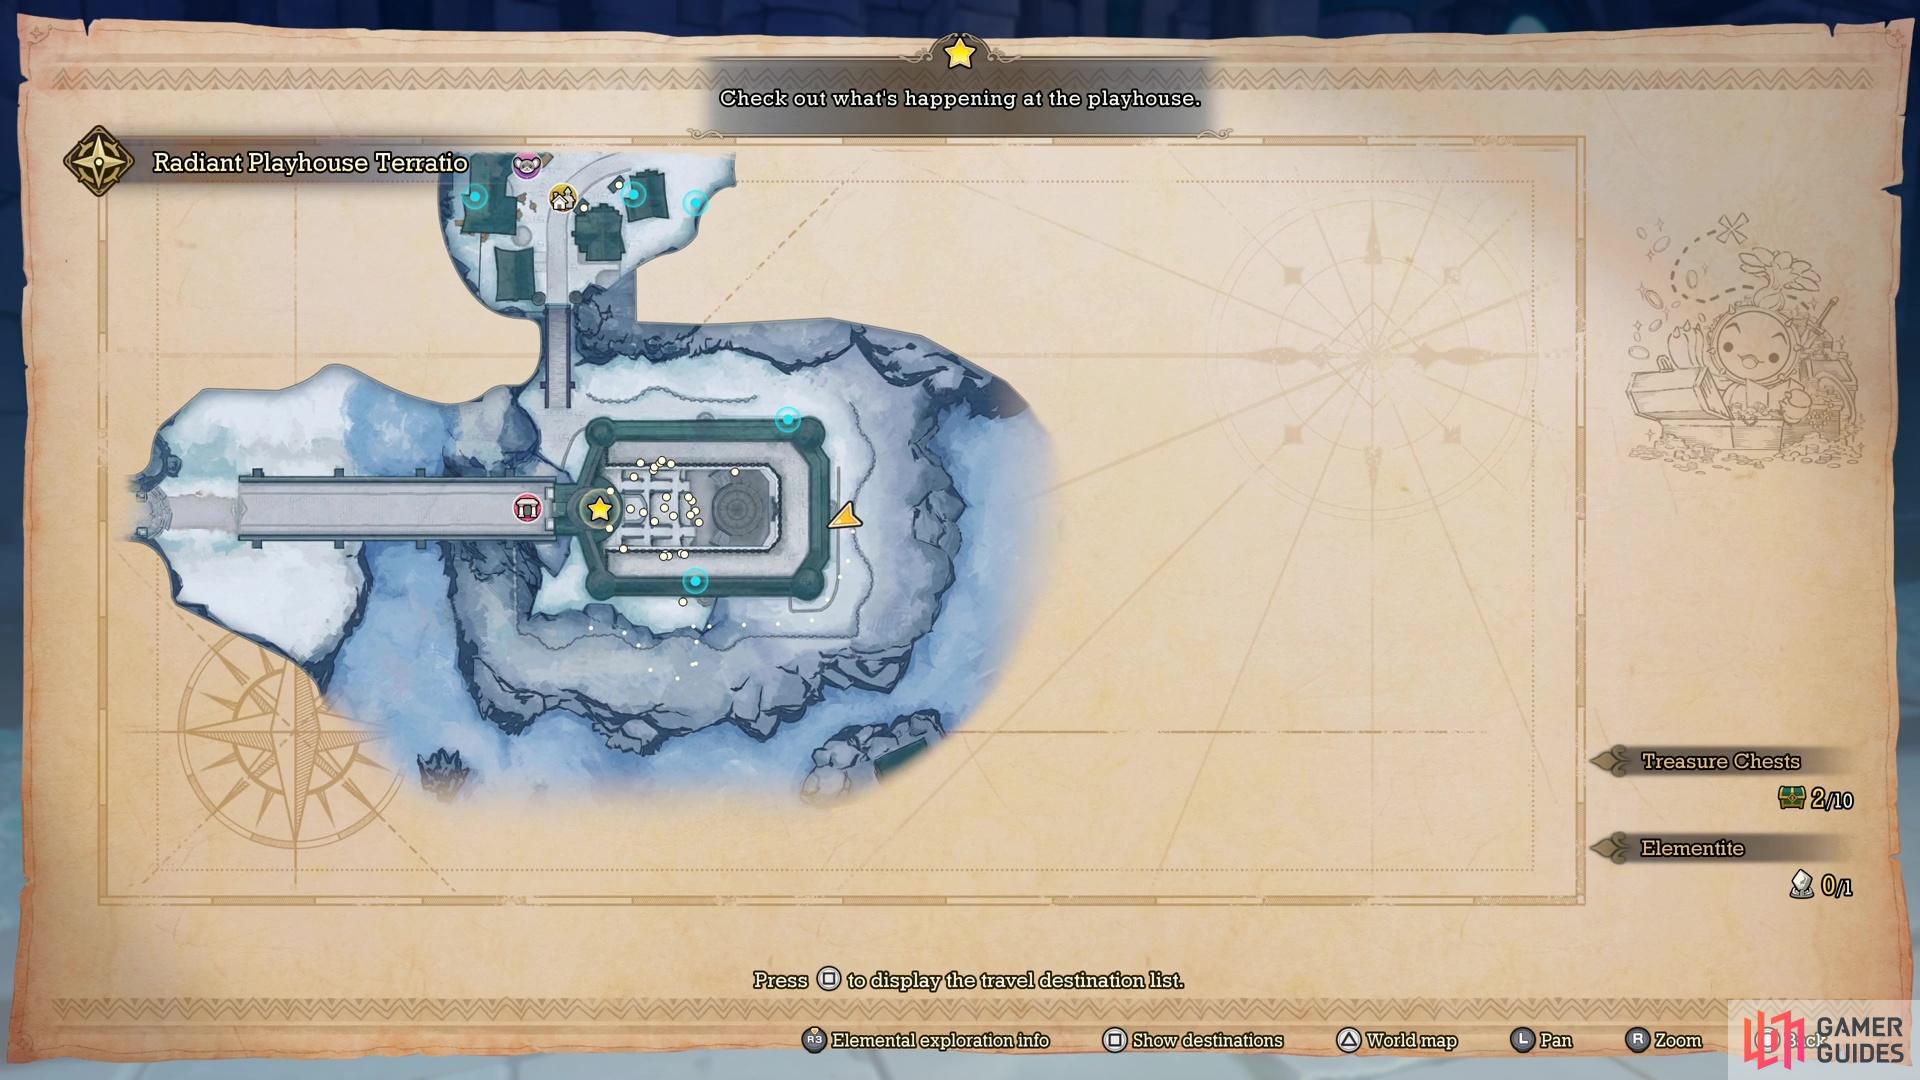

(1 of 6) The location of the Li’l Cactus in Radiant Playhouse of Terratio, on the map.
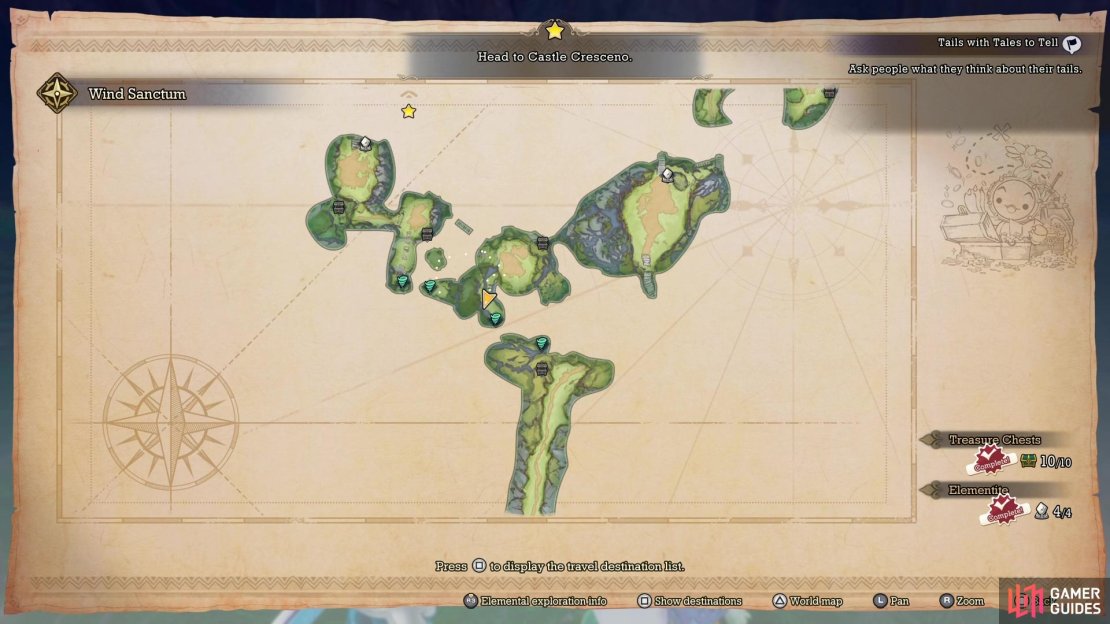
Lil Cactus: Wind Sanctum
- Map Marker
- Diary Entry: On the Wind, in the
 Sky
Sky
This one can be a little challenging to find, simply because the dungeon is a tad annoying to navigate. Progress through the place normally, until you get the updraft onto a higher ledge. You then drop down and hit another Elemental Trigger, causing a nearby wind tunnel to appear on a nearby small island. You’ll land on a bigger island that has a battle with a ![]() Kid Drakonis and some
Kid Drakonis and some ![]() Pricklebeaks in the center. There will be some stairs on the side, leading to a higher spot. Look on the wall up here to find the Cactus.
Pricklebeaks in the center. There will be some stairs on the side, leading to a higher spot. Look on the wall up here to find the Cactus.
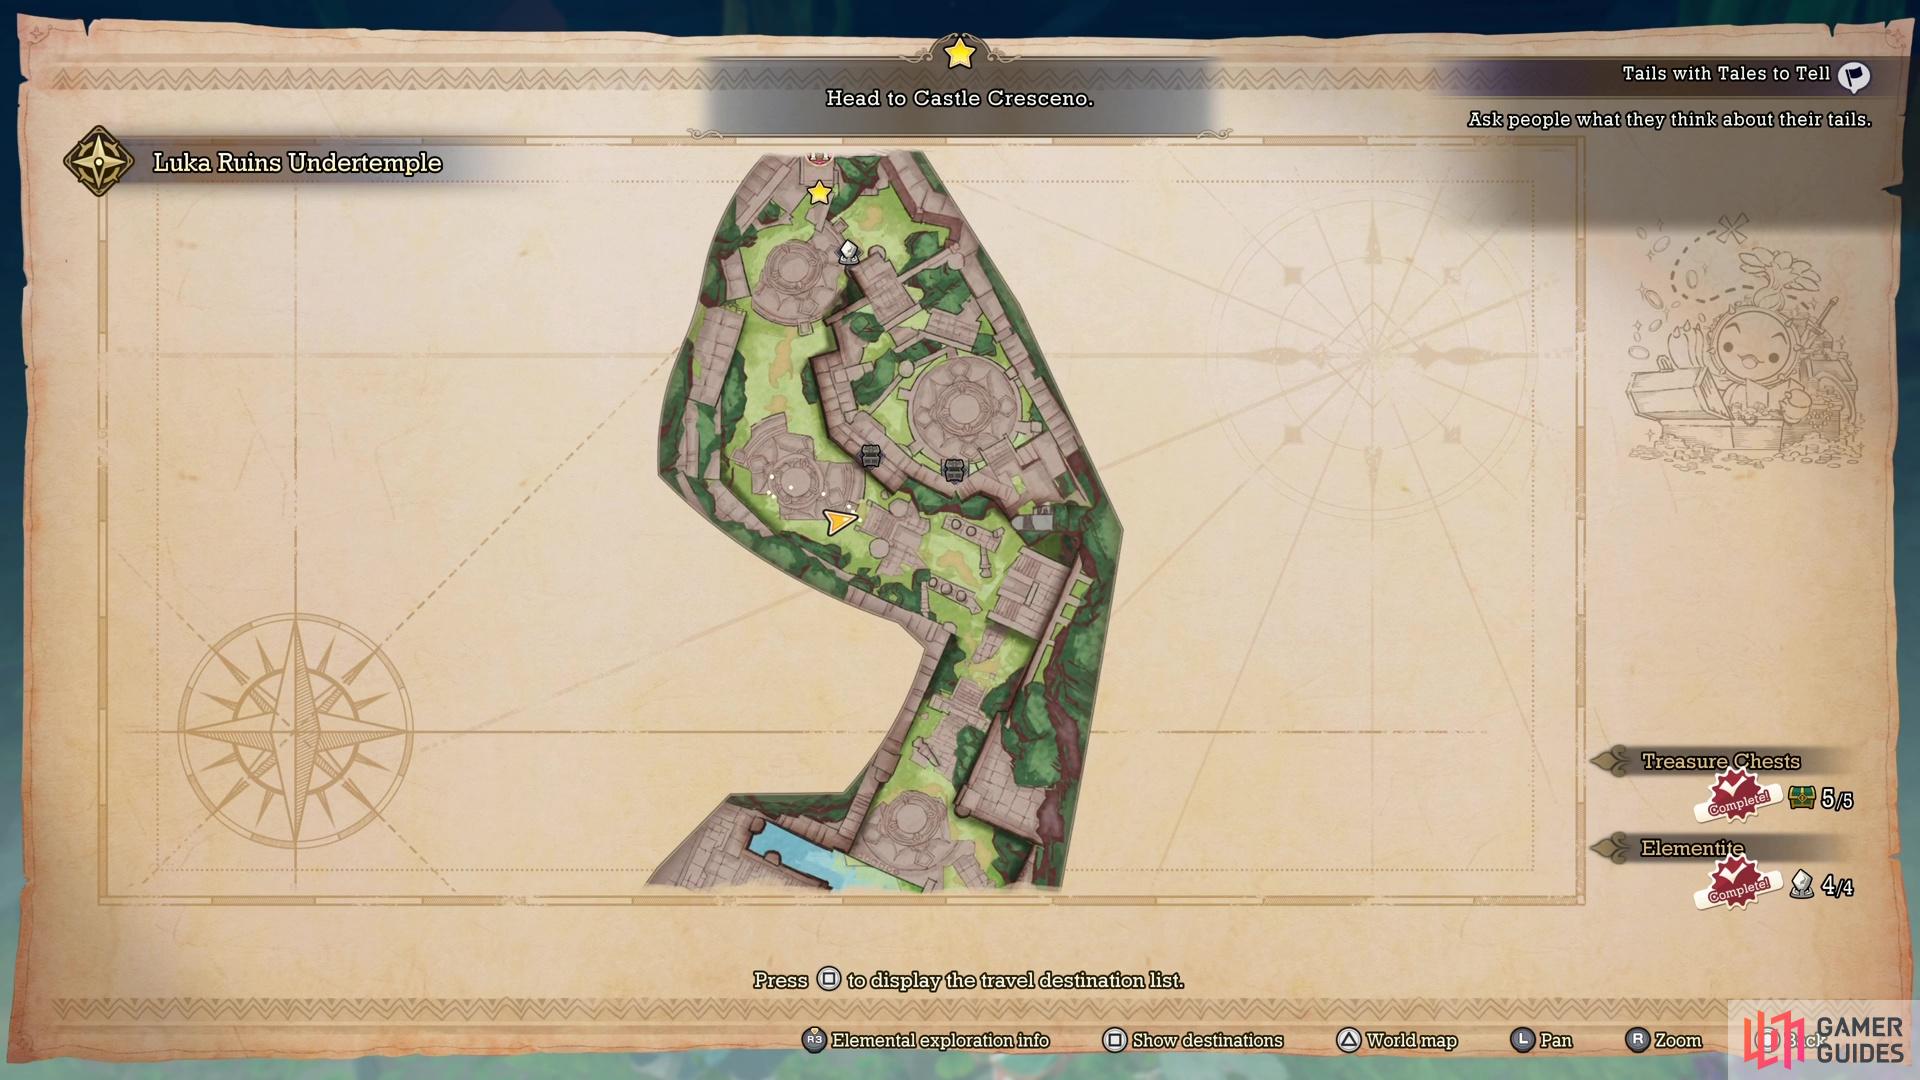
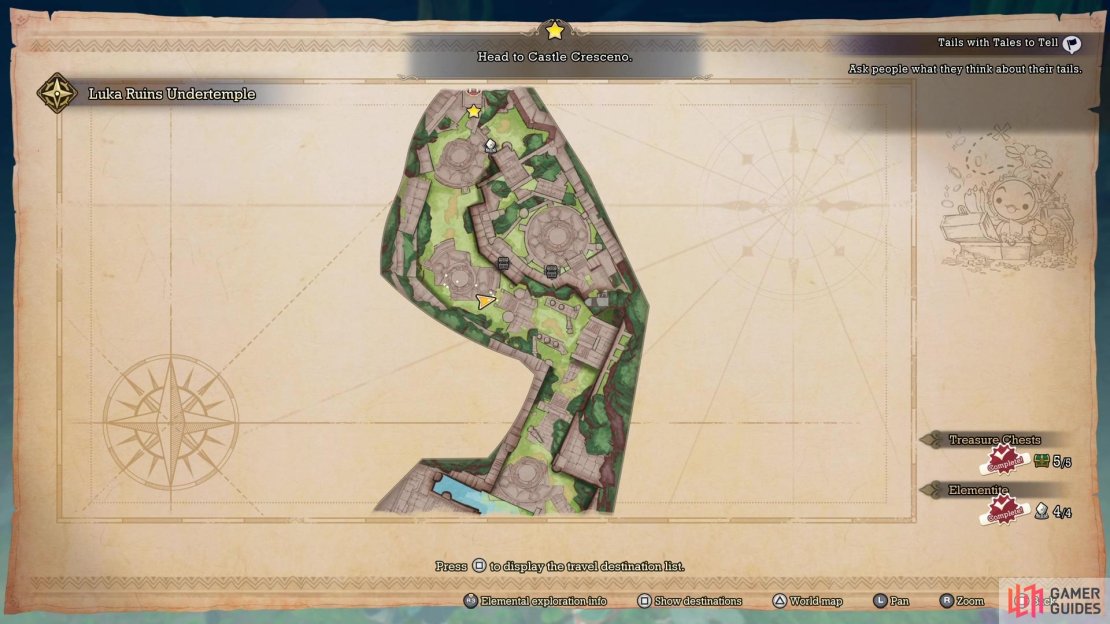
Lil Cactus: Luka Ruins Undertemple
- Map Marker
- Diary Entry: Mind the Ruins
The Cactus here can be easily missed, due to the scenery, but it’s not too far from the entrance. After defeating the second set of enemies that you encounter in the ruins, you will go up a small set of stairs. Instead of climbing the stairs, look to the right of them to find the Cactus hiding very well.
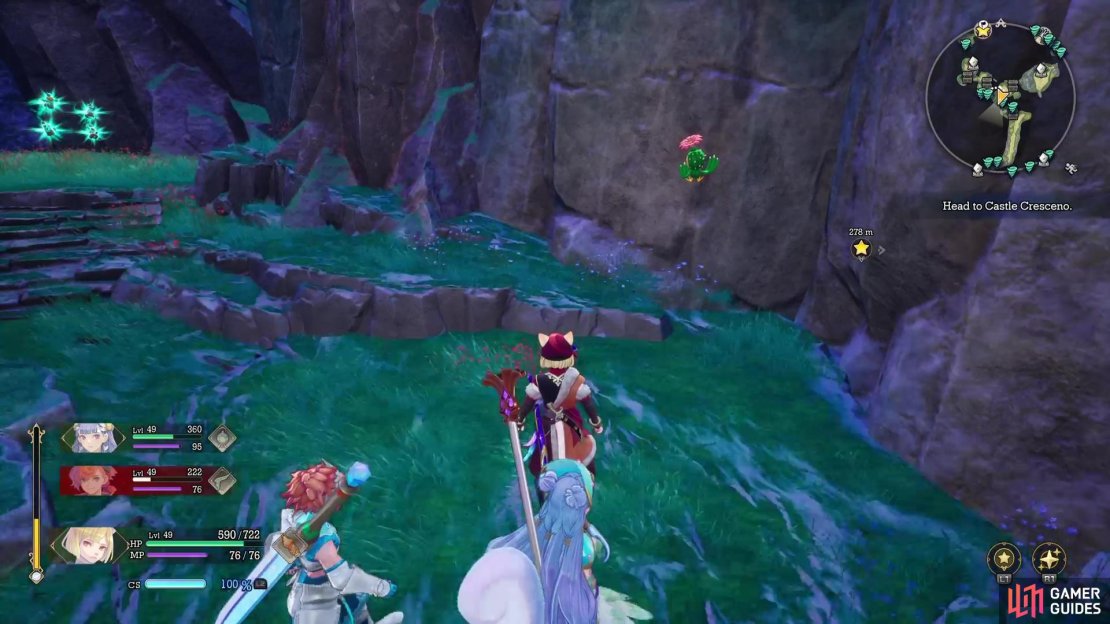
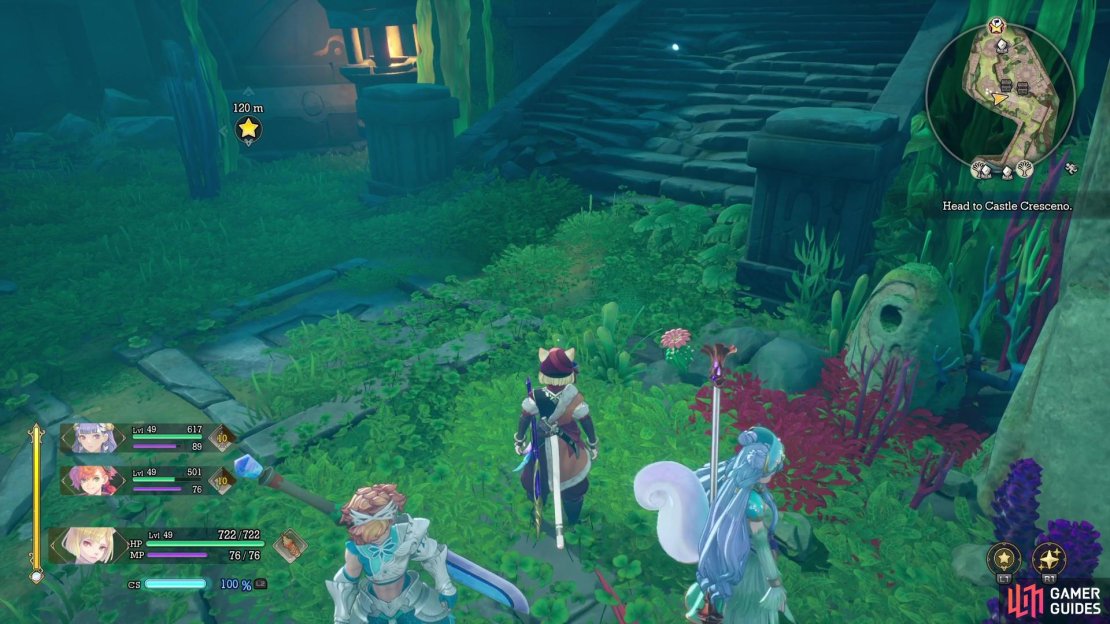
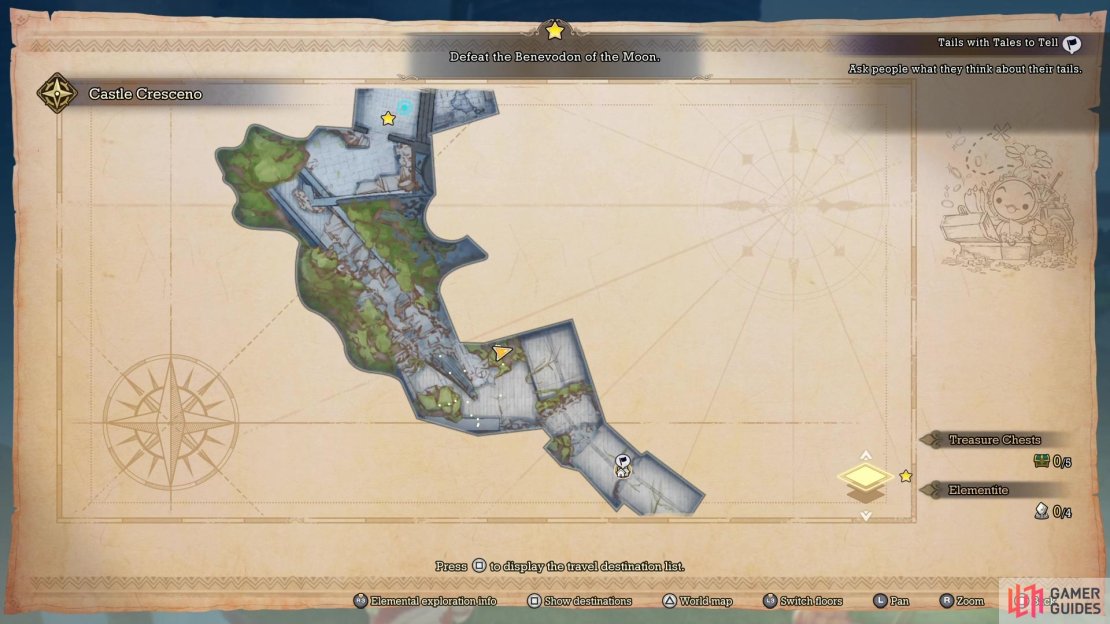
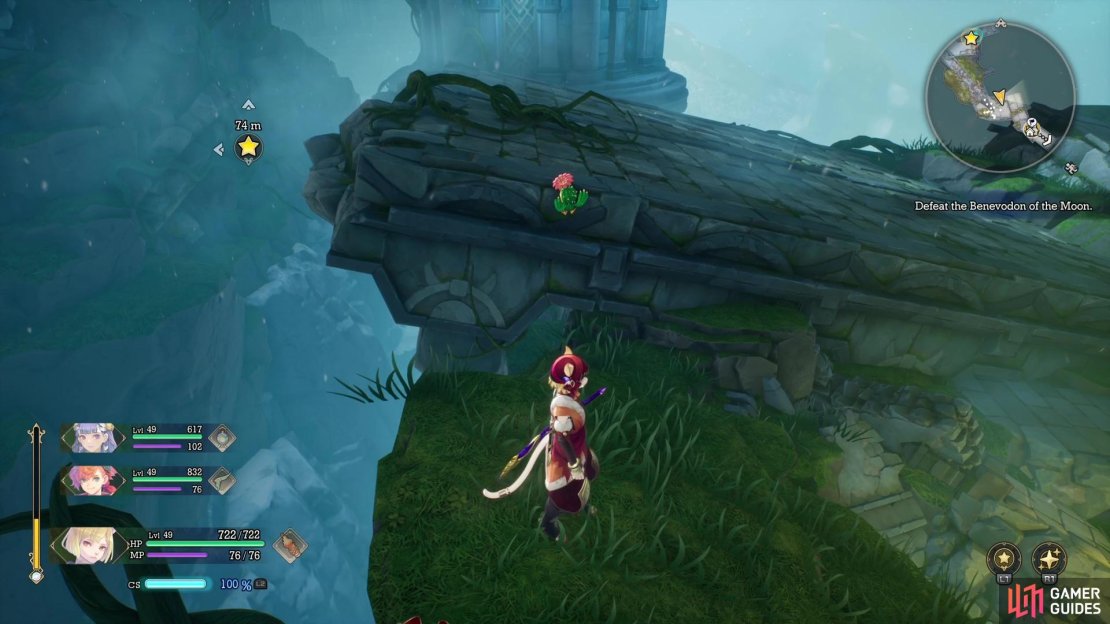
Lil Cactus: Castle Cresceno
- Map Marker
- Diary Entry: The Ribbiting
 Castle Cresceno
Castle Cresceno is the dungeon you visit when going after the Benevodon of the Moon, in Chapter 7. Thankfully, you don’t have to go far to find the Cactus, as it’s close to the entrance. When you first enter the dungeon, go straight forward, along the broken bridge/road and stop at the end, before you start climbing the rubble. The Cactus will be hanging off the side of it, over some ground.
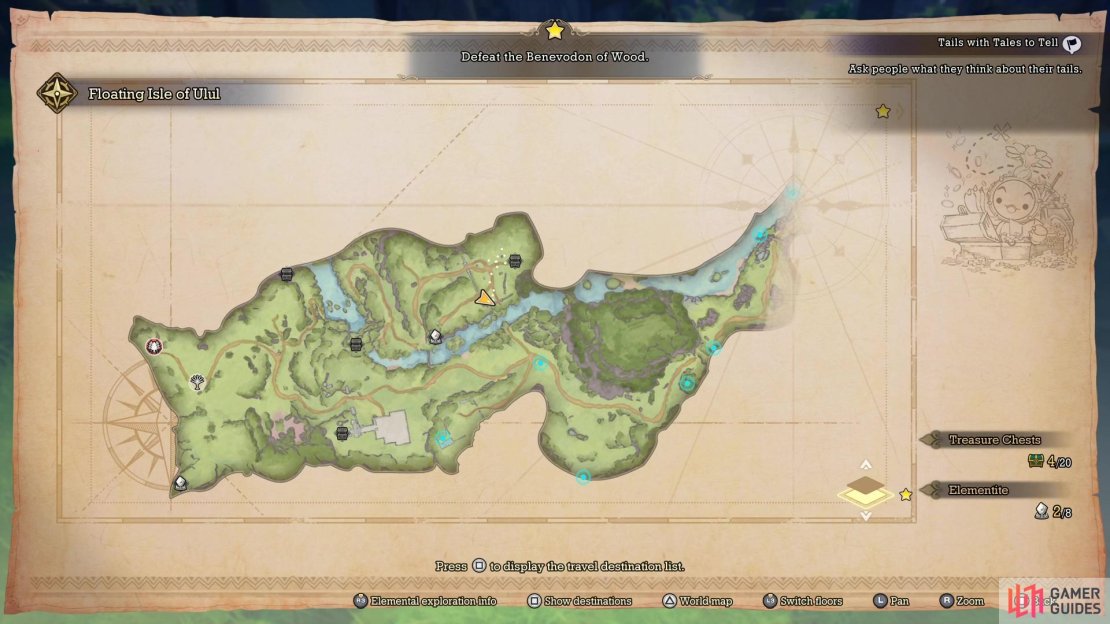
Lil Cactus: Floating Isle of Ulul
- Map Marker
- Diary Entry: Ulul, Isle in the Sky
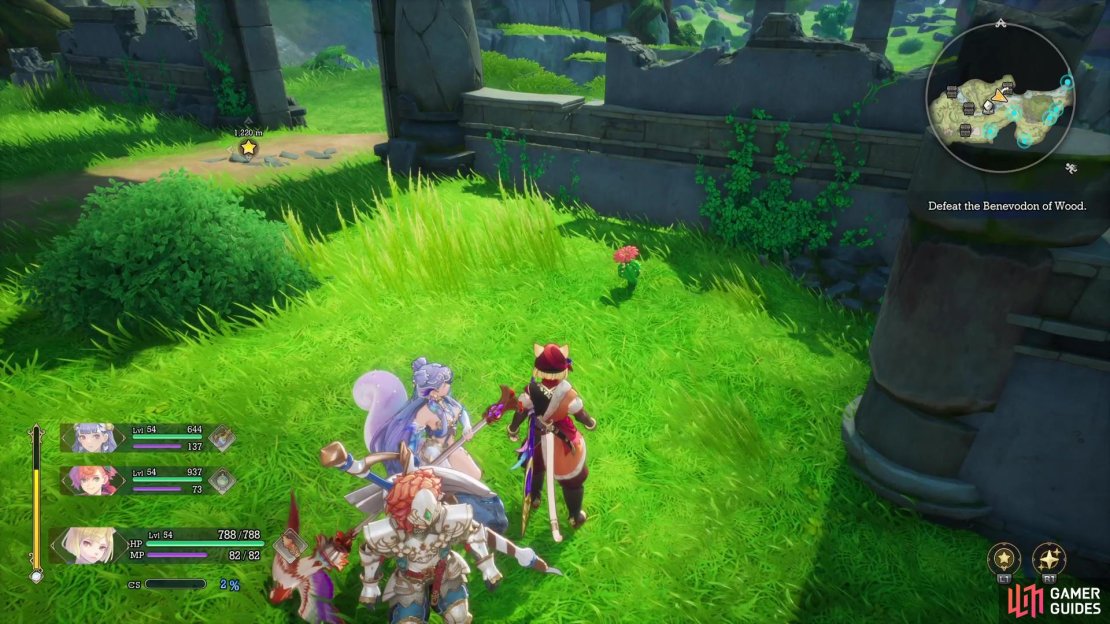
The ![]() Floating Isle of Ulul is home to the Benevodon of Wood, which you’ll go after in Chapter 7 of the main story. This is a fairly large and open area, so finding the Cactus will be a little annoying. From the entrance, head east until you reach a river, where you’ll want to cross it to get on the eastern side of it. As you stay on the northern side of the river, you will eventually encounter some ruins, where you’ll find some
Floating Isle of Ulul is home to the Benevodon of Wood, which you’ll go after in Chapter 7 of the main story. This is a fairly large and open area, so finding the Cactus will be a little annoying. From the entrance, head east until you reach a river, where you’ll want to cross it to get on the eastern side of it. As you stay on the northern side of the river, you will eventually encounter some ruins, where you’ll find some ![]() Golden Chess and
Golden Chess and ![]() Steelpion enemies. There is also a chest in the area with a
Steelpion enemies. There is also a chest in the area with a ![]() Luck Sigil+ ability seed in it. On the southern side of these ruins, in one of the corners, will be the Cactus.
Luck Sigil+ ability seed in it. On the southern side of these ruins, in one of the corners, will be the Cactus.
Lil Cactus: Dorpher Volcano
- Map Marker
- Diary Entry: Drip Drop, Dorpher Lava
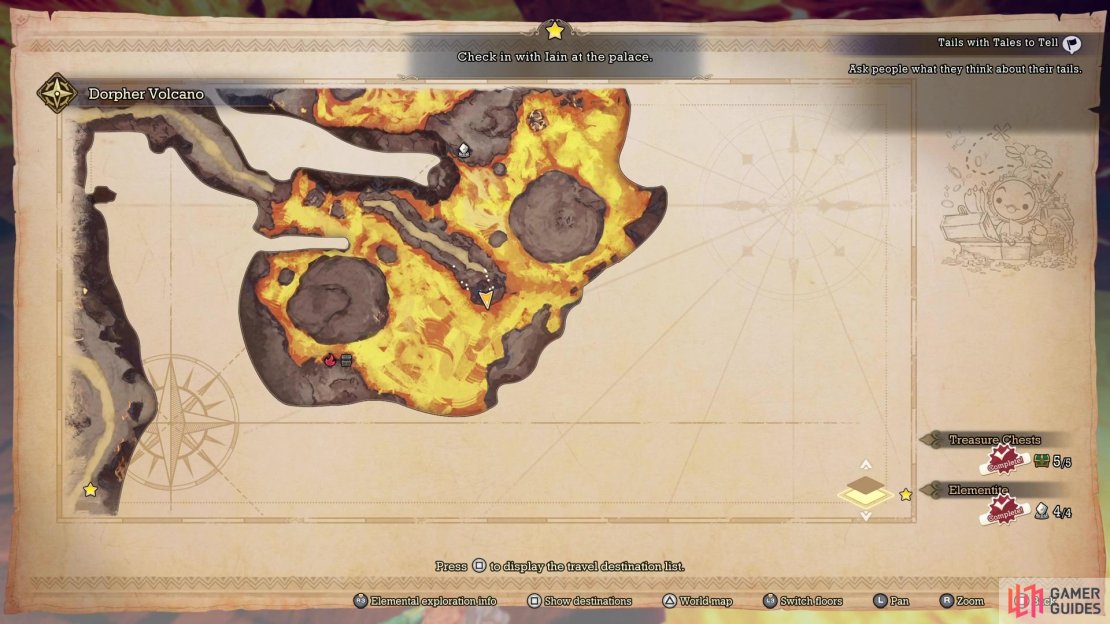
While going through the ![]() Dorpher Volcano, there will be a section that has you taking one of two paths. Both have to be done in order to progress in the dungeon. To find this Cactus, head along the path to the east (on the map) and cross over the lava using the first set of rocks. On the trail right after doing that, at the very end, you will see some large crystals. Go behind them and search along the edge to find the Cactus hanging onto it.
Dorpher Volcano, there will be a section that has you taking one of two paths. Both have to be done in order to progress in the dungeon. To find this Cactus, head along the path to the east (on the map) and cross over the lava using the first set of rocks. On the trail right after doing that, at the very end, you will see some large crystals. Go behind them and search along the edge to find the Cactus hanging onto it.
Lil Cactus: Distorted Sanctuary
- Map Marker
- Diary Entry: Your Courage Will Save Us
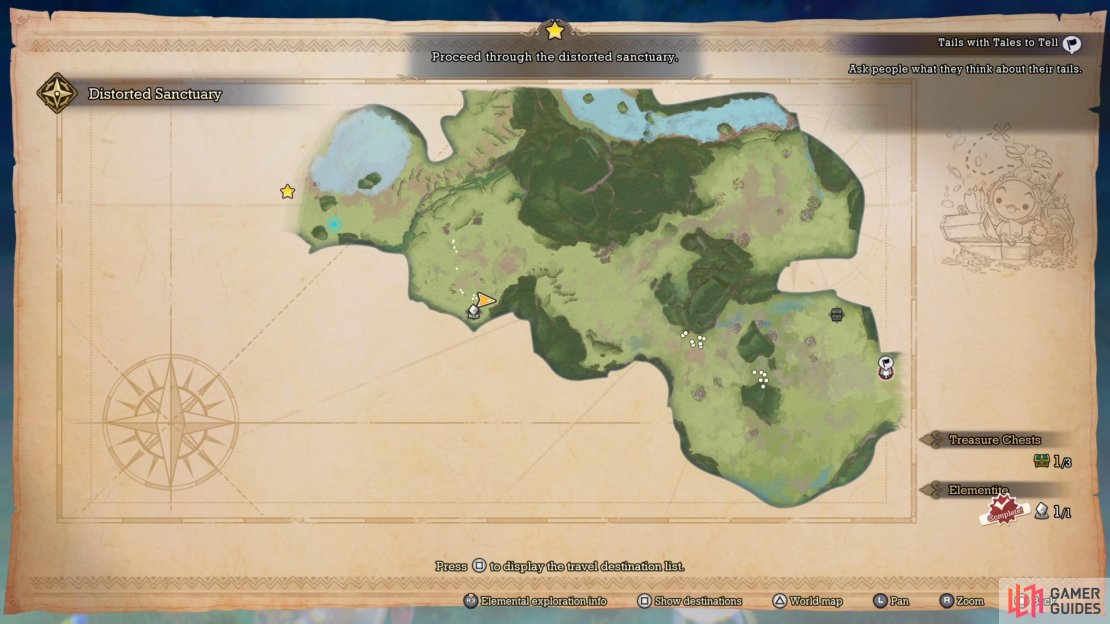
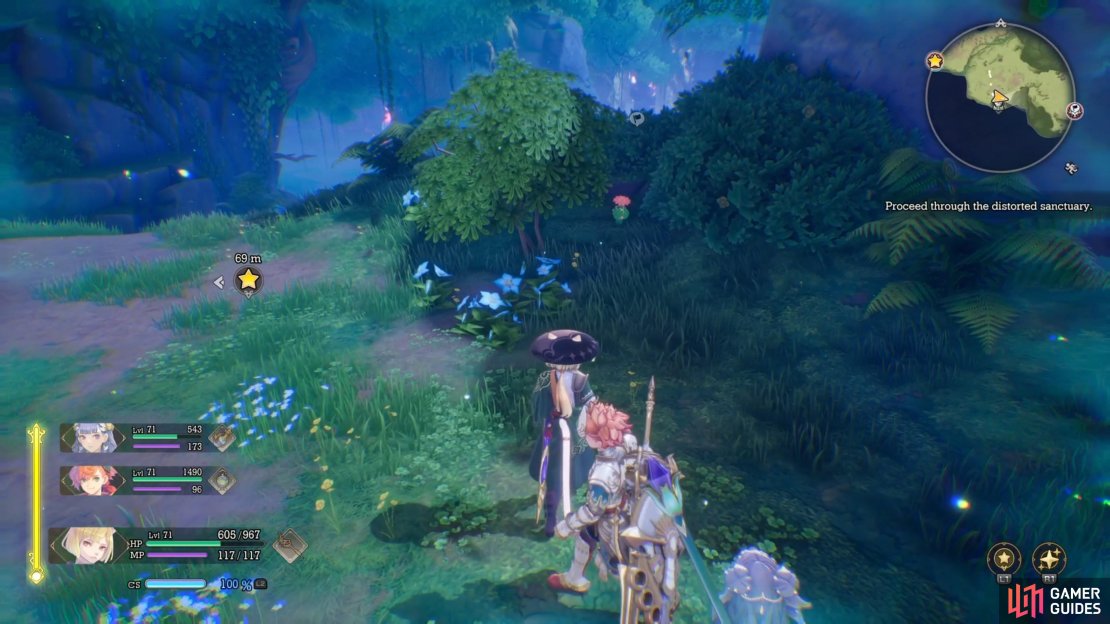
![]() The Distorted Sanctuary is pretty much the final dungeon of the main story and is made up of areas you’ve previously visited during the game. You access this place through the Sanctuary Entrance and the first area is reminiscent of Mylos Woods. Head straight west/northwest at the beginning until you go up a hill. At the top of the hill, look in the foliage to spy the Cactus trying to hide. Note that this should be really close to the Elementite there.
The Distorted Sanctuary is pretty much the final dungeon of the main story and is made up of areas you’ve previously visited during the game. You access this place through the Sanctuary Entrance and the first area is reminiscent of Mylos Woods. Head straight west/northwest at the beginning until you go up a hill. At the top of the hill, look in the foliage to spy the Cactus trying to hide. Note that this should be really close to the Elementite there.
No Comments