
In addition to the Elemental Plots in Visions of Mana, you will be able to get new skills and passives for your characters via Ability Seeds. You will be able to find Ability Seeds in chests, as rewards from side quests, and you will also be able to exchange for them at ![]() Niccolo’s Emporium. When you first begin the game, you will only have two slots available for Ability Seeds. In order to get more slots, you will need to find items catered to each character, called Chalices.
Niccolo’s Emporium. When you first begin the game, you will only have two slots available for Ability Seeds. In order to get more slots, you will need to find items catered to each character, called Chalices.
Three of these can be found in chests scattered across various areas, while the final one can be bought in the postgame. Once you’ve obtained one of these Chalices, you can go to the Ability Seed screen for your character and press  /
/ to redeem it, unlocking two more slots. The maximum slots any character can have is ten and there are no trophies/achievements related to these Chalices, so they are completely optional. It’s a good idea to hunt these down, though, since they can help make your character stronger.
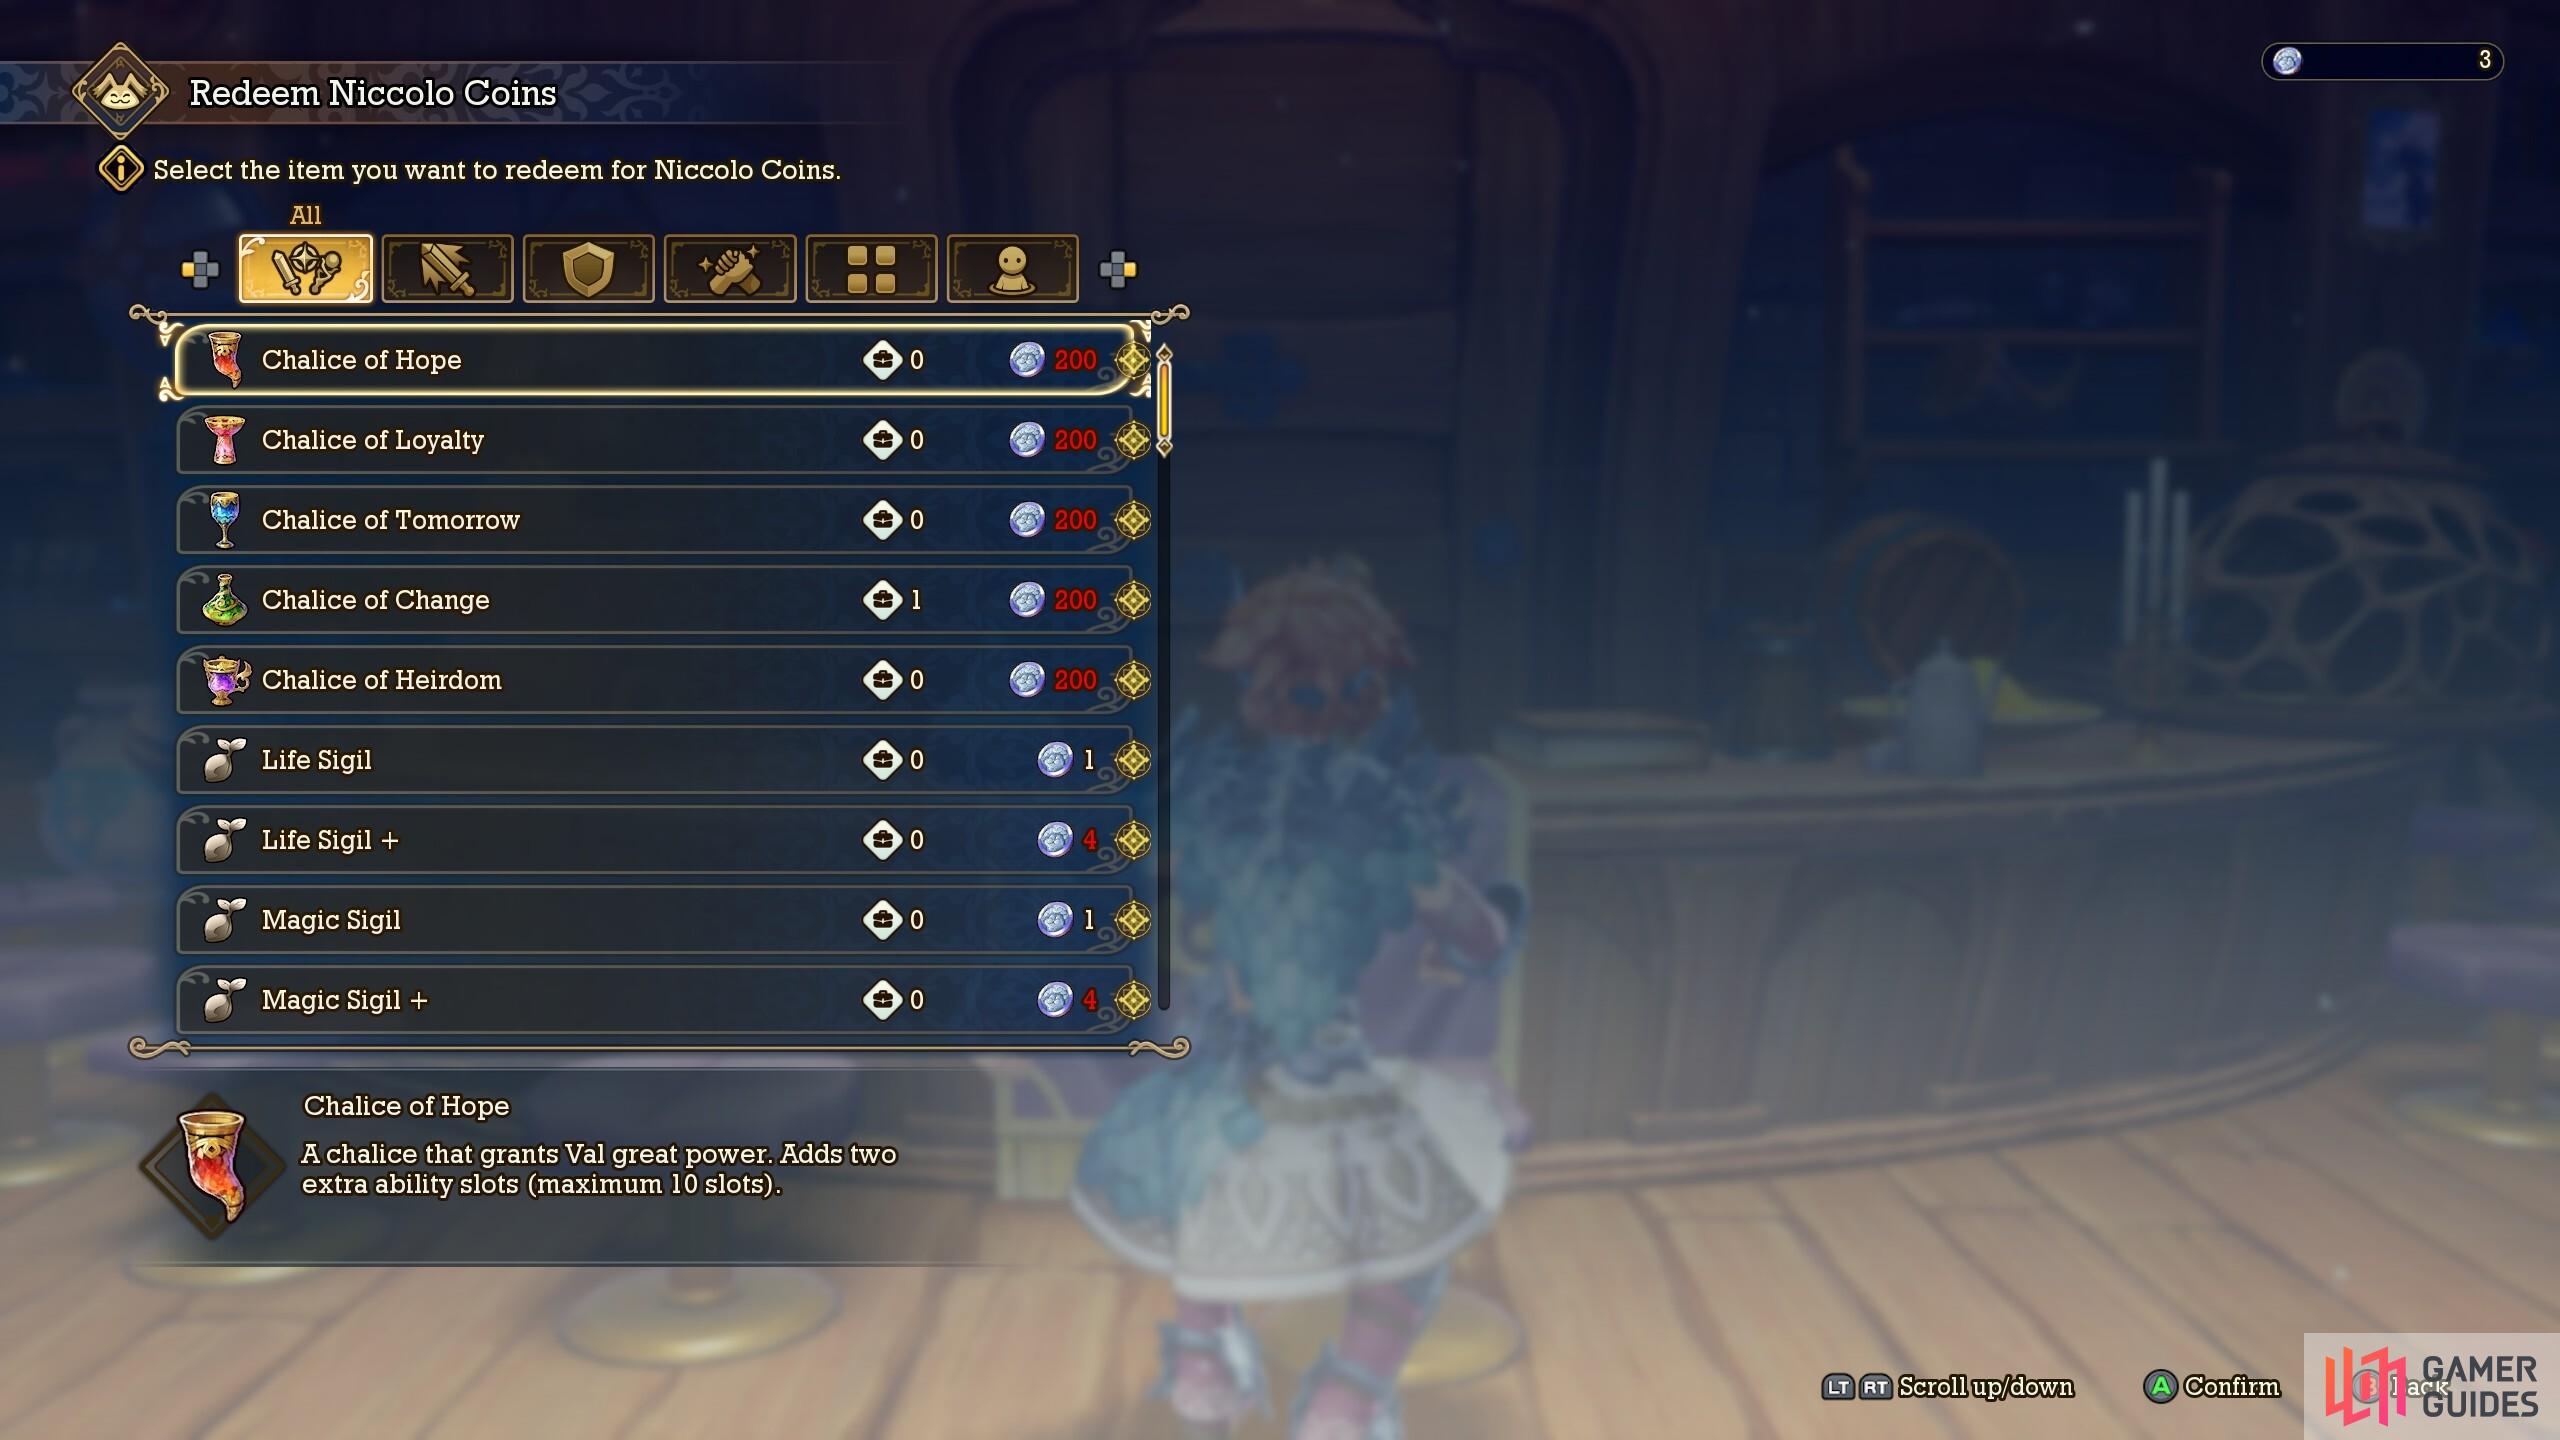
The final Chalice for each character can be gotten from Niccolo’s Emporium after finishing the main story.
Chalice of Hope Locations
The first Chalice on this list is the ![]() Chalice of Hope, which belongs to
Chalice of Hope, which belongs to ![]() Val. He will be the last character to gain the final Chalice that is in a chest.
Val. He will be the last character to gain the final Chalice that is in a chest.
Chalice of Hope 1
![]() Dura Gorge is a location that has a lower level and an upper area. When you first enter this spot from
Dura Gorge is a location that has a lower level and an upper area. When you first enter this spot from ![]() Ahrvet’s Pasture, you will be in the lower section. Move straight ahead and activate the Wind Vessel spot, then ride the wind to the top portion. As soon as you regain control, look to your south to spot a chest across a small gap. Hop across and open the chest for the Chalice of Hope.
Ahrvet’s Pasture, you will be in the lower section. Move straight ahead and activate the Wind Vessel spot, then ride the wind to the top portion. As soon as you regain control, look to your south to spot a chest across a small gap. Hop across and open the chest for the Chalice of Hope.
Chalice of Hope 2
The second Chalice for Val won’t be until you go after the Benevodons in Chapter 7 of the main story. As part of the Benevodon of Wood, you will end up visiting the ![]() Floating Isle of Ulul. Progress through this area until you reach a big lake in the eastern section of the island. Before using the Wood Vessel to ride the plants across, look for the trail on the map that takes you to a dead end to the west of those plant spots. At the very end of the trail will be a chest underneath a tree, containing this Chalice of Hope.
Floating Isle of Ulul. Progress through this area until you reach a big lake in the eastern section of the island. Before using the Wood Vessel to ride the plants across, look for the trail on the map that takes you to a dead end to the west of those plant spots. At the very end of the trail will be a chest underneath a tree, containing this Chalice of Hope.
(1 of 6) The first Chalice is in Dura Gorge, right after taking the first wind updraft.
Chalice of Hope 3
The third Chalice you can find out in the field is inside of ![]() Dorpher Volcano, which will be the final Benevodon you go after in Chapter 7. At some point inside the volcano, you will have to go left and right in order to create a middle path and go further. As you go west, follow the path and not far from the end of it, you should see another one heading south. Take that route and you will find a chest with the Chalice of Hope at the end.
Dorpher Volcano, which will be the final Benevodon you go after in Chapter 7. At some point inside the volcano, you will have to go left and right in order to create a middle path and go further. As you go west, follow the path and not far from the end of it, you should see another one heading south. Take that route and you will find a chest with the Chalice of Hope at the end.
Chalice of Loyalty Locations
The ![]() Chalice of Loyalty will belong to
Chalice of Loyalty will belong to ![]() Careena, with them being pretty spread out in terms of when you get them.
Careena, with them being pretty spread out in terms of when you get them.
Chalice of Loyalty 1
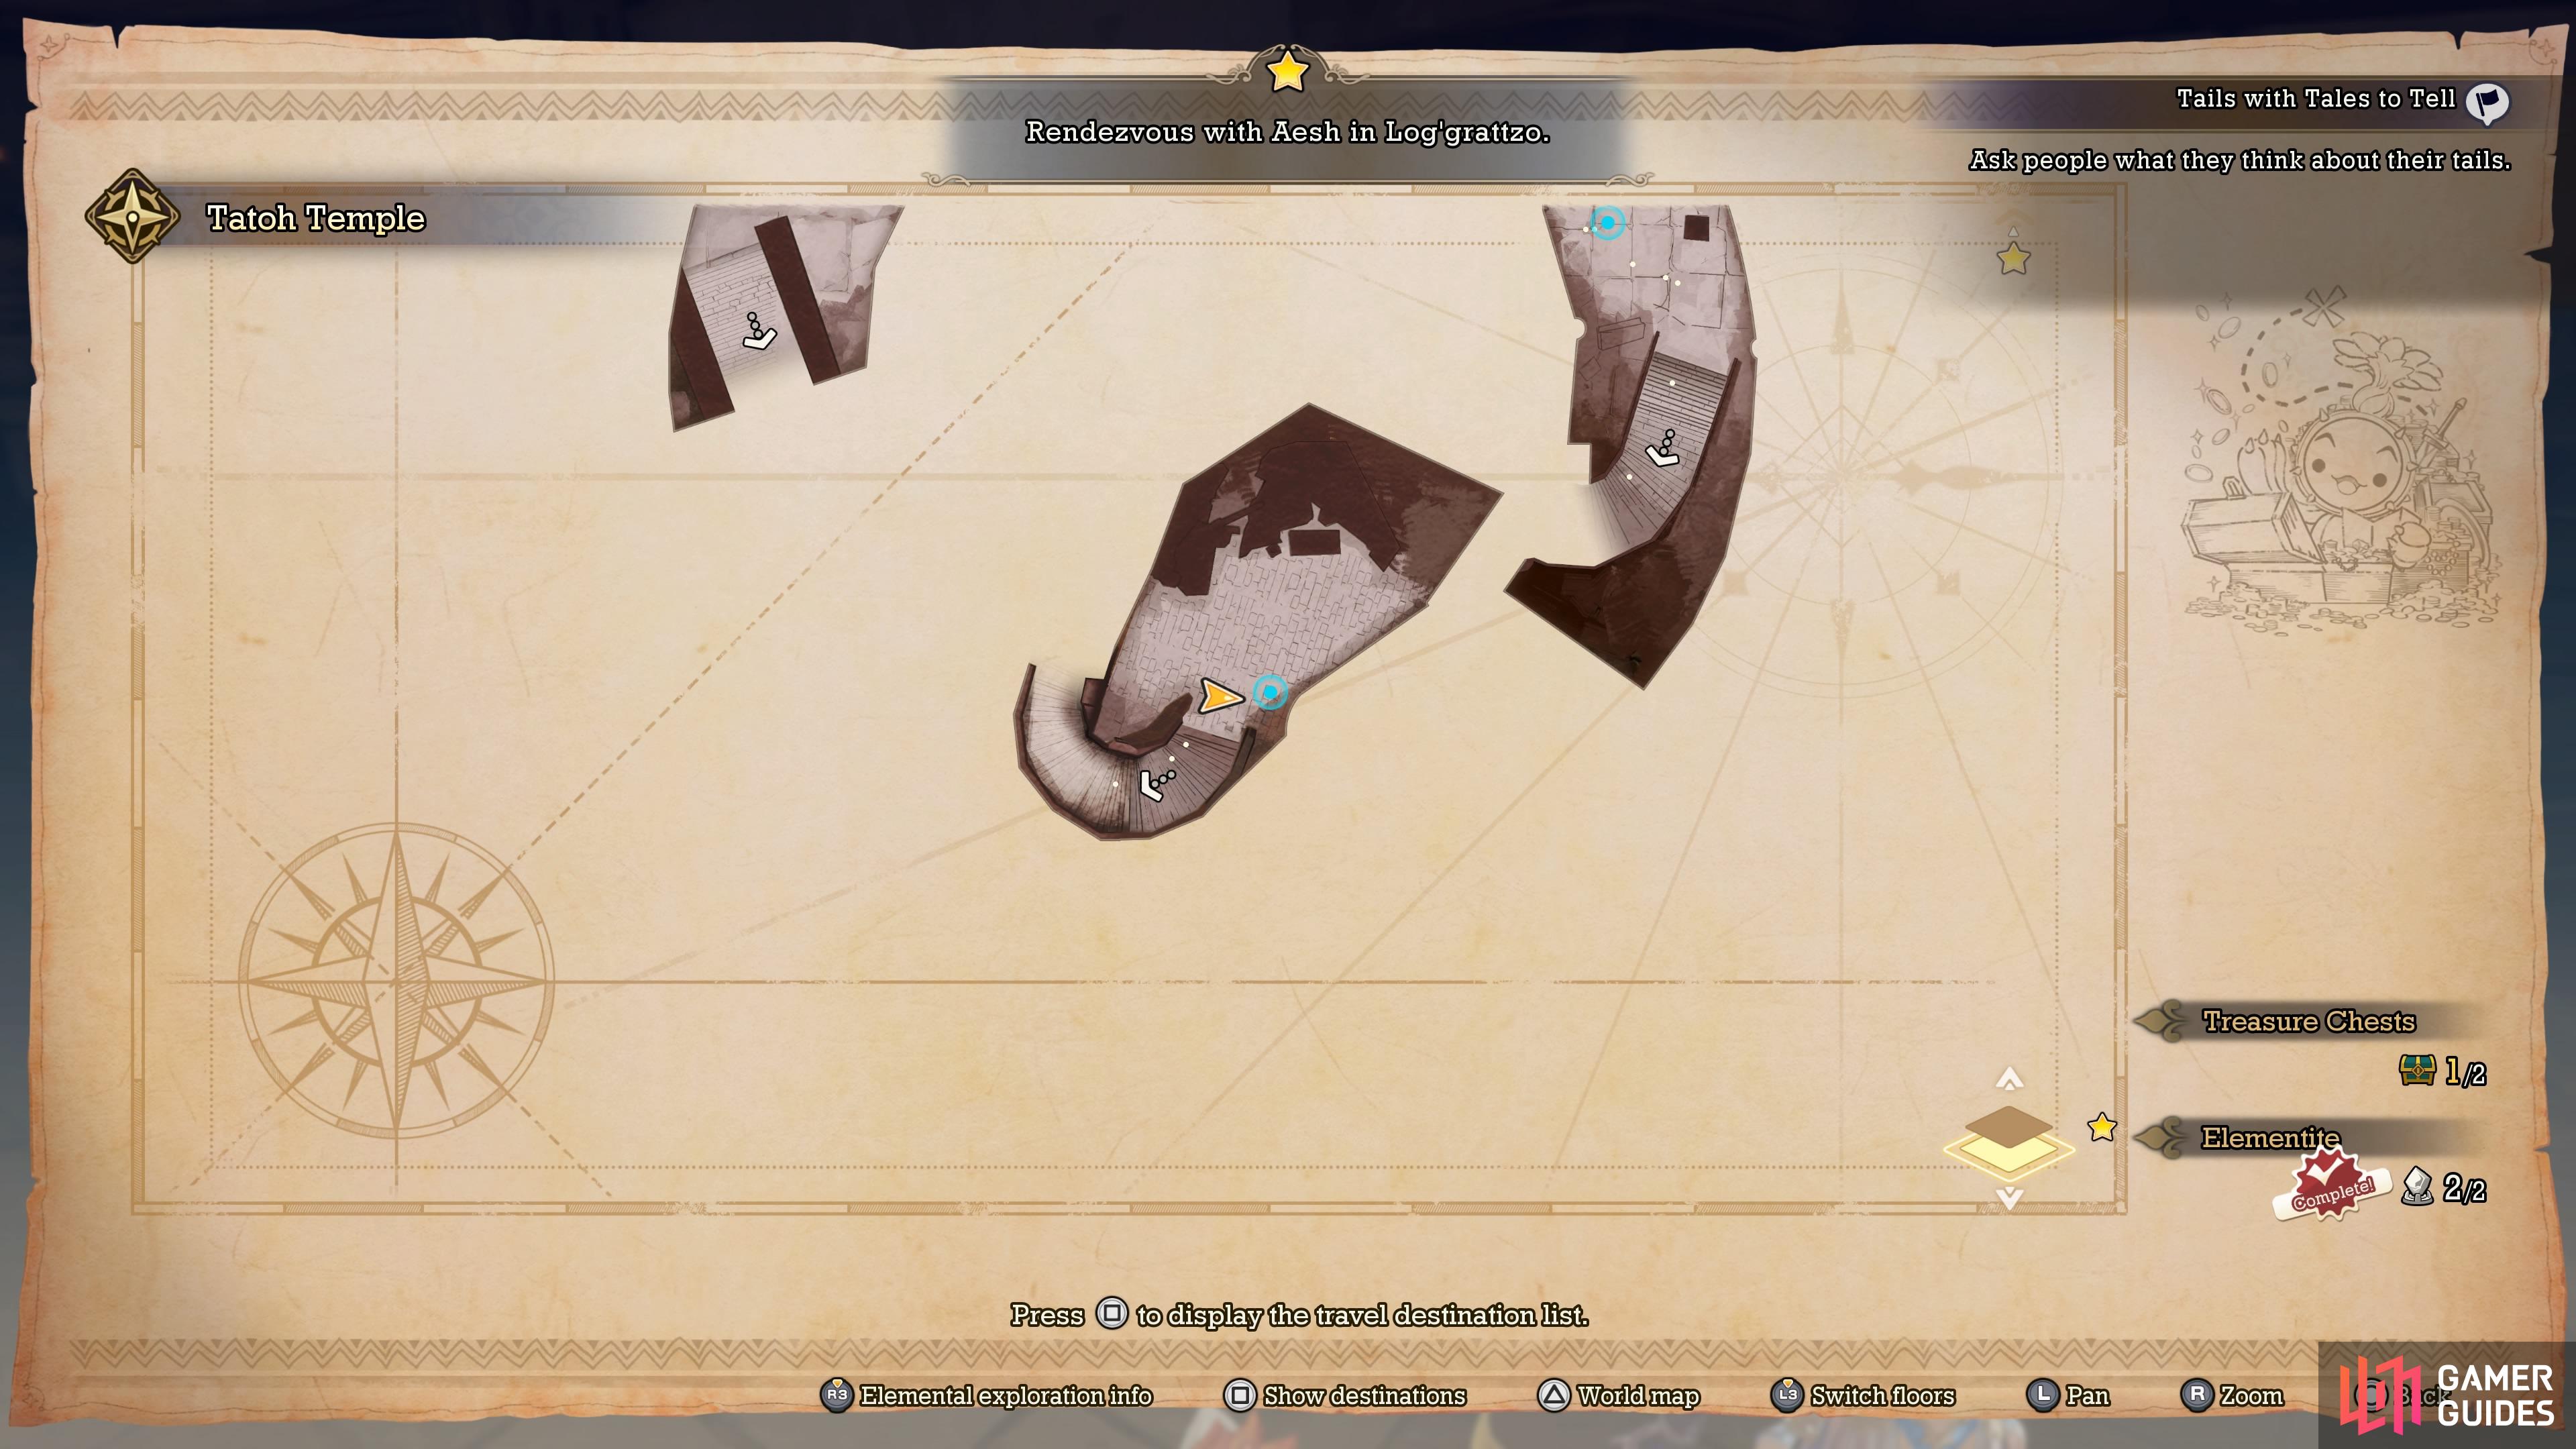
The ![]() Tatoh Temple is where you’ll find Careena’s first Chalice. It might be easier to go back into the temple after clearing it, though. It’s unclear if this can be gotten prior to clearing the temple, but these instructions are for after doing the boss there. From the entrance, double jump and dash over to the area to your left. Look for the stairs going down that don’t lead to the fire vessel trigger, as that will just take your further into the dungeon. The other set of stairs will bring you straight to the chest at the bottom of it, so loot it for the Chalice of Loyalty.
Tatoh Temple is where you’ll find Careena’s first Chalice. It might be easier to go back into the temple after clearing it, though. It’s unclear if this can be gotten prior to clearing the temple, but these instructions are for after doing the boss there. From the entrance, double jump and dash over to the area to your left. Look for the stairs going down that don’t lead to the fire vessel trigger, as that will just take your further into the dungeon. The other set of stairs will bring you straight to the chest at the bottom of it, so loot it for the Chalice of Loyalty.
Chalice of Loyalty 2
Once you reach the ![]() Temple of Wendel, you’ll have to journey through most of the dungeon in order to get to this Chalice. After defeating the
Temple of Wendel, you’ll have to journey through most of the dungeon in order to get to this Chalice. After defeating the ![]() Frost Gigas, you’ll encounter an area with some suspended ice platforms that are invisible (your party comments on this). Keep going until you encounter a battle with some
Frost Gigas, you’ll encounter an area with some suspended ice platforms that are invisible (your party comments on this). Keep going until you encounter a battle with some ![]() Bluster Gas and
Bluster Gas and ![]() Blue Ooze enemies. Just past them will be another light mirror that you can use to direct a laser, which will reveal those invisible platforms. Jump up to the ledge right by that light device to find a chest, which contains the Chalice of Loyalty.
Blue Ooze enemies. Just past them will be another light mirror that you can use to direct a laser, which will reveal those invisible platforms. Jump up to the ledge right by that light device to find a chest, which contains the Chalice of Loyalty.
Chalice of Loyalty 3
The third Chalice will be found in the ![]() Wind Sanctum, a dungeon you visit during Chapter 7 of the main story. Thankfully, you won’t have to go too far into the dungeon to find the chest with it. When you reach the first battle with
Wind Sanctum, a dungeon you visit during Chapter 7 of the main story. Thankfully, you won’t have to go too far into the dungeon to find the chest with it. When you reach the first battle with ![]() Hippogryph Claws (should be the second battle in the dungeon), defeat them and look nearby to find the chest with the Chalice of Loyalty.
Hippogryph Claws (should be the second battle in the dungeon), defeat them and look nearby to find the chest with the Chalice of Loyalty.
Chalice of Tomorrow Locations
The ![]() Chalice of Tomorrow is exclusive to
Chalice of Tomorrow is exclusive to ![]() Morley, with them being kind of easy to find in the game, so as long as you explore thoroughly, you won’t be missing them.
Morley, with them being kind of easy to find in the game, so as long as you explore thoroughly, you won’t be missing them.
Chalice of Tomorrow 1
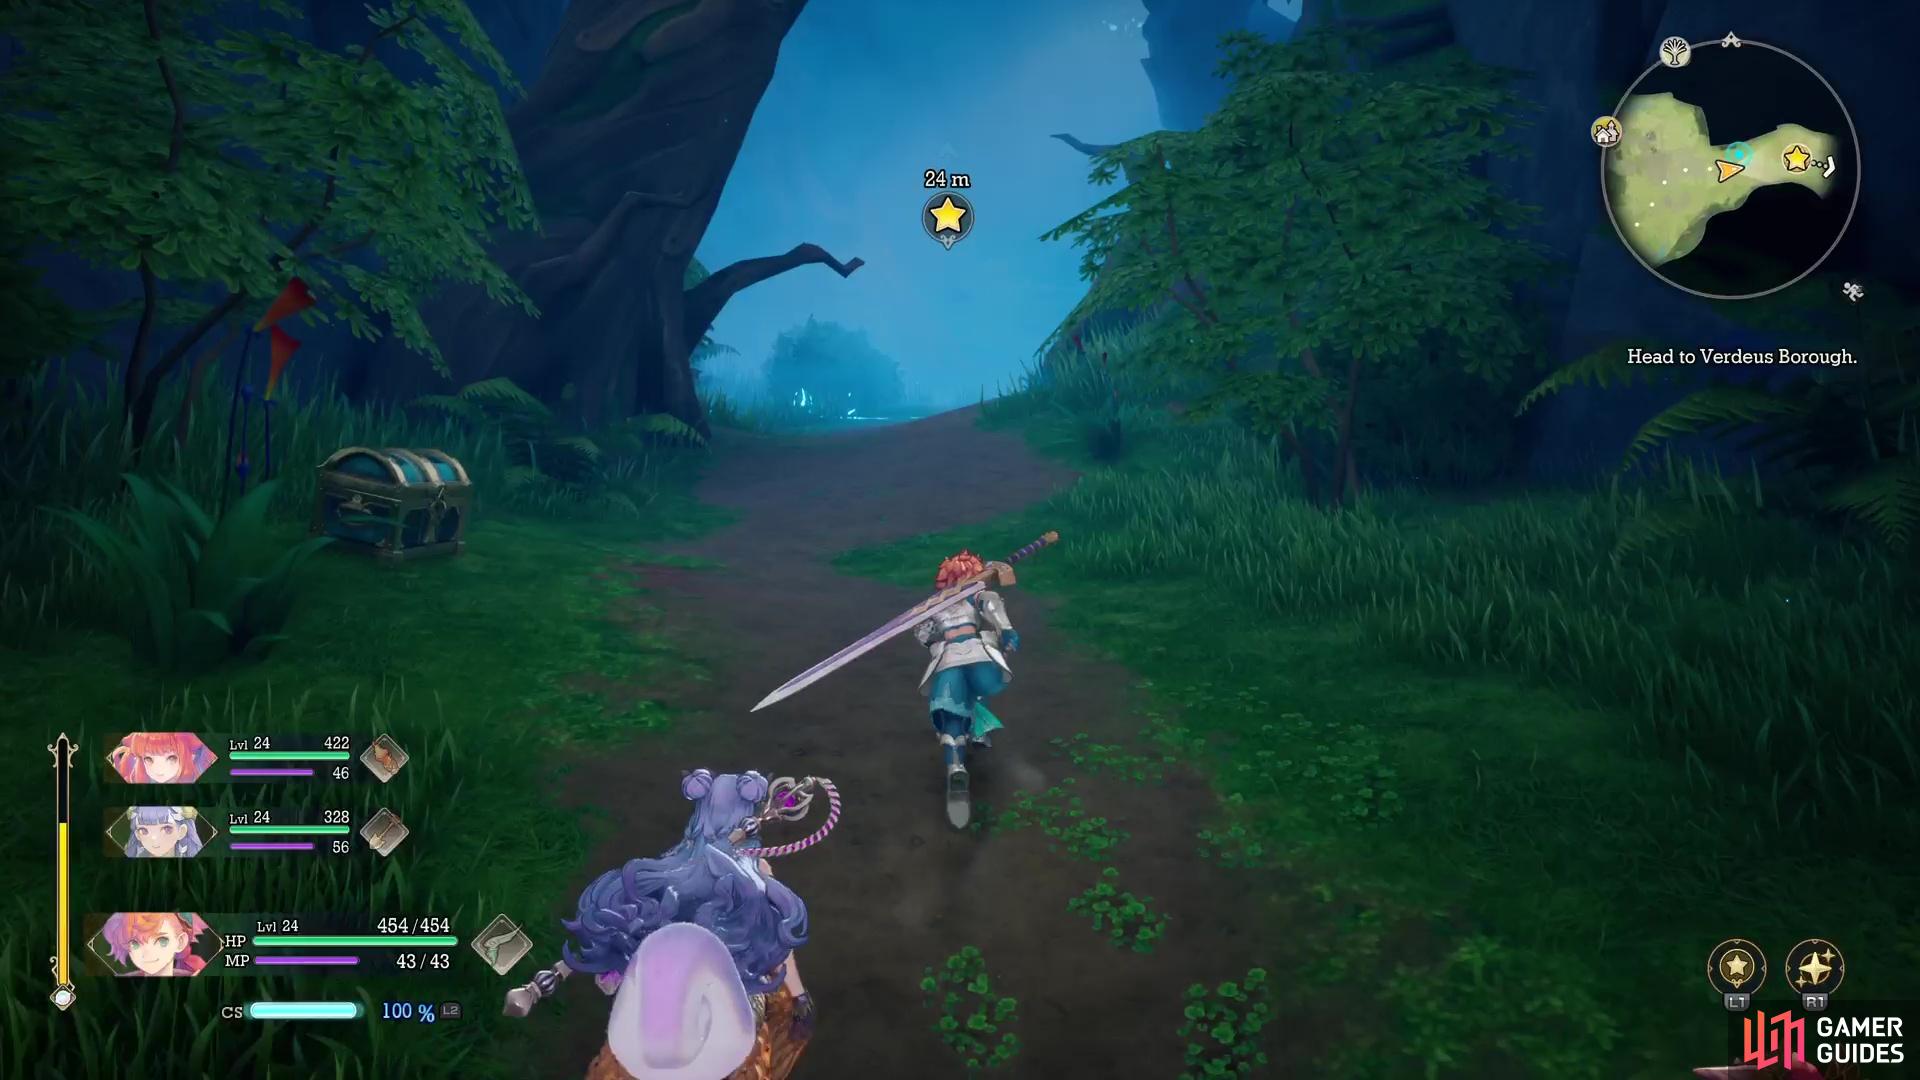
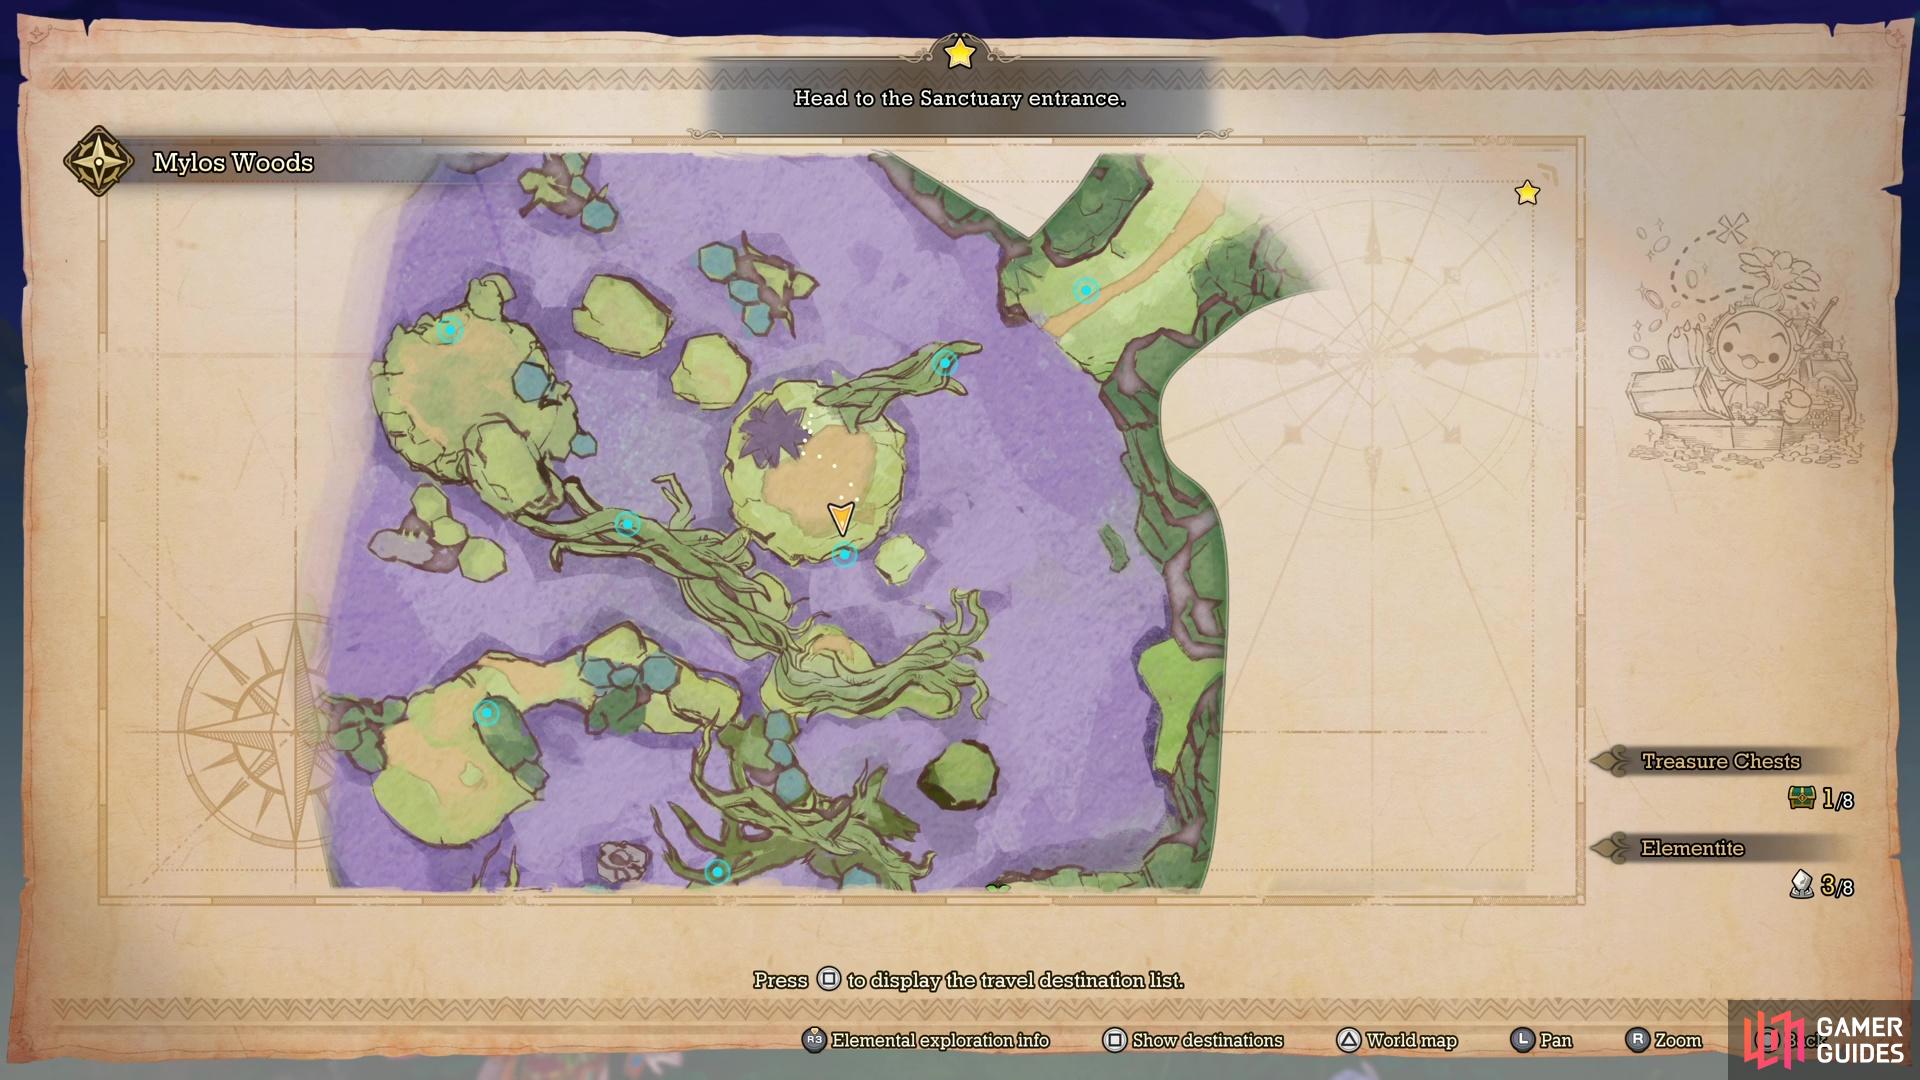
The first Chalice is hard to miss, as it’s right along the main path. Once you reach ![]() Mylos Woods and are set to head to
Mylos Woods and are set to head to ![]() Verdeus Borough, you will have to defeat some enemies to destroy flowers blocking the exit. Once you’ve done this, head to the eastern exit and the chest will be right by it, so open it for the Chalice of Tomorrow.
Verdeus Borough, you will have to defeat some enemies to destroy flowers blocking the exit. Once you’ve done this, head to the eastern exit and the chest will be right by it, so open it for the Chalice of Tomorrow.
Chalice of Tomorrow 2
The second Chalice is another one that’s hard to miss, as it’s right in front of you as you explore the ![]() Passagean Tomespire. There will be two trips to this dungeon, with the first ending in a boss that looks like a door. You will return to Log’grattzo for a short time, then have to go back. As soon as you head back and pass through the doorway where the boss once was, open the chest right in front of you, in the middle of the room, for the Chalice of Tomorrow.
Passagean Tomespire. There will be two trips to this dungeon, with the first ending in a boss that looks like a door. You will return to Log’grattzo for a short time, then have to go back. As soon as you head back and pass through the doorway where the boss once was, open the chest right in front of you, in the middle of the room, for the Chalice of Tomorrow.
Chalice of Tomorrow 3
The third Chalice will be found in ![]() Castle Cresceno, which is accessible in Chapter 7 of the main story. Progress through the dungeon normally, until you witness a cutscene with Careena wanting to open an obvious mimic chest. Val will also point out some fallen gears that you can use as stepping stones to get further into the place. While facing the mimic chest, look to the left to see one set of gears. Use these to get to the end, where you’ll find the chest with the Chalice of Tomorrow.
Castle Cresceno, which is accessible in Chapter 7 of the main story. Progress through the dungeon normally, until you witness a cutscene with Careena wanting to open an obvious mimic chest. Val will also point out some fallen gears that you can use as stepping stones to get further into the place. While facing the mimic chest, look to the left to see one set of gears. Use these to get to the end, where you’ll find the chest with the Chalice of Tomorrow.
Chalice of Heirdom Locations
The ![]() Chalice of Heirdom is the item that expands
Chalice of Heirdom is the item that expands ![]() Palamena’s ability slots. If you go after all of the treasures in the various areas, you will undoubtedly find them, as some are off the beaten path.
Palamena’s ability slots. If you go after all of the treasures in the various areas, you will undoubtedly find them, as some are off the beaten path.
Chalice of Heirdom 1
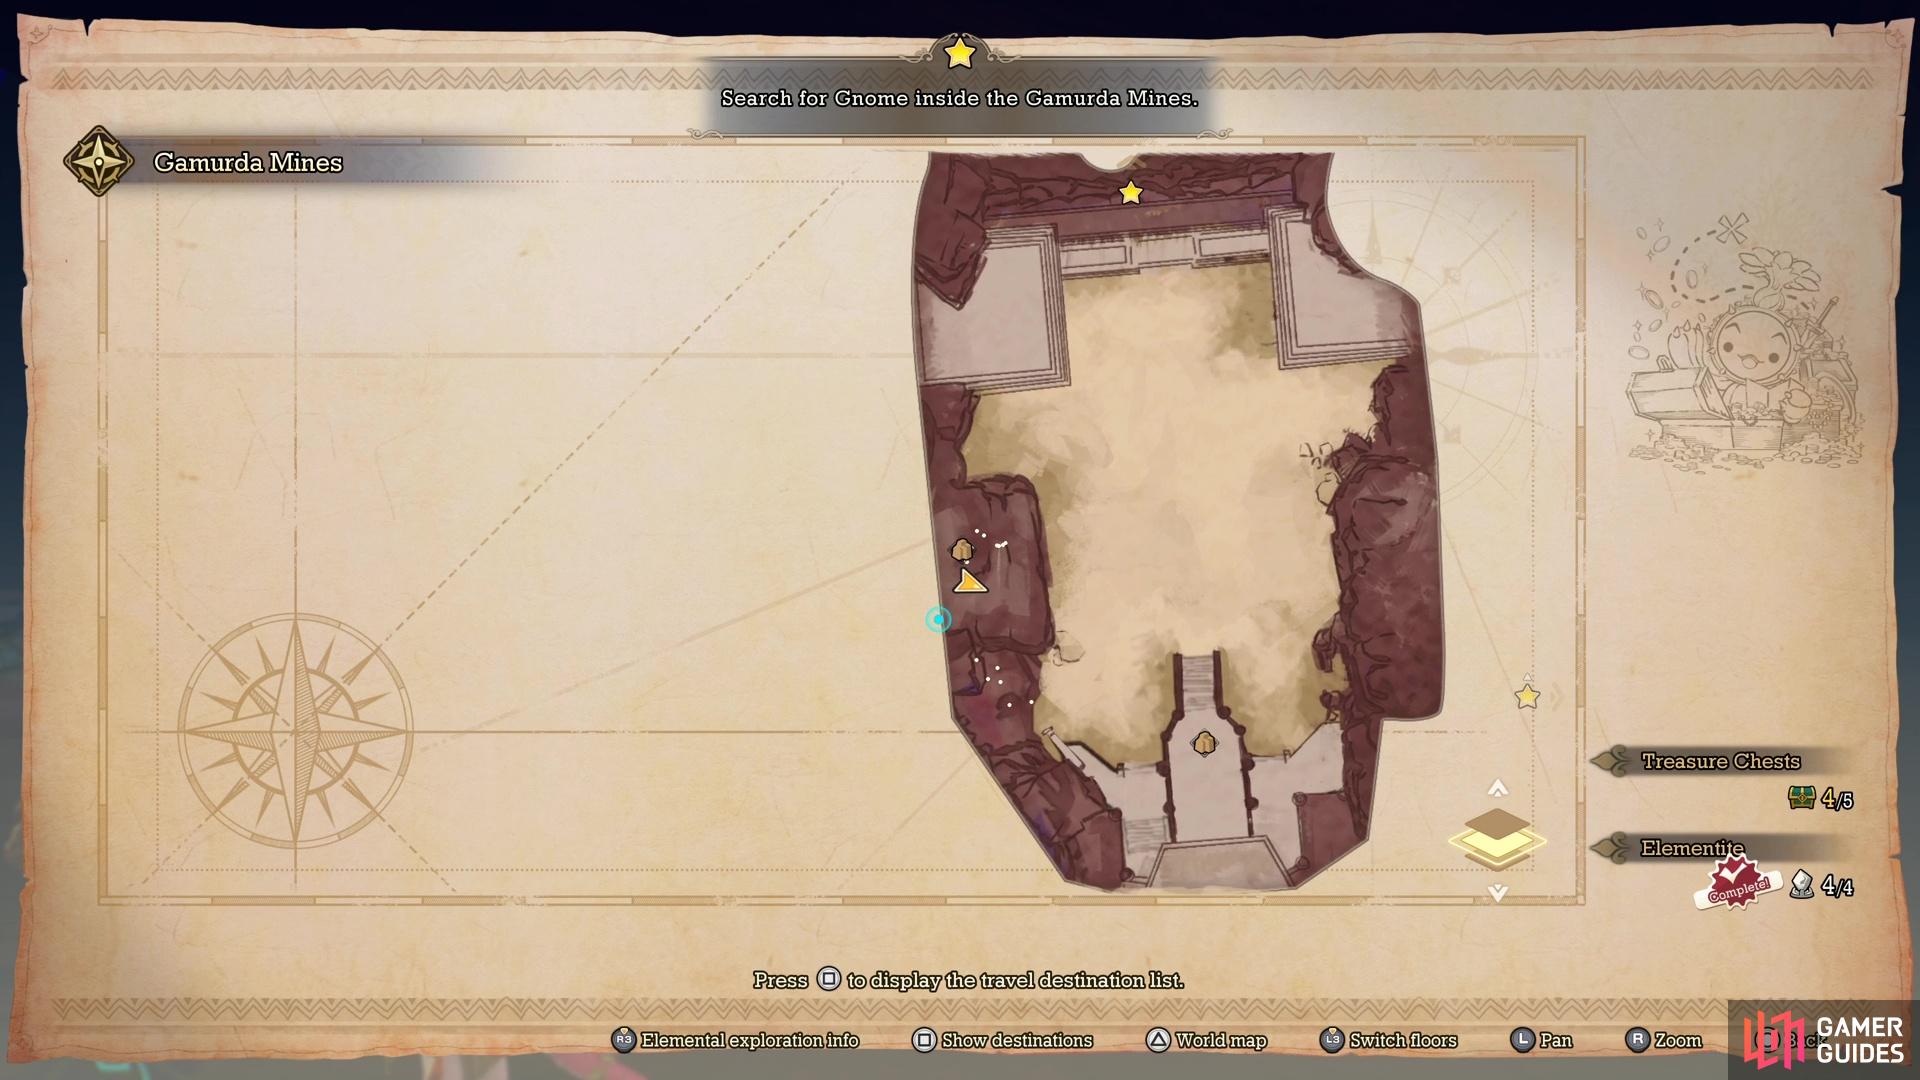
The first Chalice is located in the ![]() Gamurda Mines, but you’ll need to wait until you get to the second level (first area inside after you do all the stuff outside). Here, you will need to use the Golems to knock four statues into the central structure. It’s best to do the statues on the eastern and western sides first, as this will create a bridge to the other two paths. Either way, head south and possess the Golem, then destroy the wall to your left. This reveals a small little room, with another Golem, as well as the chest with the Chalice of Heirdom (and the
Gamurda Mines, but you’ll need to wait until you get to the second level (first area inside after you do all the stuff outside). Here, you will need to use the Golems to knock four statues into the central structure. It’s best to do the statues on the eastern and western sides first, as this will create a bridge to the other two paths. Either way, head south and possess the Golem, then destroy the wall to your left. This reveals a small little room, with another Golem, as well as the chest with the Chalice of Heirdom (and the ![]() Li’l Cactus for this area).
Li’l Cactus for this area).
Chalice of Heirdom 2
The second Chalice will be found on Log’grattzo, which is the island you go to in Chapter 5, via ![]() Vuscav. Upon setting foot on the island, head straight for the
Vuscav. Upon setting foot on the island, head straight for the ![]() Archives, the building where you first meet
Archives, the building where you first meet ![]() Aesh. Inside the building, go straight ahead and not down the side paths, where you will find a chest behind a large pile of books. That chest contains the Chalice of Heirdom.
Aesh. Inside the building, go straight ahead and not down the side paths, where you will find a chest behind a large pile of books. That chest contains the Chalice of Heirdom.
Chalice of Heirdom 3
In Chapter 7 of the main story, you will go after the Benevodons, one of which will be found inside the ![]() Luka Ruins. However, this one will be in the Undertemple, a deeper area of the ruins. Progress through the dungeon until you face the midboss,
Luka Ruins. However, this one will be in the Undertemple, a deeper area of the ruins. Progress through the dungeon until you face the midboss, ![]() Shreegill. After defeating it, you’ll be in the back half of the dungeon, which is where you’ll find this Chalice. Upon lowering the water level here, you’ll be in a big area with water bubbles and pillars on which you can stand on the tops. Drop to the bottom and swim underneath the arch, where you’ll come to some stairs. Climb them, then jump and dash over to the north, as you can see a chest on an upper ledge. That chest contains the Chalice of Heirdom. Note that this is right before the
Shreegill. After defeating it, you’ll be in the back half of the dungeon, which is where you’ll find this Chalice. Upon lowering the water level here, you’ll be in a big area with water bubbles and pillars on which you can stand on the tops. Drop to the bottom and swim underneath the arch, where you’ll come to some stairs. Climb them, then jump and dash over to the north, as you can see a chest on an upper ledge. That chest contains the Chalice of Heirdom. Note that this is right before the ![]() Meridian and the final boss fight here in the ruins.
Meridian and the final boss fight here in the ruins.
Chalice of Change Locations
The ![]() Chalice of Change is the one that will give extra slots for
Chalice of Change is the one that will give extra slots for ![]() Julei, the last party member that joins your group.
Julei, the last party member that joins your group.
Chalice of Change 1
The first one will be found shortly after Julei officially joins your party in Verdeus Borough. Once that happens, you will have to go through the second half of the Mylos Woods. Progress until you reach the area with the poisonous bog, which you want to avoid because it’ll actually inflict poison on your characters. Make your way to the larger island here to the northeast, where you will encounter a swarm of ![]() Killer Pansy enemies, with a lone
Killer Pansy enemies, with a lone ![]() Queeneeb. After defeating them, look on the southern side of the “island” to spot the chest with the Chalice of Change.
Queeneeb. After defeating them, look on the southern side of the “island” to spot the chest with the Chalice of Change.
Chalice of Change 2
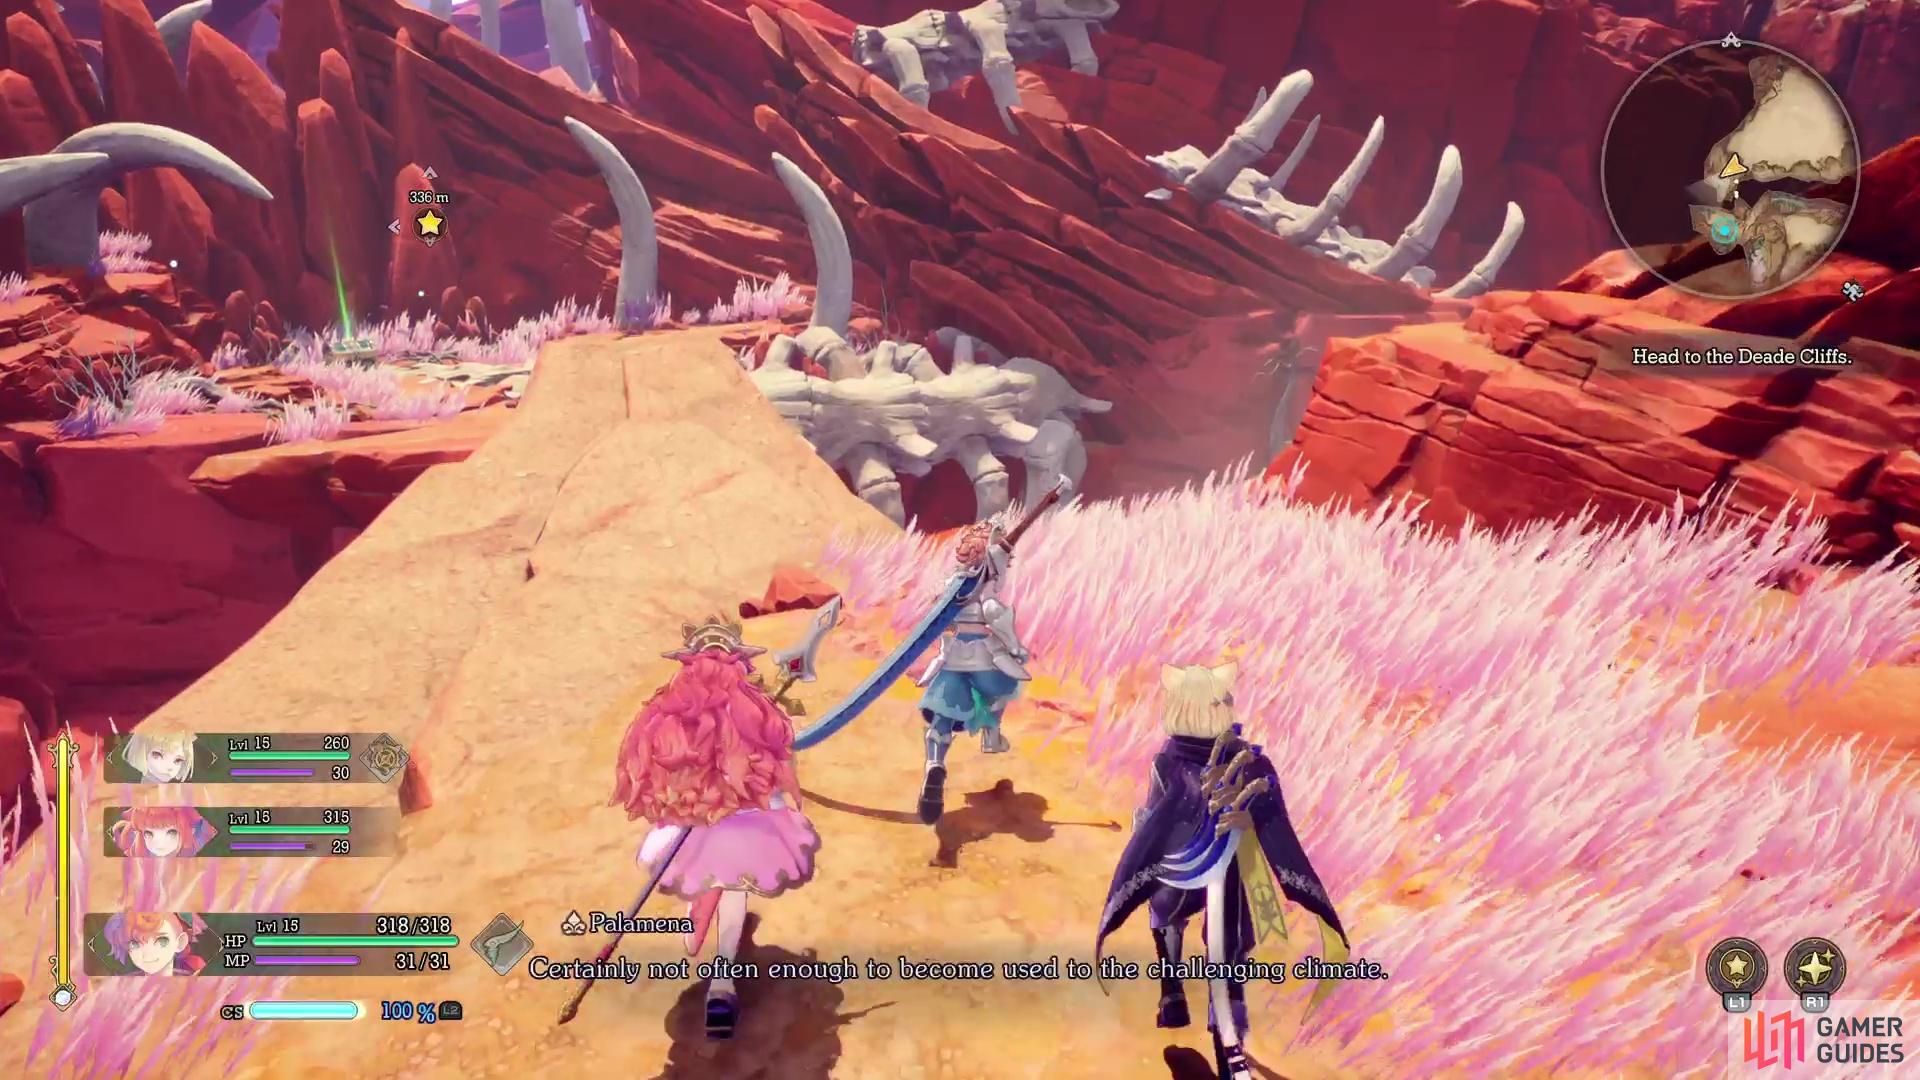
During Chapter 6 of the main story, you will visit the ![]() Sanctuary of Mana. Progress through the area, until you reach the Meridian right before the
Sanctuary of Mana. Progress through the area, until you reach the Meridian right before the ![]() Vadise boss fight. From there, you can head south of the Meridian to pass through some ruins, so do that (there’s a chest on a pedestal here, but it’s not the Chalice). From the ruins, go east and at the corner will be not only a Dark Elementite, but also the chest with the Chalice of Change.
Vadise boss fight. From there, you can head south of the Meridian to pass through some ruins, so do that (there’s a chest on a pedestal here, but it’s not the Chalice). From the ruins, go east and at the corner will be not only a Dark Elementite, but also the chest with the Chalice of Change.
Chalice of Change 3
At some point during Chapter 7, you will fly to the Floating Isle of Ulul to chase after the Benevodon of Wood. As you progress through the area, you will eventually use the Wood Vessel to conjure a flower to reach the next ledge. As soon as you cross over to the other side, there will be a chest right in front of you, so open it up for the Chalice of Change.
No Comments