
This page covers where to find all Exocraft in No Man’s Sky, including how to use the Roamer, Nomad, Pilgrim, Colossus, Minotaur, and Nautilon. We also cover how to construct an Exocraft Summoning Station on a planet, and an Orbital Exocraft Materialiser on the Freighter.
Guide for Where to Find Exocraft Blueprints and How to Summon Them
Visit the Construction Research Station on the Space Anomaly
There are six main Exocraft currently available in No Man’s Sky. These are the Roamer, Nomad, Pilgrim, Colossus, Minotaur, and Nautilon. The easiest way to acquire the blueprints for these is from the Transport Modules menu in the Construction Research Station, which can be found on board the Space Anomaly. You’ll need to play through the main story of the game before you can encounter and summon the Anomaly, but it doesn’t take too long. The Roamer Geobay is the first blueprint that you can acquire from the Transport Modules, and it costs only 4 Salvaged Data to purchase.
| Icon | Exocraft | Type | Blueprint Cost | Geobay Materials |
|---|---|---|---|---|
 |
Roamer | Land / water vehicle | 4 Salvaged Data | 5 Metal Plating, 2 Ion Battery, 50 Paraffinium |
 |
Nomad | Land / water hovercraft | 8 Salvaged Data | 5 Metal Plating, 2 Ion Battery, 50 Paraffinium |
 |
Pilgrim | Land vehicle | 10 Salvaged Data | 5 Metal Plating, 100 Silver, 5 Di-hydrogen Jelly |
 |
Colossus | Land vehicle | 8 Salvaged Data | 5 Metal Plating, 2 Ion Battery, 50 Paraffinium |
 |
Minotaur | Mech Suit | 10 Salvaged Data | 5 Metal Plating, 4 Ion Battery, 100 Gold |
 |
Nautilon | Submersible | 10 Salvaged Data | 5 Metal Plating, 4 Crystal Sulphide, 100 Salt |
Construct the Exocraft Summoning Station
Once you have access to the blueprints for Exocraft, you’ll also want to acquire the blueprint for an Exocraft Summoning Station. This is a structure that can be built on any planet in any system, which will then allow you to summon Exocraft from anywhere within the system that the summoning station has been built in. However, before you can summon an Exocraft, you’ll first need to construct the Geobay for it, which can be found in the same menu as the Exocraft Geobay blueprints (Transport Modules). You can acquire the blueprint for the summoning station immediately after you purchase the blueprint for the Roamer. It’ll cost you 12 Salvaged Data, but it’s well worth the investment as it will allow you to summon the Roamer (and any other Exocraft for which you’ve construct Geobays) on any planet within the system.
If you want to summon Exocraft on any planet within other systems, you’ll need to construct another Exocraft Summoning Station there. If you don’t have enough resources for this but you need Exocraft in another system for a specific task, you can dismantle the current summoning station and rebuild it in the new system. So long as the station is constructed and operational, you will be able to summon available Exocraft on any planet within the system.
Construct the Orbital Exocraft Materialiser
Aside from the Exocraft Summoning Station, you can also construct the Orbital Exocraft Materialiser if you own a Freighter. The blueprint for this can also be acquired from the Construction Research Station on board the Space Anomaly, for 15 Salvaged Data. Once the Orbital Exocraft Materialiser has been constructed on your Freighter, you will be able to summon Exocraft on any planet in any system where the Freighter is present. It’s a good idea to make a habit of summoning your Freighter to any new system that you travel to before you descend to a planet, since you never know when you might need an Exocraft.
How to Use Exocraft in NMS
The Exocraft in No Man’s Sky can each be used in similar ways for the most part. However, there are some differences worth noting, and each Exocraft can excel in specific environmental conditions. The Roamer is the first Exocraft that you’ll have access to, and it will serve most of your basic needs as you traverse planets. With that said, there are some differences between the different Exocraft capabilities to make it worthwhile to acquire and use all of them eventually, though you may want to focus on upgrading one at a time to get the most out of each.
Exocraft Inventory Slots Overview
| Exocraft | Inventory Slots |
|---|---|
| Roamer | 28 |
| Nomad | 16 |
| Pilgrim | 16 |
| Colossus | 42 |
| Minotaur | 28 |
| Nautilon | 28 |
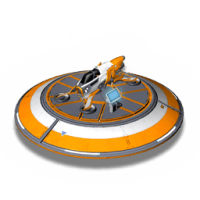
How to Use the Roamer
The Roamer is an excellent Exocraft which is capable of traversing most types of terrain without any issues, including tough mountainous regions. It can also operate underwater, but at the cost of being much slower than it is on land. The Acceleration Module helps to speed up the Roamer underwater, but it can only be used in short bursts. You may also find it difficult to exit from water sources which don’t have gentle slopes leading to land, so it isn’t recommended to use the Roamer in deep water.
Aside from the terrain navigation abilities of the Roamer, it can also be upgraded with powerful scanner modules such as the Exocraft Signal Booster, Advanced Signal Booster, and Exocraft Signal Booster Upgrade. The last two enhance scanning capabilities and range by +100%, allowing you to scan vast distances while inside the Roamer. In addition, they also allow you to scan for specific building types over vast distances on any planet, including Trade Outposts, Depots, Drop Pods, Abandoned Structures, Ruins, and Alien Structures.
In addition to the above, the Roamer can also be equipped with a mounted cannon and mining laser, both of which can be upgraded, making it a decent choice for both gathering resources and fighting off enemies. You can also upgrade the Roamer with hazard protection units for extreme cold, heat, toxic, and radioactive environments. The only limiting factor here is that the inventory space is essentially reduced to zero once all the upgrades have been applied.
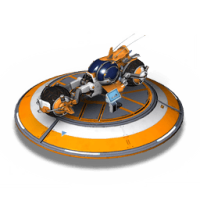
How to Use the Nomad
The Nomad is a small, lightweight hovercraft which is slightly slower than the Roamer, but far more agile. It doesn’t have the same performance in terms of navigating rough terrain, but it shines on open water, which it can easily hover over at a decent speed. This means you can travel over lakes and oceans without the fear of being submerged, so long as you maintain fuel supplies. On top of this, the Nomad can also be equipped with the same scanning technology as the Roamer, with the Exocraft Signal Booster, Advanced Signal Booster, and Exocraft Signal Booster Upgrade.
You will also be able to add the Acceleration Module and associated upgrades, all four hazard protection units, and the mounted cannon and mining laser. This makes it an excellent alternative for marshy planets, where there’s a lot of water interspersed with reasonably flat land terrain. However, the main limiting factor for the Nomad is that it only has 16 inventory slots, so you’ll need to choose between the above technologies and upgrade modules based on what you will need most, rather than use all of them at once as you can with the Roamer.
How to Use the Pilgrim
The Pilgrim is a fairly small, lightweight two-wheeled land vehicle which can be equipped and upgraded with all the same technologies as the Roamer and Nomad mentioned above. However, like the Nomad, it only comes with 16 available inventory slots, so you’ll need to choose carefully which technologies are most relevant to your needs. The Pilgrim has the Acceleration Module installed by default, and we highly recommend that you keep it for this vehicle, as it makes it the fastest land vehicle in the game, especially since the cooldown of the module is lower for the Pilgrim than it is for any other Exocraft.
The Pilgrim is most suited to land terrain, as it moves incredibly slowly underwater. This is perhaps the most fun land vehicle to use, as you can travel up hilly and mountainous terrain at high speed, and jump from one height to the next without sustaining injury. It’s also a highly agile vehicle, so you can escape danger quickly if necessary.
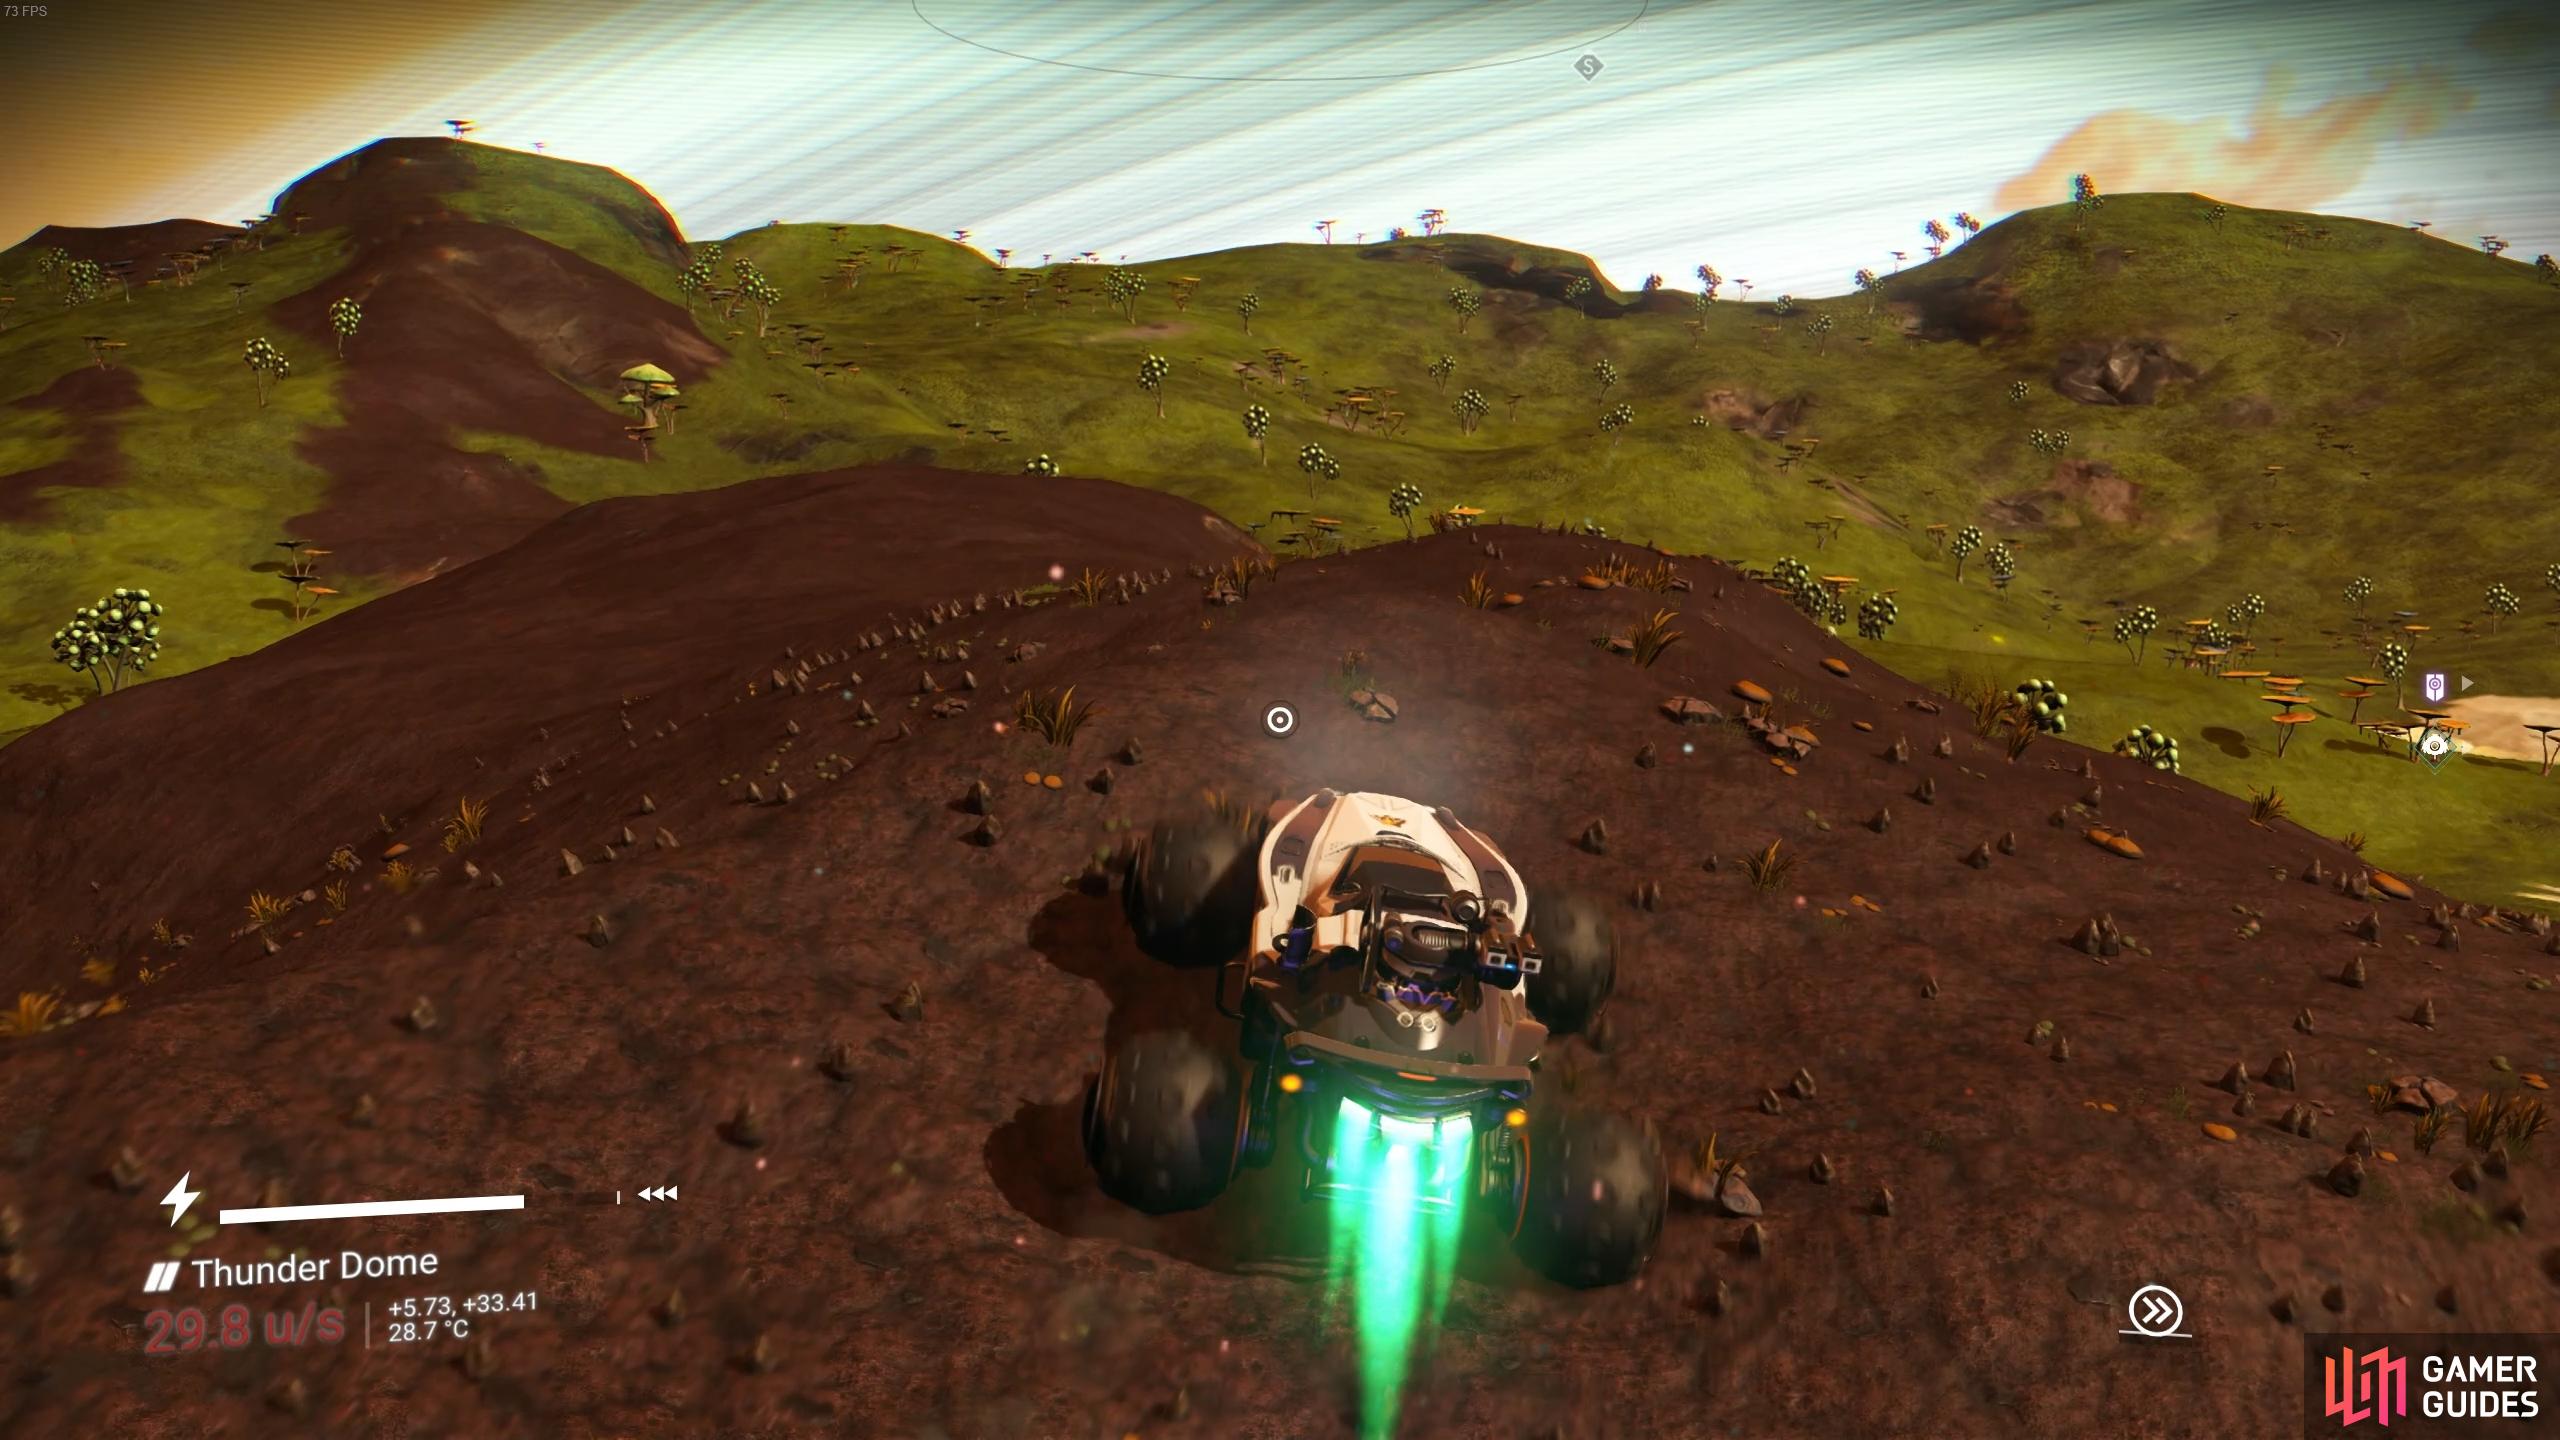
(1 of 6) The Roamer is most suited to rough terrain land exploration, but is a good all-rounder.
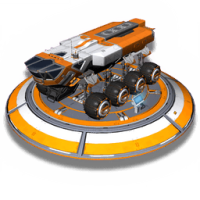
How to Use the Colossus
As you may have guessed, the Colossus is the largest of all the Exocraft, in both physical size and inventory space, with a massive 42 slots compared with the 16 - 28 of other Exocraft. It can be equipped with all the same technologies and upgrade modules as the Roamer, Nomad, and Pilgrim, including the scanner modules which allow you to identify buildings over vast distances. It has the mining laser technology installed by default, hinting at the intended use for this enormous vehicle and its unrivalled inventory space: exploration and resource gathering. You will easily be able to install all of the available technologies and their upgrades, and still have space left for materials that you mine or gather while exploring.
Despite the size of the Colossus, it’s still a fairly agile land vehicle which can move at decent speeds. However, it’s still noticeably slower than the Roamer, Nomad, and Pilgrim, and much less agile. It does have the advantage of height in shallow water, reducing the slowing effect which occurs when an Exocraft is entirely submerged. However, the Colossus is by no means suitable for underwater exploration, especially since the Nautilon exists.
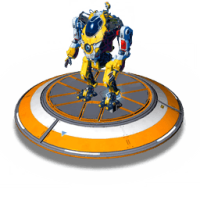
How to Use the Minotaur
The Minotaur is unique as the only mech suit type of Exocraft currently available. It has its own set of technologies and upgrades which are different from those that can be installed on the Roamer, Nomad, Pilgrim, and Colossus. However, some of them serve essentially the same function, such as the Minotaur laser and Minotaur cannon, both equivalents of the mining laser and mounted cannon. However, the scanner on the Minotaur (known as the Radar Array) is much weaker than those on the above Exocraft, and essentially functions in the same way that the Analysis Visor does, providing information on local objects only.
Although limited in scanning capabilities, the Minotaur comes with some impressive technology. It has an Environmental Control Unit installed by default, which makes it impervious to all environmental hazards indefinitely, so long as the main engine is powered with fuel. It also has the Sentinel Hardframe Right Arm, which installs a weapon capable of stunning targets, serving as a support weapon for the cannon. Finally, there’s the Minotaur AI Pilot, which once installed allows the Minotaur to be controlled by an AI. This will follow you around on a planet and engage in mining or combat defence when necessary. The mining laser can also be upgraded to the Minotaur Bore, allowing it to manipulate terrain in the same way that you can with your Multi-Tool.
The default movement of the Minotaur is the slowest of all Exocraft, since it is only capable of walking at a sluggish pace. However, the Minotaur comes with its own powerful jetpack, capable of propelling you forward to great distances. The jetpack also has a much faster recharge rate than your own, so you can use it very frequently. In addition, the Minotaur will move at the same pace underwater as it does on land, making it suitable for exploration underwater. This makes it a fairly versatile Exocraft, especially with the Environmental Control Unit, since this allows you to explore even in the most extreme hazard conditions.
How to Use the Nautilon
The Nautilon is another Exocraft unlike any of the others. It is the only one dedicated to underwater navigation, and it excels when exploring ocean depths. It can be docked at underwater structures and it has its own set of technology and upgrades, including the Humboldt Drive. This is the system which allows underwater movement for the Nautilon, and it is powered by Hydrothermal Fuel Cells. The blueprint for Hydrothermal Fuel Cells can be found at Manufacturing Facilities or Operation Centres. Alternatively, it can be purchased from the Synthesis Laboratory on board the Space Anomaly. You’ll need 40 Salt, 40 Cyto-Phosphate, and 40 Carbon to craft one of these cells.
The requirement of this specific propulsion system adds a few extra steps before you can begin to use the Nautilon, but it’s well worth the effort if you enjoy exploring underwater. There are also two lights attached to the front of the Nautilon, allowing you to see things even in the darkest depths of the oceans. You can also install high-powered sonar, which essentially functions in the same way as the Analysis Visor, and the standard cannon / laser modules.
How to Customize Exocraft Appearance
There are generally six options to customize Exocraft appearance for each of the land vehicles: paintwork, cockpit / bonnet / cabin, left tanks, right tanks, engine housing and rocket unit. The same number of options exist for the Nautilon, but with its own submarine equivalents. Unfortunately, you can only adjust the paint colours for the Minotaur. Aside from the paintwork, the other customization options allow you to add decals on top of the paint. You can adjust the appearance by interacting with the Exocraft Modification terminal, which can be found on every geobay where the Exocraft is initially stored.
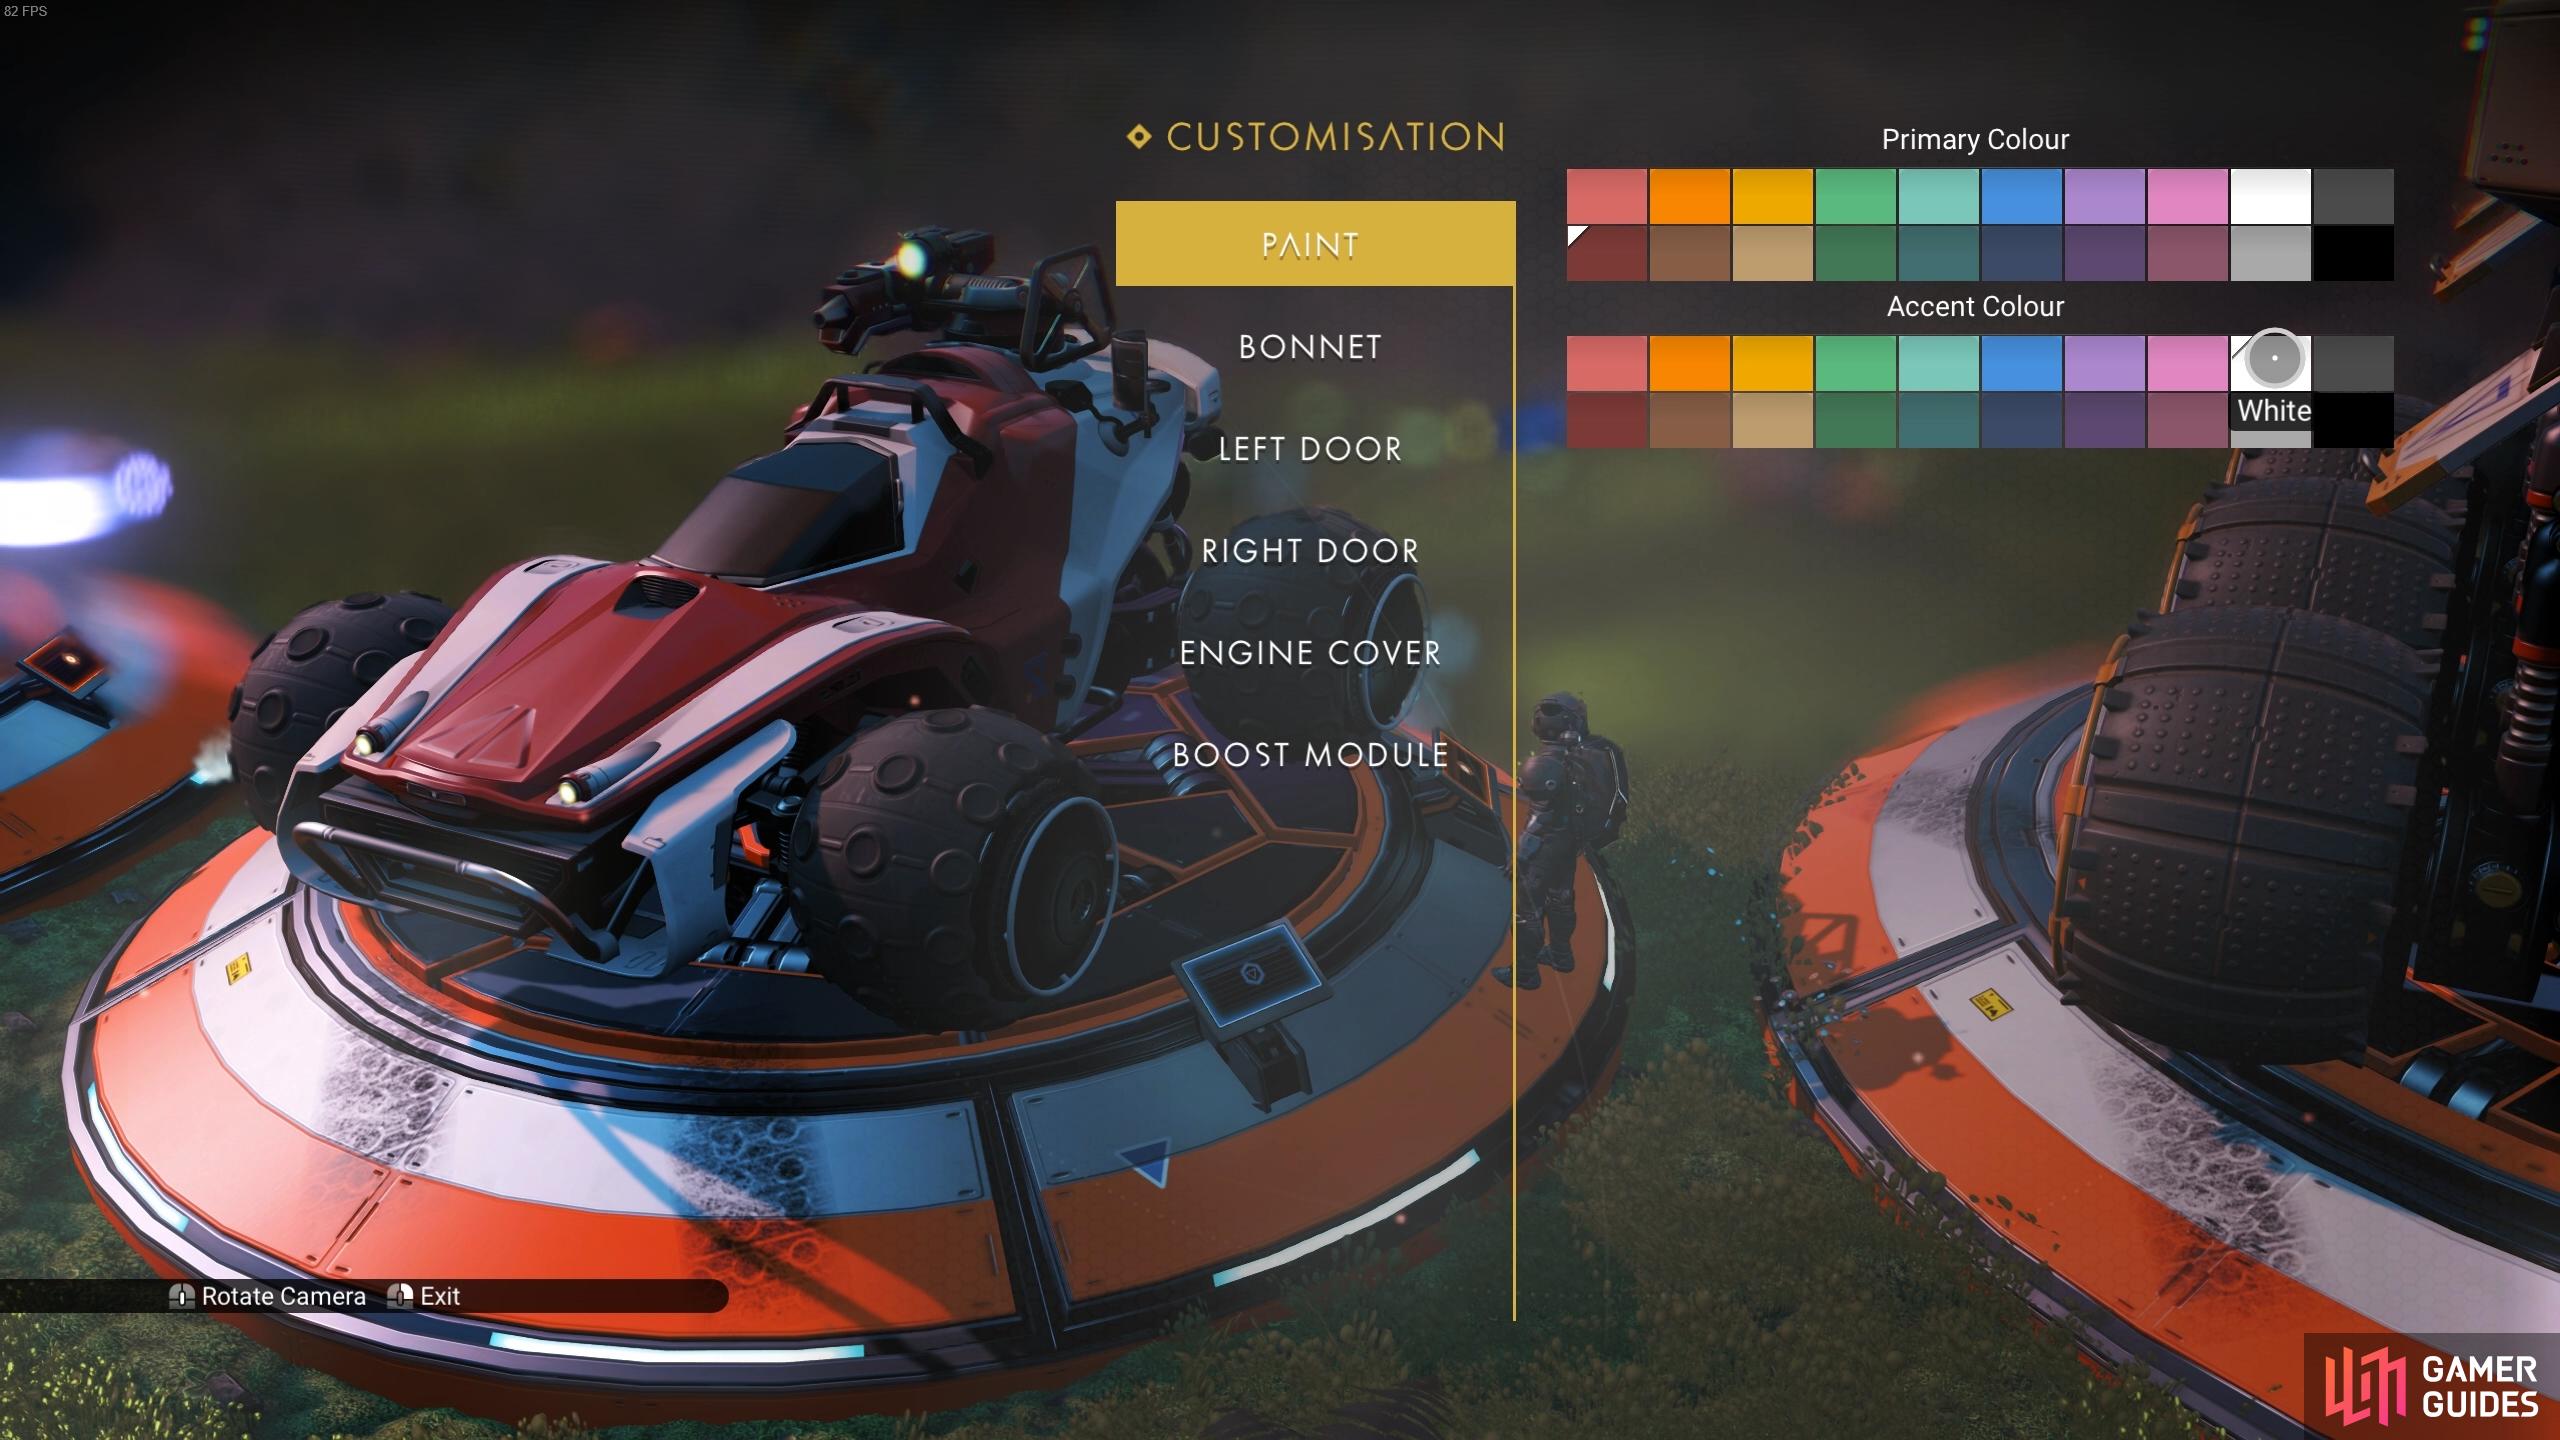
You can apply up to two layers of paint for most Exocraft.
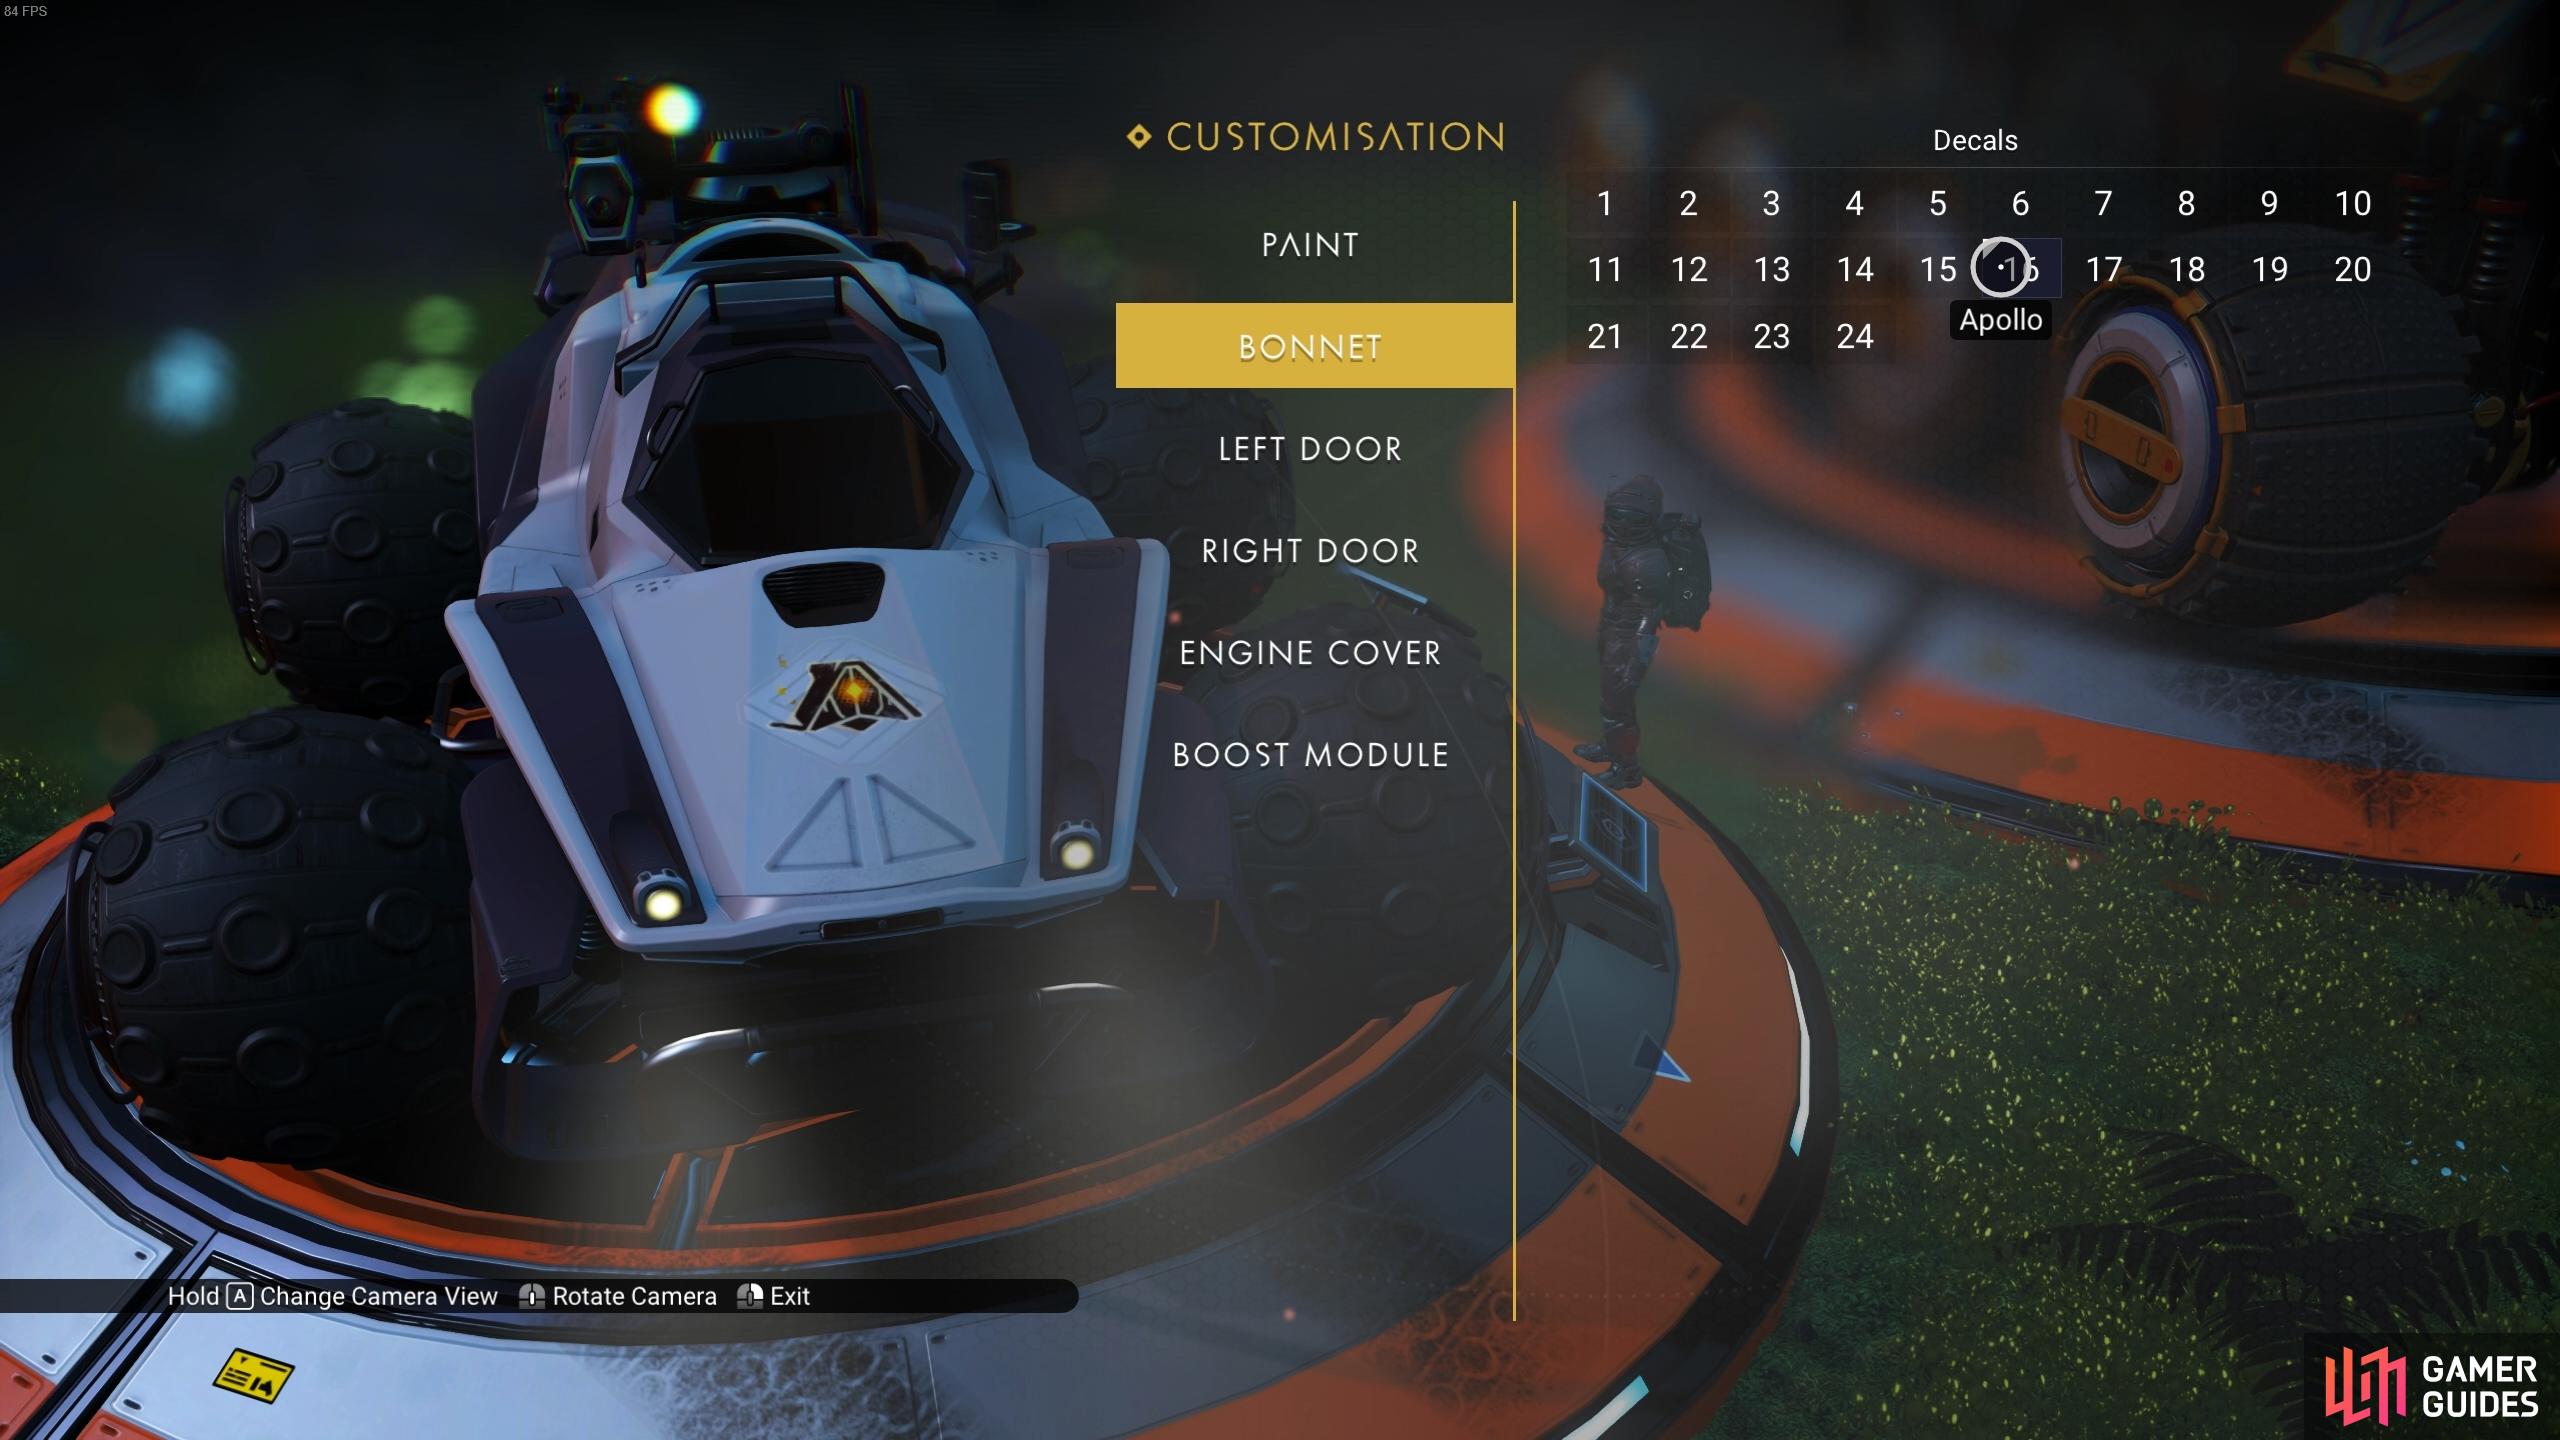
There are up to 6 options to add decals for all Exocraft except the Minotaur.
No Comments