
| Important Items in this Area | Enemy Skills in this Area |
|---|---|
| Aegis Armlet | ???? |
| Behemoth Horn | |
| Glow Lance | |
| Guard Source | |
| HP Shout | |
| Magic Source | |
| Master Fist | |
| Max Ray | |
| Mind Source x2 | |
| Pile Bunker | |
| Power Source | |
| Speed Source | |
| Starlight Phone | |
| W-Item Materia |
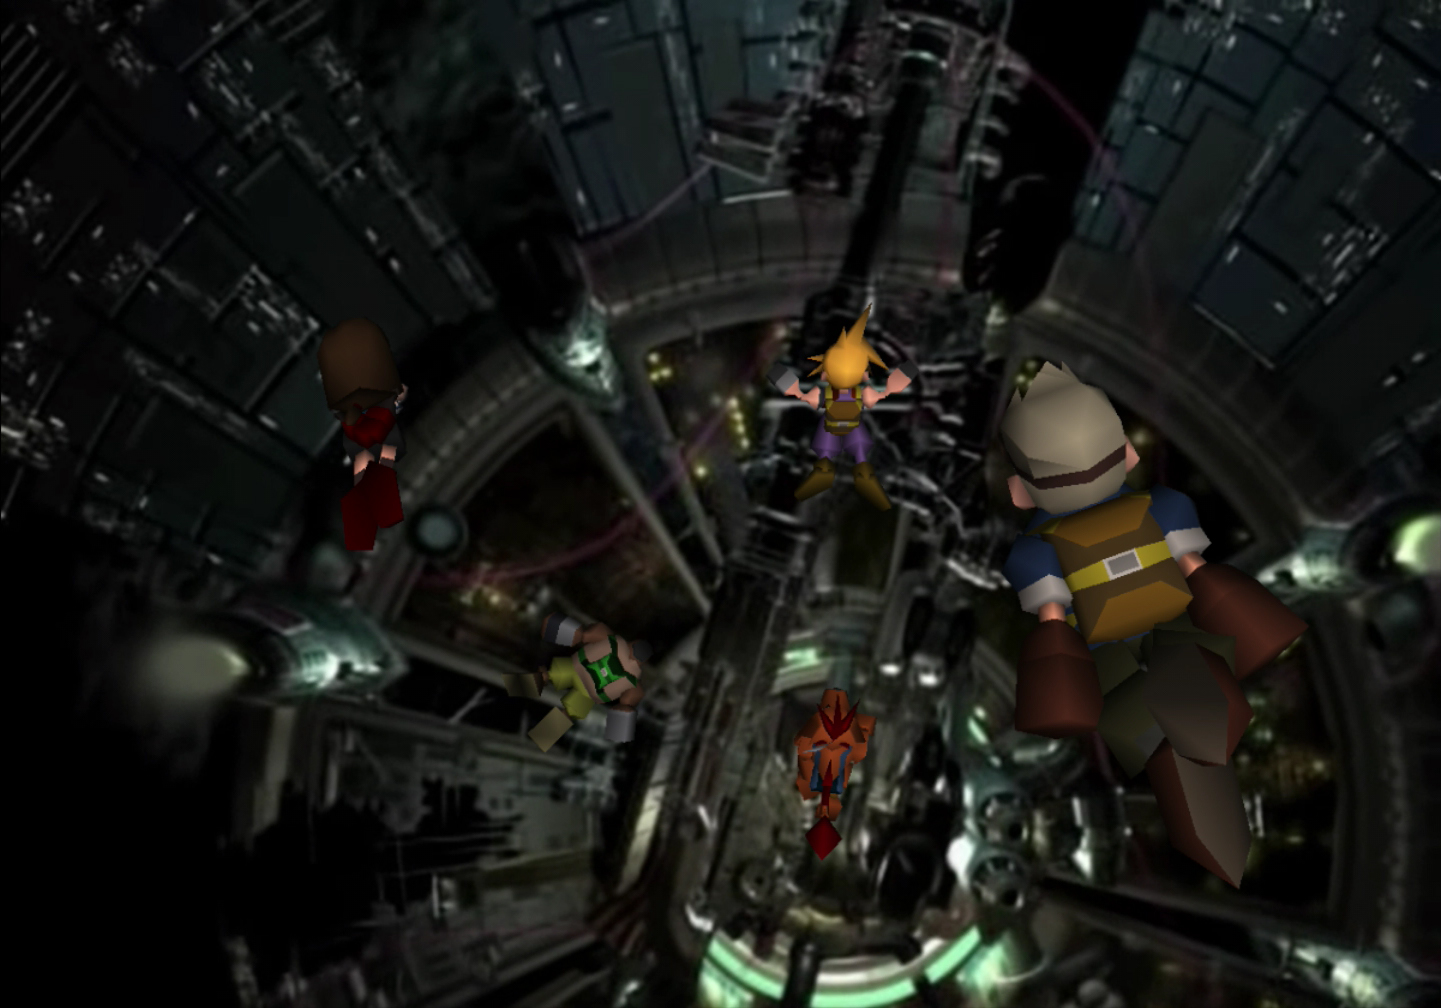
Fly over Midgar with the Highwind and, in the face of Shinra’s lock-down of the city, the party elects for a more flashy means of gaining access to upper Midgar. Before you jump consider changing your party; if you take Barret with you, you can obtain his ultimate weapon. If not, not. So it’s probably a good idea to include him in your group. Also, considering the nature of your target, taking Vincent along might be a good idea. It would be a shame to deny him his chance at vengeance. Of course that means Red XIII won’t be able to settle his score, but Vincent has more history.
Sector 8, Underground
Continue to the next screen where the party is gathered. Save your game at the Save Point, talk to Cait Sith, then climb down the ladder to reach the underground. Once here you’ll be on a walkway with two paths to take; a metal walkway, and south of this, some stairs. Take the northern walkway first, head down a ramp, make your way across a haphazardly segmented bridge, then up another ramp to reach some pipes. Follow the pipes east behind a ladder to find a chest containing a Megalixir . If you follow the pipes west you’ll find a chest with an Elixir inside.
After looting the two chests return to the entrance platform and head down the stairs neglected earlier. Climb down a ladder to reach a lower screen then head west to reach another ladder, which you can climb to reach the upper level again. Loot a chest for an Aegis Armlet , which only has four (two pairs of joined) Materia sockets, but it has a good Defense% rating and an absurdly high Magic Def% rating.
Climb back down the ladder and return east to the first ladder, then continue east and leap a gap, only to have physics rear its ugly head and thwart your progress. Oh well. Continue west, jump onto a red pipe, then climb another pair of ladders to return to the upper screen again, Make your way north then east along an L-shaped platform and enter an open duct to reach the eastern end of the lower level. Loot two chests on the platform you end up on to score an Elixir (east) and a Starlight Phone (west).
Descend another ladder and head east to jump onto a duct which will lead to the upper level again, then continue west and scale a ladder to reach a platform where you’ll find a chest, inside of which is the Max Ray . This weapon boasts 97 Attack and has six Materia sockets (three pairs of joined Materia sockets), making it easily the best weapon Barret will get on his hand-stump besides his ultimate weapon. Return back down the ladder, then take the duct to the lower level. Climb the ladder back up to the upper platform and head up the stairs. Save your game at the Save Point then, and change up your Materia arsenal for an upcoming fight; make sure two characters have Ribbons equipped, and the one character without it has Added Effect + Mystify. Make sure everybody has Steal Materia equipped, if possible, and… A piece of Sense Materia wouldn’t hurt either. Once done, head through the nearby passageway.
Winding Tunnel
After making your way through a transitional screen you’ll return at long last to… the Winding Tunnel! Yeah! It’s pretty much the same as it was when you were going to blow up the Sector 5 reactor, but with meaner beasties and better loot. Head south (towards the camera) and make your way through alternating circular tunnel/Y-shaped junction screens.
After a while you’ll find a Power Source in a chest in a Y-shaped junction. Continue on until, in another Y-junction you find a chest with a Guard Source inside it, then talk to Red XIII in the same area, who will reveal that this isn’t the right way… if he’s not in your party, anyways. In the next Y-Junction you’ll find two chests, the eastern one contains a Mind Source and the western one will yield a Magic Source . In the next screen (not a Y-junction for a change!) rests the best bit of loot this entire area, a yellow orb of goodness just east of the Save Point, which happens to be W-Item Materia .
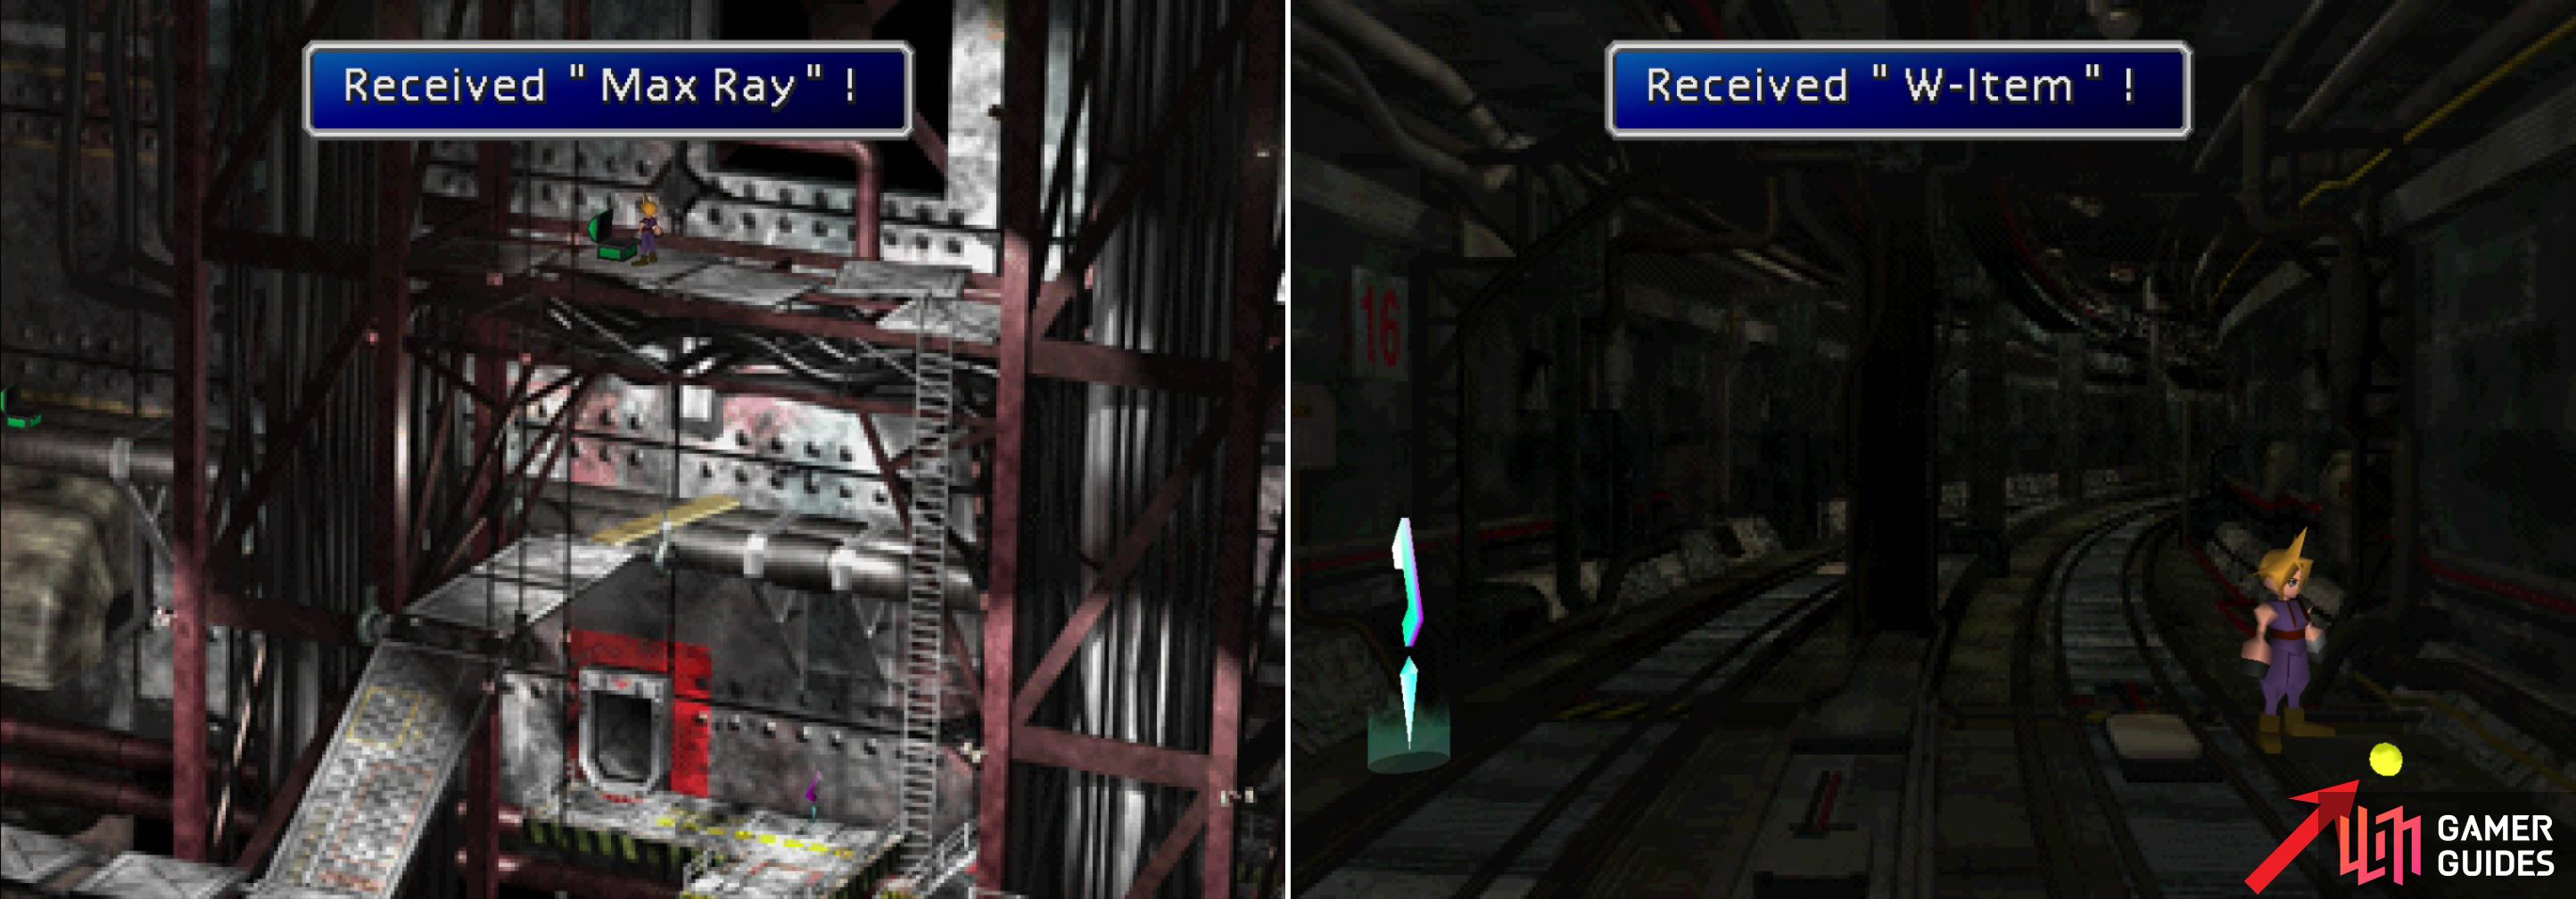
Near the end of the Sector 8, Underground area you’ll find the Max Ray, one of Barret’s most powerful weapons (left). Explore the Winding Tunnel by heading in the wrong direction to find the W-Item Materia (right).
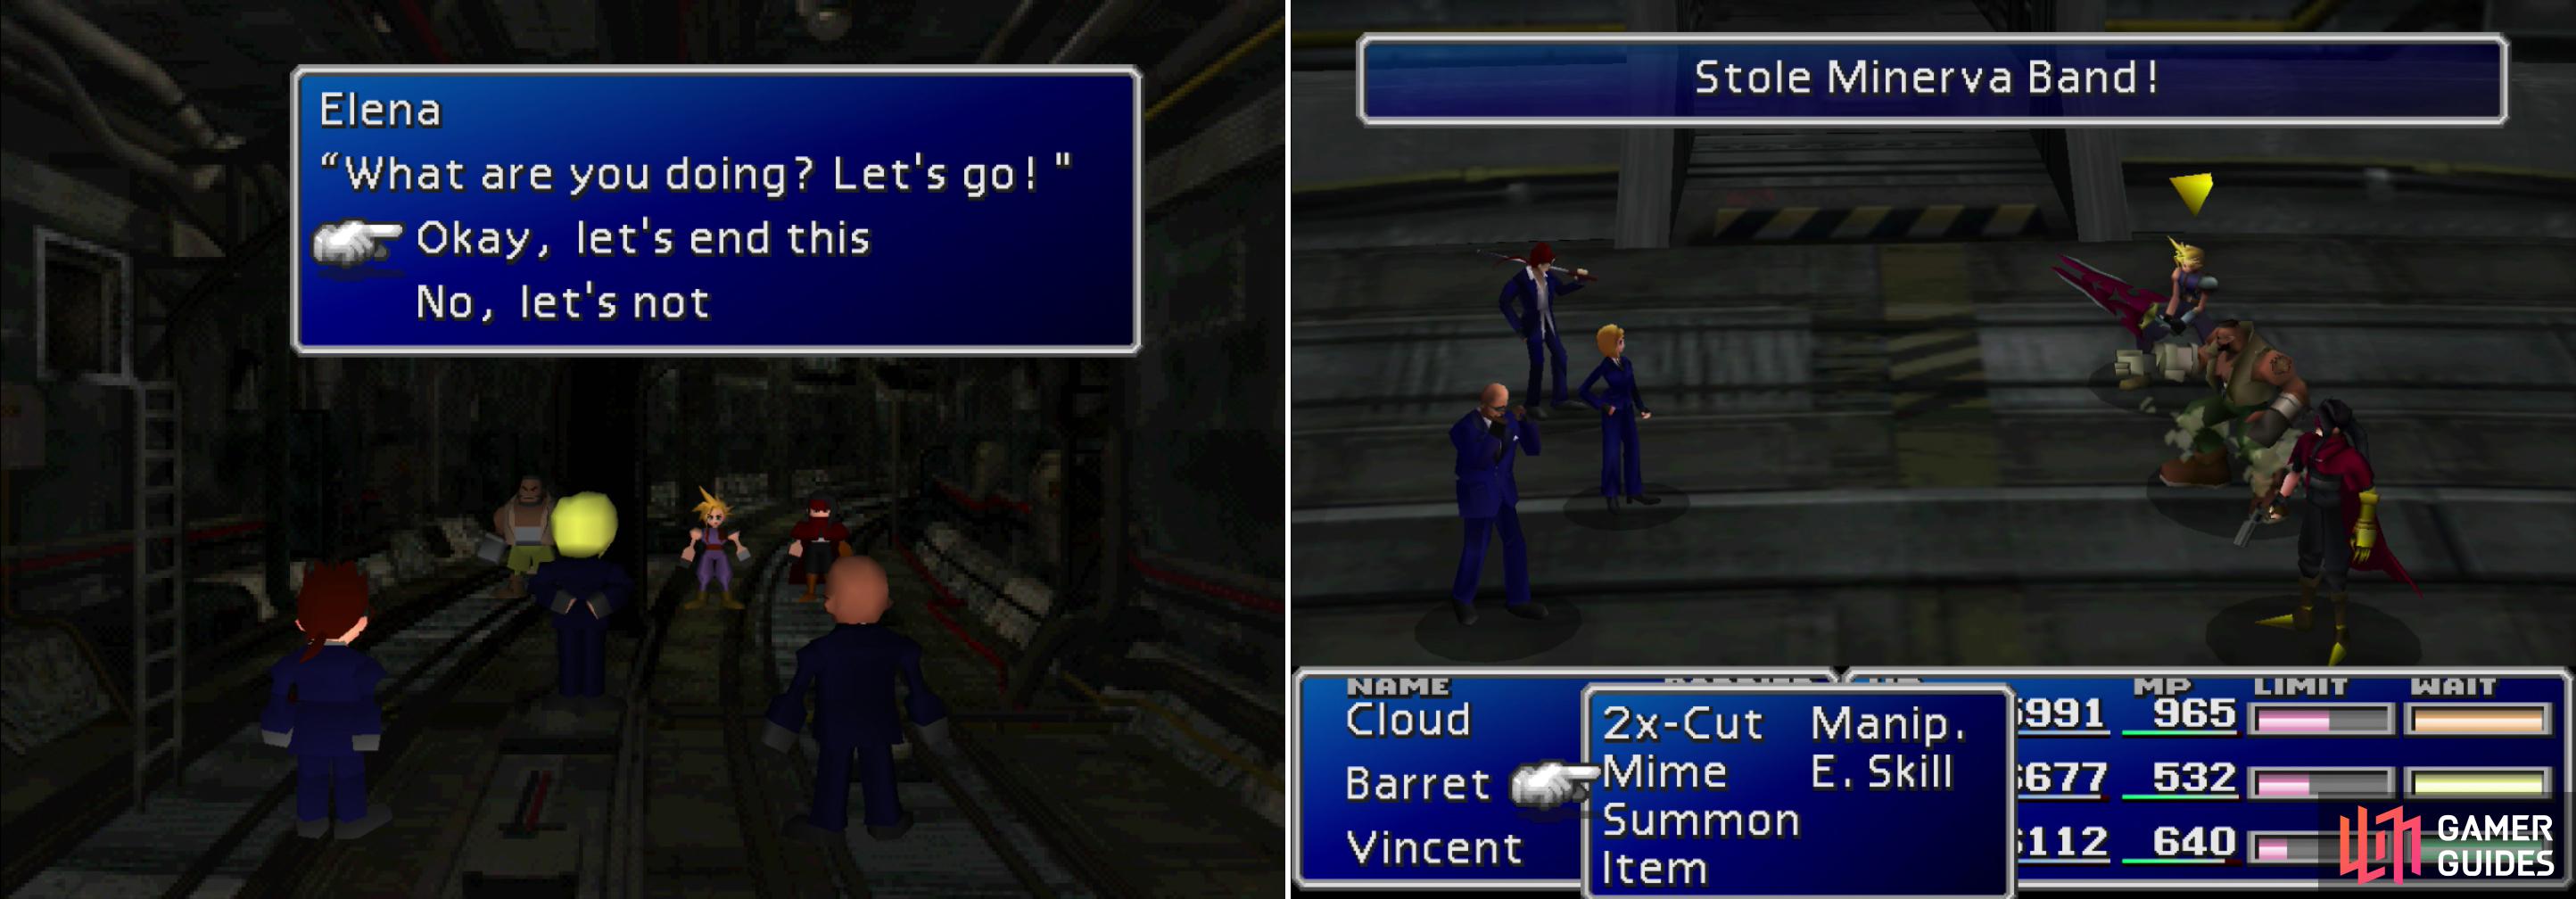
Make your way back north until you reach the part of the Winding Tunnel that connects to the Sector 8, Underground. Return to the previous area to save your game if you wish, and when you’re ready proceed north along the tunnel (away from the camera), only to be shortly interrupted by the Turks. Although Shinra is in shambles, they still elect to do their duty. If you dealt with the threesome back in Wutai you’ll get the option to opt out of the fight (say “No, let’s not”), but there’s great loot to be stolen from them, not to mention the XP and AP they’re worth, so select the option “Okay, let’s end this” to pick a fight.
Boss Battle: Reno, Rude and Elena
Reno and Rude are joined by Elena this time around, who is actually the strongest of the three. Maybe because of all the beatings you’ve given the other two previously? Before you bother attacking them, protect yourself with “Big Guard” and get to stealing. Reno will cough up another Tough Ring , Rude has his trusty Ziedrich , and Elena can be robbed for a Minerva Band . If you don’t steal from them, they’ll just drop two Elixirs , so it’s in your best interests to grab those awesome items they’re carrying.
In the Winding Tunnel you’ll encounter the Turks for the final time. If you built up some camaraderie during Wutai, they’ll offer to live and let live (left). It’s more valuable to fight them, however, as you can score great loot from them (right).
Offensively, they’re not any more powerful than other foes you’ve been fighting, dealing less damage than most creatures on the Gelnika. Compared to the fight on that sunken plane, Reno and Rude have toned down their arsenals considerably. Reno will use his shock baton to whack characters for around 400 damage, his “Turk Light” attack does around 500, and his “Electroprod” deals about 800 damage.
Rude is no longer the Materia master he was earlier, having settled for brute force. His physical attack deals 1000~ damage, while his “Grand Spark” will inflict around 900, although he won’t use it in rapid succession this time around like he did back in Rocket Town.
Elena has the most diverse range of attacks; she’ll throw two different items, one hits the entire party for around 500 damage and the other will set another character back to the tune of 600 damage. Her physical attack deals nearly 1000 damage, but her most dangerous attack deals no damage at all, essentially being the same thing as the “Fascination” attack used by Snow enemies, inflicting Confusion on one target. Other than those attacks, if she’s feeling threatened she’ll jump to the back row.
There are a few complications with this fight. Their attacks are relatively weak, but collectively they can stack up some nasty damage. Each Turk also absorbs a different element, Reno absorbs lightning, Rude absorbs fire, and Elena absorbs ice, so many of the tried and true enemy skills are off the table… although “Aqualung” still works. Lastly, if one of them is defeated, the other two will flee, as well, depriving you of their XP, AP and Gil. Either keep track of their HP with Sense Materia and finish them off with one mighty attack (Bahamut ZERO or a Limit Break), or… if you have the luxury just cast Knights of the Round at the beginning of the fight (after stealing their gear) to end things quickly.
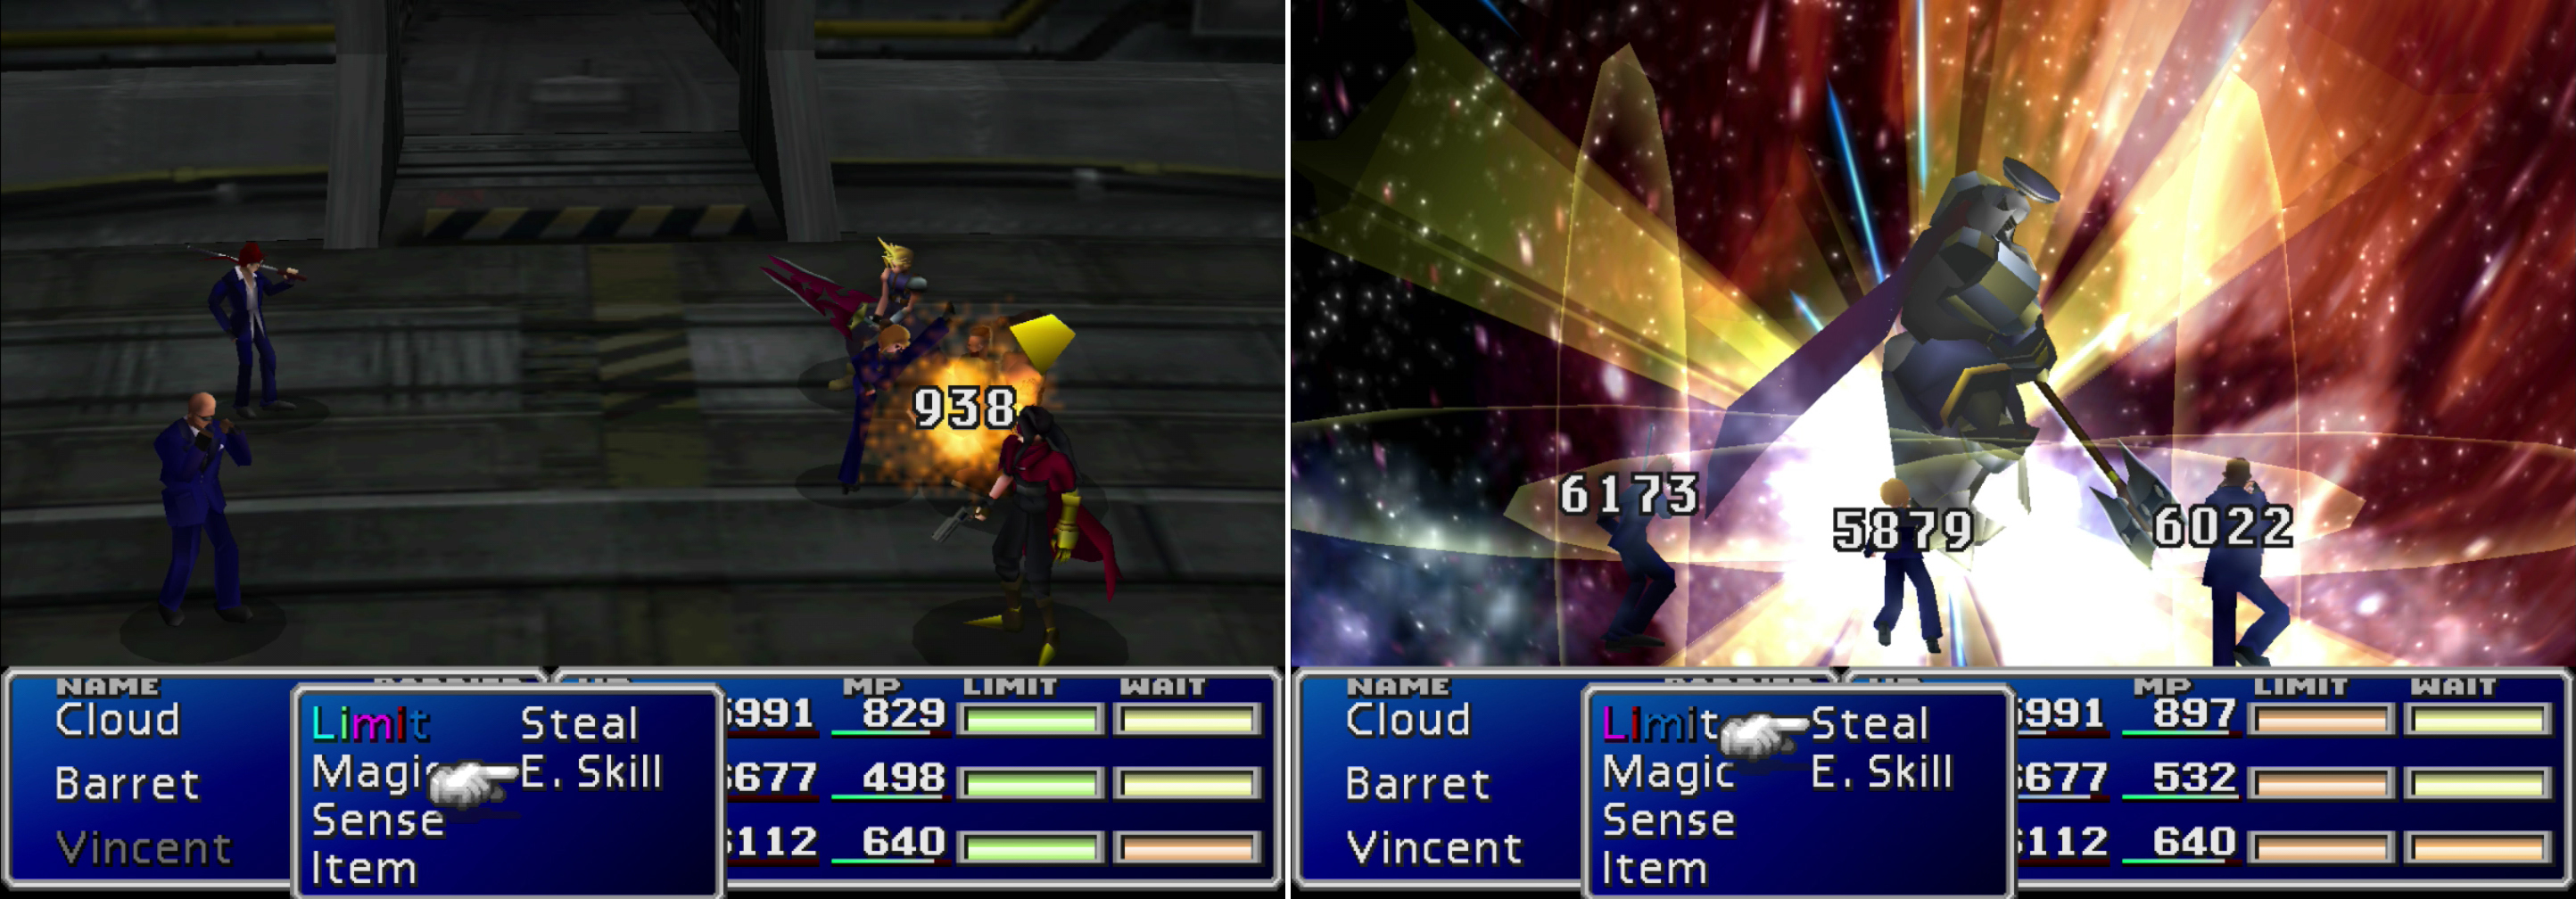
Elena helps even the odds in this final fight against the Turks… numerically at least (left). Using powerful attacks to defeat all three Turks at once will ensure you get the best rewards at the end of the battle (right).
| Reno | Stats | Rude | Stats | Elena | Stats |
|---|---|---|---|---|---|
| HP: | 25000 | HP: | 28000 | HP: | 30000 |
| MP: | 200 | MP: | 250 | MP: | 100 |
| Weaknesses: | N/A | Weaknesses: | N/A | Weaknesses: | N/A |
| Resistances: | Gravity (negates), Lightning (absorbs) | Resistances: | Fire (absorbs), Gravity (negates) | Resistances: | Gravity (negates), Ice (absorbs), |
| XP: | 4500 | XP: | 5500 | XP: | 6400 |
| AP: | 450 | AP: | 600 | AP: | 500 |
| Steal: | Tough Ring | Steal: | Ziedrich: | Steal: | Minerva Band |
| Drop: | Elixir | Drop: | Elixir | Drop: | Elixir |
| Gil | 3000 | Gil: | 5000 | Gil: | 7000 |
Searching Shinra Headquarters
The Minerva Band you can steal from Elena is the big prize of the battle, and it’s the second one you could have found in this game. There just so happens to be two female characters in the party. What a fine coincidence!
Continue north to reach another Y-junction where you’ll find Yuffie (if she’s not already in your party). If you take the western path you’ll reach the scaffolding under the cannon. It’s our goal, but there’s more loot to gain, first. Head east, instead, and pass through a tunnel where Tifa lurks and to another Y-junction, where Cid is complaining about the cannon. If you go east you’ll reach a dead-end, so head west instead to find… another dead end. But in this terminal tunnel there’s a ladder you can climb to reach the Shinra headquarters.
Cait Sith, if he’s not in your party, will come out of the building saying that the cannon isn’t here, either… something he, as a Shinra executive, should know. Head into the building and go up the stairs to the second floor and enter the item shop. In the chaos of the Weapon attacks, the cashier has fled, allow you to finally loot the two chests in the shop. The one to the south-east contains the Master Fist , which has a laughable 38 Attack and six unjoined Materia sockets. On the other hand, it gains a damage multiplier when she’s inflicted with the Near-Death, Poison, Sadness, Silence, Slow and Darkness status, and two multipliers for Death Sentence and Slow-Numb. For example, if she was inflicted with Sadness (x1), Silence (x1) and Death Sentence (x2) she’d have a x5 damage multiplier. This weapon works well in conjunction with the Curse Ring, but even with the damage bonus working well, there are many other characters who will be doing far superior damage with their ultimate weapons.
Next, the chest to the north-west yields the Pile Bunker (or Pile Banger, as it appears in the inventory screen). This weapon is utterly useless in light of the fact that you just found the Max Ray and are about to find Barret’s ultimate weapon. It’s his most powerful melee weapon, having 90 Attack and six Materia socket (three pairs of paired sockets), but since it has no AP growth, it’s in no way preferable to the Max Ray.
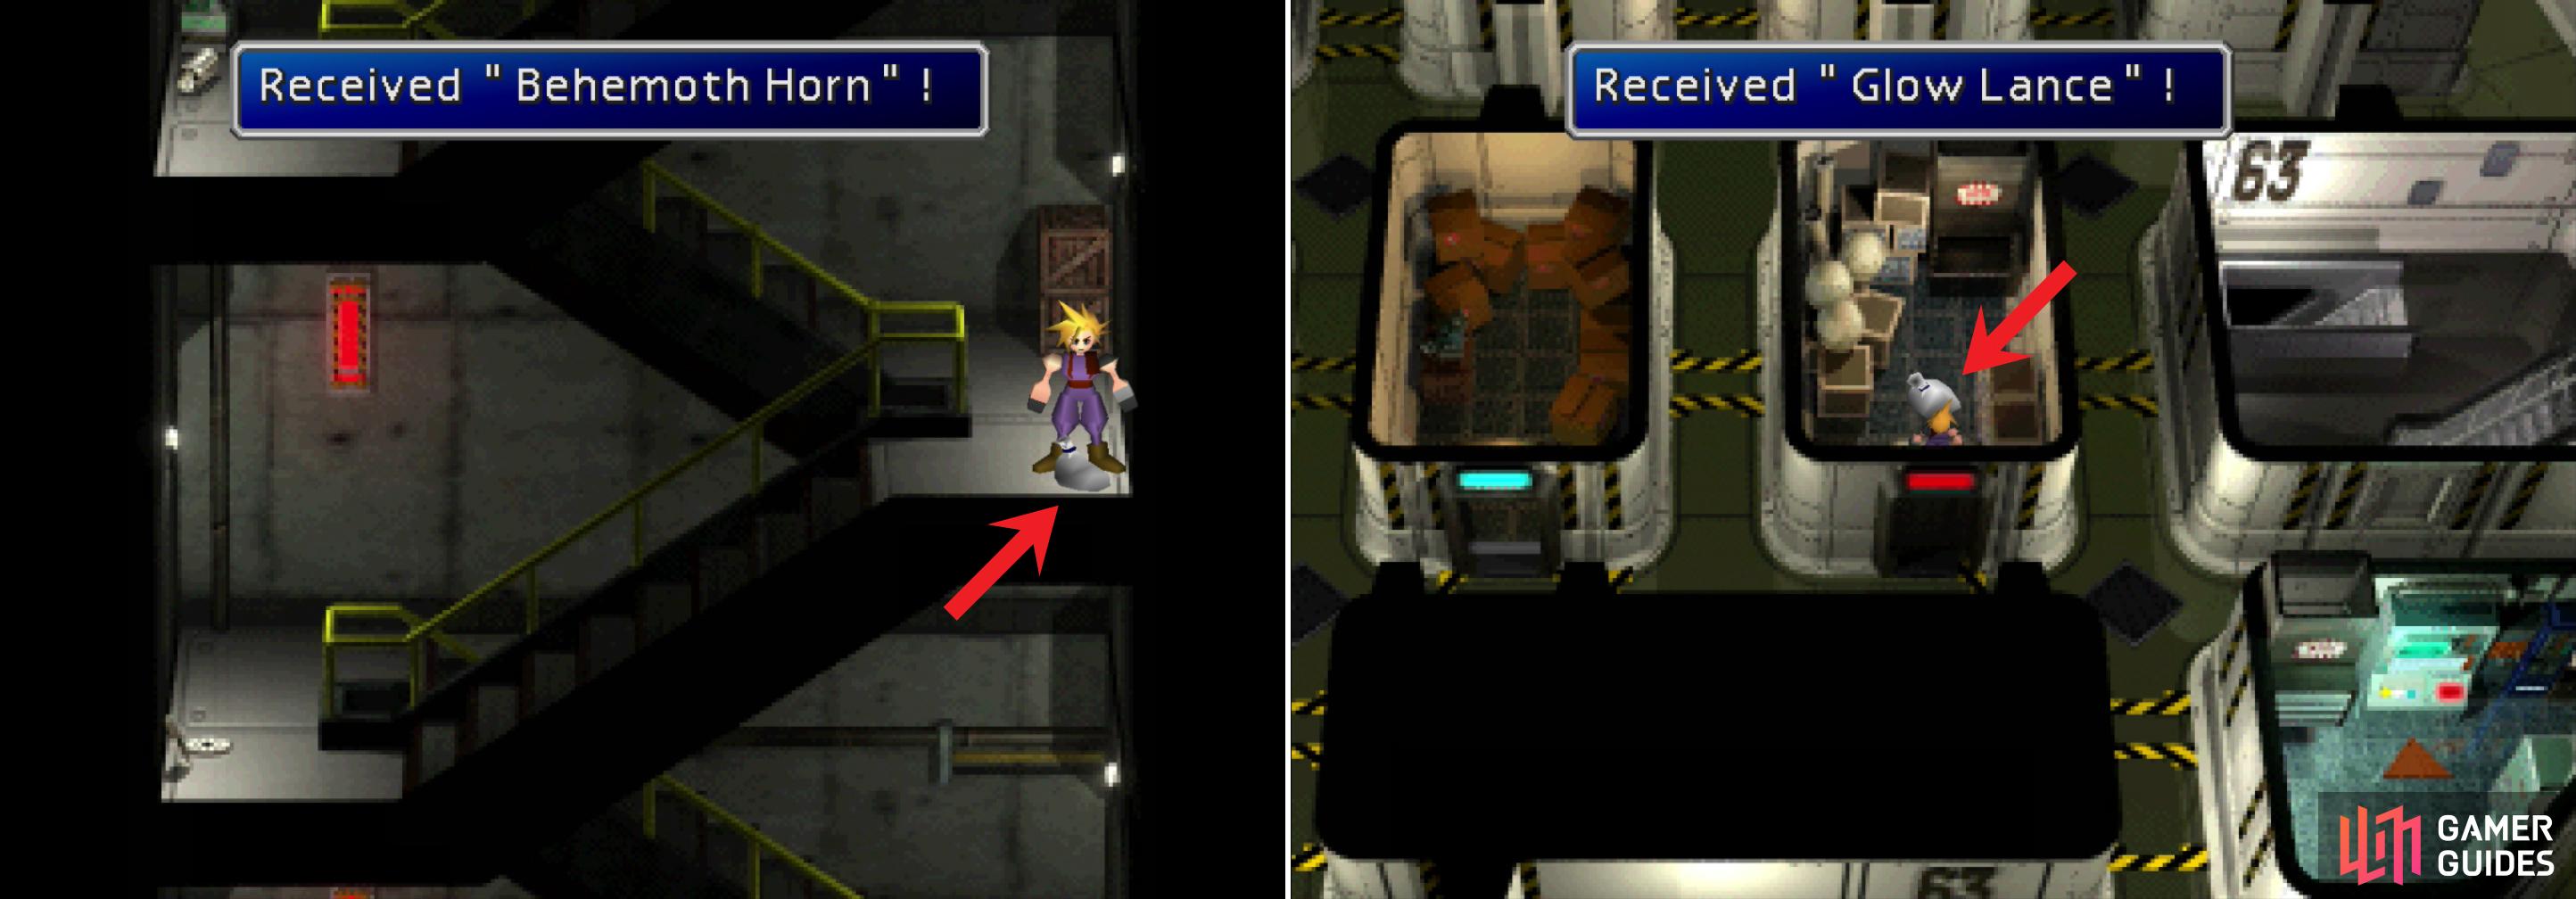
Find the Behemoth Horn weapon on the long staircase of Shinra Headquarters (left). On the 63rd Floor you can find the Glow Lance, a weapon for Cid (right).
Leave the Shinra headquarters building and head west to reach the stairs leading to the building. If you go through the tedious process of climbing them again you can find an item bag on a stairwell landing (on the eastern side of the screen) which contains the Behemoth Horn weapon for Red XIII. This trinket has 91 Attack and six unjoined Materia sockets, but it has a painfully low 75 Attack%. If you can’t find this weapon on your way up, head back down the stairs and search again. Sometimes you’ll get an abbreviated trip up the stairs which bypasses this weapon, but it’s there.
Once you reach the 59th Floor, take the elevator up the elevators to the east to reach the 63rd Floor and grab an item bag in the eastern-most of the two, small central rooms to score the Glow Lance (78 Attack, three pairs of Materia sockets). Grab it and head up to the 64th Floor, where you can rest for free in the room along the western end of the level. If you assaulted the vending machine at the beginning of the game, you can now search it (and bang on it again) to obtain a Mind Source and a Speed Source . Not bad, but for the real treat head to the locker room to the north and search the northern-most row of lockers to obtain the HP Shout , Cait Sith’s ultimate weapon, and the same megaphone that Cloud stupidly left behind the first time you were here.
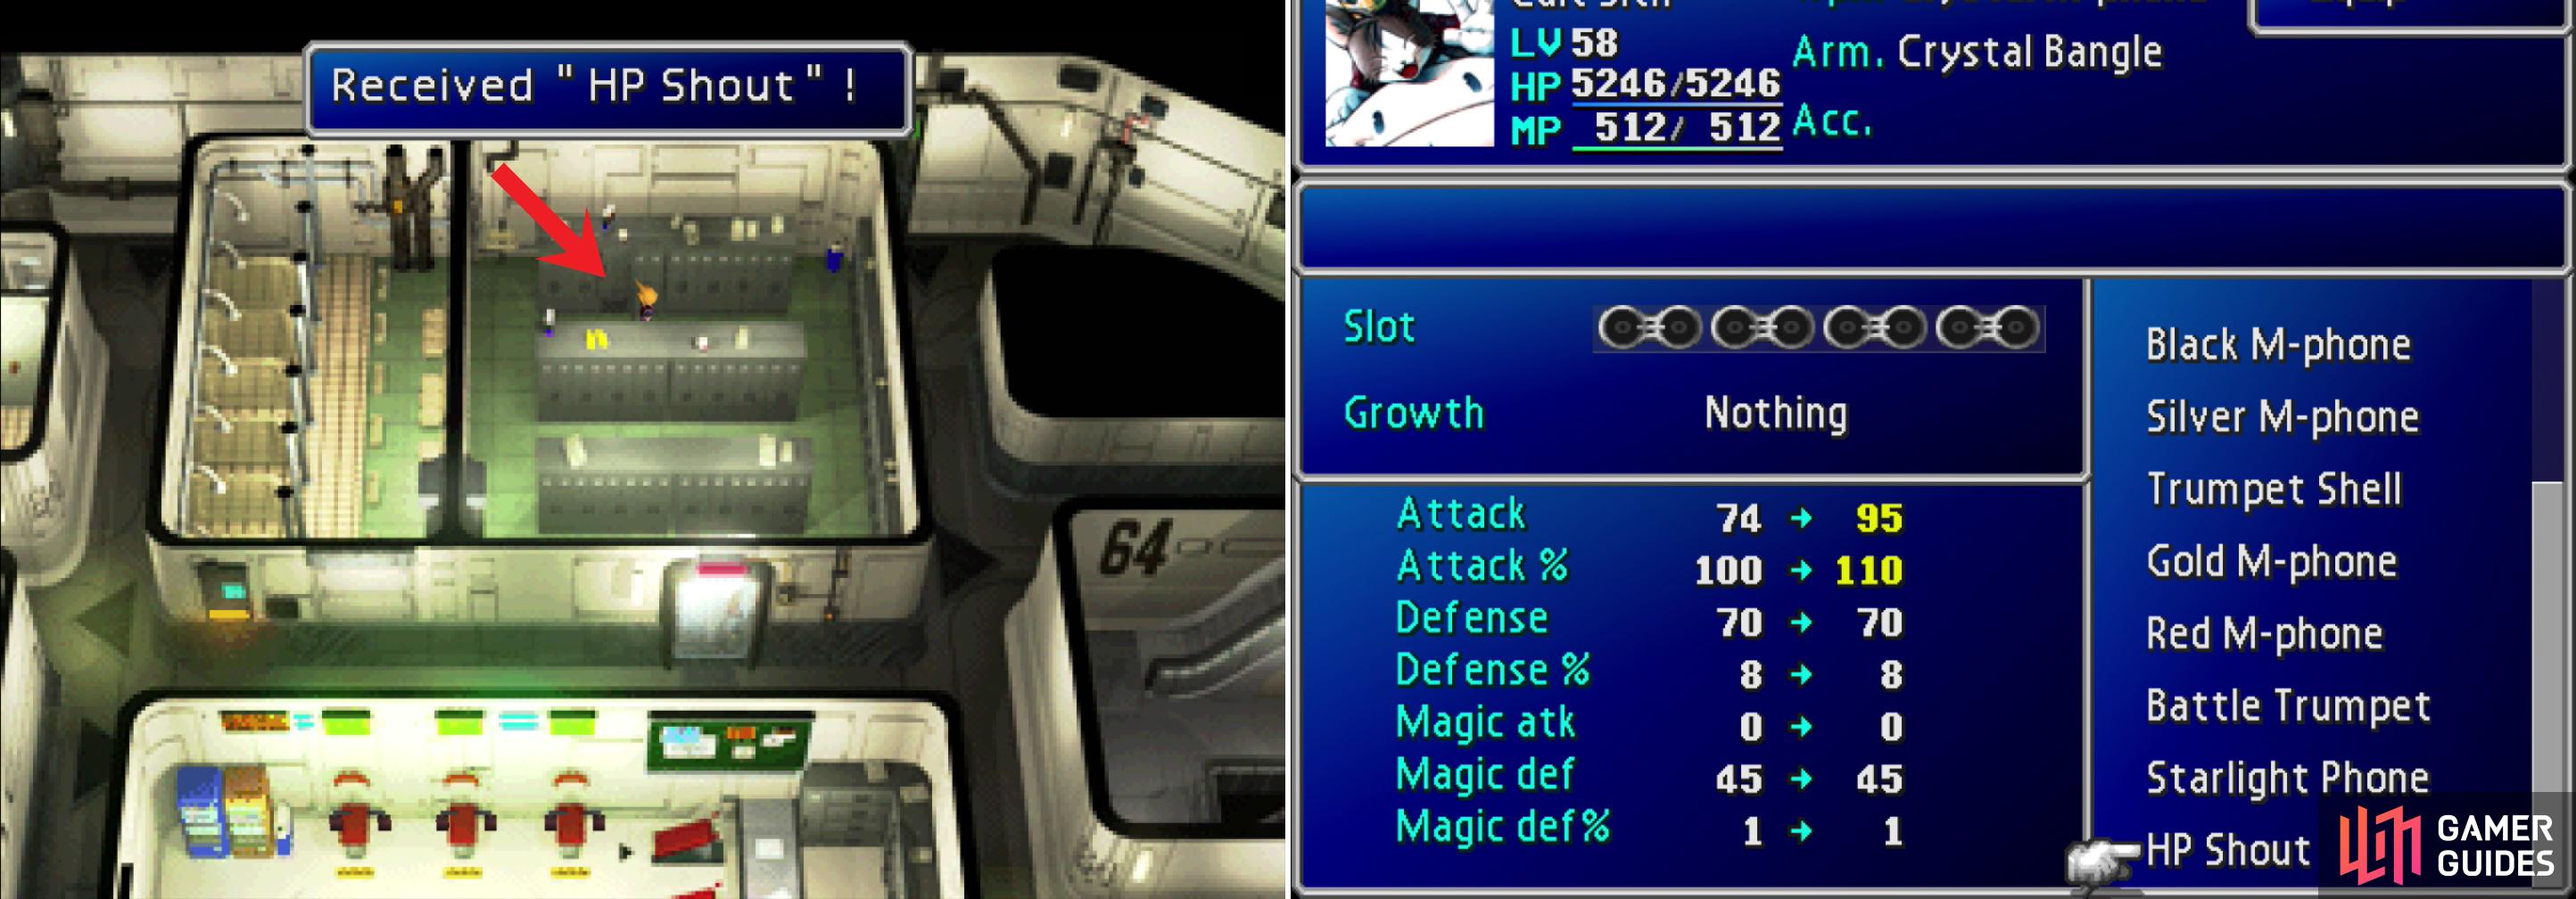
Return to the 64th Floor and search the lockers to claim the megaphone Cloud neglected earlier (left). This megaphone, the HP Shout, happens to be Cait Sith’s ultimate weapon, which deals more damage the fuller Cait Sith’s HP bar is (right).
No Comments