| Collectables | # |
|---|---|
| Runes | 3 |
| Bone Charms | 2 |
| Blueprints | 1 |
| Sokolov Portraits | 2 |
As you start the mission, you’ll be greeted by your first sight of a Tallboy. These look like guards on long prosthetic legs that can move quite fast, have a much longer line of sight than normal guards and will fire incendiary bolts at you if they see you. In other words, avoid them at all costs, but if you should want to take them down, coming down on them from above is definitely the best option.
From the start of the level look for the sewer entrance below the estate. Dive underwater next to the gate to find the sewer key to unlock the grating. This will be hand later on for a quick, stealthy escape.
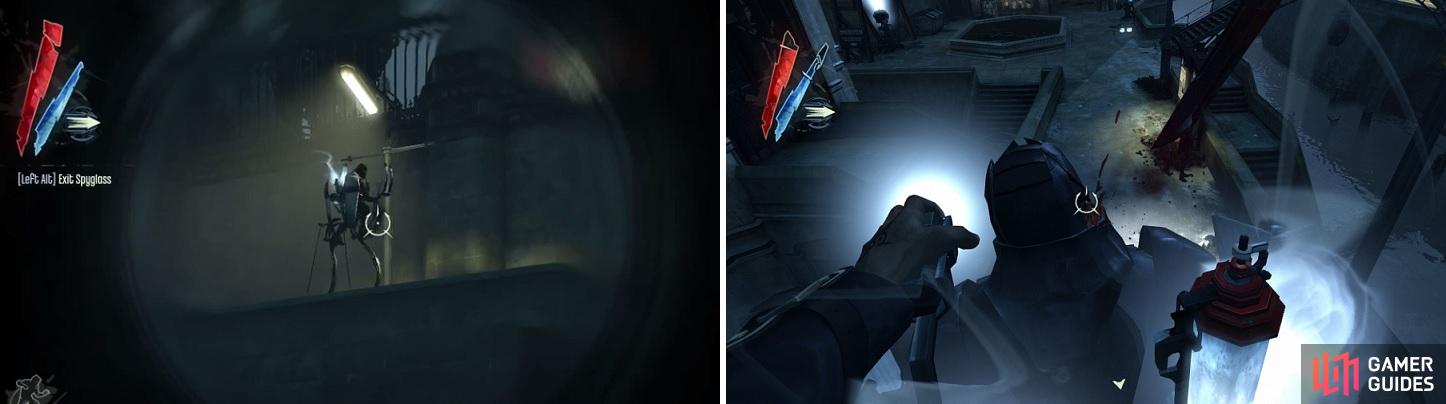
Tallboys are very dangerous enemies that can’t be subdued in a non-lethal manner. Drop assassinating them (right) is one way to kill them.
Optional: Loot the Estate District
Wait for the tallboy to cross the bridge, then climb the stairs and move under the stone arches in front. On the opposite side of the structure, hop up onto the guard post and then up to the roof behind you. Climb up to the next roof on the right and you’ll see an open window in front. Edge up to the window and take care of the weeper inside with a sleeper bolt.
This will encourage another pair of weepers to come down a set of stairs from the room. One will enter the room, pop her to sleep as well, but the other will stay in the stairwell. Blink up to the rooftop to the right and find the stairs leading down and take care of the final weeper here. Enter the room they were guarding to find a Rune (1/3) resting on an Outsider Shrine and a Bone Charm (1/2) on a corpse in the next room.
Backtrack to the start and pull out your heart. Note the rune in the water upstream, hop into the water and swim past it for now and to the farthest point upstream from where we started - use blink whilst swimming to avoid the fish. Hop out on the platform to the left and use the heart to pinpoint a Rune (2/3) in the vicinity and dive down to grab it.
Return to the starting area again and when the tallboy is elsewhere, head across the bridge and sleep bolt the guard down the street leading directly parallel to the estate to the right. Hide his body and enter the open doorway here. Don’t rush in. Wait a second to see a weeper start climbing the stairs in front.
Ignore the four weepers at ground level and sneak over to the stairs, tail the lone weeper as he climbs and choke him to sleep when you get the chance. Continue all the way to the top and loot the room. In addition to all the goodies worth a tonne of coin, you’ll also find Bone Charm (2/2) .
Now that we’ve picked up all the goodies outside (or not), there are three options as to how to enter the party. I personally prefer the third option as it is quick, easy and provides a useful escape route.
1) From the top of the house with the weepers noted just above. On the top floor, there is a second door in we can open to access a balcony. From here we can blink across to the Boyle Estate’s guard quarters. Do so and loot the room and key. Unlock the door here and cruise down the stairs. Blink up to the crates in the next room and use the rope to& access the balconies above. From here we can blink down to the courtyard below. To the left we will see Lord Shaw (optional task, we’ll come back!) and to his right, the door to the Boyle Estate. Enter here to join the party.
2) After crossing the bridge, you’ll notice a ditch running parallel to the road immediately beneath the estate’s walls. Follow this all the way to the left to find a small circular opening boarded up. Smash the boards and crawl through. You’ll need an invitation to enter, if you picked the invitation up from the Art Dealer’s house earlier (pointed out in the walkthrough in House of Pleasure ) you can hand it over to be let in.
If you don’t have one, approach the reveler nearby, as you do one of them will lose their invitation and it will go flying past in the wind. Follow it, pick it up and hand it to the guard to be let in. As you enter the gate, look into the guardroom to the right and grab the Blueprint (Spiky Grenade Housing) from the table. Exit and continue into the courtyard. Enter the door up the stairs to the left as indicated to joint the party.
3) From start of the level look for the sewer entrance below the estate. Dive underwater next to the gate to find the sewer key to unlock the grating. Open the grate and head inside, swim to the end and climb out and up the stairs. Open the door here to enter the Boyle Estate. As you enter the main room, look up and blink to the wooden beams above. Head over to the barred window and activate the lever.
Drop down and continue up the through the barrels on the raised section (note the locked door in the back corner - there’s a rune in here and we’ll be back for it later) and up the stairs to the left. You’ll find yourself in the kitchen and damn those are big jellies! Turn to the left as you ;enter to find another set of stairs, climb up one floor and through the door on the left to join the party.
The Boyle Estate
Once you are inside the party, you can exit either of the doors to return to the courtyard outside to find Lord Shaw for Pendleton’s optional mission. Do so if you are interested, you can also go and grab a Blueprint (Sticky Grenade Casing) from the guard room in the tunnel you can find in the courtyard between the two entrances to the main building (if you miss this, you can pick it up again in a new location in a few missions time, so its not necessary). If not, it’s time to mingle!
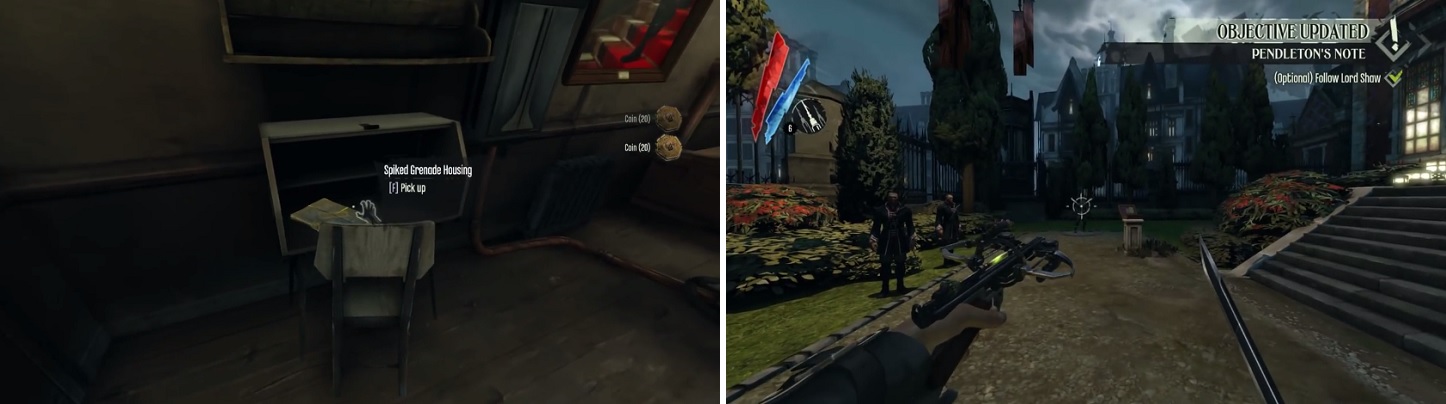
Make sure you grab the blueprint (left) from the guardhouse before heading inside the mansion. If you’re going for the Clean Hands achievement/trophy, remember to equip sleep darts for your crossbow before firing at Lord Shaw (right).
Optional: Lord Shaw
Once outside the main house, talk to Lord Shaw and give him the note from Pendleton. He doesn’t appear too happy, does he? You will have to duel him. Go over to the starting point and when you are able to turn around, pop him. If you are going for a zero kill run, you can still complete this mission, just be sure to equip the sleep bolts for your crossbow! Afterwards, head back inside.
Now that we are in party mode we need to find the target. There are three Lady Boyles at the party and they are all walking around in identical costumes in three color variants - white, black and red . We need to discover which one it is we need to deal with. To do this we can chat with guests, or sneak up to the second floor and rifle around for information.
For a zero kill run, I’d recommend the former. Before doing anything head over to the far right hand room and sign the guest book so that the guards don’t come and bother you. Afterwards, let’s get chatting. The people you want to talk to are:
- Miss White: The lady with the moth mask - she’ll want you to bring her a drink. Go to the main hall with the very large table to find a fountain, where you can grab the drink. Bring it back to her to discover who is wearing which color.
- Lord Brisby: The guy with the creepy rabbit mask - he’ll give you a non-lethal option of removing Lady Boyle and tell you the name of your target.
Once you have spoken to those two, you should know which one is your target so track them down on the floor. There is a very easy method to bypass all of the guards and subdue the Boyle you’re after, although if you want to get everything here, you’ll want to head upstairs first.
There are three ways to get upstairs:
- Disable the Wall of Light
- Access via the kitchen
- Blink up to the balcony from outside
Note that whichever sister is your target, exploring their room will yield a Sokolov Portrait and a Skeleton Key for Dunwall Tower , as well as some nice loot that will give you a good chunk of coin. Additionally, if your target is Waverly or Lydia, you will be able to read their diaries for information that will help you to take to them out non-lethally.
The easiest way to get into the upstairs area might be from the stairs inside the mansion, but there’s a guard sitting there by a barrier, blocking it. Approach him and he’ll say that the area past him is off-limits, then proceed to walk downstairs, so you can sneak by (preferably using Blink to quickly get up the stairs) when he’s away.
Once you manage to get upstairs, you’ll want to be careful, as there will be more guards up there, with around four patrolling the halls. There are two things you’re looking for up here, which are Sokolov Paintings (2 of them), with one being in one of the Boyles’ bedrooms; you can easily distinguish them from their ornate-looking doors. The other painting will be in the central area of the bedrooms, in a room with a bunch of glass cases. If you want a Rune in the cellar, you’ll have to find a Basement Vault Key in one of the Boyles’ rooms.
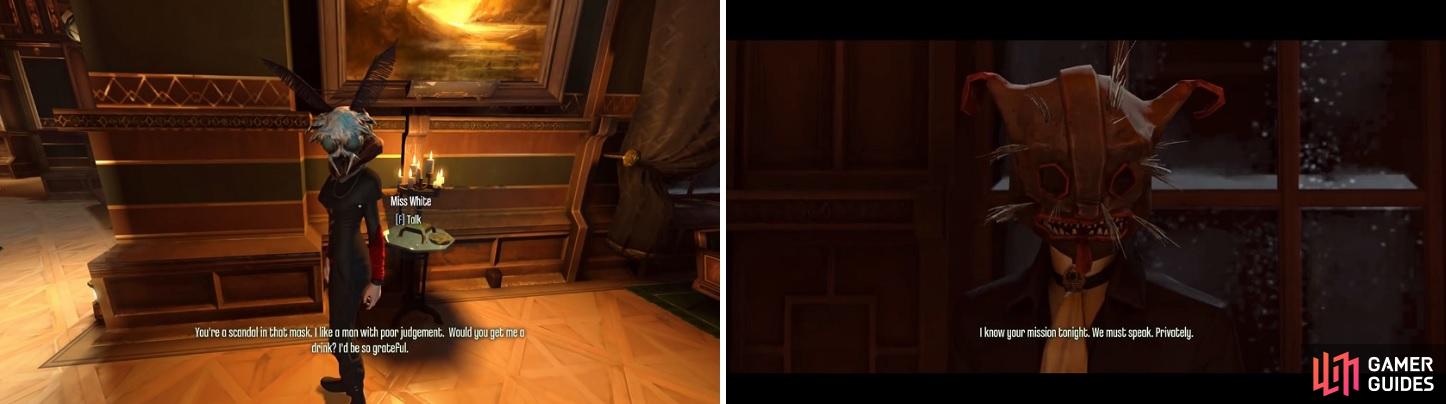
Talking to both Miss White (left) and Lord Brisby (right) will reveal who your target is exactly.
Subduing Lady Boyle
We have already mentioned that there is a very easy way to get Boyle alive, no matter which one it is. After talking to both Miss White and Lord Brisby to find out who your target is, find her (should be marked) amongst the other guests and talk to her. She will ask you some questions and if you answer with the correct responses, then she will go down to the basement on her own accord! The questions and how many you get will be slightly different each time, but try the following responses:
- I think I know your name.
- Can I suggest we have a more privarte conversation?
- I’m here to kill you (seems to be specific if Esma is target)
- I’m here to save your life.
- Actually I have a message. Someone’s going to meet you in the cellar. It’s important. You should hurry.
Doing the above, the Lady Boyle you need will walk down to the basement and you can follow her down without any problems. As soon as you get past the kitchen, choke her out, pick up her body and press the switch on the wall to open the door.
Now that you are down in the cellar, unlock the vault door (if you got the Basement Vault Key from upstairs) in the corner and grab the Rune (3/3) and rest of the loot before exiting back to the sewer entrance and back to the outside. Be careful of the swarm of rats in the one alcove. Swim back to the main canal and turn left, blink swim all the way in this direction until you find Samuel’s boat. Talk to him to end the mission.
No Comments