Crotas End
Objective
Location: Ocean of Storms, Moon
Fireteam: 1-6 Players
Normal - Level 30
Hard Mode - Level 33
Hard Mode Differences
-
- All enemies are Level 33.
-
- You may not revive if you are killed.
-
- Primary Weapons may drop at all major sections.
-
- Enemies take less flinch damage.
The Hellmouth
After forming your Fireteam and selecting the Crota’s End Raid you will appear on the farside of the Hellmouth. Stand on the circular plate on the grand to form a bridge out over the pit. Once formed, the team may now run out to the end of the bridge and leap down, falling far but landing gently in The Abyss.
The Abyss
Navigate the Abyss.
Hard Mode Differences
-
- Chest is only available once, regardless of mode.
-
- Ogres, Cursed Thralls, and Knights are Majors.
-
- Oversoul Edict may drop for this section.
Recommendations
- Weapons: Anything with Firefly Perk. Fatebringer makes a good choice, so does Icebreaker.
- Hunter: Use Bladedancer with Vanish, Escape Artist, and Stalker for invisibility perks. The Exotic Gauntlets “Don’t Touch Me” complement well here if you have them.
- Titan: Use Defender with Blessing of Light, Illuminated, and Suppressor Grenade. This helps with keeping the team alive. Helm of Saint-14 is an obvious choice for keeping enemies confused if they infiltrate Ward of Dawn.
- Warlock: Use Sunsinger with Fireborn, Gift of the Sun, and Brimstone. This allows you to revive and Scorch will explode enemies. The “Sunbreakers” Gauntlets work well for leaving Solar Grenades at lamps, paired with Gift of the Sun and you can throw grenades more frequently.
The Mechanics
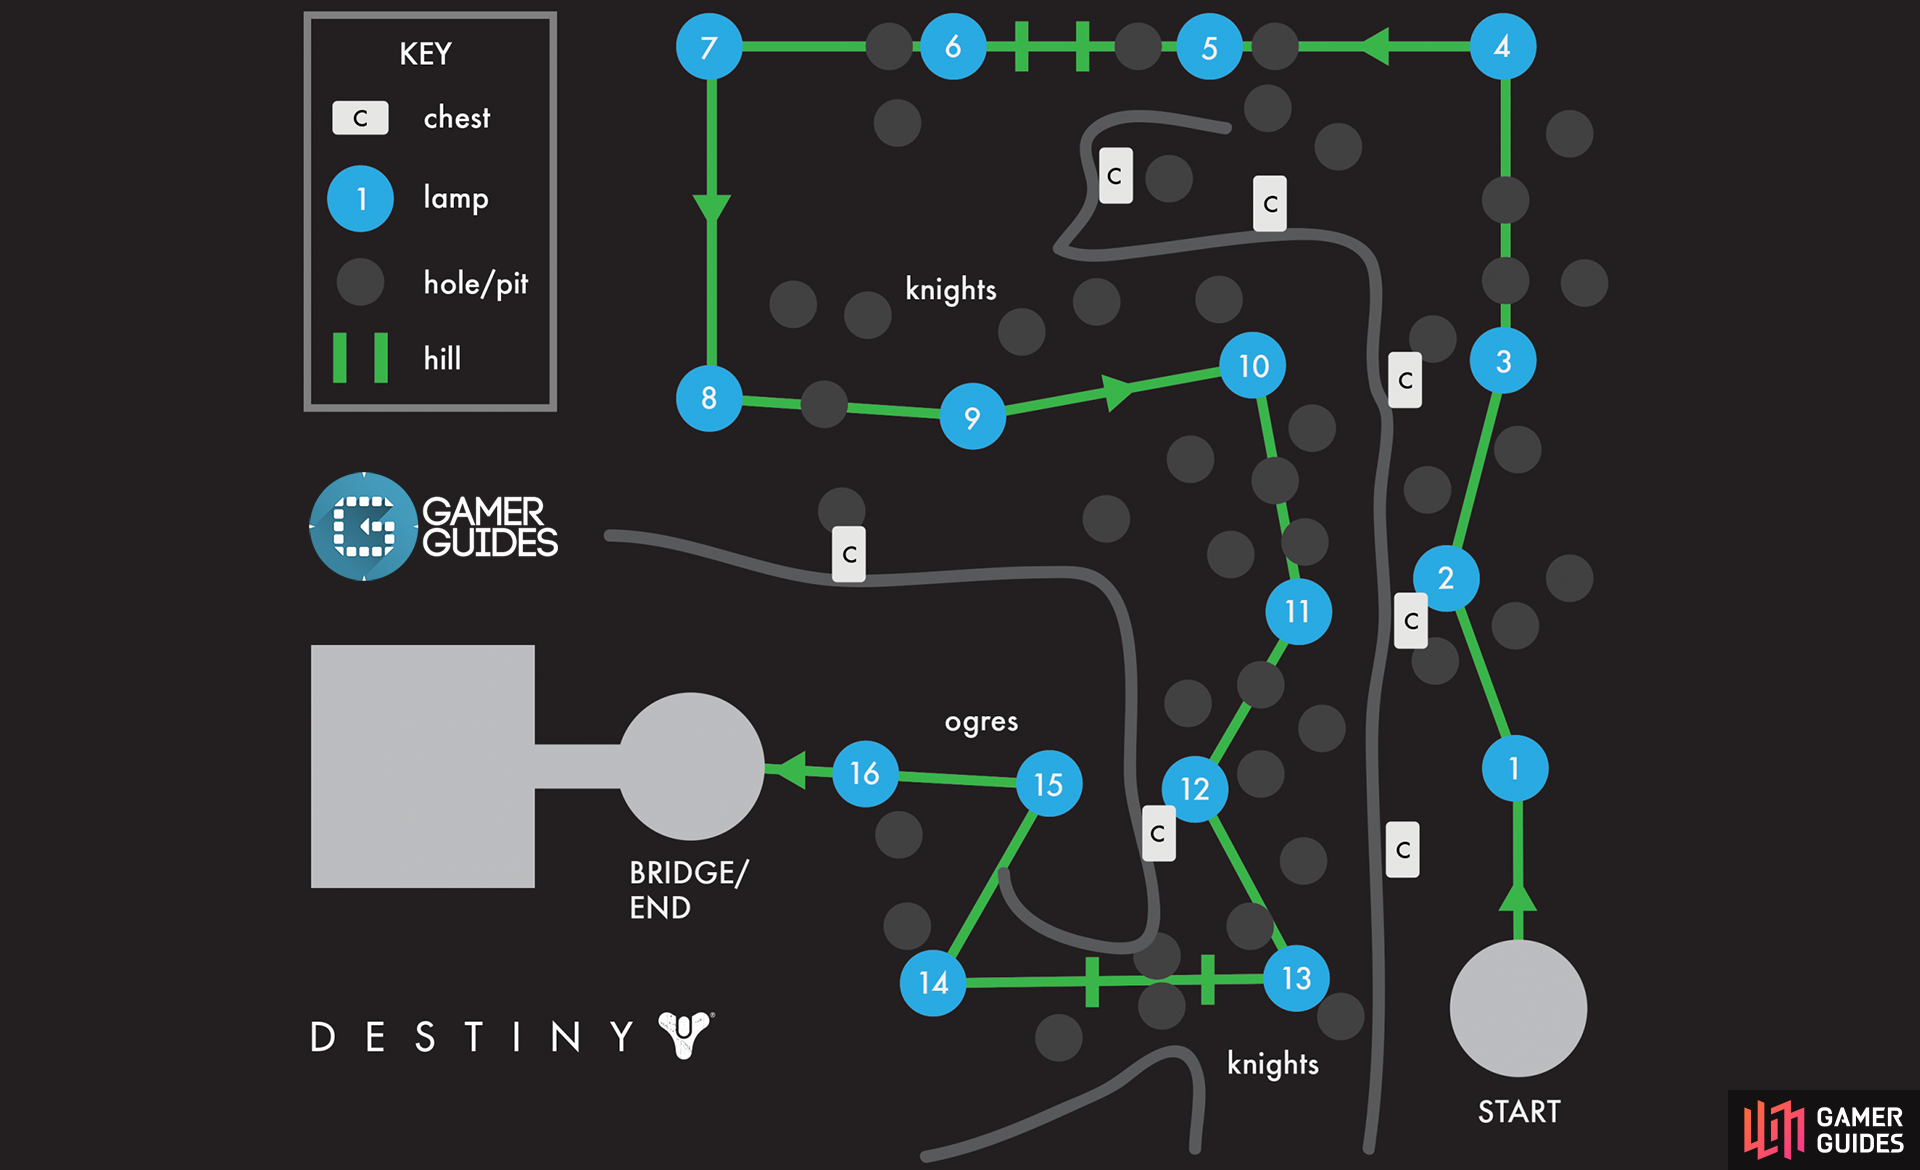
This area is incredibly dark, light generated only from a few lamps that light the path to the next zone. Thrall and Cursed Thrall hide in the darkness and they will swarm the Fireteam as you progress through the darkness, it’s nice to take them out in waves and that’s why your weapon has Firefly on it. Stepping into the darkness adds a debuff to your Guardian called “Weight of Darkness” which can stack up to 10 times. Each stack causes you to move slower, once you reach 10 stacks you’ll be moving at a crawl – double jump is disabled by this debuff as well. Standing in the light of the lamps will remove the debuff slowly, allowing you to progress from lamp to lamp defeating the Thrall as you move. A few lamps have Major Knights guarding them, it’s usually best to bypass them. In addition to all this, there are holes in the ground and rocks/pillars in the way.
Chests in The Abyss
From the starting area, there are 3 easily reachable doors along the left-side wall. Each door has the potential to contain the chest for The Abyss. There is another room left of the 5th lamp and another to the left of the hill toward the 6th lamp. Look right as you move from lamp 8 to 9 to spot another door, the final room is between lamps 13 and 14 on your right just before going up the final hill. It’s recommended to go for the first three doors if you want the chest contents, otherwise it’s harder to reach the other doors and you could die after making it quite some distance.
Conquering The Abyss
To begin, move as a team to the third lamp. It’s a short distance and allows the group time to debuff about 5 stack of Weight of Darkness, it’s safer than staying at lamp 1 or 2 where you’ll find Cursed Thrall. Defeat some Thrall during this portion then make the long trip to lamp 4. The next two lamps are in a straight line, the sixth one being up a hill. It’s best to go straight up the hill here where you’ll have a great vantage point to pick off Thrall. Continue to lamps 7 and 8 where you get a bit of respite from the mayhem. As you move towards the next lamp a Knight will appear, it’s a long run to skip lamp 9 though so everyone should kill this Knight. The progression from here isn’t too bad, just remember to continue killing Thrall and use Ward of Dawn if things get too hectic. As you make your push up the second hill another Knight will appear, just run past him and get to the top of the hill.
Once you reach the final lamp you’ll notice a well-lit area with a circular plate, stand on it to trigger the bridge. It takes some time and you must defeat Ogres that will spawn as a cause of this. Near the final lamp are two smaller rocks, leap on these to avoid many of the Thrall and begin defeating the Acolytes and Knights that will appear at this point. Once the bridge has formed you’ll need to run across and into the light which takes you to the Bridge.
The Bridge
Crota’s Nether Realm
Hard Mode Differences
-
- Abyss Defiant is now a possible Reward.
Recommendations
- Weapons: Sniper Rifles are handy (Icebreaker), Solar Rocket Launchers are great (Gjallarhorn) if you have them. Your primary weapon doesn’t matter too much, Vision of Confluence is great if you have it.
- Hunter: Use Gunslinger and Triple Jump for easy maneuverability. Golden Gun is useful for quickly eliminating Swordbearers.
- Titan: Use the same setup as you did for The Abyss. You’ll be guarding the bridge and going over last because you can survive the longest, the easiest.
- Warlock: Sunsinger with Fireborn is great in case you die, which is the worst thing that can happen in this part.
The Mechanics
There’s a lot going on with this fight, but once you have it down it’s pretty easy to execute. This area is divided into two sides with a bridge that connects them, on each side is a Bridge Plate and two Annihilator Totems. Standing on a Bridge Plate starts to form the bridge, one person must remain standing on the Bridge Plate to form the bridge and keep it active. When a Bridge Plate is activated, the Annihilator Totems on that side begin to light up orange and will wipe the Fireteam. To counter this, at least one Guardian must be under/near each Annihilator Totem. The encounter starts once someone triggers the bridge building via the Bridge Plate, so the Fireteam can get in position near the Annihilator Totems. A Defender Titan should take the Bridge Plate with another Guardian, two Guardians on each Totem.
Waves of Thrall, Knights, and Acolytes will begin to come down the steps and crawl up the sides of the platform. A Swordbearer appears and when defeated, drops a Sword of Crota. Attempting to cross the bridge without the Sword of Crota will get the Guardian killed by the Bane of Swordless debuff. Once the Swordbearer is defeated, a Gatekeeper (Large Blue Aura Knight) spawns on the far side and can only be defeated by the Sword of Crota. Sides of the bridge should be called Side A and Side B to make communication easiest.
Crossing the Bridge
The group will split into teams of two, going to the left Totem, right Totem, and Bridge Plate. When the first Swordbearer appears it should be killed immediately and the weakest player should grab the Sword of Crota and cross the bridge. The Gatekeeper should be defeated easily as no additional enemies should have spawned on Side B. The first Guardian to cross should now hide behind on of the small pillars to the left or right of the bridge. Enemies will not attack here if you don’t peak, this allows time for the second Guardian to cross and assist after the Gatekeeper has been defeated. The first two Guardians may choose to hide together, waiting for Guardian number three to cross and defeat the Gatekeeper. Once Side A and Side B both have three Guardians then Side A will want to step off the Bridge Plate and let Side B stand on the Bridge Plate on that side, keeping in mind that the other 2 Guardians on Side B must stand underneath the Annihilator Totems here.
This is the tricky part of the fight, the left side Totem on Side B will face a Major Wizard and two Boomer Knights while the right side Totem gets Thrall and Acolytes; your best player should be on the left of Side B. It’s easy to stand at the entrance to the zone now and defeat the Swordbearer from here safely. On Side A, defeat the Swordbearer and send a fourth Guardian across; this player will back up the Bridge Plate and left Totem. With just two Guardians left on Side A it gets a little difficult, don’t shy away from using Heavy Ammo. The last person to cross should be the Defender Titan, he can survive the longest and will be able to get help from Sniper Rifle fire from Side B to defeat the Swordbearer.
Once everyone is across two Ogres will spawn, one of each side of the platform. Step off the Bridge Plate and gather on the left or right Totem to quickly take out the Ogre, then switch to the other one. Once both Ogres have been defeated you’ll receive your rewards and all other enemies will despawn.
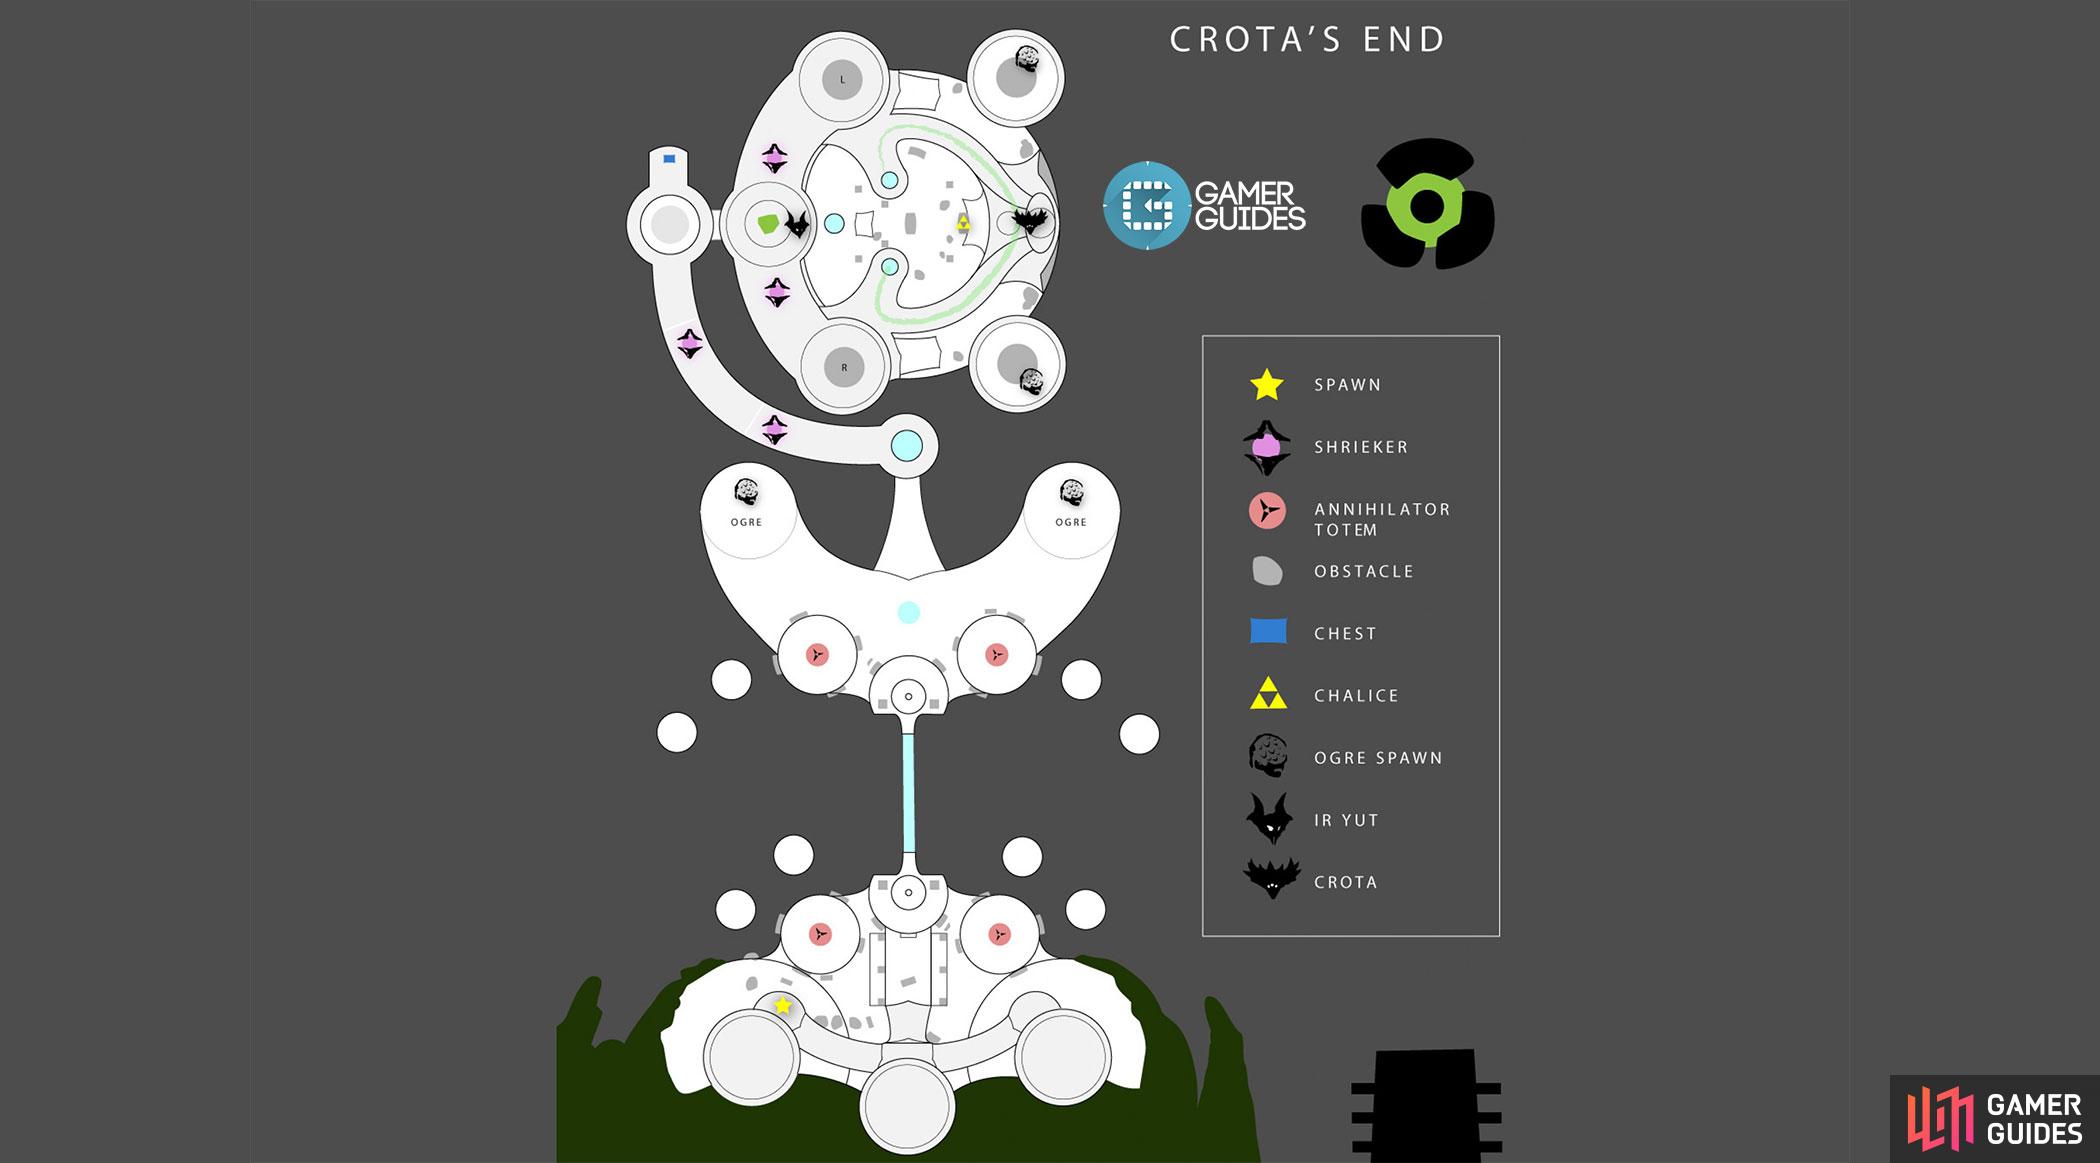
Battle Ir Yut and Crota in this final chamber.
Ir Yut, The Deathsinger
Hard Mode Differences
-
- Shriekers will respawn in the Thrallway.
-
- Liturgy of Ruin activates in 1 minute 30 seconds after Deathsong begins.
-
- Receive only one reward.
Recommendations
- Weapons: Rocket Launchers and Sniper Rifles. Scout Rifles and Handguns are great for distance damage.
- Hunter: Use Bladedancer on the way to Ir Yut, switch to Gunslinger for the boss fight.
- Titan: Use Striker on the way to Ir Yut, switch to Defender with Weapons of Light for the boss fight.
- Warlock: Use Voidwalker on the way to Ir Yut, switch to Sunsinger for the boss fight.
The Mechanics
This is a multiple phase battle, but the phases are short and the fight is quick. The first phase is actually reaching Crota’s Chamber, where you’ll encounter Thrall and Shriekers. The Shriekers must be destroyed to move forward, an invisible wall is put up between the Fireteam and the exit – this mechanic is applied during the boss fight as well. Once one of the Sword Knights guarding Crota’s Chamber damages a Guardian or is damaged by a Guardian, Ir Yut will begin her song, starting an unseen timer (2 minutes 30 seconds on Normal, 1 minute 30 seconds on Hard). Once the timer reaches its end you’ll receive the debuff for Liturgy of Ruin which is a 30 second timer. If this gets to 0 then you die, but during the Liturgy of Ruin Ir Yut is stationary and thus open to Heavy Weapon fire. There are Wizards and Shriekers guarding Ir Yut, they will need to be defeated to reach her.
Chest in the Thrallway
In the hallway full of Thralls on the way to Ir Yut is a chest behind a timed door. It begins to close after defeating the Thrall Exploder in the hallway, entering the room past the hallway, or after 1 minute from entering the hallway. The best way to navigate this is have three people throw grenades to take out the Thrall and have two others use Rocket Launchers to take out the Shriekers. The last person should be a Bladedancer who can stealth run past everything and leap over the hole in the room to beat the timed door easily. This chest always contains Radiant Energy or Radiant Shards.
Death to the Deathsinger
Once you understand the mechanics to this battle it goes by rather quickly. A confident group can split into two groups of three, one going left and the other right, while an underleveled team may choose to stay together. Regardless, the following will need to be executed: leap past the Sword Knights without damaging them or taking damage (doing so starts the Deathsong) and leap up into the Towers. Once grouped in a Tower, one player will enter the crystal room and shoot the Wizard then race back out. This draws the Wizard out for the Guardians waiting at the Towers to snipe down. Once both Wizards have been defeated take a moment to clear out some of the additional Hive then hit one of the original Sword Knights. This starts the Deathsong but also spawns the Shriekers which must be defeated to reach Ir Yut. Remember that this starts the timer so you’ll need to take the Shriekers out on both sides of the crystal room, best done with a Rocket Launcher (2 shots for most, Gjallarhorn can do it in one shot).
With the Shriekers downed you’ll be able to damage Ir Yut. Do your best to hit her, she moves around a lot, but conserve your Heavy Ammo. When the Liturgy of Ruin begins Ir Yut will become stationary so unload your Heavy Weapons at this time in conjunction with Weapons of Light to easily defeat her. You’ll need to clear out the remaining Acolytes and Knights still, but once you receive your rewards then you have obtained the checkpoint for Crota.
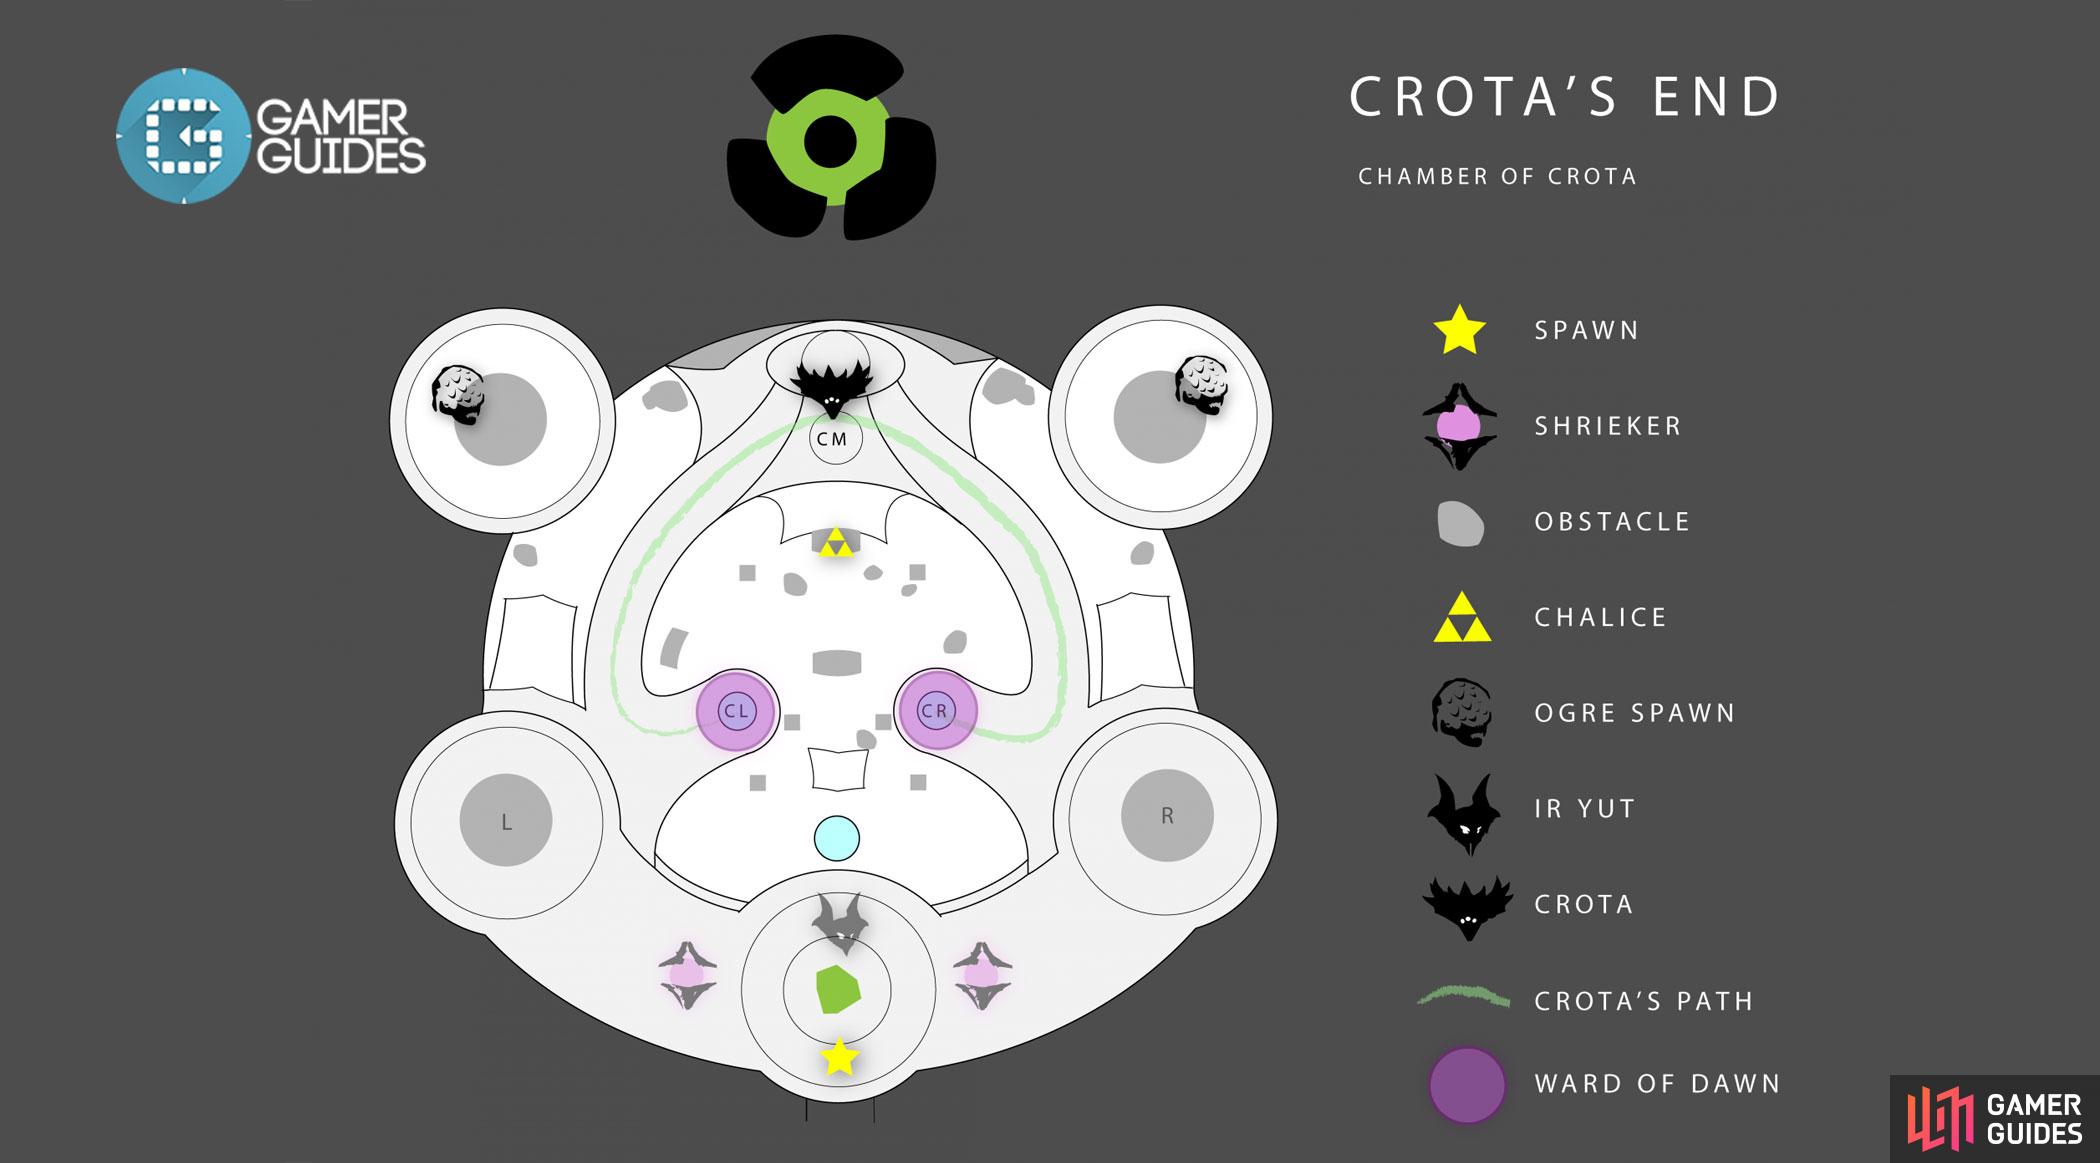
Crota, Son of Oryx
Hard Mode Differences
-
- Chalice does not spawn.
-
- Hallowed Wizards will now spawn to the left of Crota.
-
- Gatekeepers have been added.
-
- All Knights are Majors.
-
- Gatekeeper does not need to be down to strike Crota.
-
- Gatekeeper will despawn after Swordbearer is defeated.
-
- Rewards now include Glowhoo, Fang of Ir Yut, and Word of Crota.
Recommendations
- Weapons: Rocket Launcher, preferably one with tracking. Sniper Rifles.
- Hunter: If using the Sword of Crota, Bladedancer, otherwise Gunslinger.
- Titan: Use Defender for Ward of Dawn.
- Warlock: Use Sunsinger for Radiance.
The Mechanics
To summon Crota all Fireteam members must stand around the crystal where Ir Yut was located. The glass walls will erect again with the team trapped inside, Acolytes and Knights spawn outside. Boomer Knights now sit in the towers, Thrall and Acolytes roam the bottom of the chamber, and a Swordbearer spawns. Crota is in the back central platform, he’ll stay here for awhile then rotate periodically. The Swordbearer must be defeated to grab the Sword of Crota, it’s the only thing that can damage Crota. The team will need to bring Crota’s shield down and let the Sword Wielder deal the damage. If anyone dies then Crota will summon his Oversoul, the large planetary object in the background. You can shoot it with anything but a Shotgun to try and overcome it and live, otherwise the Fireteam is wiped out. Crota will also summon his Oversoul when enraged, but at this point (15% health) it’s best to just finish Crota. On Normal Mode there is a Chalice of Light that can be collected and passed around the Fireteam to rejuvenate lost health, this does not exist on Hard Mode.
Crotas End
Summon Crota to get the battle started, you’ll want to hide in the crevasses of the room and atop the doors so you can only see one side. This provides a crossfire where you can pick off the Hive without taking much damage. On Hard Mode you’ll want to leave the Knights so that someone can Super them, make sure to get them low enough for a killshot. Guardians can use Exotic gear that returns health from Orbs of Light to regain any missing health, leaving some Orbs is also great for the Defender Titan who will be using Ward of Dawn twice this fight. With the area cleaned out, everyone except the Sword Wielder should switch to Sniper Rifles or Rocket Launcher. Gather up on the left side and head out into the main chamber, the group of five should sit on the outer ledge of the crystal room at the very center. This gives a clear view down to the Swordbearer that will spawn from the middle door underneath Crota.
Assist the Sword Wielder in defeating the Swordbearer, this is best accomplished by having a Defender Titan use Ward of Dawn on the left platform and sitting there to draw enemy fire. The remaining four Guardians should wield Rocket Launchers at this point as the Sword Wielder claims the Sword of Crota. The Sword Wielder will go up the right side rocks to reach Crota’s platform, calling for damage on Crota when ready to go in with the sword. A few rockets will cause Crota’s shield to go down and Crota will kneel for a period of time. As soon as Crota begins to kneel he may take damage from the Sword Wielder, with perfect timing it’s possible to get 4 hits on Crota before his shield regenerates but most Guardians will do 3.
A Bladedancer that is Sword Wielder can drop the sword and melee Crota to gain invisibility then pick the sword back up. Titans and Warlocks will need to leap away or be killed, thus Hunters are recommended for Sword Wielder. Another round of Rockets will take down Crota’s shield again, allowing the Sword Wielder to damage Crota once more. The Sword of Crota will disappear around this time so the team should head back into the crystal room and regroup. The Defender Titan should collect enough Orbs to gain Super again, the rest of the team should collect Heavy Ammo or use a Heavy Synth. Crota will shift to the right platform, ignore him and go back out once he shifts to center. Defeat the Swordbearer once more and repeat the scenario from before with damaging Crota. After the second set of hits with the Sword of Crota, he will likely enrage (he enrages at 15%). You must do a third round of rockets and damage at this point or back off and defeat the Oversoul before going again. On Hard Mode you’ll have to deal with Ogres after the second Swordbearer so it’s best to down him in two swords instead of 3.
No Comments