Abyssal Ruins
The Abyssal Ruins are a cool little post-game feature. Brimming with ancient treasure, the ruins are found underwater, on the bottom of Undella Bay . To reach them you need HM06 - Dive , which can be received from Hugh by speaking with him in Undella Town after defeating the Elite Four.
When you’re ready, head to Undella Town and make your way east towards Undella Bay. Use Surf to move onto the water and head east. Near the coast you’ll find the first dive spot, denoted by a dark patch of water. Due east you’ll find another spot to the north-east and south-east you’ll find the other two spots.
After teaching Dive to a Pokemon, you can move onto the dive spots and use the move to head underwater. Once you’re below the surface, press and hold ‘Up’ on the D-Pad or Circle Pad until you reach the entrance of the ruins and head on through.
Depending on where you entered, you’ll start in a different part of the first floor of the ruins. If you entered via the western dive spot, you’ll start at the western entrance. If you entered via the eastern dive spot, you’ll start at the eastern entrance and so on.
There are no Pokemon found in the Abyssal Ruins, only a variety of valuable ancient items which can be collected. The biggest thing to note is that after moving over around 500 tiles, you’ll be swept back outside the ruins and will have to re-enter at the first floor, no matter how far into the ruins you were.
For this reason, you’ll need to enter a number of times if you want to collect every single item in the ruins (around five times would be the absolute minimum).
Exploration Tips
-
Plan ahead. Minimising the number of tiles you cover by minimising or eliminating heading down wrong paths or taking longer routes than you need to will mean that you’ll be able to explore more in a single run, so you’ll be done in a shorter time.
-
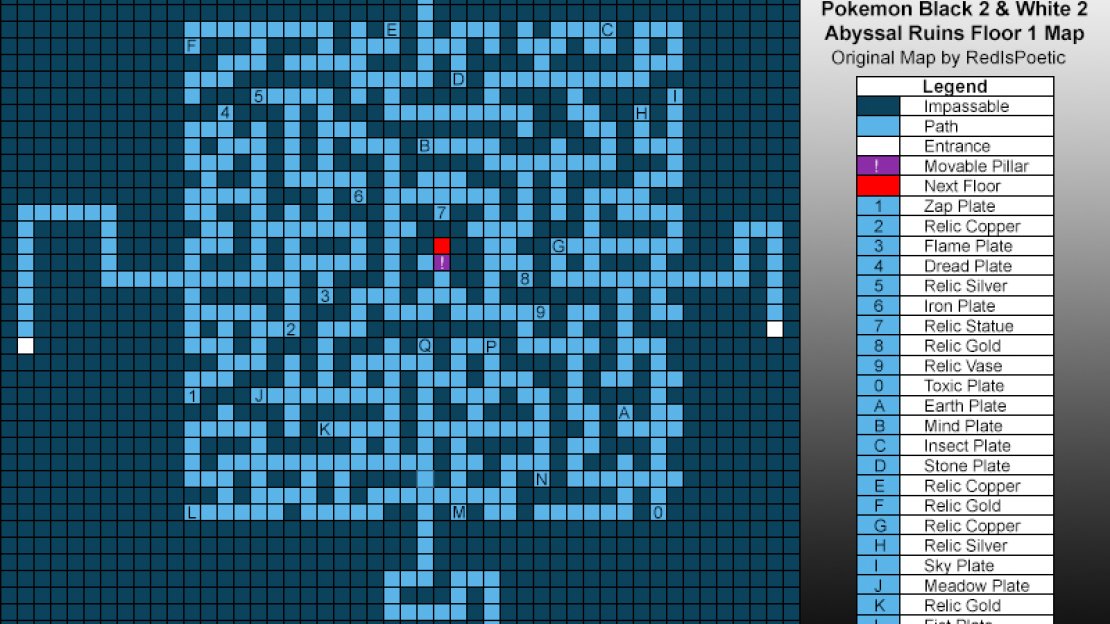
Explore Abyssal Ruins 1F in sections. Looking at the map, you should be able to tell that 1F is split into four parts, with all parts leading to the centre of the floor. It’s best to fully complete one part before moving to the next. This will help minimise the number of tiles you move over.
-
It doesn’t matter which entrance to 1F you come from; all are the same distance away from the entrance to 2F.
-
When aiming for Abyssal Ruins 4F, it’s best to forget about all other items and focus on making the route you take as short as possible. It’s not exceptionally hard to reach 4F by any means, but you don’t want to be swept out of the ruins a few steps before you grab the Relic Crown there, now do you?
You can do about two quarters (or a little less) of Abyssal Ruins 1F per run, so it’ll take you two or three (probably three) trips before you’ve cleared just the first floor. You can do almost all of Abyssal Ruins 2F in a single run, as with Abyssal Ruins 3F.
When on a new run, after clearing out 1F, you should head directly to the entrance to 2F so that you’re not wasting time and can explore more. Some with 3F after clearing out 2F.
Note that you’ll need to have a Pokemon that can use Flash and one that can use Strength . If you don’t, you won’t be able to access 3F or 4F, so keep that in mind.
This is because you must use Flash when adjacent to the purple moveable block in 2F, blocking the entrance to 3F, and use Strength when adjacent to the block in 3F. This will cause them to move out of the way and allow you through.
All Relic items can be sold to a Black Belt in the house just to the west of the entrance to Marine Tube in Undella Town . Talking with him will open up your bag, where you can select Relic items to offer to him. He will offer up to $300,000 for a Relic item (the Relic Crown in that case)!
It’s most definitely worth selling to him, especially seeing as there’s no real use for them otherwise.
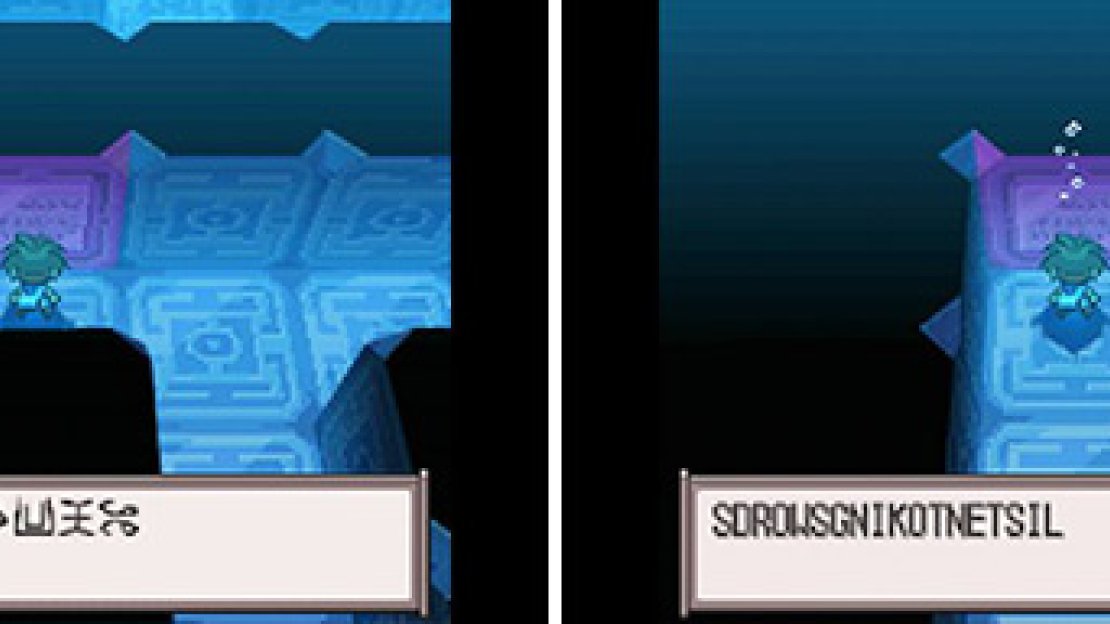
Try reading the letters backwards.
As you make your way through the ruins, you can inspect the purple walls to uncover lines of unreadable symbols. If you speak to Zinzolin, who’s standing around the middle of Undella Town, the symbols will be automatically translated into English letters, but won’t make any sense.
That is, until you read the letters backwards. Once you reach the 2nd floor, in addition to reading the text backwards, you must also go backwards a letter for each letter. So “M” would actually be “L”. Then backwards two letters for the 3rd floor and backwards three letters for the 4th and final floor.
When properly read, the mysterious text gives you super-vague hints as to how to progress through the ruins. But since you’re reading our guide, you don’t really need their help. On the 4th floor, there are some symbols that can’t be translated at all and appear as black circles instead.
Once you’ve progressed through to the end of the ruins, Zinzolin will be so impressed he’ll give you a Big Pearl the next time you speak to him.
Other than that, there’s not much else to be said. Have fun exploring and make sure you don’t miss any items.
Floor 1
Abyssal Ruins Floor 1 Map
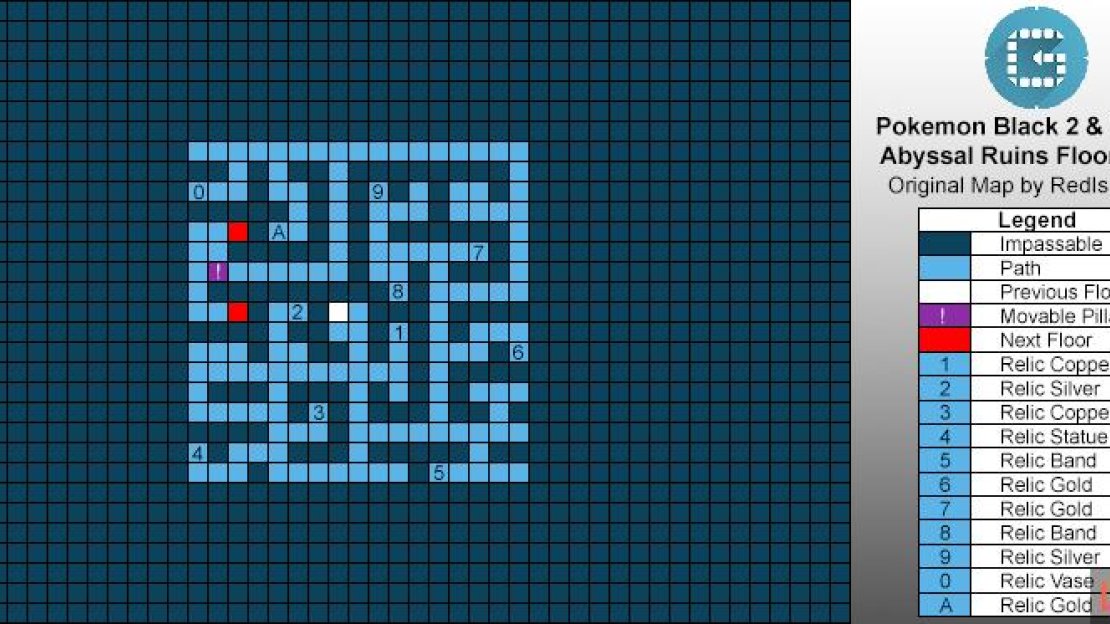
Floor 2
Abysall Ruins Floor 2 Map
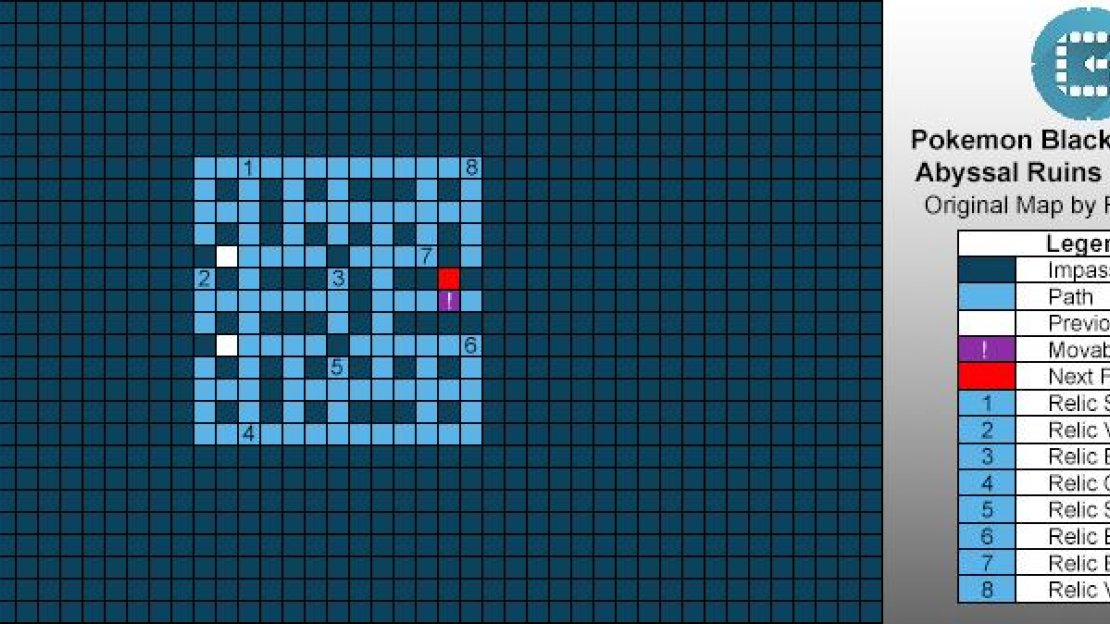
Floor 3
Abysall Ruins Floor 3 Map
Floor 4
Congrats on getting here! No map is needed since this floor is really small and you can’t get lost. Just go up and grab the Relic Crown in the centre of the room. From here, you can return to Floor 3 to do some last-minute looting or just walk around until you get booted.


No Comments