It’s finally time to bring it to Drek, so once all of the cutscenes are over, head forward and use the Swingshot targets to get to a vendor, where you’ll find a new weapon waiting for you ( Buzz Blades at 30K). Swing past the next set of targets and wait for Cora to extend the bridge, where you’ll get into a fight with a bunch of Sandshark-like enemies and little machines that can spawn more. Beyond that will be some Blargs, including the normal ones, some heavier ones, including a few flyers, and also a turret. With all of the enemies gone, you’ll need to find a way inside of the factory, so Clank mentions that he used an air duct to escape from the factory.
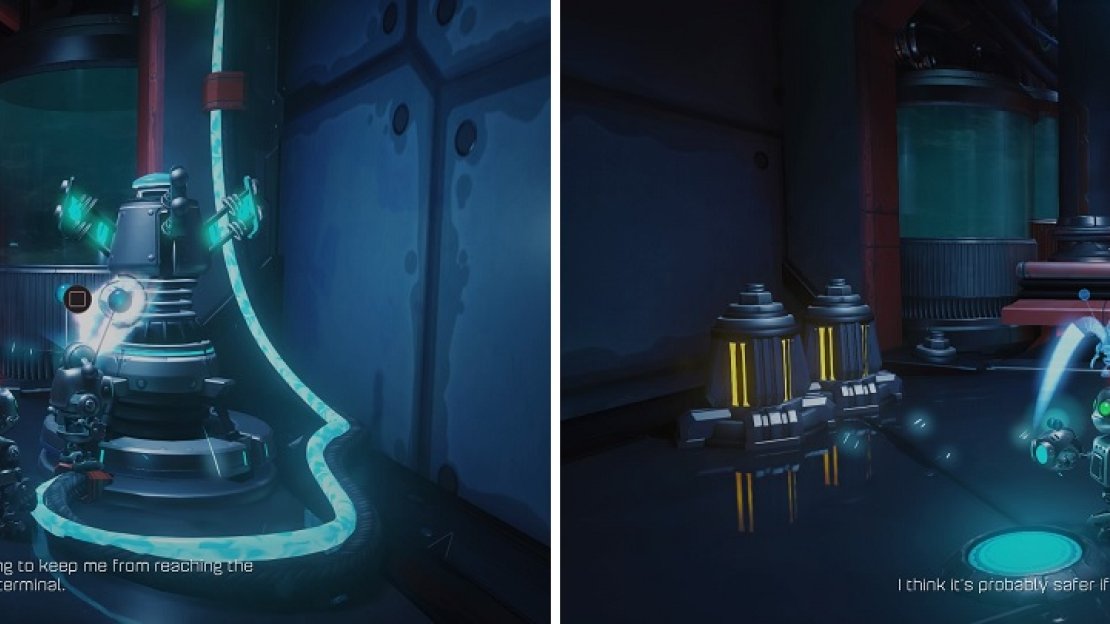
Now that you’re playing as Clank, go forward and take out the two enemies and take note of the Holocard behind the metal grate as you head through the door. It’s time for more gadgetron bots, so grab the first one and use it to cross the first pool of lava. Grab the next bot and use it to cross the lava to the left to find another bot, which you can use in conjunction with the one you just used to reach the ledge to find a third bot. Change two of the bots to Powerbots and use them to open the door to find a bomb, so have the third bot as a bridge to the metal grate so you can blast it open ( don’t forget the Holocard from before! ).
In the next room, someone will drop a big crate on the other side of the room, unleashing some enemies for you to defeat. Quickly dispatch them and use the boxes at the far end to get onto the conveyor belt. Toss the bot next to the power source to make the piston go up, then pass underneath it to get to the next area. This next part is a little tricky, so listen up. There is a conveyor belt that moves around the central section of this little area, which will pass by power sources. These power sources control pistons in the little hallway next to the sources, so you’re going to need to toss a powerbot onto the conveyor, then wait as it passes each source one by one, allowing you to eventually pass under each one.
Crush five Gadgebots under one of the pistons to get a trophy!
This will lead to another small hallway, where the same person from before will drop some explosive crates, so watch out for them. Hit the switch to open the door, then grab the bot, using it to create a bridge across the lava. You can now snatch the bot on the other side and use it to create another bridge across the same lava. With that done, you can grab the bot that should still be on the conveyor belt and place it next to the power source on the second bridge you created. Lastly, to open the door, take the first bridgebot and turn it into a powerbot, going across the second bridge and placing it next to the power source.
There’s nothing of importance in the small room, but the room beyond will have you fighting a few actual Warbots. You can’t hurt these with your melee attacks, so use the bomb in the middle of the room to defeat them all (two hits each). If you need health, you’ll find some in the rooms where the first two Warbots came out of. When you head into the next room, the assistant will run away into a big crate that will block your progress, so you need to find a way to move it. Luckily, there’s a large magnet in the room, but there is no power going to it. You will see three power sources in the room, though, which means you’ll have to use three bots to turn it on.
One bot is on top of the metal crate to the left of where you entered, so you’re going to need a springbot to get to it. The other two are to the right of where you entered, with one at the far end of the room and the other being in a small alcove. Both will require you to jump on the crates as they move across the conveyor belts. Note that there’s a Holocard seemingly floating in the air above one of the conveyors; you’ll have to quickly toss a springbot on one of the moving crates, then swiftly jump to the alcove with it. Anyway, enough with the diversions and back to the main task. Once you have all three bots, turn them all into powerbots and place them next to the three power sources, then hit the switch to finish with this area for good.
Investigate the Factory
You’ll be back in control of Ratchet now, so head through the doorway to initiate a cutscene, which will lead to a fight with some evil Zurkons. While they aren’t too tough, they have a numbers advantage, so weapons with a lot of splash damage will be good here. Clean up the mess, then go to the end of the hallway, taking the elevator to go to the factory where Clank was created. Replenish your ammo/health at the vendor and take the conveyor, noting the laser you need to jump over. In front of the big barrier will be more of those little mouse robots and more Zurkons. The next conveyor belt will have more lasers on it, then there will be some Blargs beyond that, including one on a turret.
For the next conveyor, there will be blue lasers that turn off and on, so you’ll need to time your way past them to find more enemies. Next, jump on the conveyor where you see the Warbots moving, then continue following them and taking out the enemies until you come to a Trespasser puzzle, granting you access to the Jetpack refueling station. Your primary objective is near the top in the southeast corner of the room, but whenever you get there, a forcefield will be erected, blocking you out. Before doing anything else, you’ll need to take care of some enemies. First, there will be three Warbots, then six more will appear after that. Finally, a combination of Warbots and Zurkons will be in front of the entrance of the security room, so when they are cleared, head inside and hit the switch to disable the barrier, as well as begin a boss fight!
BOSS - Mrs Zurkon
This is definitely a fast-paced battle, as you have use of your Jetpack during it. Hopefully you didn’t have to use a lot of the nanotech crates in the previous battles, as they will prove to be very useful as this fight drags on. Mrs. Zurkon will more or less stay pretty stationary, only moving a little bit, so hitting her will not be that big of a problem. However, her attacks will make it so you have to move around a lot yourself. Staying on the move with the Jetpack is one of the best ways to mitigate damage to yourself in this battle, so always keep a lookout on your fuel and rush to a refueling station when needed.
One of her main attacks involves shooting a big blast of energy your way, which will home in on you. She can also release a bunch of evil Zurkons during the battle, so it might be a good idea to bring out your own to help deal with them, although they will most likely be in the crossfire as you unleash pain on Mrs. Zurkon. If you get too close to her, she can push you away with a forcefield, dealing some damage in the process. Lastly, once you do enough damage, she will erect a big shield in front of her that she will send a copy of itself outwards as a projectile. You’ll have to blast it with your weaponry enough so that it dissipates, allowing you to go back to damaging her. As long as you keep moving and stay on top of your ammo/fuel, you shouldn’t have too much trouble with Mrs. Zurkon.
After the battle is over, head to the big door where the forcefield was located, solve the Trespasser puzzle, then watch the cutscenes that follow.


No Comments