Overview
![The Slums map is a small, semi-symmetrical map that has one team start at the [Far East] and the other at the [Far West] of the map. The centrepiece of the Slums map is the large [Central Square] featuring a large statue on a raised dias. Just to the south of this is an [Electronics Store] that can be entered. The Eastern side of the map does not have a whole lot going on. Plyers start at the [Far East] and directly in front of the starting area is a large, [Locked Building] that serves to funnel players down either side of it. To the left of the [Locked Building] is a [Dumpster Area]. To the right of the [Locked Building] is a road with a building to the north with [Arches] leading to under cover areas running the length of the building, west of here is an entrance to the [Central Square]. Directly west of the [Locked Building] is a [Small Courtyard] that has access points to the [Arches] building area, the [Dumpster Area], the [Electronics Store] and the [Central Square]. The Western part of the map is a little more interesting, with a couple of accessible buildings. From the spawn point at the [Far West], there is a [small square] to the north and a [Coin Laundry] to the south. Directly in front is a [Locked Church] that similar to the [Locked building] funnels players to either side of it. At the north of the west side is a [Mechanic Shop] that runs from the [Small Square] to the [Central Square]. Along the Southern end of the area is a [Half-Built Wall] running parallel to the road next to the [Locked Church]. Further to the East of this, you will run into the [Electronics Store]. Directly East of the [Locked Church] is a small [Cemetary] which gives easy access to the [Central Square], the [Mechanic Shop] Area, the [Half-Built Wall] area and the [Electronics Shop].](/assets/guides/20/24902-mpslums01jpg.jpg)
The Slums map is a small, semi-symmetrical map that has one team start at the [Far East] and the other at the [Far West] of the map. The centrepiece of the Slums map is the large [Central Square] featuring a large statue on a raised dias. Just to the south of this is an [Electronics Store] that can be entered. The Eastern side of the map does not have a whole lot going on. Plyers start at the [Far East] and directly in front of the starting area is a large, [Locked Building] that serves to funnel players down either side of it. To the left of the [Locked Building] is a [Dumpster Area]. To the right of the [Locked Building] is a road with a building to the north with [Arches] leading to under cover areas running the length of the building, west of here is an entrance to the [Central Square]. Directly west of the [Locked Building] is a [Small Courtyard] that has access points to the [Arches] building area, the [Dumpster Area], the [Electronics Store] and the [Central Square]. The Western part of the map is a little more interesting, with a couple of accessible buildings. From the spawn point at the [Far West], there is a [small square] to the north and a [Coin Laundry] to the south. Directly in front is a [Locked Church] that similar to the [Locked building] funnels players to either side of it. At the north of the west side is a [Mechanic Shop] that runs from the [Small Square] to the [Central Square]. Along the Southern end of the area is a [Half-Built Wall] running parallel to the road next to the [Locked Church]. Further to the East of this, you will run into the [Electronics Store]. Directly East of the [Locked Church] is a small [Cemetary] which gives easy access to the [Central Square], the [Mechanic Shop] Area, the [Half-Built Wall] area and the [Electronics Shop].
Objective locations:
Capture the Flag
Flag A - Under the covered section of the [Dumpster Area] .
Flag B - Between the [Small Square] and the [Mechanic Shop] on the west side of the map.
Demolition
Site A - Inside the [Electronics Store].
Site B - At the very north of the [Central Square].
Domination
Flag A - Under the covered section of the [Dumpster Area].
Flag B - In the southern end of the [Central Square].
Flag C - Between the [Small Square] and the [Mechanic Shop] on the west side of the map.
Hardpoint
Site 1 - At the statue in the [Central Square].
Site 2 - In the [Dumpster Area].
Site 3 - Inside the [Half-Built Wall] zone.
Site 4 - Inside the [Machanic Shop] on the Western side of the map.
Headquarters
Site 1 - Inside the [Electronics Store].
Site 2 - Inside the [Half-Built Wall] zone.
Site 3 - Under the covered section of the [Dumpster Area].
Site 4 - Inside the [Mechanic Shop] on the Western side of the map.
Site 5 - In the [Cemetary] between the [Locked Church] and the [Central Square].
Site 6 - Undercover at the western end of the [Arches] building.
Site 7 - In the [Small Courtyard] between the [Locked Building] and the [Central Square].
Search and Destroy
Site A - At the entrance to the [Electronics Store] on the East side of the map.
Site B - At the very north of the [Central Square].
Suggested Loadouts
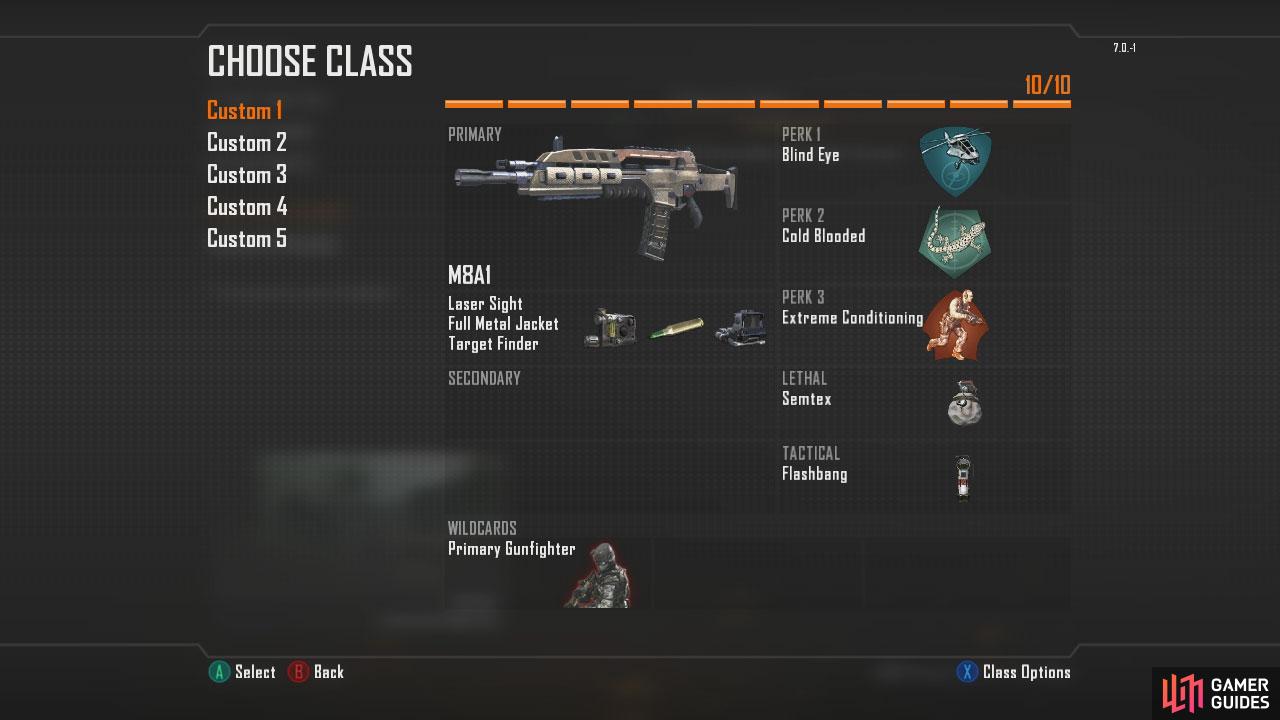
Short-Mid Range Primary Weapon > MSMC Primary Attachment > Long Barrel + Target Finder Secondary Weapon > Your Choice! Secondary Attachment > Your Choice! Lethal > Grenade OR Semtex Tactical > Flashbang Perk 1 > Lightweight Perk 2 > Toughness Perk 3 > Extreme Conditioning Wildcard > None! Note 1: The SMG listed is my favorite, but any one will do! Note 2: This set up will give the SMG a slightly longer range, making it effective both up close and at a medium distance as well. he grenades and flashbangs will help you out if you get in a tight spot, whilst the perks ensure you move silently, run for longer and can take a hit or two without flinching. Mid-Long Range Primary Weapon > M8A1 Primary Attachment > Laser Sight + (FMJ OR Extended Mag) + Target Finder Secondary Weapon > None! Secondary Attachment > None! Lethal > Semtex OR Grenade Tactical > Flashbang OR Smoke Grenade Perk 1 > Blind Eye Perk 2 > Cold Blooded Perk 3 > Extreme Conditioning Wildcard > Primary Gunfighter Note 1: The Assault Rifle listed is my favorite, but any one will do! Note 2: This set up will give you a great assault rifle perfect for mid-long range engagements. The FMJ OR Extended Magattachments can be mixed up to either provide additional damage or ammo whilst the other attachments increase range and accuracy. The perks ensure you will be harder to detect and can sprint further without stopping.
Map Specific Tactics
Action Hot Spots
This is a small map and as such, there is only on major hot spot and that is located in the large, fenced [Central Square].
General Tips
Stay out of the [Central Square] if you want to live!
Due to the narrow paths and sharp corners throughout the map, claymores and bouncing betties are great to take out unsuspecting foes when planted sneakily around corners.
The entire map is one large outdoor area and as such, it is a great place to cary around an mid-long range wepaon such as an LMG or assault rifle.
Sniping Positions
There are no real vantage points on offer in the slums map, but there are a couple of places you can situate yourself in that will allow you a long line of sight and a good amount of cover. They are in the [Small Square] behind the fountain and in the zone behind the [Half-Built Wall] . These areas are both on the west side of the map (nothing going for the east on this one!) and allow you to see down the main roads by which enemies will have to advance.
No Comments