
| Important Items in this Area | . |
|---|---|
| Diagram: Wolven Silver Sword - Enhanced | Adalbert Kermith’s Third Map |
| Nilfgaardian Demands | Impera Brigade Guard Card |
| Letter to Tamara | Nausicaa Cavalry Rider Card |
| Rusty Key | Vreemde Card |
| A Prayer | Albrich Card |
| Talisman | Zerrikanian Fire Scorpion Card |
| Top | Religion and Life |
| The Natural Obscurity of Curses | Pellar’s Bell |
| Nausicaa Cavalry Rider Card | Diagram: Ursine Silver Sword - Mastercrafted |
| Cynthia Card |
| Gwent Players in this Area |
|---|
| Bloody Baron - Sigismund Dijkstra Card |
| Fergus Graem - Random Card |
| Quartermaster - Random Card |
| Trader - Random Card |
Crows Perch
If you killed the soldiers at the Inn at the Crossroads, none of the peasants in Crow’s Perch will be out and about. Over near the doors to the east that lead to the gate, you’ll find two of the Baron’s soldiers (level three) that you’ll have to put down. Near the gate itself, more soldiers will speak to you through the gate, stating that they’ve heard what you did at the Inn, and they wisely aren’t going to allow you in. Well, would you? Looks like you’ll need to find a sneakier way in…
Head downhill to the market, where you’ll see that one lone old man has decided to brave the murderous Witcher. Talk to him and ask him how to get inside the keep, and he’ll try to wrangle 15 Crowns off of you. Pay him and he’ll tell you about an alternate way into the castle, you just need to find some shrine north-west of the city.
Leave the city via the way you entered and follow the road back up north. When you reach a crossroads (the southern road leads to the Ghouls nest you cleared earlier) head north until you find a road to the north-east. Follow the road until you find a search area, which is largely unnecessary, because the shrine is easily visible off the eastern side of the road. From the shrine head south-east and into the river, where you should see a cave you can swim into, the roof of which is just above the water line.
Dive into the river and swim south until your progress is blocked by rocks. Climb up onto the stone ledge blocking your path and continue running south, then east, where you’ll find another ledge to scale. This cave is one of the first areas that’s dark enough to perhaps warrants the use of a Cat potion, so use it if you’ve got it, or just try to do your best without. Drop off another ledge to the north and defeat a Water Hag (level six). Water Hags will throw muck at you, which will stun Geralt (you can still move, but you can’t attack or cast Signs), and will often sink into the ground, only to surface somewhere else, with more muck to throw in hand, ready to throw. They’ll also resort to swiping with their claws against nearby or stunned foes.
Once the Water Hag is gone, it’s time to go lootin’! Plunder a chest west of the ledge, then head north and search a cubby to the east (north-east of a pool of water) to find a pair of chests; one to the east, in a cubby, and one along the northern wall. The latter is the more lucrative chest (although the former’s no slouch, either!) as it just so happens to contain the “Diagram: Wolven Silver Sword - Enhanced” . This is certainly the most powerful Silver Sword diagram you’ve found so far… as least if you’ve been following this guide. 292-356 damage? Crazy, but it has a hefty level requirement of twenty-one to match. Not only that, but you’ll have to find the earlier diagrams before you can craft this one. Still, better to have it than not. Finish ogling that silver sword, then dive in to the water to the west and search the cliff face to the east (yes, the rock you just jumped off) to find two chests under water, both of which can be quite generous.
Climb back out of the water up onto the ledge to the west, then turn south and scale a ledge just east of the one we dropped off earlier. Continue up a ramp to the south-east and follow it around counter-clockwise, scaling a ledge and looting some crates as you go. Finally, to the north, you’ll discover a well with a ladder leading out of it. Climb your way to the surface to witness a cutscene that introduces you to the Bloody Baron.
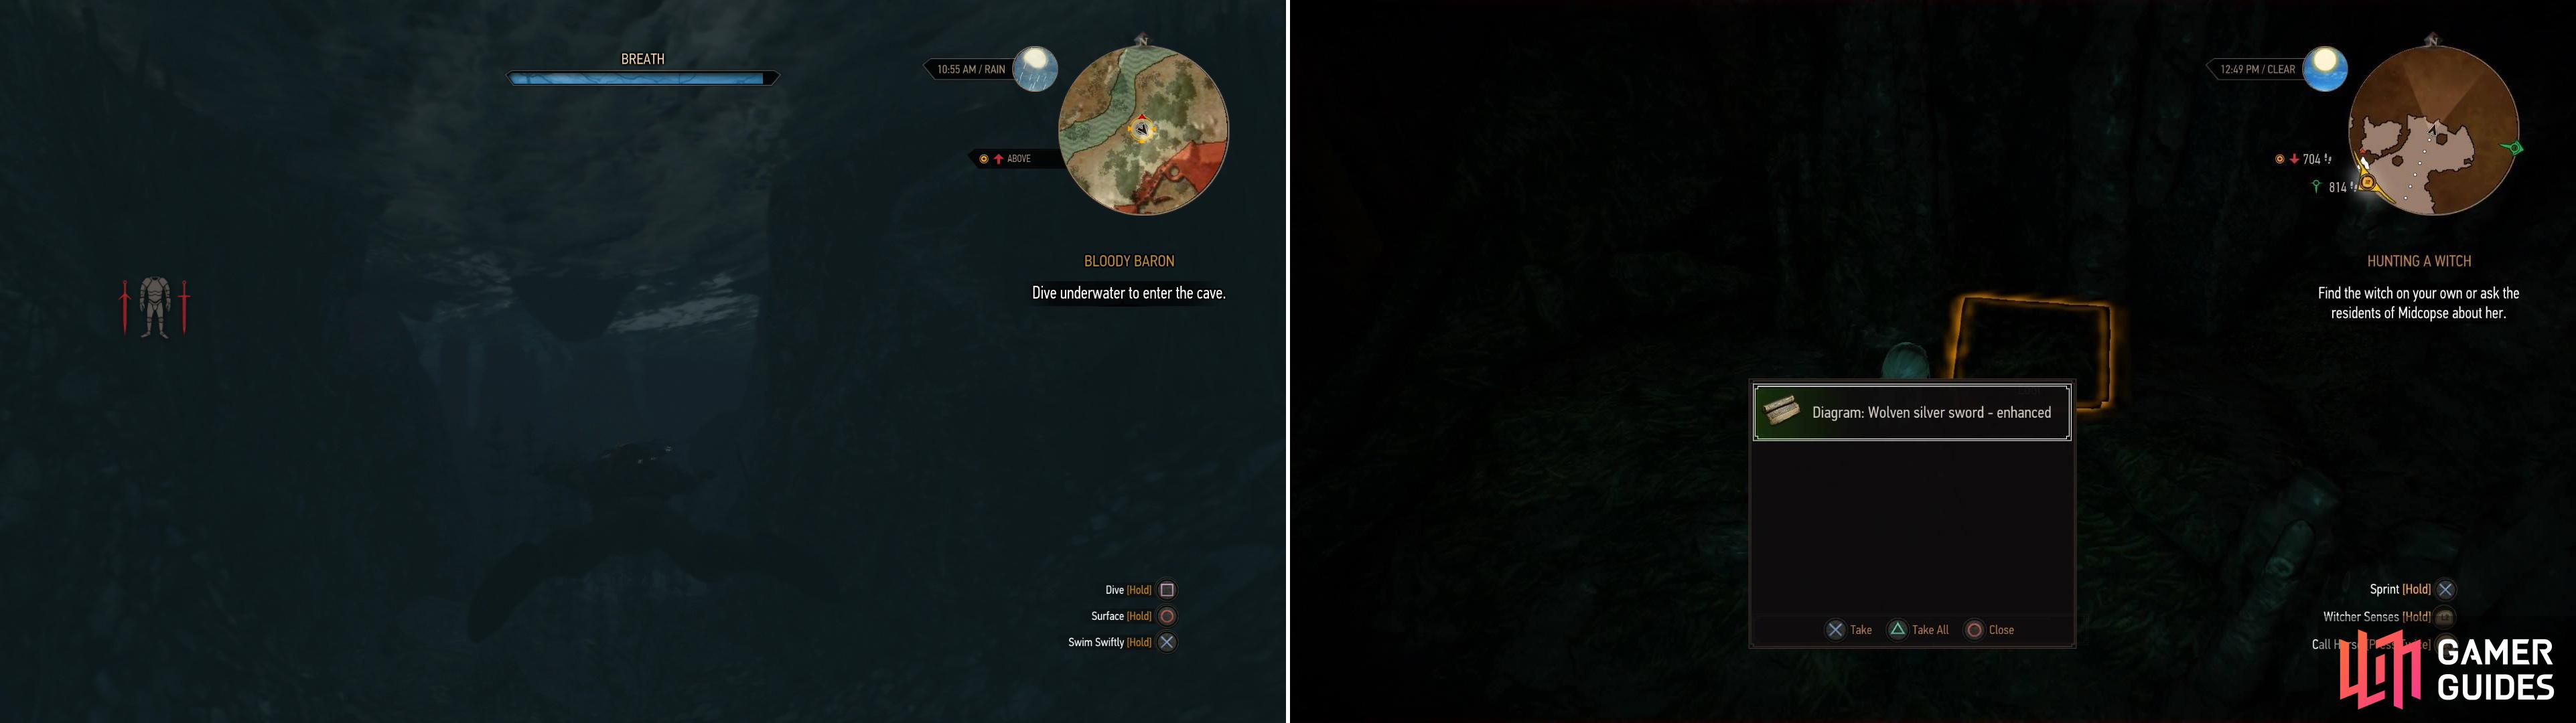
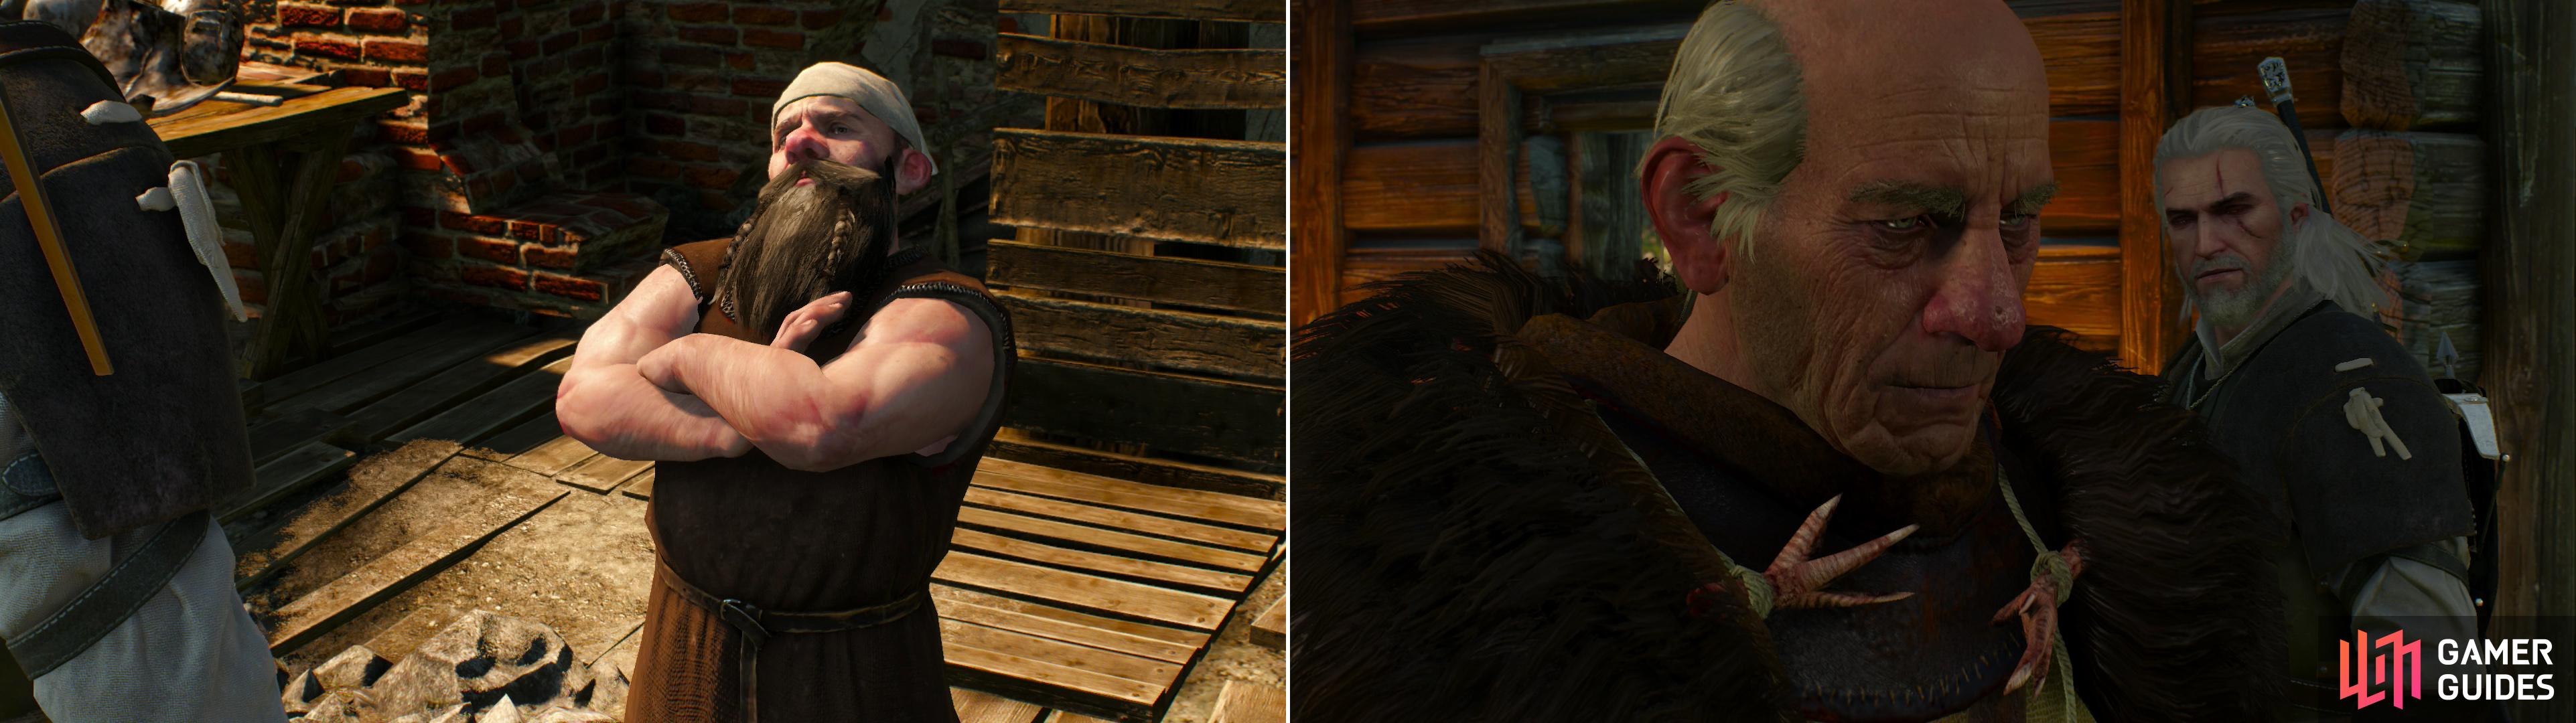
If you killed the Baron’s guards earlier, you’ll have to sneak through a cave to meet him (left), but on the plus side, you can grab the Diagram: Wolven Silver Sword - Enhanced along the way! (right)
On the other hand, if you didn’t get into a fight at the Inn at the Crossroads… well, walk into Crow’s Perch to find a lively and active city. Head west and go through a gate unmolested, then up a hill, where the guard will pester you. You’ll be recognized by one of the guards at the tavern, and if you stick to the top dialogue options, you’ll be escorted to meet the Baron. Yeah… a bit simpler, no? Of course, nothing prevents you from exploring the cave mentioned earlier if you didn’t kill the guards, and considering the treasure, it’s a worth-while diversion.
The Bloody Baron’s guest leaves and he’ll chat with Geralt, telling him flatly that he knows who he is, and why he’s here. If you killed his guards earlier, he’ll also suggest that he hasn’t yet decided what to do with you, but how the conversation goes might determine that. Nice threat, there. Have a drink with the Baron (or not) and he’ll get to business, albeit indirectly, and at length, telling you about Ciri in the form of a bit of playable gameplay…
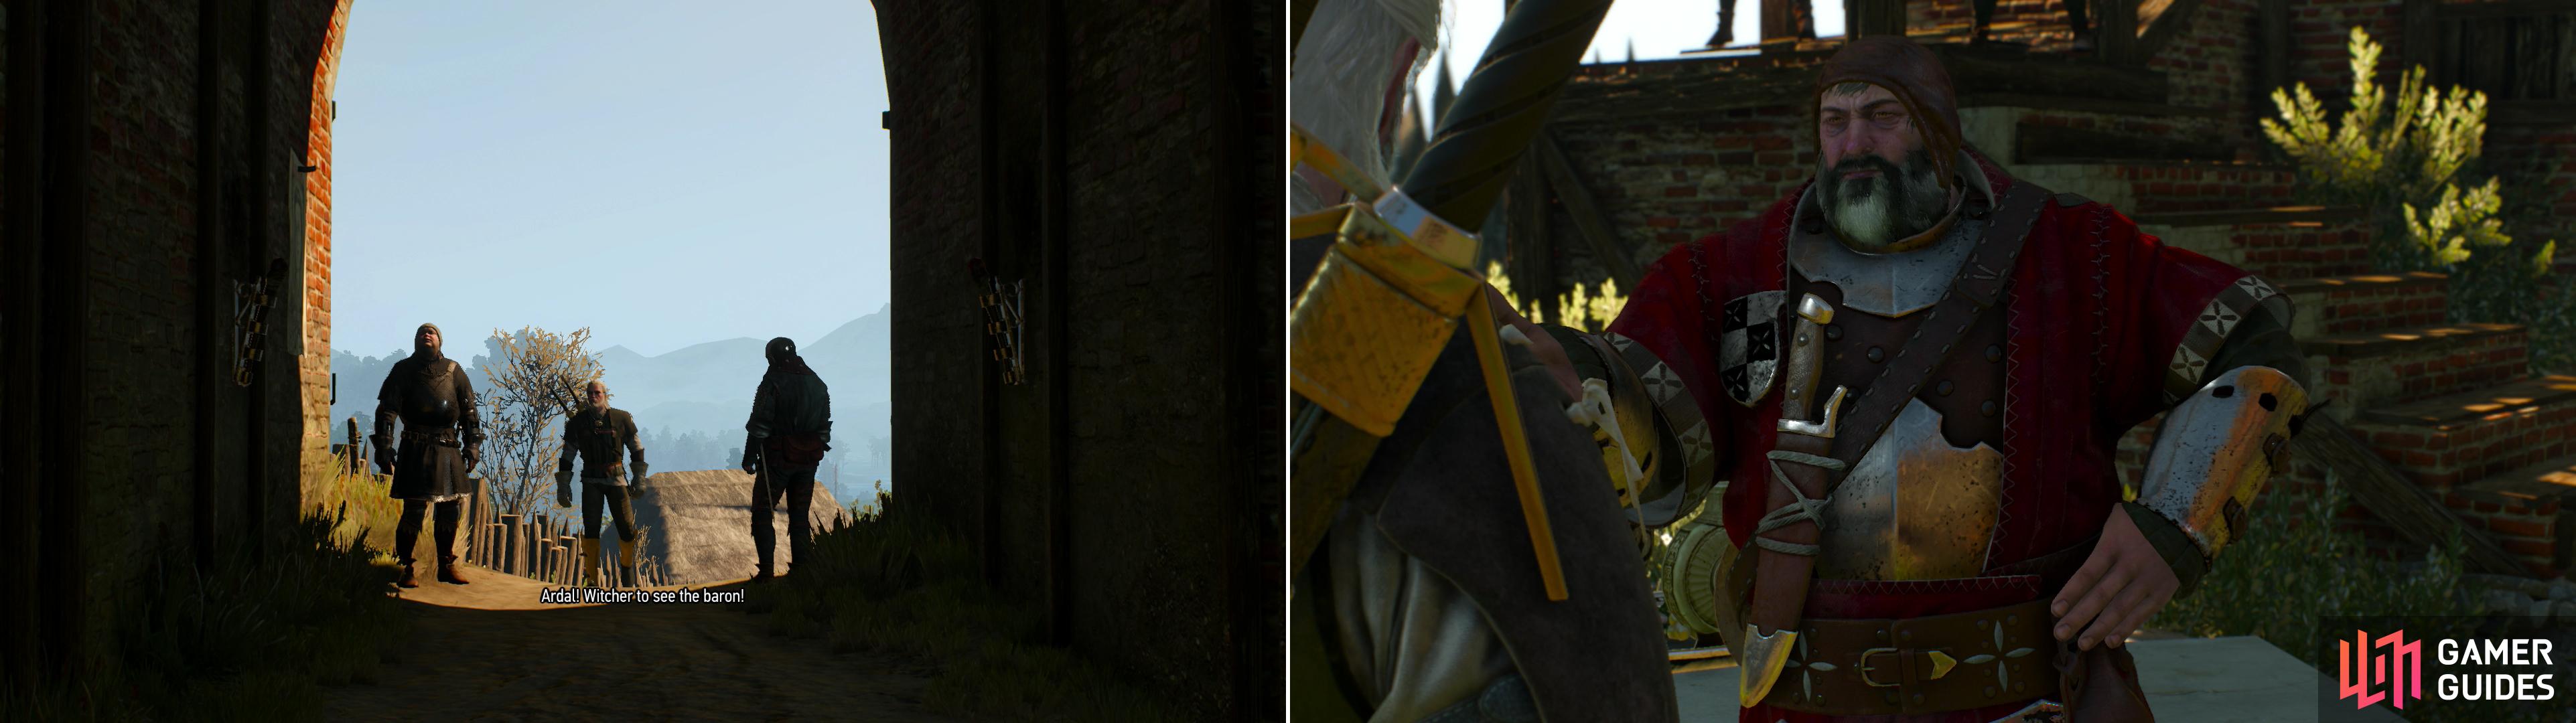
If you remained peaceful with the Baron’s guards, you’ll be granted an audience with the Bloody Baron with little fuss (left). However you manage it, when you meet the Baron he’ll tell you about his encounter with Ciri (right).
Ciris Story: The King of the Wolves (Level 5)
You’re now in control of Ciri. Some things to note about her for now; you can’t mess with her gear, she can’t level up, and she can’t (yet) cast spells or Signs. Her dodge ability, however, is of a more flashy and magical nature than Geralt’s, and her health regenerates far faster than Geralt’s outside of combat. Otherwise, swordplay is the same. Strong attack, fast attack, parry, dodge, riposte… all that good stuff.
Head north-west, then north, picking plants as you go. You’ll need them later, but grabbing them early might save you trouble, although it is somewhat more difficult to loot them considering she doesn’t have Witcher Senses. Continue on until you find a treed girl being harassed by some Wolves. Lend her a hand and kill some Wolves (level five) - don’t worry so much about taking damage, as Ciri will regenerate fully between battles.
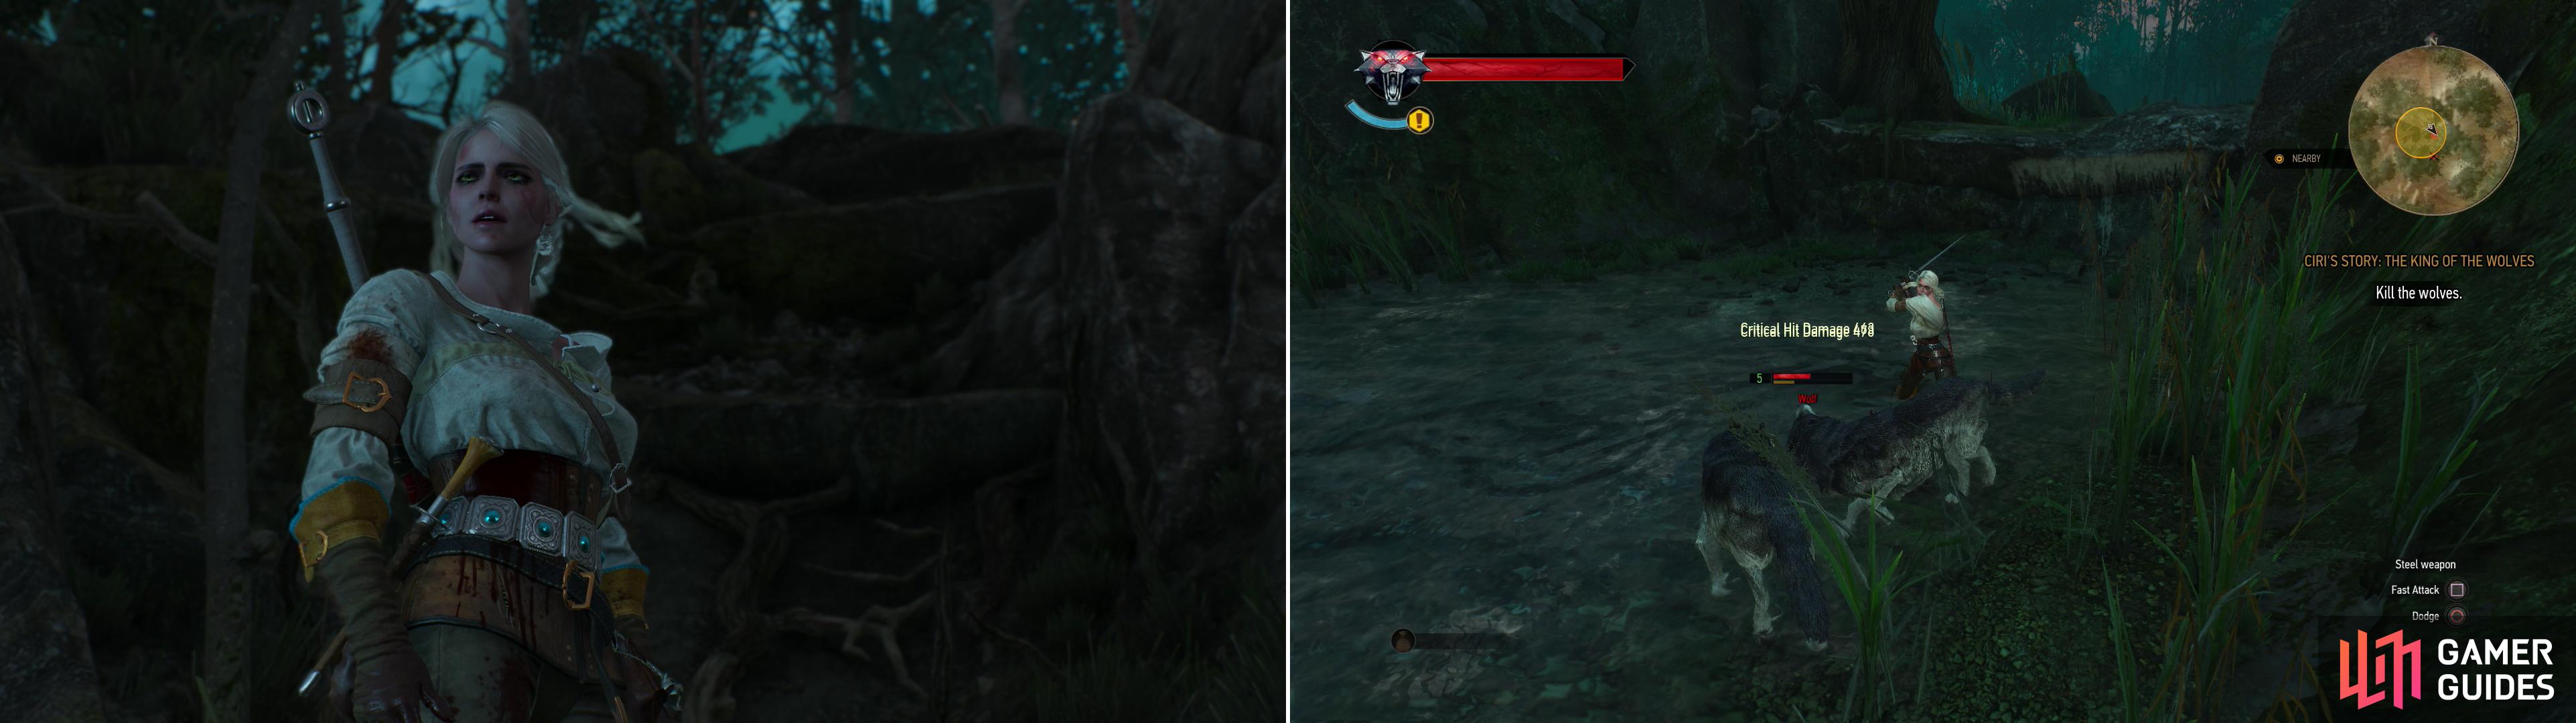
The Baron’s retelling of Ciri’s story is played out in gameplay, with you controlling Ciri (left). Dispatch some wolves - the beasts prowl these woods in number, and you’ll have to dispatch several groups of them (right).
Once the Wolves are dead Ciri will coax the girl down, and as two lost people in a swamp, they’ll find common cause. The little girl will tell Ciri about how she ended up in the swamp, and mention some “Wolf King” that might cause them trouble. Confident in her abilities to deal with both Wolves and Kings, Ciri and the girl set off.
When you’re back in control head north-west and dispatch a group of five (level five) Wolves feasting on carrion, then loot the bodies and pick the Wolfsbane nearby. After the fight Ciri calls the girl back to her side. Investigate the carrion and Ciri will deduce with what the critter was slain. Sounds kind of familiar… Follow the girl, Gretka, to the north and she’ll spot a mangled corpse in the remains of a boat. Ciri will tell the girl to look away, then set to investigate the body. Perform your autopsy by looking at the different wounds, and, despite being bothered by Gretka a few times, she’ll identify the Wolf King.
Ciri unfortunately lacks a silver sword, but she does know how to make a blade coating that will do the trick nicely, and lists the ingredients. If you’ve been diligent about picking plants and looting Wolves, you should now only need Fool’s Parsley. Follow the girl downhill to the west and dispatch another quintet of Wolves (level five), then loot around the area to find the Fool’s Parsley you need (tall stalks, white flower), and the Wolfsbane, should you need any (tall stalks, purple flowers). Once done, Ciri will automatically concoct the blade coating she needs.
Return west to the site of the last fight once the oil is made, investigate the corpse of a pig if you wish, then follow the girl west, then north, down a slope and into a cave. Inside you’ll find the King of Wolves about to do unspeakable things to a man. No special strategies needed with this fight, as the King of Wolves is an easier fight than any of the Wolves you’ve slain thus far, just use fast attacks and dodge until it’s dead. Once done, have a chat with the poor man in the cave, who will ultimately lead Ciri to his lord.

After discovering the gruesome remains of one of the King of Wolves’s victims, Ciri decides she needs to prepare an oil to combat the beast (left). With such preparations, Ciri should have no trouble dethroning the King of Wolves (right).
Family Matters (Level 6)
Having recounted his tale, the Baron makes a predictable offer. You’re both looking for missing women, why not help each other out? Not really having any other options, Geralt asks about the Baron’s missing wife and daughter. Question him for more details, and at length he’ll relent to letting you investigate matter more intimately. This ends the quest “Bloody Baron” and begins “Family Matters” and “Ciri’s Room” .
| Objective | Reward |
|---|---|
| For meeting with the Bloody Baron | 100 XP |
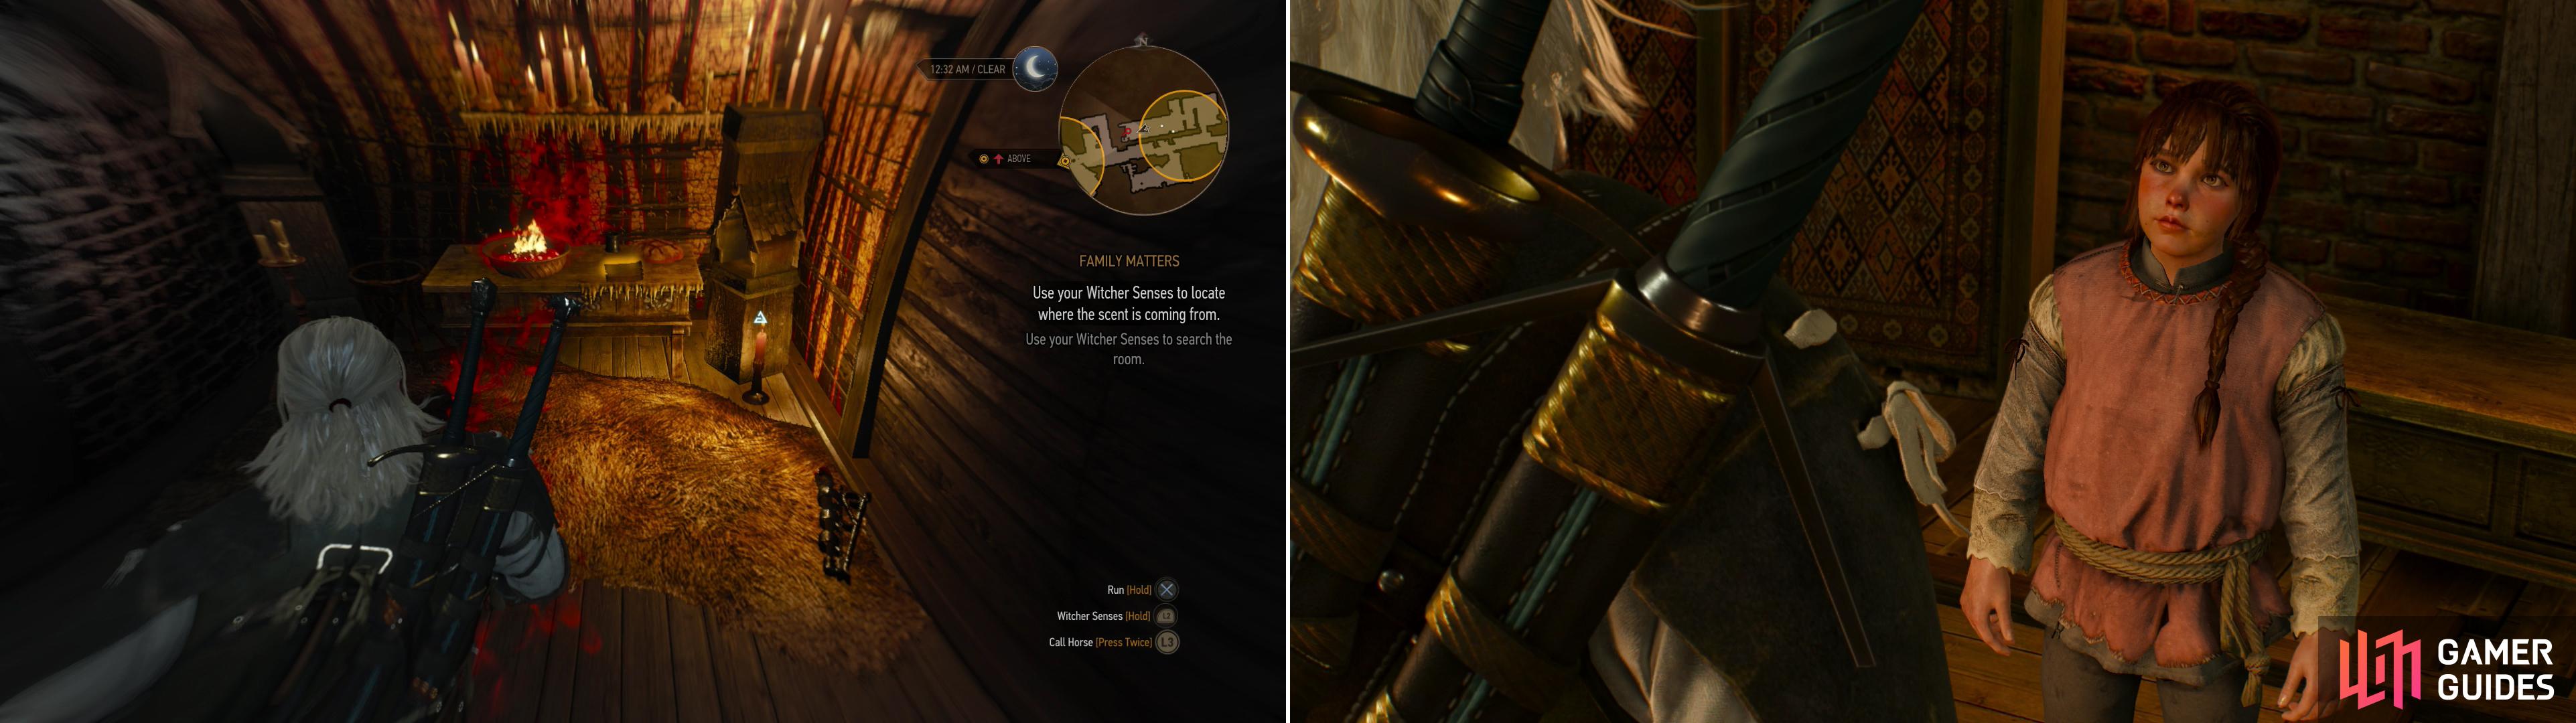
Time to snoop through other people’s belongings! Start out by looting a nearby table to find the note “Nilfgaardian Demands” , then follow the Baron up some stairs while he babbles. He’ll unlock two doors for you, in the western room grab the note “Letter to Tamara” along the south-western wall, loot a chest in the bedroom to the north-west, then search the containers along the south-eastern wall, the middle of which will contain a “Rusty Key” and some incense which leaves a scent trail for Geralt to follow. Be sure to also search near the bed to find a doll… the sort of doll you’d use for nefarious purposes.
Track the scent down several flights of stairs, then up a tunnel to the north-east, through a doorway to the north-west, and to a locked door, which can be opened with the Rusty Key. At the south-western end of the room you’ll find an altar to the Eternal Fire and the note “A Prayer” . Seems benign enough, but read the prayer note and the last three lines should give you pause. Perhaps it’s not such a happy family after all… Be sure to loot the store rooms down here, as they contain quite a haul of common - but valuable -goodies, including Alcohest and Alchemist’s Powder. You’ll also get your fair share of junk, but hey… it can all be sold off, stored or dismantled.
Backtrack upstairs and go into the eastern room next, activating your Witcher Senses once you’re inside. Start out by looting all the yellow-glowing objects, the investigate the candlestick to the west, some flowers to the east, and the wall to the south. The off-colored wall directs Geralt to a painting to the east, which in turn leads him to the cabinet on the other side of the wall. Investigate a wooden post near the flowers, then head back west and search the table near the candlestick. Follow a scent trail outside the room and down a flight of stairs where you will find a “Talisman” at the end of the scent trail.
Return to the Baron and tell him about your findings. Unfortunately, he - and apparently his guards - were too sloshed to remember anything, but the Talisman proves more helpful. Seems likely that you’ll find more answers by visiting a local pellar (alchemist), who by the Baron’s description seems like… well, like a guy you wouldn’t want your wife to visit. He also mentions some witch who recently arrived in Midcopse. Could this be the same witch Ciri clashed with?
| Objective | Reward |
|---|---|
| For investigating the rooms of Tamara and Anna | 150 XP |
The Baron will now head off back to his office downstairs. Follow him and talk to him, where you’ll find you can ask him about more subjects, including his collusion with Nilfgaard and witches in the area. More importantly, you can play Gwent with him, which you’ll need to do to unlock some new Gwent players around Velen. He’s got a pretty mediocre Northern Kingdoms deck, only noteworthy because of the Scorch cards he’ll play. Beat him you’ll get the “Sigismund Dijkstra” card, which has 4 Strength and the always useful “Spy” ability, making it a worthy addition to any Northern Kingdoms deck. He’ll also mention some other people you can play, which starts the “Gwent: Velen Players” quest.
| Objective | Reward |
|---|---|
| For defeating the Bloody Baron at Gwent | 25 XP |
| Item | Sigismund Dijkstra Card |
After the Baron’s tale, Geralt will be coerced into hunting for clues about the Baron’s missing family (left). Search Ciri’s room, after which you’ll meet the girl Ciri rescued in the Baron’s tale (right).
Ciris Room (Level 5)
Take a break from Gwent for a bit (don’t worry, you’ll get back to it soon enough) and switch the tracked quest to “Ciri’s Room”. While you’re here, you might as well search out her room, after all. From the Baron’s room (on the second floor) head down the hallway to the north-east. Ciri’s room is the southern of the two rooms at the eastern end of the hall. Turn those old Witcher Senses back on and search near the bed to find one of Gretka’s toys, a “Top” , then turn around and search some garments on the floor. Finally, investigate the table to find a book “The Natural Obscurity of Curses” , which you should read. There’s also a stash in here in patched versions of the game, if you need to store some loot. Leave the room and head across the hall and enter the room to the north, to find Gretka. As the Baron said, she’s alive and well, working in the kitchen. Talk to her and ask about Ciri, and when you’ve gotten all the info you can out of her, give her back the Top to end the quest.
| Objective | Reward |
|---|---|
| For investigating Ciri’s Room | 100 XP |
Exploring Crows Perch
Head back down the hall to the south-west and go down a short hallway to the south to find a door leading outside. You can now explore the upper reaches of Crow’s Perch, including the Notice Board, which might as well be ignored for now.
Of particular interest loot-wise is a staircase south of the tree in the middle of the courtyard. Head up the stairs and into the remains of a brick building. Once inside if you go up some stairs and leap a gap you’ll find some sacks to loot, but if you go downstairs you’ll find a chest in the grass, which may prove to be very generous. The barracks east of the stairs leading into the brick ruins also contains a number of lootable objects, which will yield a variety of food and alcohol. You can also search the garden north-west of the tree to find a “Love Letter” , obviously a memento from a happier time. One last thing, too - if you haven’t already explored the caves under Crow’s Perch, climb down into the well here to reach them. No good reason to miss out on that lovely “Diagram: Wolven Silver Sword - Enhanced” .
Return to the courtyard outside the Baron’s manor and from the tree Head east under an arch to find two merchants; a Dwarven armorer named Fergus Graem, and the Quartermaster, both of whom play Gwent. Fergus Graem has a rather lackluster Scoia’tael deck, completely incapable of taking advantage of the deck’s “Muster” Cards, while the Quartermaster has an equally dull Northern Realms deck, noteworthy only because he’s got a few good “Spy” cards. Beat them and take their random cards, then further boost your collection by buying the “Nausicaa Cavalry Rider” card and the “Cynthia” cards from the Quartermaster. Neither of these are great cards, but hey… the more the merrier. The Quartermaster also sells “Adalbert Kermith’s Third Map” , which, once read, will start the quest “Scavenger Hunt: Cat School Gear Upgrade Diagrams - Part 3” .
Ask Fergus about a master armorer, and he’ll admit to being one. When Geralt gives his specifications, the dwarf will mock Geralt’s dream armor. The dwarf’s human assistant, however, will babble about some mythical tools in Skellige that could be used the craft the armor. Strike up a deal to find these tools and the quest “Master Armorers” will start. It’ll be a while before you’ll get around to this quest, however. Then again, it’ll be a while before you’re anywhere near high enough of a level to bother with such armor anyways, so… fair enough.
Head down to the lower part of town to find a Trader, who will also play some Gwent with you. Better yet, he’ll sell a few cards, including an “ Impera Brigade Guard“ card, a “Nausicaa Cavalry Rider” card, two weak cards with the “Tight Bond” ability. He also sells the “Vreemde” card and the “Albrich” card, two practically worthless low Strength cards, as well as a “Zerrikanian Fire Scorpion” card. As much as everybody loves Gwent, though, there’s another thing you should buy from this merchant while you’re here, if you can afford it - the book “Religion and Life” . It’s need for a quest later - much later - but buying it now will ensure you don’t need to run back for it later. Anyways, thrash him at Gwent, buy his cards and his book, then leave Crow’s Perch.
As you leave Crow’s Perch, talk to the dwarven armorer, Fergus (left). After getting past the Baron’s soldiers you’ll meet the Pellar (right).
A Princess in Distress (level 5)
Fast-travel to Blackbough to get near the pellar’s house. In fact, you ran right past it during the quest “Wild at Heart”. Find the house north-west of Blackbough, the pellar is marked on the map as “Alchemy Supplies”. Unfortunately, when you arrive you’ll notice that you’re not the only ones who want to talk to the pellar. Some of the Baron’s soldiers are outside, and they aren’t here on a social call. When you approach you’ll enter conversation with them. Either kill them (level six), use the Axii Sign to convince them to leave, or simply tell them how to really cure their sick friend. Bribing them won’t work, Axii is the most lucrative choice, but curing their friend might just be better for everybody in the long run.
| Objective | Reward |
|---|---|
| For convincing the Baron’s men to leave with the Axii Sign | 40 XP |
Once the guards are gone knock on the door to find this pellar, who seems to have the whole seer act down. Show him the amulet and he’ll identify it, and babble about what dark magic is was meant to protect Anna from. The pellar will offer to use his skills (whatever they may be) to help locate Tamara and Anna, but it seems that a key component has gone missing, without which it’s obviously impossible to perform an augury. Offer to find his “princess” and he’ll give you a “Pellar’s Bell” , which you’ll need to escort his… Princess.
Geralt of Rivia, Butcher of Blaviken, Legendary Witcher… goat rescuer? Better just get on with it. Head south of the house and activate your Witcher Senses to find some goat tracks leading west into a search area about the size of Crow’s Perch. Follow the meandering, often broken tracks westward to near the western edge of the search area (straight west from the pellar’s house on the map) to find Princess. Along the way, you may need to slaughter some Wolves (level five). How Princess made it out here without becoming a meal is a mystery unto itself…

Ring the bell you were given and lure Princess back towards the Pellar’s Hut (left). Along the way you’ll have to fend off a Bear, which clearly views Princess as a snack worth fighting for (right).
Princess will get a life bar, and you’ll have to use Pellar’s Bell to coax the stupid creature to move. Use it like any bomb or Sign-equip it via the radial menu, then “Cast” it with [L1]. Lead the goat west until it wanders off. Locate it again to discover that it happened to find a Bear, which just so happens to fancy some goat for dinner. Geralt will politely ask the goat to get away from the Bear (level six), which you’ll have to dispatch. Quen, dodging, and strong attacks should be sufficient. Once done, continue walking along, ringing the bell so Princess follows you. Once you near the house, Geralt will compliment the goat on its one redeeming quality, and the pellar will show the goat some affection when you approach. Ew.
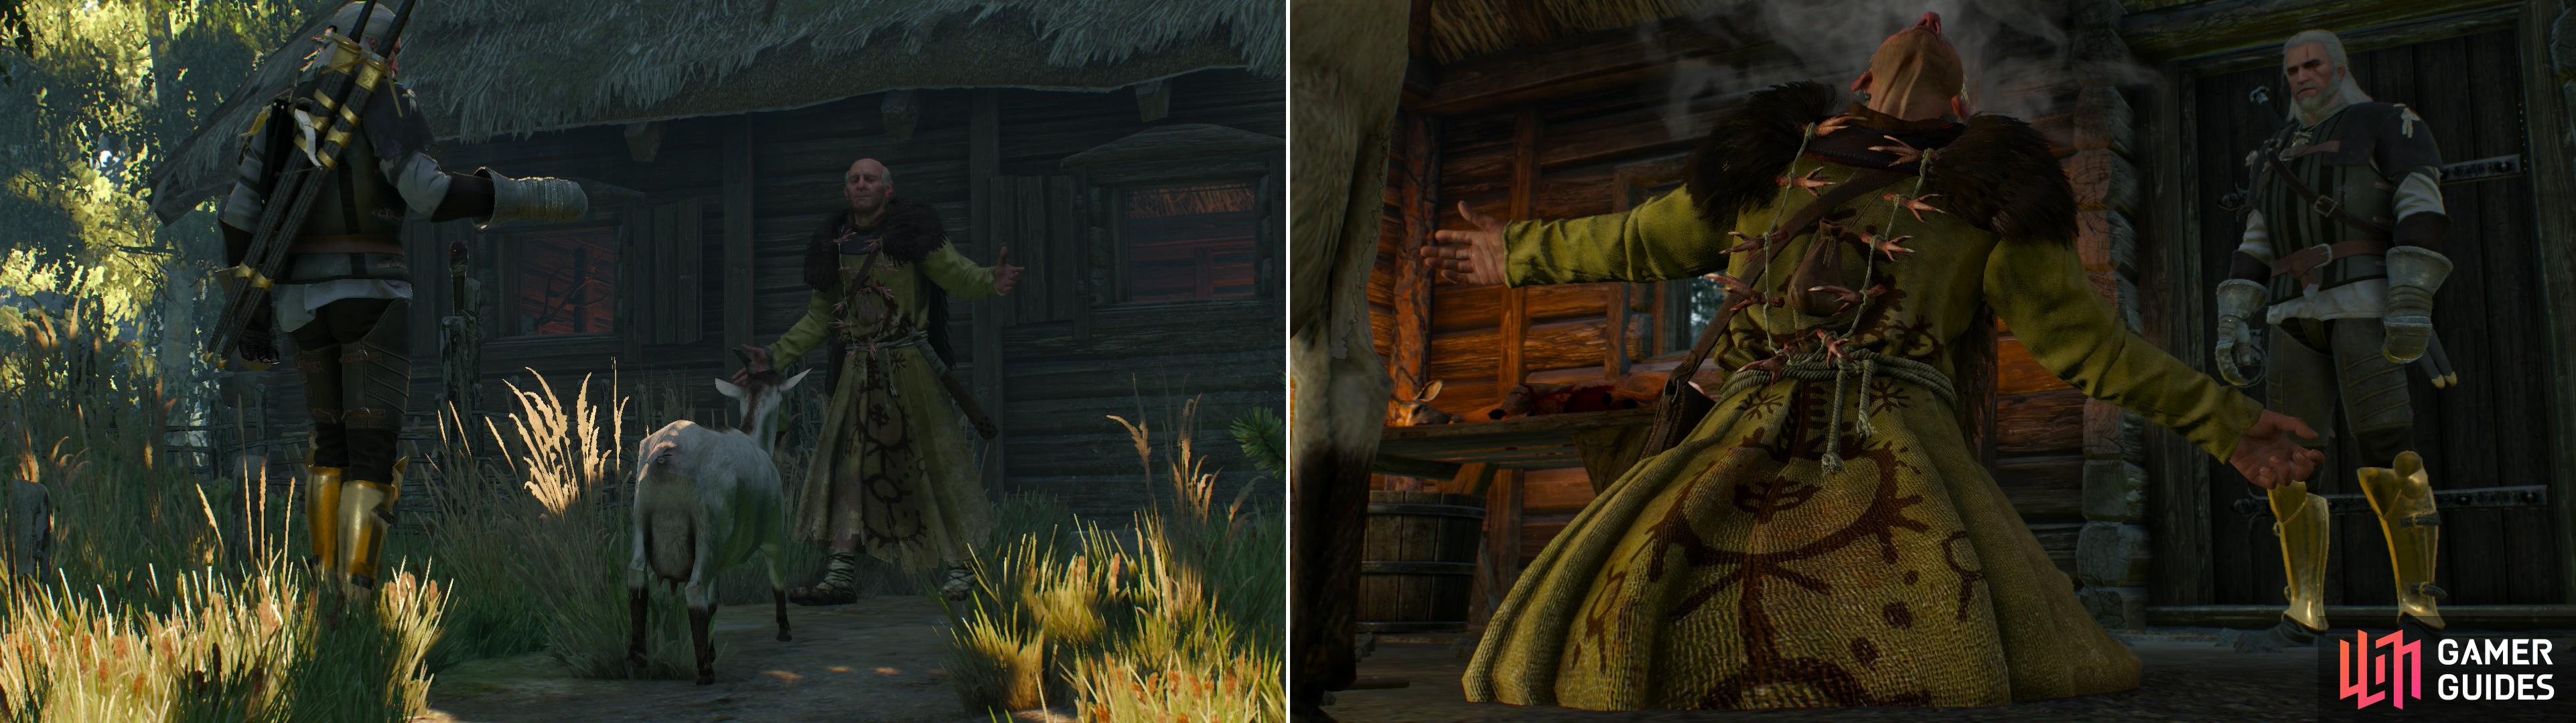
Recover the Pellar’s beloved… ah… goat (left) and he’ll perform and augury for you (right).
Encourage the pellar to live up to his end of the bargain and Geralt will leave to get a final component for the ritual, which the pellar will perform. Once the augury is done, question the pellar further, and he’ll reveal some of Anna’s secrets. This doesn’t give you the whereabouts of Anna and Tamara as you’d hoped it might, but it does give you another lead. It seems like you need to talk to the Baron again.
| Objective | Reward |
|---|---|
| For getting the pellar to perform an augury | 100 XP |

 Sign up
"In fact, you ran right past it during the quest “Wild at Heart”."
Once again, the quest is assumed to be completed, although in this guide, this is one of the last sections in Velen.
"The latter is the more lucrative chest (although the former’s no slouch, either!) as it just so happens to contain the “Diagram: Wolven Silver Sword - Enhanced” ."
In my case it was a Mastercrafted silver sword. Therefore, I believe that the loot is random.
That chest always has that diagram... There are a few chests there and it's dark... You likely missed the right chest.
"The barracks east of the stairs leading into the brick ruins also contains a number of lootable objects, which will yield a variety of food and alcohol."
If I'm not mistaken with the description, there is a locked door in these barracks.
I'm going to tell you about secret chests very few ppl know about: from the locked door go to the end and take the stairs UP. Jump over some crates and you will be on the roof. Get the stuff at the end of the roof and then go over to the other side of the roof. At the end of that are more stairs going up, to a tower. At the end of those turn to the left and jump into a secret room containing multiple chests with lots of goodies. The place he was talking about was a different set of stairs altogether.
"Follow the girl downhill to the west and dispatch another quintet of Wolves (level five), then loot around the area to find"
Here you should find dog tally (as quest says), it must be looted from a dead dog, near the place where the wolves were.
"When you reach a crossroads (the southern road leads to the Ghouls nest you cleared earlier) head north until you find a road to the north-east. Follow the road until you find a search area, which is largely unnecessary, because the shrine is easily visible off the eastern side of the road."
For those who want to find on their own, it's simple: follow the road northeast of the shrine at the crossroads and look for the small shrine on the east side of the road. It won't be that far from the intersection.