
| Important Items in this Area |
|---|
| Letter |
| Arrest Warrant for the Witcher Gerd |
| Innkeep’s Notes |
| Diagram: Ursine Steel Sword |
| Distiller’s Letter |
| Distiller’s Log |
| Mash |
| Skellige Spirit |
You’ve chased down pretty much every side quest and free form quest in the western part of Ard Skellig… not to mention all the loot you pulled out of the water. Sure, most of it was done under flimsy pretenses, but you can’t argue with all the diagrams this exploration has uncovered.
Practicum in Advanced Alchemy (Level 24)
Fast-travel back to the “Whale Graveyard” and kill any Drowned Dead (level eighteen) which may have spawned in your absence. Once done, turn south-west to find a trail leading uphill. Follow this trail until you reach a cave, outside of which you’ll find Gremist, the master alchemist who is the subject of the quest “Practicum in Advanced Alchemy” . Well, while you’re here and all… you know how this goes. Go talk to him and he’ll prove reluctant about teaching you the formulae he struggled and sacrificed for, but if you persist he’ll come around and offer to teach you… if you perform three tasks for him. Agree and, well… the tasks are to get him some rare spirit, a pimpernel, and convince the druid Frijof to preform a ritual for him. Seems simple enough. Agree and the next round of Skellige exploration will begin.
Ruined Inn
Don’t worry, this won’t be nearly as involved as the last quest you ran (and sailed!) around half of Ard Skellig for. It will, however, prove far more lucrative, if you discount all those Diagrams and whatnot. Fast-travel back to Fyresdal and head south through the town to reach the port, where three roads form a “T”. Take the eastern fork and cross a bridge, then follow this road south and south-east until you come to another three-way fork. Continue east until you find the “Ruined Inn” - the location and the signpost.
As you approach it should become all too clear why this inn is ruined - or at least, why it presently remains so. Sirines (level thirteen) have made their nest here. Kill the Sirines, then get to looting, as this isn’t just a Monster Nest location, but an Abandoned Site, as well. There are two houses near the water you can pay attention to, and inside the western-most of the two buildings (the one next to the Sirine nest) you’ll find a treasure chest to loot… because this area, in fact, houses THREE events. Loot the chest to find a “Letter”, which will start the quest “Family Fortune” once read.
Might as well finish this quest up while you’re here. Head to the end of the lone dock outside of the Ruined Inn and turn south-west to spot the mast of a large, sunken ship. Swim over there (perhaps dealing with some Sirines (level thirteen) and Ekhidna (level nineteen) along the way) and search the submerged end of the ship’s deck to find another chest. Looting this chest will finish the quest “Family Fortune” .
Return to the Ruined Inn and this time search the northern-most of the three structures - presumably the ruined inn itself. Go down some stairs along the northern end of the ruined building to reach a basement, now occupied by some Wraiths (level twenty). Banish them, then investigate a note on the wall to get the “Arrest Warrant for the Witcher Gerd” . Once done, head into the south-eastern room and search a chest to find the “Innkeep’s Notes” and the “Diagram: Ursine Steel Sword” . It seems that Witcher Gerd’s lack of common sense, predilection for gambling, and poor luck resulted in this diagram falling into your hands.
Anywho, now that you’re done with everything here, destroy the Sirine Nest and kill the Ekhidna (level nineteen) that may take umbrage at your vandalism, after which the Monster Nest and Abandoned Site events will be completed, and folk will move into the place. The new inhabitants includes an Herbalist, should you be in urgent need of herbs.
| Objective | Reward |
|---|---|
| For destroying the Sirine Nest | 20 XP |
| For killing the Ekhidna guardian | 50 XP |
| For liberating the Abandoned Site | 170 XP / 50 Crowns |
The Palisade
Now, there are two ways to get to the Distillery from here. You can head north from the Ruined Inn and pass between some mountains, turning east when you’re able and heading along the mountains to find a trail that’ll lead up to the Distillery, or you can take the more scenic route, which is also more lucrative.
Head back to Fyresdal signpost and follow a road north out of town. When the road forks, turn north-east and cross a bridge, then continue following this road north-east. Eventually you’ll reach the Palisade signpost, where a Peasant is screaming for help. Approach him and you’ll find out that he’s not so much in need of help as he lets on - put him (level thirteen) and his Skelliger allies (level eleven) down.
| Objective | Reward |
|---|---|
| For fighting through the ambush | 15 XP |
Well, that was disheartening. How about some good ol’ monster slaying to cheer you up? Cross a bridge over a ditch outside the palisade, then search the hills to the north-east to find a Wyvern flying about. Put the beast down and note that you’re just south of the two lakes south of Blandare. Neat.
A Bards Beloved (level 15)
There’s one more diversion to take care of while you’re in this part of Skellige, and since there’s no other reason to come here, you might as well take care of it now. Return south to the road running to the palisade, then follow this road east until you reach a fork. At this fork, follow the northern-most road to the northeast until you hit another fork just east of the smaller of the two lakes south of Blandare. At this second fork, continue east until you find a third and final fork, at which turn southeast and follow a small trail into the forest until it terminates at a cave.
Enter the cave and inside you’ll find a Troubadour, who seems to be having some… lady troubles. After the conversation ends, the quest “A Bard’s Beloved” will begin. Continue northeast into the watery depths of the cave, where you’ll find the beleaguered bard’s beloved, which just so happens to be a Water Hag. After a short chat, Geralt decides he’s in no mood to play the hag’s game, and instead decides to strike up a more normal Witcher-monster relationship with the necrophage. Put the Water Hag (level 15) down to complete the quest. The Troubadour will wisely have fled during the fight.
| Objective | Reward |
|---|---|
| For punishing the abusive hag | 25 XP |
The Distillery
Leave the cave and return back to the Palisade fast travel point, from which make your way back east to the fork. This time, take the southern-most road to the east and continue east for some distance until you reach another fork. At this point take the south-eastern road into the mountains, which becomes little more than a shallow, rocky trench as the path leads up into the snowy mountains. Kill any White Wolves (level fifteen) you encounter along the way then, when you reach the snowy ruins of the brewery atop the mount you’ll have to deal with a trio of Alghouls (level twenty-tree). It’s been a while since you’ve faced Alghouls, and three of them can be a chore. Use Necrophage Oil to increase damage, Axii to make them retract their spines and stop regenerating, and try to avoid fighting all three at once, something the terrain helps with.
Once the Alghouls are dead, search the ruins to the north for some meager treasure before heading down some stairs to the south-east, then south-west to find the “Distillery” signpost.
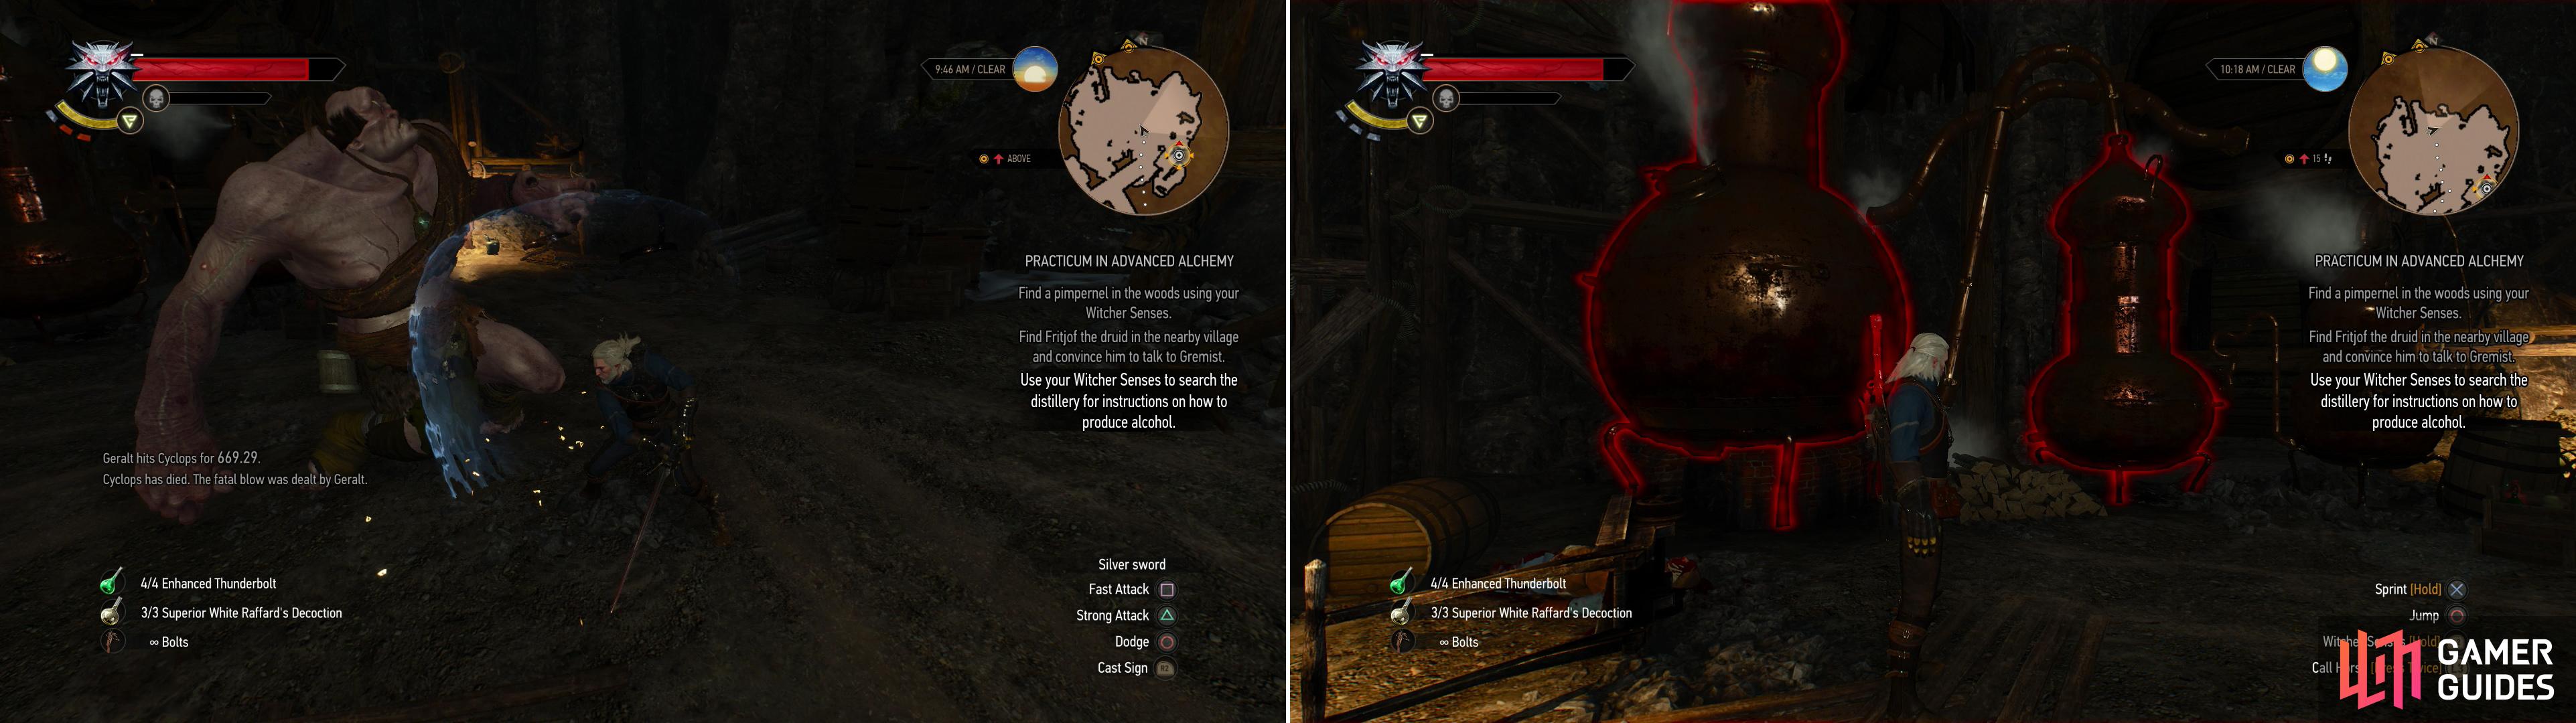
Kill the Cyclops that now occupies the Distillery (left) then bew yourself some Skellige Spirit (right).
Cross a bridge and turn north to enter a cave, wherein you’ll find a Cyclops (level twenty-one). Nothing you haven’t handled before, although in these confined quarters it may be a little trickier dodging its attacks, since the camera will invariably work against you. Still, strong attack and dodge works well most of the time, and remember to apply that Igni to blast its health away with that damage-over-time. Kill it and search its home to score a few crates full of less-than-stellar loot. When done, head up into a structure in the south-eastern corner of the chamber and loot around here, too. Search the beds for a “Distiller’s Letter” and a “Distiller’s Log” . The former contains the following relevant information about the brewing process:
- Put the mash in the evaporator
- Light the fire under the evaporator
- Cool the condenser. FIRST turn the right lever, then the left. NOT the other way around.
Simple enough. Head to the northern end of the room and climb a ladder, then use your Witcher Senses to highlight a a jar of “Mash” . Return to the ground floor and head east to find a machine into which you can place the Mash. Do so, then when Geralt prompts you, hit it with Igni. When prompted again, hit it with Aard. Head further east to find two levers-pull the right (eastern) one first, then the left (western) one. Once done loot a barrel to claim the “Skellige Spirit” that Gremist wants.
| Objective | Reward |
|---|---|
| For brewing some Skellige Spirit | 80 XP |

 Sign up
"rocky trench as the path leads up into the snowy mountains"
there is another fork, where you must choose the south-eastern path.