
| Important Items in this Area |
|---|
| Thief’s Journal |
| Diagram: Enhanced Ursine Gauntlets |
| Letter to Yanne |
| Gwent Players in this Area |
|---|
| Merchant - Random Card |
You’re now done with Fayrlund, time to continue your trek south to Fyresdal. Along the way, however, there are plenty of map markers to clear, quests to advance (or even complete!) and treasures to pilfer. Let’s get on with exploring Skellige than, eh?
Bandit Camp (Level 12)
Backtrack up to Rannvaig (or just use the signpost) and from Rannvaig head east, to find a Bandit Camp along the southern end of a lake. Kill the resident Bandits (level twelve) and loot the chest near their shelter.
Abandoned Site (Level 15)
Head north along the western end of the lake until you reach a mill to the north of the lake. This mill is now the site of an “Abandoned Area”, which is populated by a variety of Drowners (level fifteen). Exterminate the Necrophages and some Skelligers will move in, including a Merchant who sells a variety of diagrams similar to what the Armorer in Kaer Trolde sold.
| Objective | Reward |
|---|---|
| For liberating the Abandoned Site | 120 XP / 50 Crowns |
The Family Blade (Level 15)
Follow the road from the Abandoned Site north, then east until you reach a fork, at which point take the north-eastern road. When the road turns north keep your eye to the east to spot a shrine looming on a hill in the distance (if you have the quest tracked you’ll spot a search area to the east). Head uphill to reach the shrine, then from this shrine follow a road a short distance to the east to find a camp occupied by several Skelligers (level fifteen). Dispatch them and search one for the “Thief’s Journal” , then read the journal to find where the blade you’re looking for has gone. Seems you’re going south, after all! Loot around the tents to find two chests; the one near a wagon, between the two tents can contain some decent loot.
Enhanced Ursine Gauntlets Location
While there’s still some exploration to do to the south, there’s a bit of loot worth traveling north for. Make your way back west to the road you spotted the shrine from, then travel north along said road to find the village of Rogne. Along the way when you come to a fork, stick to the western of the two roads, as the eastern road (which runs north-east) will just take you to a cave that’s part of the quest “Contract: Missing Miners”, where a powerful Rock Troll named Wham-a-Wham dwells - a beast you have no need to fight just yet. As for Rogne itself… there’s nothing interesting about this place now, but discovering the signpost will come in handy for the future.
From Rogne follow a road to the north-east and cross two crude bridges, then continue following the road through a ravine. When you reach a fork follow another road to the north-west, being wary of the Endrega Drones (level twenty) which infest the hills east of the road. Eventually you’ll find a crumbling stone structure with an intact arch. Pass under the arch and dispatch a pair of Wraiths (level twenty-two) which appear to dispute your passage. Once they’re banished head up some stairs to the north-east to reach a square tower, inside of which is a chest containing the “Diagram: Enhanced Ursine Gauntlets” . Neat.
There’s more loot to be had further north, but it’s guarded by powerful beasties that are best left for later.
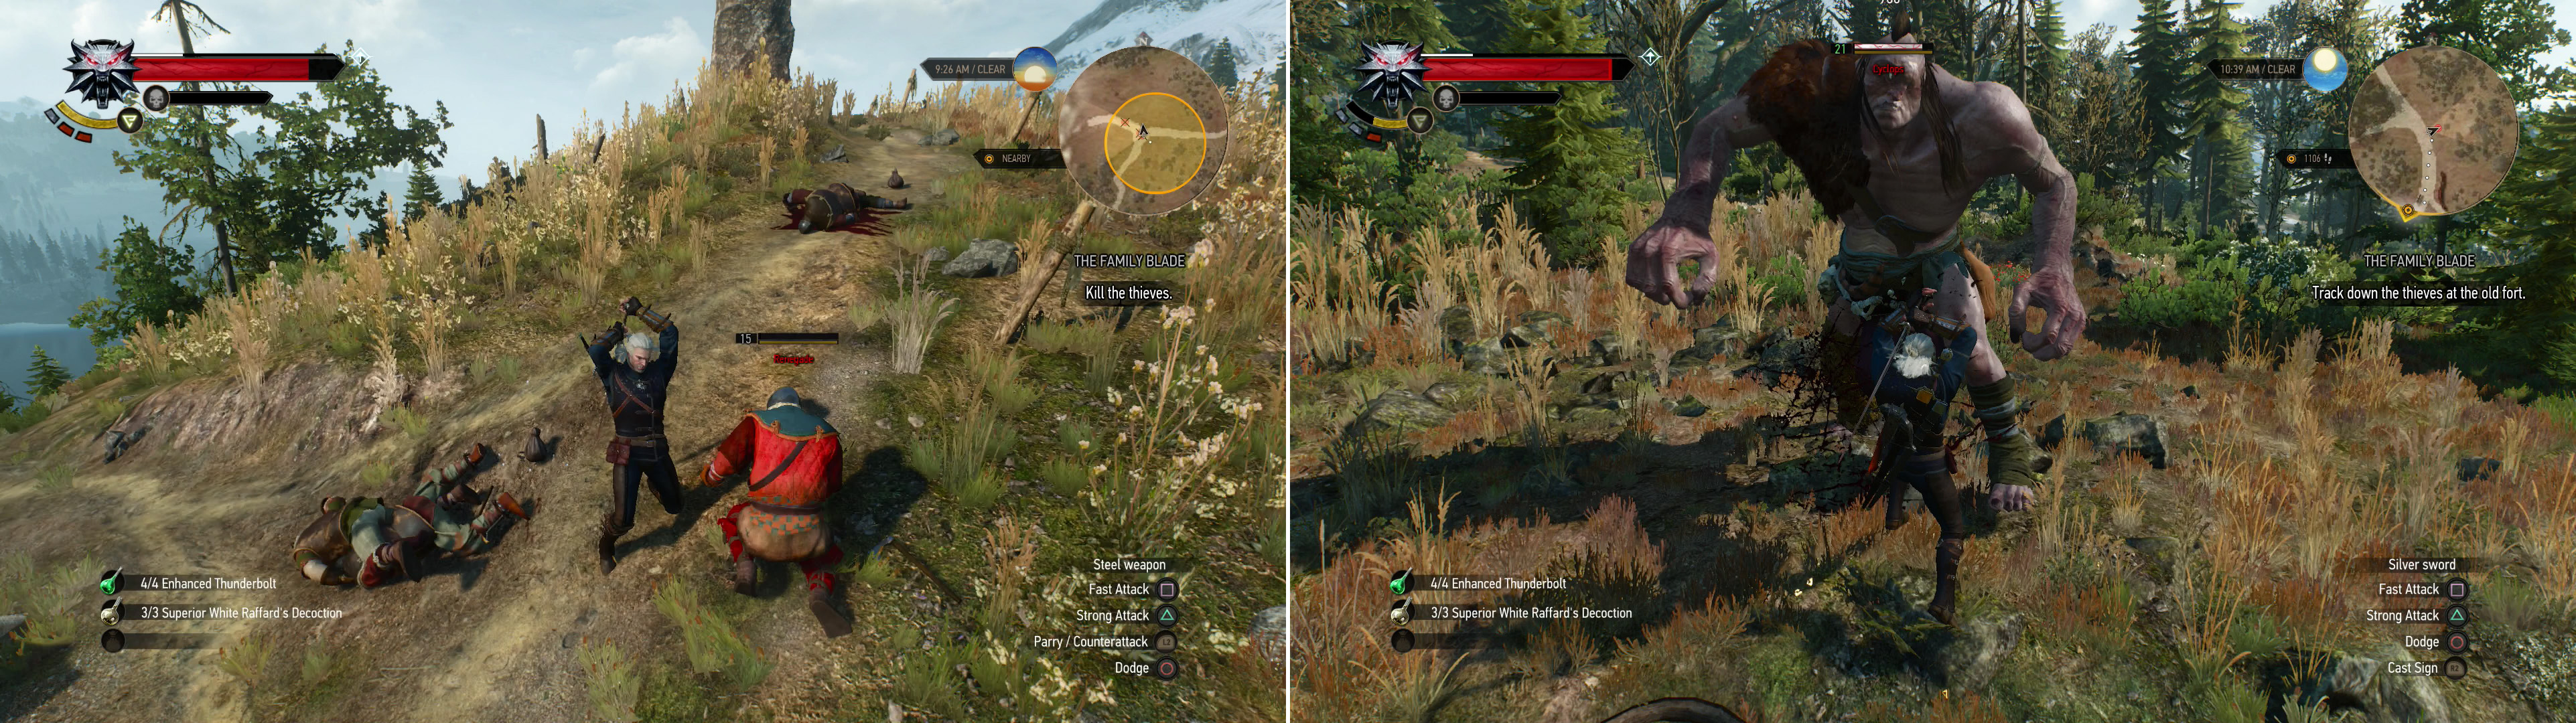
Kill some Bandits, only to discover that the blade you’re looking for has already changed hands (left). Find a Cyclops near a sacked cart, clearly the culprit of this atrocity (right).
Hard Times (Level 21) Walkthrough
Make your way back to Rogne, and from there back track to the shrine. South-east from the shrine you’ll find a series of roads criss-crossing the lowlands, where you can find a few things worth noting. From the shrine follow a road to the east, then take the first road south (the road that runs alongside the tents belonging to the Skelligers you killed earlier). As you follow the road south you’ll pass by two two roads to the east which, which you should ignore for now.
Keep following the first road south of the shrine you’ll eventually reach a triangular fork, at which point turn north-west and run alongside the lake to loot some houses near the shore. Once done, backtrack east to the road you took to get down here and head back north up it until you reach the first (southern-most) road running east. Follow this road east, then south-east, until you find another fork, at which point turn north to find yet another fork. This one you want to follow north east. Along the way east you may find some mounted Bandits (level sixteen) prowling perilously close to a pack of Nekkers (level twelve).
More interesting, however, is the Cyclops (level twenty-one) that lurks near an overturned wagon, which in turn is found along the side of a larger road the smaller one you followed connects to. A heavy hitter, the Cyclops’ attacks can be blocked with Quen, just avoid its leaping stomp attack, which it takes great effort to inform you of ahead of time. Igni works particularly well against them, too, even though this isn’t reflected in the bestiary. Applying the burning damage-over-time effect will do tremendous damage to the beast, even if it doesn’t last particularly long. A few seconds of burning is still worth many sword strikes.
Kill and loot the beast, then use your Witcher Senses to examine the nearby caravan - the dead horse and human, specifically - then turn east and investigate some tracks along the edge of the road. While investigating, you may be pestered by a Ghoul (level nineteen), and while following the tracks you may run afoul of another Ghoul (level nine). Speaking of which, follow the trail east to find a corpse, upon which you’ll find the “Letter to Yanne” . Seems like somebody’s going to get some bad news back at Kaer Trolde…
Guarded Treasure near Blandare (Level 23)
Return to the wagon and follow the road south-east until the road bends to the south-west, at which point you should spot a smaller trail continuing to the south-east. Follow the trail and you’ll find some barrows, in one of which is a Guarded Treasure event. Apply some Specter Oil to your blade, then head down into the northern-most of the barrows, which will provoke three Wraiths (levels twenty-two and twenty-three). Dispatch them and loot a chest to the south.
Blandare
Return above ground and head south and slightly east to find yet another village, this one named Blandare. Loot the various outlying farms to the east for various goodies, then head to the south-western cluster of buildings to find the village proper, including a signpost and a notice board. Talk to a man named Djenge Frett near the signpost and he’ll offer to team up and hunt the vile Grossbart brothers and give you some direction, starting the quest “The Sad Tale of the Grossbart Brothers” . As with most side quests in this guide, you’ll get around to completing this as the main story and bouts of exploration lead you closer to the area. From the notice board Continue east along a road to find a Merchant, who sells little of interest (but plays Gwent!), then hit the notice board and grab the notice “Contract: Missing Miners” , which starts a quest by the same name. It’s a bit high-level right now, but there’s no harm in picking it up.

 Sign up
No Comments