
Heroes of Gaia
This is the platinum trophy for the PS4 version of the game and it is definitely one of the more challenging ones for Final Fantasy games. The reason for this is because of all the potential missables in the game, with some of them being pretty far into the game. The biggest culprit of this is Movie Critic, requiring you to view Active Time Events throughout the playthrough, most of which are optional and some of them being quite missable. You’re looking at two playthroughs, at least, totalling about 80-100 hours, possibly more.


Bloodlust
Welcome to the grindiest trophy/achievement in the game, which requires you to kill 10,000 enemies in a single playthrough. You won’t be anywhere close to that goal upon finishing the game, so you will need to farm kills. One of the better places to do this is inside Gizamaluke’s Grotto, since there is a chance of having up to four enemies spawning in a battle there. You can trigger auto-battle with the R2/RT/ZR button (while in battle), then use the speed-up booster to make battles go a lot quicker. This trophy/achievement will take a good amount of time to get, so you might be looking at 10+ hours of just doing this; it might be best to break this up into chunks to make things not go stale.

Driving the Hard Bargain
Missable. As you visit places throughout your journey, you might happen upon a moogle named Stiltzkin. You’ll know it’s him, as he’s wearing a bandana on his head and a backpack. He spawns in set locations and when speaking with him, you will find that he’ll try and sell item packs for some Gil. To get this trophy/achievement, you will need to purchase every single one of these item packs from Stiltzkin, of which there’s 8 in total. What makes this missable is that he will move on to the next location, whether you bought the items or not. Note that you will need the room to purchase the item, so if you were to have 99 of one of the items, then you won’t be able to buy the pack from him.
- Burmecia (open chest in back of room with moogle to make him appear)
- Cleyra (in inn after defeating Antlion)
- Fossil Roo (next to Mogki the moogle)
- Conde Petie Mountain Path (right next to moogle)
- Alexandria on Disc 3 (inside chapel)
- Oeilvert (inside, next to Mooel)
- Bran Bal (exit and re-enter room with Moorock the moogle)
- Alexandria on Disc 4 (inside chapel)

Checking the Code
You won’t be able to get this trophy/achievement until Disc 4. Upon revisiting Madain Sari, you will find Lani standing on the docks in the kitchen area of Eiko’s home. The problem occurs if you have Eiko, Dagger or Amarant in your active party, as approaching Lani will cause her to run away. Remove them from your party and you will be able to talk with her. Talk to her twice, then visit the Eidolon Wall in the northern part of the village. Once inside, from the entrance, walk clockwise around the entire room and when you get back to the entrance, you should hear a chime.
Now, turn around and walk counterclockwise until you get the chime again (at the entrance). Alternate between the two until you get the chime a total of nine times, after which, you can move onto the final step; you’ll know you’re done when the game restores your HP/MP. Now, you will need to read the inscriptions on the wall, all of them, in fact. Once you do this, you will unlock this trophy/achievement.

One Nag Too Many
Upon exiting the Evil Forest, you will receive a key item, the Moogle Flute. This allows you to call a moogle named Moguo on the world map, who will let you use a Tent to heal and even save your game. For this trophy/achievement, you need to call Moguo, then dismiss him. Keep doing this and you will notice he’ll start getting a little angry. It should take around 15 or so times of doing this to unlock the trophy/achievement.

Follow Your Nose
Not that far into the game, you will be able to visit a place called Chocobo’s Forest, where you will gain control of a Chocobo called Choco. At this same time, you will unlock the Chocobo Hot and Cold, which basically lets you dig up items to gain points with the moogle named Mene in the forest. For every successful item you dig up, you gain points and those points add to Choco’s beak level. Your goal, for this trophy/achievement, is to get Choco’s beak level to 99, the max that it can be. There are two good spots for this, the first of which is when you first unlock Chocobo’s Lagoon. This area is small and it’s easy to get the max amount of items to receive the bonus points. The other area is the final one, Chocobo’s Air Garden, where the bonus points for finding the max amount of items is pretty high.

Beach Bum
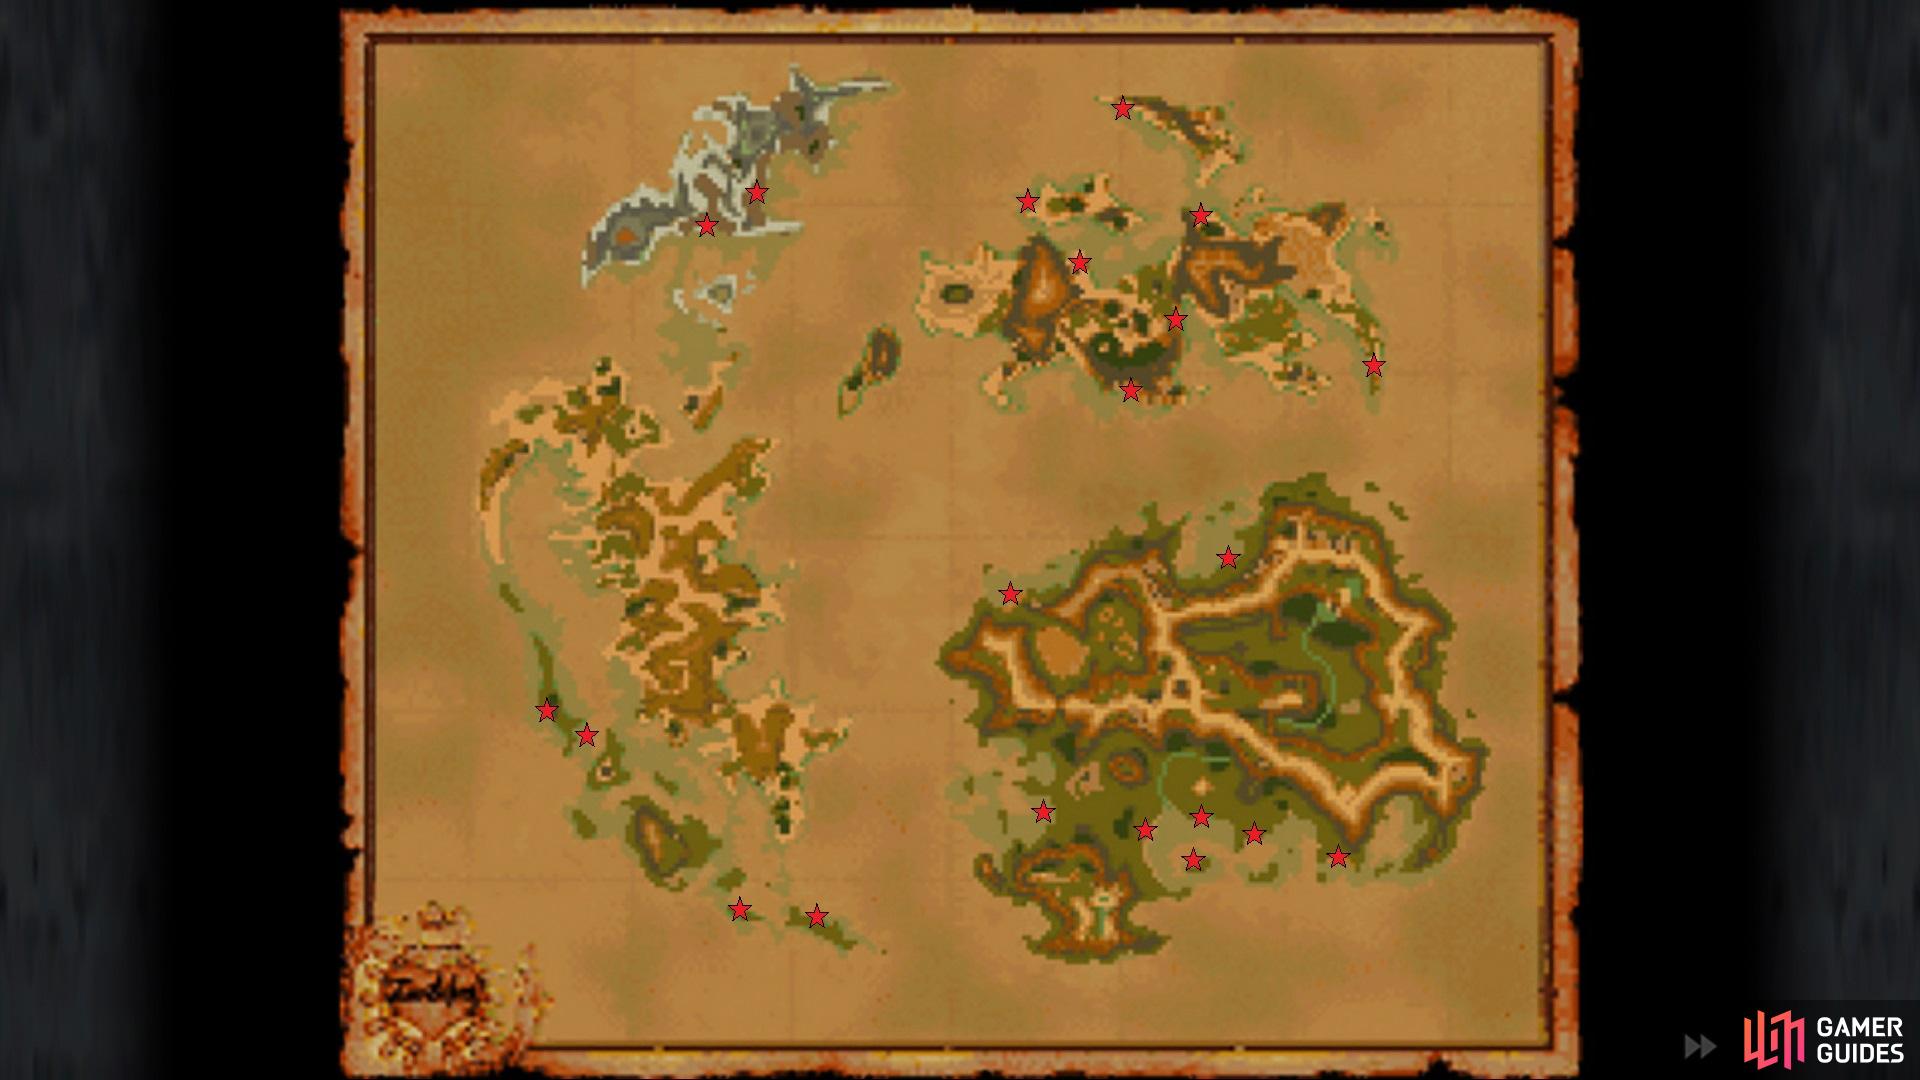
In order to even begin going after this trophy/achievement, you will need to finish the Chocographs side quest, as well as the Mountain Cracks and Dive Spots side bit. Once you do that, visit Chocobo’s Paradise and challenge the Fat Chocobo to a card game. Instead of going straight to the card game, he will talk about the beaches of the world and ask you to find every one. There’s a total of 21 beaches on the world map and upon standing on one, you will see a special symbol. Press a specific button while seeing this symbol will count the beach as found and whenever you do this for all of the beaches, you will unlock the trophy/achievement, plus you’ll be able to restore the party’s HP/MP while close to the beaches.

Diggin’ It
This trophy/achievement requires you to find all of the Chocographs when doing the Chocobo Hot and Cold minigame, then dig up their treasures. Visit the first link above for every treasure location.

Back Online & Well Lubricated
During the course of the main story, you will find that you can deliver letters from one moogle to another. That has no bearing on this trophy/achievement, as the side quest for this trophy/achievement doesn’t actually unlock until Disc 4. To begin, go to Alexandria and to the chapel to find Kupo. Pick the Mognet option and he will ask you to deliver a letter to Atla, officially beginning this side quest. Now, for every moogle you deliver a letter to, you will follow up by being asked to deliver another letter, with the side quest bringing you back to Kupo in Alexandria. Here is a list of all the moogles you will be visiting, along with their locations:
- Kupo (Alexandria; in the chapel)
- Atla (Burmecia; in the far back)
- Mogryo (Black Mage Village; outside Chocobo’s stable)
- Kumool (Ipsen’s Castle; second room)
- Mois (Entrance to Fossil Roo; On Qu’s Marsh side and requires Quina in party)
- Noggy (Daguerreo; on second floor on right side)
- Kupo (Alexandria)
Upon delivering the final letter to Kupo, you will receive a hint that someone in Alexandria has the Superslick item needed to restart the whole Mognet Central. Ruby, Zidane’s friend, will have it and she’s inside of her theater. Once you grab the Superslick (this will unlock Well Lubricated), you will need to find Mognet Central, which is located on an island north of the Outer Continent, specifically northeast of Madain Sari. You’ll need to get there with Choco, so the Ocean Ability is at least required. Look for the long mountain range on this island and find the U-shaped part of it. There will be a crack in the mountain there, so use a Dead Pepper while riding Choco to blast a hole in the mountain. Inside will be Mognet Central, so head to the second floor and speak with Artemicion, handing over the Superslick item you got from Ruby to get this trophy/achievement.

Frog Wrangler & Going For the Gold
One of the minigames in FF9 is catching frogs, which is done in places called Qu’s Marsh, of which there are four in the game’s world. To be able to catch frogs, though, you need one of the game’s characters, Quina, who will be found in one of said marshes. Upon entering the pond where the frogs are located with Quina in your active party, s/he will ask you if s/he can catch some frogs. Say yes and you will start the minigame, which basically has you running around and spamming the confirm button to catch frogs when they are on land. The problem with catching frogs is that they can take a while to respawn, so you will have to wait a good while (in-game timer) before you’ll be able to catch them again
As you advance the story, you will gain access to the other three locations, meaning things will go quicker then. However, since the frogs don’t instantly respawn and you have to wait a while for them to do so, even with all four locations unlocked, this is best to do over the course of the game and not all at once. It’s also important that you leave one male frog and one female frog behind, as that increases the respawn rate than if you caught all of them. To add onto this is the golden frog, which can only spawn in a single location and helps the respawn rate immensely in that location. You can simply catch the golden frog for the trophy/achievement, then reload that save to get it back. Do note that once you catch the 99th frog, you will fight one of the game’s superbosses, so be prepared for that.

Auctioneer
One of the towns you can visit is called Treno, which has an auction house in it that functions pretty similarly to real-world ones. Upon entering the auction house, the auctioneer will say the four items that will be up for sale, then start the bidding war on each one in succession. The NPCs will bid on the item up for sale and you can bid on it, too, by speaking with the auctioneer and inputting your bid. If yours holds up until the end, then you will win the item. One tip to help you win items is to wait until the auctioneer says “Any more?”, then input your bid, which will usually win you the item immediately after. You need to win 10 items in order to get the trophy/achievement.

Sword of Kings
The Excalibur is a weapon for Steiner that you won’t be able to get until Disc 4, although it’s possible to do some of the steps for the side quest on prior discs (don’t confuse this weapon with the Excalibur II, which is a different beast altogether). All of the steps for the Excalibur revolve around the Treno Auction House. When you first have access to it, you will find the auction house is selling some items that don’t seem to have any use. These are placed into your Key Items and are as follows: Griffin’s Heart, Doga’s Artifact, and Une’s Mirror. Win them and you will be able to sell them to specific NPCs inside of Treno itself.
For more information on those NPCs, visit the Treno Auction House page. Sell those three items and whenever you reach Treno on Disc 3, you can do the same thing with the Rat’s Tail item. Upon reaching Disc 4, head to Daguerreo and find the Old Man on the left side on the second level. Speaking to him will have him ask you to bring back an item called the Magical Fingertip. If you’ve sold all four of the above items to their respective NPCs, then the Magical Fingertip will appear in the auction house. Win it and bring it back to the Old Man to receive the Excalibur.

Beating the Ragtime Blues
Missable. As you progress the game, you might want into a special encounter in forests called the Ragtime Mouse. This enemy is basically a trivia minigame, where he will ask a true or false question and you answer by attacking either the O (True) or X (False). For answering correctly, you will receive some money, which increases as you encounter him more. If you answer wrong or happen to attack the Ragtime Mouse, then you will still be able to move onto the next question, but you will void this trophy/achievement. There’s a total of 16 different questions he will ask you, although you won’t be able to encounter him all at once. After answering all questions correctly, find him one more time and he will be “defeated,” finishing off this side quest.
For more information on the answers to these questions, visit the Ragtime Mouse page. Note that you can circumvent the random encounters with the Ragtime Mouse by using the stutter step technique on the world map. Basically, you just lightly tap the directional pad to move (the leaves will rustle in the forest if you aren’t doing it right) repeatedly and you should only encounter the Ragtime Mouse.

Mister Nice Guy
Missable. Similar to the Ragtime Mouse, more special encounters involve something called Friendly Monsters. These have the same music as the Ragtime Mouse, but they are special, in that, they will ask for a specific item from you. Give them the item and they will reward you with an item, but the biggest reward will be the massive AP. There’s a total of nine Friendly Monsters, but the final one won’t do anything until you befriended the other eight. Note that you can do the others in any order, but some of them might require items given out by previous ones, plus the order listed on the above page is as you progress in the main storyline. The only possible reason this is missable is if you sell off all the Moonstones or Emeralds, as there’s only a limited amount. Once you have over the Diamond to Yan, the final Friendly Monster, this trophy/achievement will unlock.

To Ozma and Back
Ozma is one of the game’s superbosses and can be one of the hardest fights to win. Before you can even think about fighting Ozma, you will require a few things in order to reach it. You need to have found enough Chocographs to have the Sky Ability for Choco. Once you do this, you have to hunt down the location of Chocobo’s Air Garden, which can randomly be in one of five spots. If you need the locations of these five spots, then head to the Side Questing 3 page to find them; note that the Air Garden will appear on your large map, so you can use that to track it down. When you head to the Air Garden, you will find a structure in the back that will trigger the fight upon inspecting it (you have ample warnings before you commit to it).
As a whole, the Ozma fight is a good bit or preparations, with some luck thrown into the mix. Finishing the Friendly Monsters side quest will not only get you a lot of sweet AP for your abilities, but it helps out with Ozma, too. Normally, if you fight Ozma without doing it, the big ball cannot be attacked with melee attacks/skills, plus it will be able to absorb shadow damage. Finishing the side quest will make it so you can hit with melee attacks, plus it will become weak to shadow damage.

My Little Airship
Missable. This trophy/achievement is tied to the Rare Coffees side quest, entailing you to find three coffees in the game’s world. Once you do, you will bring them back to Morrid in Observatory Mountain, located just outside of the Village of Dali. Upon doing so, Morrid will reward you with the model airship he owns, sending to the Tantalus hideout in Lindblum. What makes this trophy/achievement missable is that when you finish the Four Shrines section of the main story, you will be blocked off from Observatory Mountain.

Stellazzio Trophies/Achievements
Stellazzios are hidden coins throughout the game’s world, that you can collect and bring to a NPC named Queen Stella in the city of Treno. For every coin you bring back, she will reward you with either an item or some Gil. There’s a total of 13 coins that you can find, although you can’t secure the 13th until you find the first 12 coins. A list of all locations is found on the Stellazzios page. For handing in 10 coins, you will receive the Earning the Queen’s Favor trophy/achievement, and handing in all 13 coins will net you the What’s Your Sign? trophy/achievement.

Another Man’s Treasure
Potentially Missable. There is a hidden ranking in the game that revolves around finding the various treasures found in chests and items given to you by NPCs. The Treasure Rank cannot be seen or known about until you are able to reach the town of Daguerreo, so you won’t be able to know your rank until at least Disc 3. The hidden S-Rank, needed for the trophy/achievement, requires at least 340 points, with all items found in chests, given by NPCs and via field icons yielding a single point. Those items you find via the Chocographs and Mountain Cracks/Dive Spots will award you two points each. If you follow the walkthrough, you will get the trophy/achievement upon visiting Daguerreo when given the chance.
Note that you can speak to the Four-Armed Man NPC inside Daguerreo to find out your rank. If it’s already S-Rank, then he will run off to the entrance of the town, where you can speak to him an unlock this trophy/achievement. The only way it’s potentially missable is by simply ignoring a lot of the treasures/field icons you come across in your journey. Note that a lot of points can come from the Chocographs/Dead Pepper Dig treasures, though.

Dragon Lady
Missable. One of the attractions in the city of Treno is the equipment shop, which will have a monster underneath it at certain points in the game’s story. Once you reach Disc 4, that monster will be a Behemoth and in order to unlock this trophy/achievement, then you have to defeat the Behemoth with Dagger. This battle can be tricky, but you can easily win by summoning Odin, who should be able to instantly kill the Behemoth. Make sure that you don’t use another character to beat the Behemoth, as it doesn’t come back once defeated.

Jump Rope Trophies/Achievements
Welcome to one of the biggest roadblocks in achieving all achievements/the platinum trophy for this game. In Alexandria, there is a minigame that you can play that involves jumping rope. It exists on the first disc, then you won’t get another chance until you head back to the city on Disc 3. It doesn’t really matter when you do this, as the minigame remains the same either way. On the first disc, the girls playing jump rope are in the square, then they will relocate to the chapel on Disc 3/4 (keep progressing the story until they show up). The goal of the minigame is to press the button to have Vivi or Eiko (latter can do this on the later discs) jump without hitting the rope. At specific intervals, the girls will speed up their swinging, making it so you’ll have to press the button faster.
The only rewards from doing this minigame will be Tetra Master cards, along with a key item that doesn’t do anything for getting 1,000 jumps in one playing of the minigame. You will need that key item to get this trophy/achievement. The biggest problem with the modern ports of this game is that there’s slight input lag, so you don’t get an instant response and that causes issues with this minigame. It is still possible and the most problematic rhythm will be from 200 jumps to 300, since it’s a bit strange, but 300+, the rhythm will go back to a normal (and very quick) pace and stay that way until 1,000.
Of course, there are other outside methods of doing this, with scripts and such (at least, on the PS4/PC versions), but those won’t be documented here and you’ll have to find those on your own.

A Round of Applause
Missable. Towards the beginning of the game, you will participate in a mock sword fight in a play. This minigame has you pressing the buttons that appear on screen in rapid succession and at the end of the play, you will be graded by how many nobles were impressed (Queen Brahne doesn’t really matter at all). In order to get this trophy/achievement, you will need to have impressed enough nobles for them to demand an encore, which usually happens at around 80 or so. Note that you will need to impress 100 nobles in order to receive a Moonstone, which is needed for the Over the Moon trophy/achievement. It goes without saying that since is only possible in a single spot in the story, progressing past this point makes it missable.

A-Hunting We Will Go
Missable. Whenever you first visit Lindblum during the story, you will be forced to participate in the Festival of the Hunt. This has you controlling Zidane, where you run around the town and defeat monsters to accrue points, plus Freya and Vivi will also be participating. Whoever has the most points at the end of the festival will win, although only Zidane, Freya or Vivi can actually win. Vivi needs to win to get this trophy/achievement and the only way for that to happen is to have both Zidane and Freya lose all of their health. However, you only control Zidane, but there is a way to get Freya into your party for a single battle. Once the clock reaches 4 minutes and 30 seconds or less, head to the Business District and go to the shops screen. Here, there will be a Zaghnol enemy, with Freya joining in. While fighting this thing, hit yourself enough to lose all of your health, which will cause Vivi to win the entire festival.

All’s Well That Ends Well
This trophy/achievement is unlocked for completing the main story, so it’s impossible to miss if you aim to complete the game.

End of the Road
Leveling a character to 99 is definitely a tedious process, considering you could probably finish all of the game’s content in the 50s-60s. It should be noted that the experience any enemy gives in the game is always split upon all living party members at a battle’s end. So, the best thing to do is to concentrate on a single character and solo enemies with him/her. By far, the best enemy for this is the Grand Dragon, which can be found at Popos Heights (you can climb up here from the moogles’ room in Gizamalukes Grotto) or on some of the islands in the southwest corner of the world map.
It’s better to solo with a character who can learn Distract, as that allows you to possibly evade the Grand Dragon’s Poison Claw attack. The other two attacks include Venom Breath, which you can prevent with Antibody, and Thundaga, which you can prevent by equipping the Coral Ring. Putting on Level Up is also a great idea, since it’ll increase your experience earned, and Auto-Life/Regen will help you stay alive. A single character with Level Up equipped will get around 50,000 experience to defeating a Grand Dragon.
There are other enemies that give more experience than the Grand Dragons, but they are either located in the final story dungeon, or they are a lot more dangerous. For example, the Yans on Vile Island (southwest of the Iifa Tree) can use Snort to knock a character permanently out of battle, plus they have the potential to deal a lot of damage to your party members.

The One Ring
Missable. This trophy/achievement, and the next one, are unlocked in Fossil Roo, a dungeon that becomes blocked off after finishing it. For this one, you will reach a point where you find a miner that will allow you to mine if you give him a Potion. Do this and find a spot to dig, until you eventually get the Madain’s Ring from it. Now, this is random and you usually need to reset the area after finding 3-4 items (can just leave and come back to restart the minigame). There’s no telling how long this can take, though, as you might be sitting there digging away for 20-30 minutes.

Peek-A-Boo
Missable. Similar to the previous trophy/achievement, this one is also located in the mining minigame. However, this one isn’t random, but if you head to the upper level and go all the way to the right side, there is a spot where you can dig. As you pick away here, you should see a familiar phrase. Keep digging until the wall collapses and a moogle falls out, earning you this trophy/achievement.

Track Star
Missable. Upon returning to Alexandria at the beginning of the third disc, you will be in control of Vivi. This needs to be done before agreeing to see Ruby’s play in the alleyway. On the one street, you will find Hippaul and his mother standing there, so speak to his mother to see that she’s trying to whip Hippaul into shape. This will be done via a running minigame, where you need to alternate between the two buttons shown. Your goal is to win the races, which will increase the level of Hippaul. To earn this trophy/achievement, you need to get Hippaul to level 80. For every race you win by a large margin, his level increases by 5, but winning otherwise only increases it by one. You can check his level by speaking to him in between the races. Once you get his level to 80, then you will receive the Athlete Queen item and the trophy/achievement.

Found in the Shuffle
Missable. During your visit to Alexandria in the beginning of the third disc, you will take control of Zidane after a little bit of story progression. While controlling Zidane, head to the equipment shop to find Zenero, Benero and Genero standing there. If you speak to them, they offer to let you play a minigame that is pretty much like the shell game or three card monte. The three brothers will shuffle around and ask you where a specific one is located. To get this trophy/achievement, you have to guess the location of the brother correctly nine times in a row.
While it’s certainly easy for the first few rounds, they begin getting pretty fast once you reach the fifth or sixth round. There is no easy way to do this, especially if you try to play it with your eyes. However, you could always record them with a phone or something, plus the modern consoles have built-in recording features. Since there is no timer involved with choosing an answer, you can play back that recording to find out the answer. Correctly guess nine times in a row to get the trophy/achievement.

Tetra Master Trophies/Achievements
Tetra Master is the card game that you can play with various NPCs in the game. It has similarities to Triple Triad from Final Fantasy VIII, but there is more randomness involved and there are actually no rewards from it whatsoever. For these three trophies/achievements, you have to win a total of 100 games across the entire game. To challenge a NPC, walk up to them and press Square/X (Xbox); the modern ports will have a card icon shown if you can challenge them. However, there is a catch, as you can’t just challenge the same NPC over and over again, since that won’t count. You will need to win games against unique NPCs, so this can take a while.
Luckily, there are over 100 NPCs at the end of the game, so you could possibly leave this until then, but as the descriptions note, you can re-challenge certain NPCs after progressing the game. It should be obvious to work on this as you progress through the main story, so you don’t have to do it all at once, but good cards don’t come until later. One thing you can do is save before challenging NPCs, especially if you have good cards, so you don’t lose them if you happen to lose the game.


It's All in the Cards III
Win 100 Tetra Master matches. (Certain NPCs can be re-challenged to increase your win count after progressing through the game.)

40
A Clean Bill of Health
As you play the game, you will inevitably be afflicted with status ailments or use buffs on your characters. This trophy/achievement requires a single character to have every buff and ailment on them at some point in the game. Note that it doesn’t have to be at once and you can pick any character you wish. However, considering Zidane is required to be in your party for the majority of the game, it might be better to go with him on this.
The most troublesome ailment to get is probably Heat, as the easier enemies to get this from will be lost due to those areas becoming inaccessible later on in the game. This would leave it that ailment being afflictable only from two enemies in the final dungeon, who appear as bosses first, then become regular enemies in the final section.
| Buff/Ailment | How to Get |
|---|---|
| Auto-Life | Quina (Auto-Life Blue Magic) or Amarant (Aura) |
| Berserk | Dagger can get this spell |
| Blind | Dagger can get this spell |
| Confuse | Dagger can get this spell |
| Doom | Quina (Doom Blue Magic) |
| Float | Dagger/Eiko can get this spell |
| Freeze | Green Vepals (frozen continent); Steiner with Ice Brand and Add Status |
| Gradual Petrify | Basilisk (Burmecia) or Stroper (Iifa Tree; inaccessible on Disc 4) |
| Haste | Eiko can get this spell |
| Heat | Maliris/Tiamat (Memoria) |
| Mini | Dagger/Eiko can get this spell |
| Petrify | Use Vivi’s Break spell |
| Poison | Vivi can get this spell |
| Protect | Dagger/Eiko can get this spell |
| Reflect | Dagger/Eiko can get this spell |
| Regen | Eiko can get this spell |
| Shell | Dagger/Eiko can get this spell |
| Silence | Dagger/Eiko can get this spell |
| Sleep | Vivi can get this spell |
| Slow | Vivi can get this spell |
| Stop | Vivi can get this spell |
| Trouble | Zidane (Annoy) |
| Vanish | Quina (Vanish Blue Magic) |
| Venom | Zombie Whale (any beach on Disc 4) |
| Virus | Malboro (Overworld on Disc 4); Yan (Vile Island) |
| Zombie | Zombie Whale (any beach on Disc 4) |

A Clean Bill of Health
Have a single character affected by all status ailments (both beneficial and detrimental).

15
Overly Emotional
Trance is a mechanic in the game that functions similar to limits in the previous games. The bar underneath your ATB bar is your Trance bar and will fill up as you are attacked by enemies. Upon being filled, your character will undergo a transformation and not only become stronger, but automatically be cleared of all status ailments. Note that once the bar is fill, you will automatically enter Trance, no matter what, as you can’t control it. To get this trophy/achievement, you will have to enter Trance a total of 50 times across all characters. This might unlock during gameplay, but if not, then you will have to farm it by letting your characters get hit.

Over the Moon
Missable. Moonstones, from a glance, are an Add-On that aren’t anything special, as the abilities they teach can be gotten elsewhere. However, there are only four of these in the game and one is needed to complete the Friendly Monsters side quest later. While the game counts you receiving a Moonstone as progress towards this trophy/achievement, you could potentially lock yourself out of unlocking it, since two of the four will become inaccessible. You are free to sell them if you want, as long as you keep one for the Friendly Monster later in the game.
- Reward for impressing 100 Nobles during the mock sword fight at the beginning of the game (missable)
- Reward for placing all colored stones on pedestal in Conde Petie Mountain Path (missable)
- Reward for giving an Emerald to the Friendly Monster, Jabberwock
- Sold by Stiltzkin in Alexandria on Disc 4


Weapons Trophies/Achievements
Every character in the game has an ultimate weapon that must be found in the game’s world (although it might not be the strongest for all of them). You can easily get all of these, except for Steiner’s, without any real hassle. All of the weapons have a trophy/achievement attached to them, so if you’re looking for the platinum trophy/all achievements, you will need to find them all.
| Weapon | Location |
|---|---|
| Kain’s Lance | From first save point in Memoria, move towards the back of the room and hug the right wall, until you find the weapon |
| The Tower | Memoria; Before facing Maliris, you will be in a room with stairs and a winding path; At the top if a “balcony” and this weapon is on there |
| Rune Claws | Memoria; In the room with the staircase, leading to an eye, look amongst the rubble on the left side |
| Angel Flute | Memoria; In the room with the cutscene talking about Alexandria, go onto the platform in the middle to find the weapon on the left side |
| Mace of Zeus | Memoria; After defeating Kraken, climb the first ladder and look on the left side of the platform |
| Gastro Fork | Collect 99 frogs and defeat the boss that follows |
| Whale Whisker | One of the items found in Chocograph #18 (Ocean one) |
| Tiger Racket | One of the items found in Dive Spot #4 (the Quan’s Dwelling one) |
| Ultima Weapon | One of the items found in Dive Spot #5 (the one where Shimmering Island used to be) |


The Ultimate Sword
Missable. The only weapon trophy that will be quite a challenge to get is Steiner’s final one, the Excalibur II. In order to get this, you have to rush through the game, defeat the fourth major (mandatory) boss (Lich) inside of the final dungeon, Memoria, then pick up the weapon in the same room, all under 12 hours. Doing this requires some good knowledge about the game, since you will be running through it as quickly as possible. There are two ways to go about this, either the normal way without boosters or using the boosters to help. The method without boosters is definitely a huge challenge, but it is possible and you won’t be able to explore too much.
Getting this with the boosters, if you’re just looking for the trophy/achievement, is a much easier option, as you can speed up the game, which doesn’t affect the in-game timer. If that’s the only booster you want to use, then that’s fine, but you can also use the other ones should you want to do such a thing.

Path of the Samurai
The Genji equipment set is one of the better ones in the game and is split into three parts: a helmet, the armor and some gloves. All three pieces involve Choco and his abilities, so you will need to do enough digging to upgrade Choco to the Sky Ability. You will also require two Dead Peppers, so make sure you dig in the Hot and Cold locations to get some. As for the locations of the Genji set, they are as follows:
| Equipment | Location |
|---|---|
| Genji Helmet | Mountain Crack #2 (On Forgotten Continent) |
| Genji Armor | Chocograph #21 (Outer Island) |
| Genji Gloves | Dive Spot #3 (southwest corner of Forgotten Continent) |

Your Lucky Day
Inside of Dali, there is a fortune thing located in the inn. Go in there and then into the room with the beds, where you’ll find the fortune on the left side of the room. For a small cost of 10 Gil a piece, you can draw a fortune and you will need the Very Good one to receive this trophy/achievement. Of course, the fortune you draw is completely random, so you might get it on the first try or it might take 20+ tries.

Out of Harm’s Way
Missable. When you visit the town of Cleyra and proceed with the story, you will be forced to make some choices with some of the NPCs there. These NPCs will require direction on which way to go, and if you choose the wrong one, then you will forfeit this trophy/achievement. The correct answers for each question are as follows:
- Let’s head right!
- Let’s go left!
- Cross the bridge to the right!
- We’re not safe yet
Whenever you’re done with this section, you will have to wait for a few more scenes before the trophy/achievement unlocks.

 Sign up
No Comments