Local Enemy Bestiary
| Enemy Name | Notes |
|---|---|
| Ahriman | Flying |
| Bomb | Weakness to Ice |
| Divebeak | Flying |
| Goon | None |
| Quadricorn | None |
| Recoil | None |
| She-Goon | None |
| Yellow Elemental | Weakness to Water |
Upper Tier : After the rather lengthy scene, go north and you’ll be taught about how to jump in certain places; in this case, the Circle Button. As you go east a bit, jump down from the ledge, then jump up the next one. Before jumping over the next gap, go down and grab the Yellow Ring , then continue back up and over the gap to Rikku and Paine. Head down the stairs to the south and use the Save Sphere - after this point, you’ll start fighting some random battles, so it’ll be nice to have that save in case something goes terribly wrong.
Go west and, after a scene, examine the switch in the wall. Start up the elevator and, after a shaky landing…
Lower Base : Go south and drop off the ledges, then head west and snatch up the Elixir . Go back the way you came and climb the ledges near the broken pillar to a clearing. Relatively speaking, anyhow. Heal up and continue north to encounter Leblanc again.
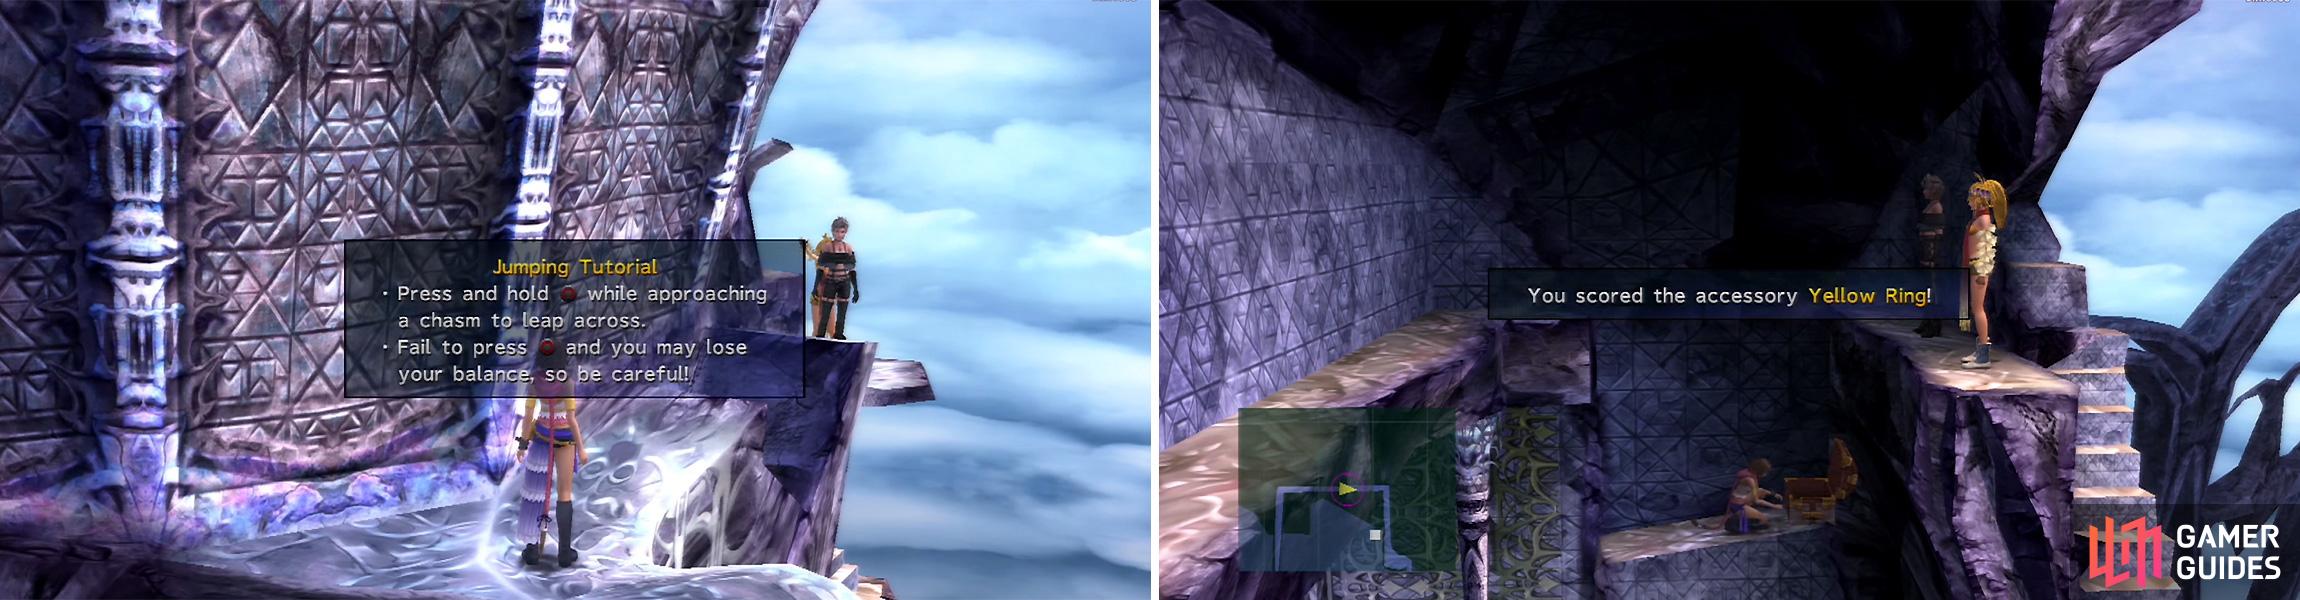
Unlike FFX, you can now jump over gaps and up ledges. You can drop down to ledges below to acquire otherwise unreachable items (right).
BOSS - Leblanc, Logos, and Ormi
| Leblanc | Details |
|---|---|
| Max HP / Max MP | 120 / 320 |
| Elem. Weak / Resis / Immunity / Absorb | None / None / Gravity / None |
| EXP / GIL / AP | 20 / 250 / 2 |
| Common Steals / Rare Steals | Tiara / None |
| Common Item Drops / Rare Item Drops | Hi-Potion / None |
| Logos | Details |
|---|---|
| Max HP / Max MP | 100 / 25 |
| Elem. Weak / Resis / Immunity / Absorb | None / None / Gravity / None |
| EXP / GIL / AP | 10 / 80 / 1 |
| Common Steals / Rare Steals | White Cape / None |
| Common Item Drops / Rare Item Drops | Potion / Phoenix Down |
| Ormi | Details |
|---|---|
| Max HP / Max MP | 130 / 10 |
| Elem. Weak / Resis / Immunity / Absorb | None / None / Gravity / None |
| EXP / GIL / AP | 10 / 80 / 1 |
| Common Steals / Rare Steals | Iron Bangle / None |
| Common Item Drops / Rare Item Drops | Potion / Phoenix Down |
Given the previous battles, you know what to expect from Ormi and Logos: essentially just their versions of an Attack, in which Logos will hit twice. These will mostly hit for 15-25 damage, though, so not much to be worried about. Leblanc has changed to a more offensive role in this fight, using a basic Attack and Sonic Fan , the latter of which can hit multiple targets, though both of these are usually hitting for 10-20 damage. She can also use Love Tap on one of her allies to Haste them. Leblanc uses them in that order, too - Attack, Sonic Fan, and Love Tap.
Taking note of this, it would be nice to take out Leblanc before anyone; Haste can make things a little tough, especially if cast on someone who then casts it on others. If you intend to go this way, simply steal her Tiara first, then wail on her; you’ll probably get in enough hits just before Love Tap or just after.
Having a Songstress for this battle is extremely helpful, too, if you don’t think you have the offensive power necessary to take down Leblanc that fast: Darkness Dance will severely lower the enemies’ Accuracy, meaning the only thing you’ll really see hitting you is Sonic Fan. Other than that, just persist with attacking and heal as needed.
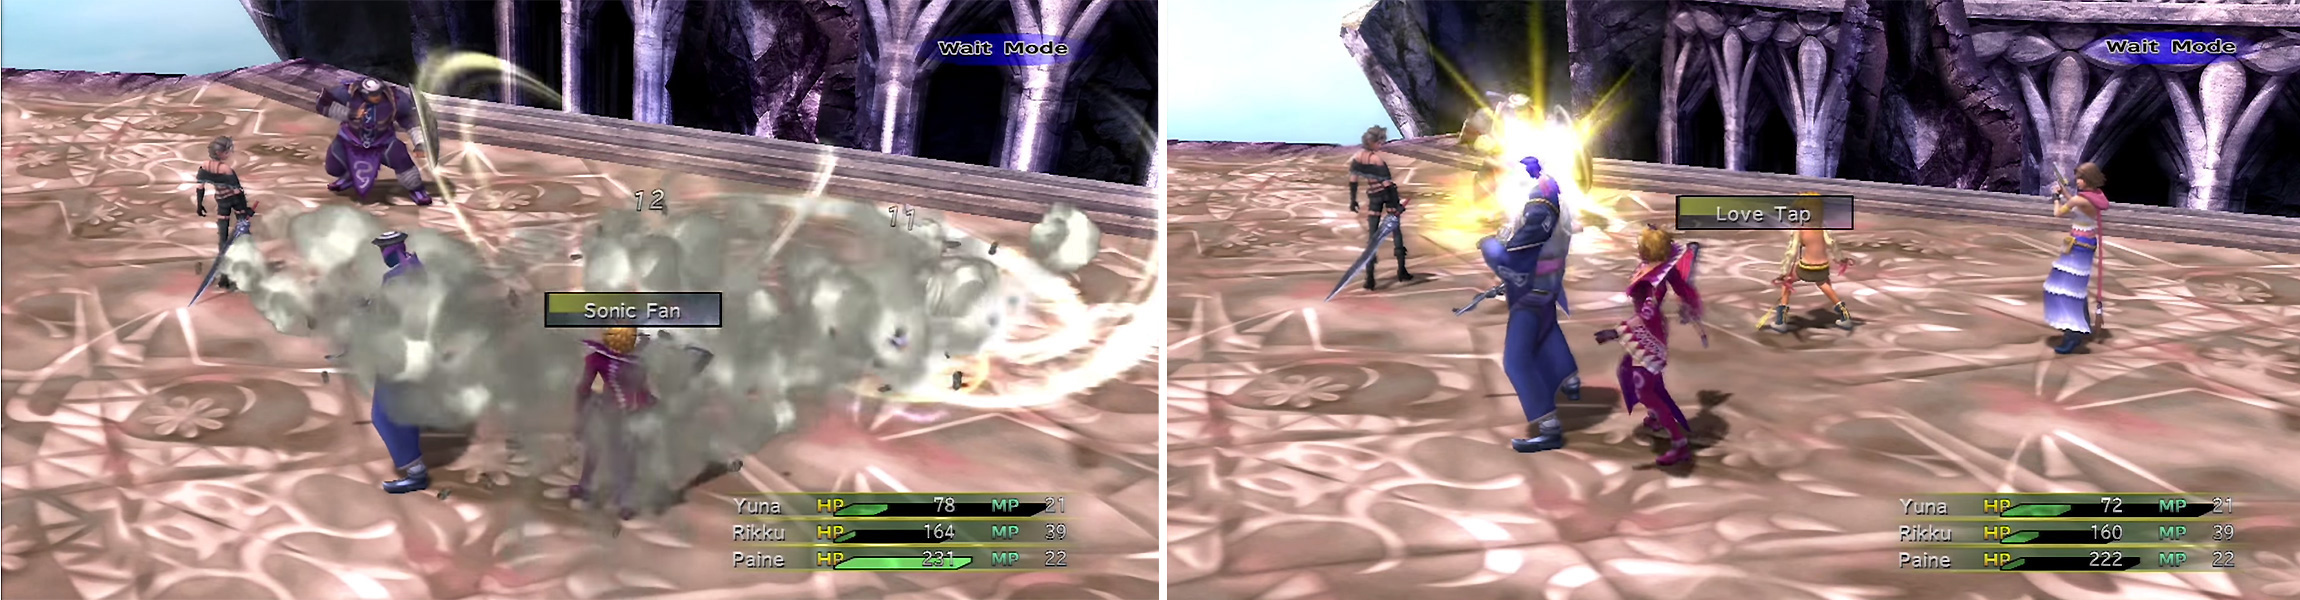
Leblanc has some new abilities. Sonic Fan (left) can hit two targets. Love Tap (right) casts Haste on one ally.
After the battle, you’ll be given a mission - simply beat the Leblanc Syndicate to the sphere! You have six minutes in which to do so, and doing so is critical for 100%. If it matters, the timer doesn’t deplete during a battle or whilst in the menu, so you don’t have to run from battles or avoid healing, unlike Final Fantasies VII and VIII.
Go north and along the path to the chest, in which you’ll find a very useful Mega Phoenix . Go west a bit and jump over the gap to the northwest. This should take you inside.
Passage : Go north to the intersection, at which you should go west and up the ledge. Activate the switch at the end of the path, then go east of the intersection and activate the switch there, too. In doing so, a pillar will be lowered - head north of the intersection and jump down into the pit to find a White Ring . Go back out, then jump over the gap this time. Continue along the path to another intersection; go east from there and go along the hallway, jumping and climbing all the way to the next area.
Upper Base : Open the Red Ring chest and re-enter the ruins.
Passage : Go on back down the ledges to the intersection, this time heading north there. In the next area, you’ll simply have to do a bunch of climbing up ledges.
Base : Go south and west along the path to another forced-but-simple battle. After the battle, you’ll end up on a broken pillar; cross the gap to the other side and jump on the rubble to reach the Spire.
Spire : Continue climbing up for a bit. As the path narrows, hug the right side to find a chest containing a Star Pendant . Backtrack to the main path and continue up; hopefully, you’ll have beaten the Syndicate up there. After the scene if you did (we barely had 10 seconds to spare!), save, then continue up to a Muscle Belt chest (only available to those winning the race), then up the stairs to the east. This quickly leads to a boss.
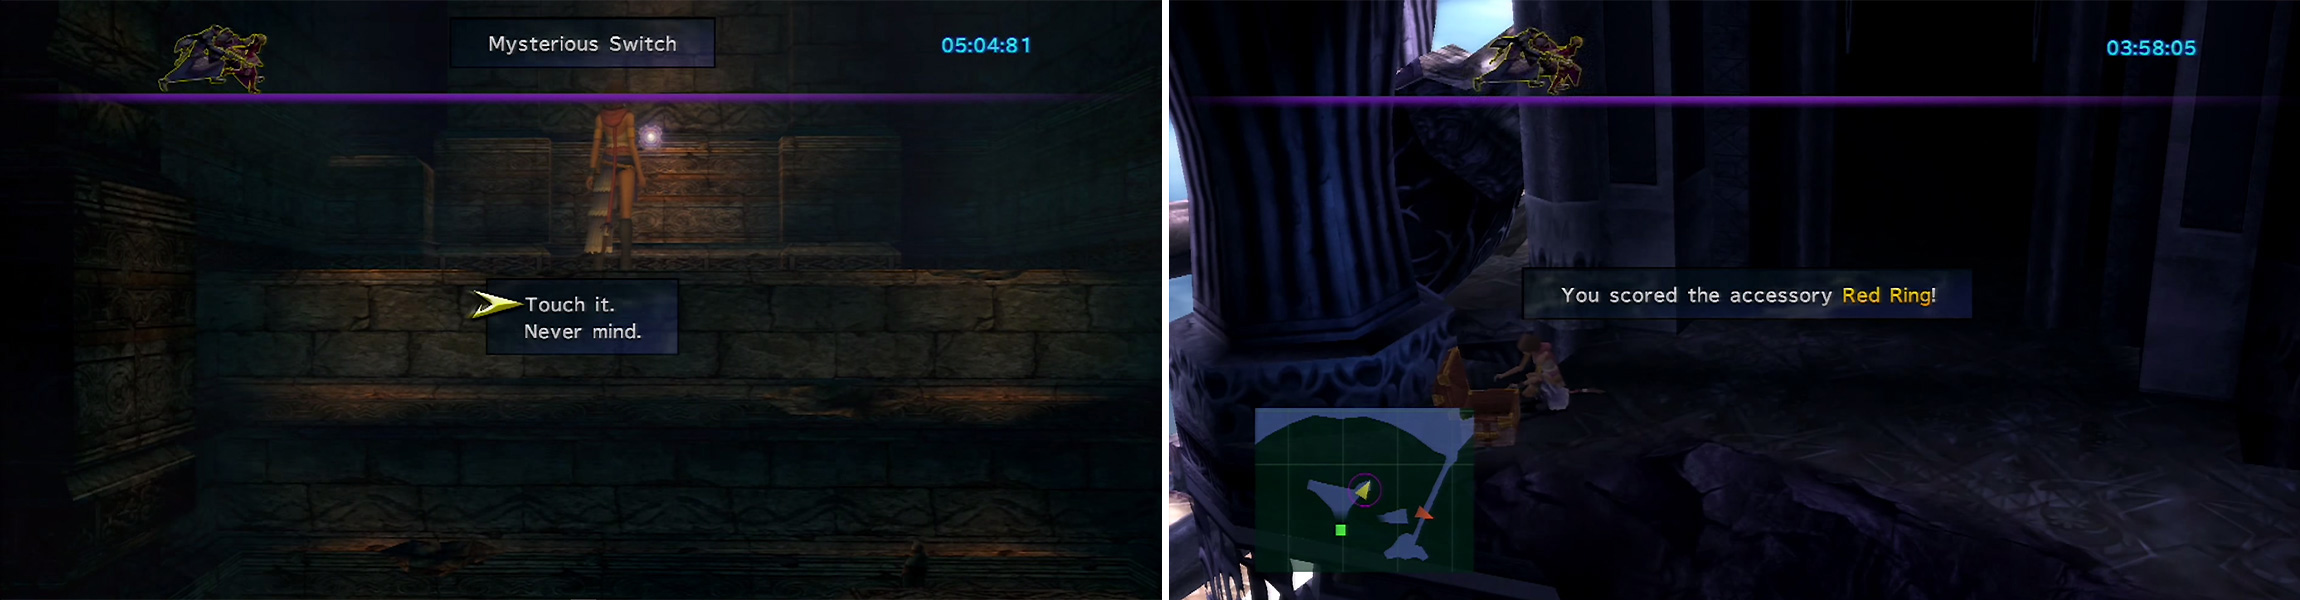
Hitting the switches (left) inside the ruins opens up paths to some nice items (right).
BOSS - Boris
| Boris | Details |
|---|---|
| Max HP / Max MP | 480, 804 (Oversoul) / 0 |
| Elem. Weak / Resis / Immunity / Absorb | Fire, Ice / None / None / None |
| EXP / GIL / AP | 26, 120 (Oversoul) / 300 / 1, 2 (Oversoul) |
| Common Steals / Rare Steals | 1 Remedy, 1 Kinesis Badge (Oversoul) / 2 Remedies |
| Common Item Drops / Rare Item Drops | 1 Star Pendant / None |
I hope you don’t have to fight the Oversouled form right now; it’s going to make things a lot harder if it does become its Oversoul form. Anyhow, it has two unnamed Attacks, one that hits twice, and another that’s just powerful, though the end damage is usually around 30-40 from both. It can also use Sticky End to everyone for around 40-50 damage, and it can also cause Stop. Finally, if you fight the Oversoul form, you’ll see the strong Tempus Laxit (hits all, causes Stop) and Power Catalyst (continual Strength increase). Power Catalyst is a huge concern since, other than Sticky End, every move used here is physical.
If you’re fighting a regular Boris, it will use one of its two Attack moves for four turns, then it will hit with Sticky End, looping from there. If it Oversouls, it will open with Power Catalyst, then go into Tempus Laxit or the double-hitting attack for damage.
The main problem with this fight in general is the Stop status ailment; at this point in the game, there’s not much you can do about it. Granted, you can use the Remedies you may have picked up in the Engine Room of the Celsius to heal it, though it’s almost a waste of such a good item; to each their own, however.
Anyway, you should have gotten the Warrior abilities Power and Armor Break by now. Those are great for opening an offense on this thing - especially the Oversoul form! - as they halve its Strength and Defense, respectively, which makes a significant impact on its offense and your offense if you’re still using a physical-oriented party. Darkness Dance should also be able to hit and further hurt its offense, leaving just Sticky End to worry about every five turns by blinding it. After that, just bash the crippled bug with your swords, or use the colored Red and White Rings to use their respective spells (Fire, Blizzard) for some extra damage. The Warrior’s preferable, but to each their own.
After the battle, you’ll be given the Gagazet Sphere . Return outside and you’ll end up back on the Celsius after a scene.
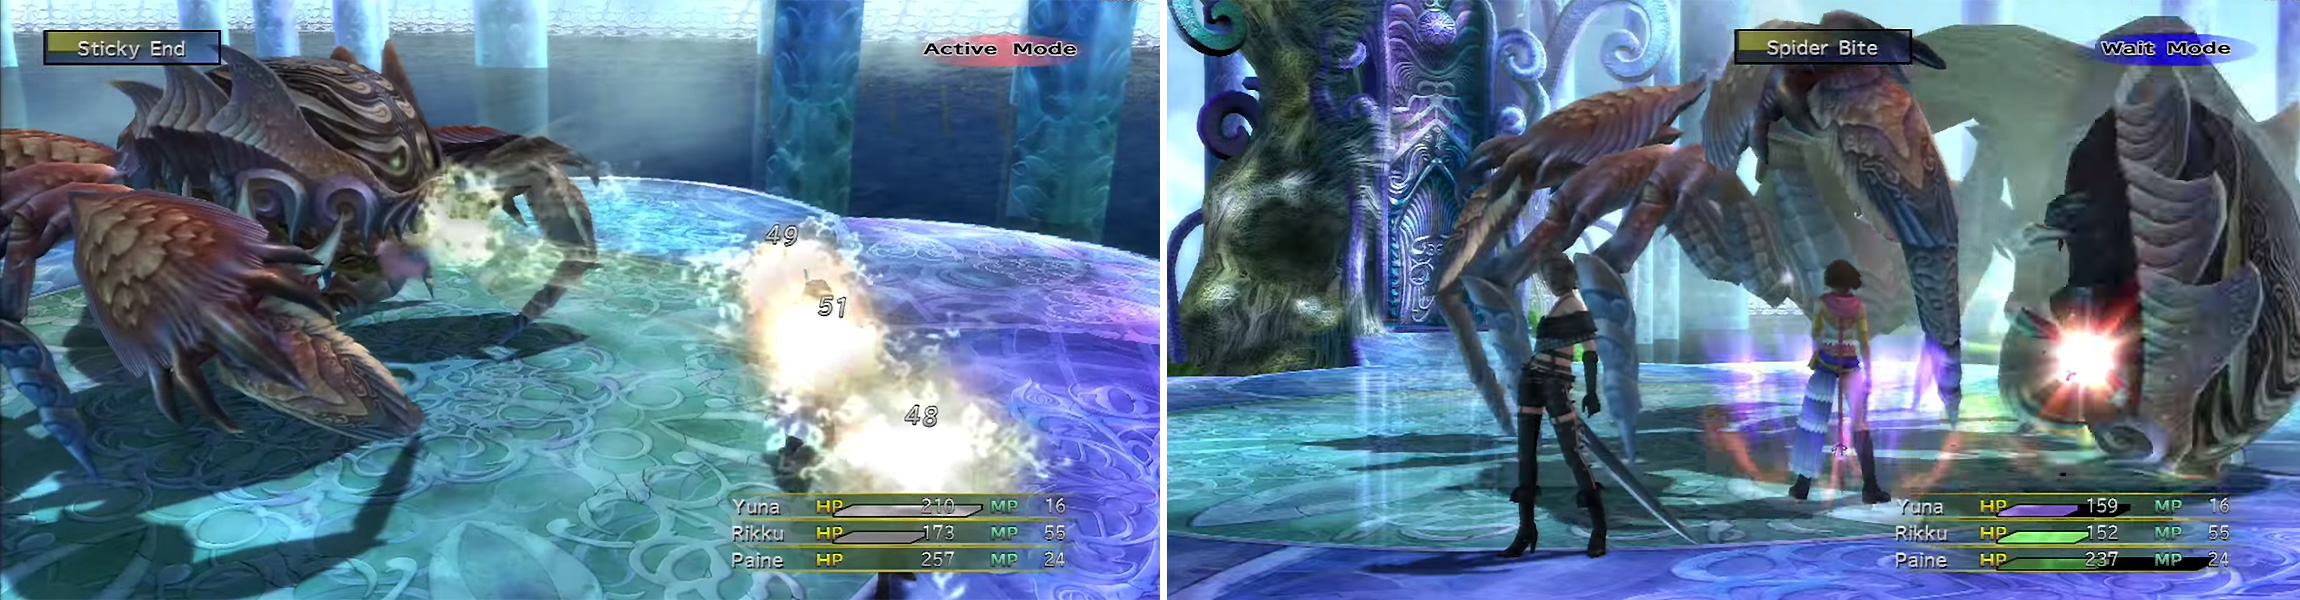
Sticky End (left) hits all characters for 40-50 HP but also causes Stop for a while. Spider Bite (right) sees Boris gobble up a character and spit them out for a decent amount of damage.

 Sign up
No Comments