
To the Crater

Your destination is the crescent isle in the far northern reaches of Luxendarc.
Back at Gathelatio, follow the shallows west and then northward. Eventually, you’ll find a shore on the far east side of a landmass. Land here, then head for the centre of the mountains blocking further passage to find a Remedy . Return to the shallows and carry on around the land.
As the shallows turn towards the north-west, another shore will be within reach. At the far east end of this island is an elusive Balsam .
Finally, follow the shallows north-west, past the snowy island and towards the snowy shore. On land, head clock-wise, all the way to the other end to discover a jug of Bacchus’s Wine . Then backtrack to the land bridge in front of the ominous Ba’al Crater.
Surface

The Ba’al Crater runs deeps–three areas deep to be precise. Pace yourself and don’t hesitate to turn off encounters so you can run to the Adventurer to heal and restock on items. From the entrance, make your way east. Along the way, take a detour down the path going south-west.
When the path splits in two, head directly east for a chest with a Balsam , then return to the path up north. Further east, the path will fork. First, follow the south-most passage and head south-west when the road splits to retrieve a Phoenix Down on the floor.
Return to the fork and follow the north-most path going east. Before long, another fork will appear. This time, take the north-most path for a chest with 400 pg inside, then go back and follow the south-most path. At the very end of this road is an exit to the next area.
Descent
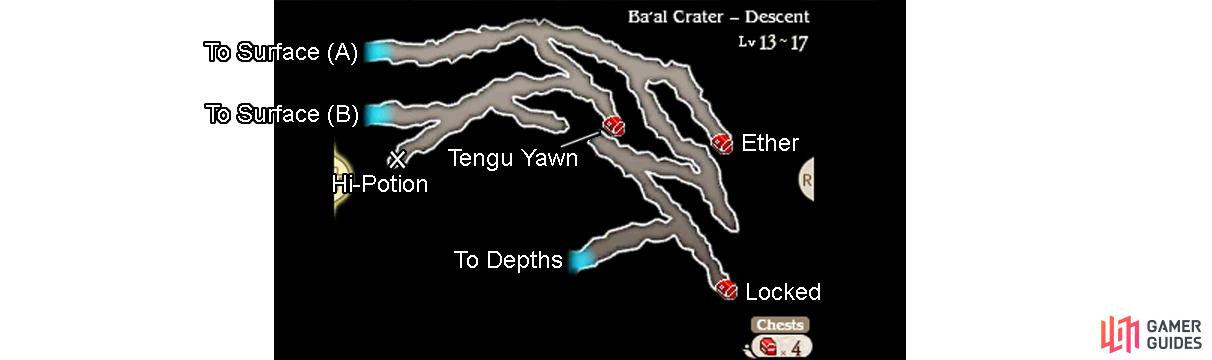
We hope you’re still standing. Continue east along the north-most path, ignoring all the side paths going south for now. At the end of the road is a chest containing a flask of Ether –great for your Wizards. Next, backtrack to the first junction of this area and head along the south-east path.
At the next junction, carry on south-east for a chest with Tengu Yawn inside, then go back and take the path going west. Very soon another junction will present itself. Head south-east from here to discover a Hi-Potion on the floor. Continue west and take the north-most path to the exit.
On the other side, you’ll be back at the Surface part of the crater. Crack open the chest in front of you for a Mythril Bow –hand this mighty weapon to your Thief or Charioteer. Back at the Descent part, return to the second junction along the north-most passage and take the side path going down.
When the path diverges, continuing south will lead to a dead end so head for the west instead. Soon, you’ll be forced to travel south-east when the road ahead comes to an end. Further down, ignore the path branching to the west to discover a blue locked chest at the end.
With no key in your possession, follow the final path west and take the exit to the next area.
Depths

At last we come to the final area. Begin by heading all the way west, ignoring the first side path going down, but taking the second side path for a chest with a Wakeup Bell . Return to the main path and carry on west to the exit. Back at the Surface, flip open the chest for a Peace Ring .
Return to the Depths and make your way back to the first junction along the north-most passage, then go down the side path leading south-east. At the next path split, go west to find some Echo Herbs on the floor, then continue along the direction you were going before.
Continuing south-east past the next junction will bring you to an anchorite , but he’ll be no help without the Summoner asterisk, so travel west to the central passage instead. After a few paces, there will be another path going south-east–follow it and ignore the next path going west for a chest containing 350 pg .
Return to the central passage and carry on west. For the time being, ignore the two side paths going south. At the end of the path, a chest containing 500 pg awaits. Next, go back and travel down the first side path you ignored, leading south-west.
At the next junction, follow the path in an easterly direction to find a Teleport Stone on the ground. Finally, continue south-west from the junction to reach the end of the dungeon. Say “hi” to the Adventurer, then inspect the south-east edge of the area ahead to discover a rogue Ba’al.
Ba al v; Urchin
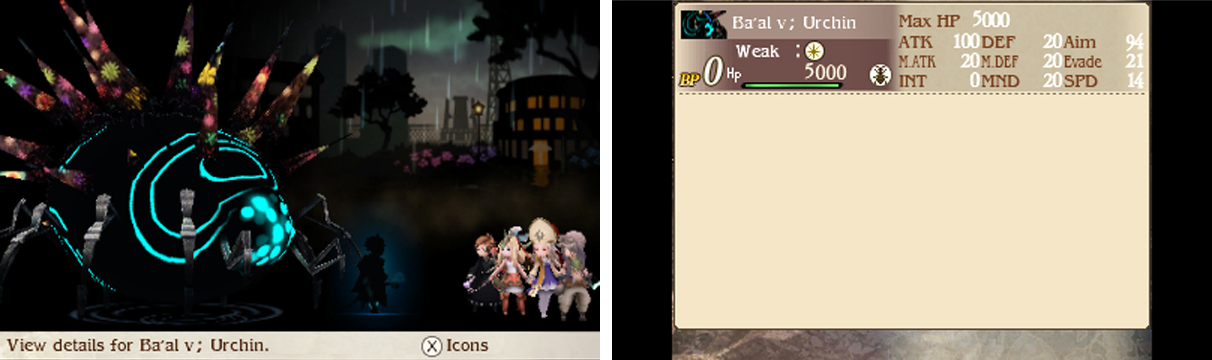
| Level | HP | Weakness | Resistance |
|---|---|---|---|
| 20 | 5000 | Light, Bug | Water |
If you played the Bravely Second demo all the way, you should recognise this Ba’al. Before tackling this monstrosity, somebody should be a Bishop to take advantage of Good Measure.
Urchin can use Sunny Day to create a 500 HP Shadowcaster from one of your characters. Each time your character performs an action, their doppelganger will cast Dark to inflict heavy dark magic on one character. Needless to say, you’ll want to eradicate the Shadowcaster fast.
Default with the character who’s been shadow-cloned and use the Mythril Bow to send the Shadowcaster reeling. Just note that if you’re a Charioteer, you’ll need to use regular attacks three times to up your bow proficiency to S before it becomes effective.
In addition, the giant bug can use Cloudy Sky to inflict damage and blind on your party. This annoyance can be solved by giving your primary physical attacker the Silver Glasses from the Harena Ruins or by using Eye Drops in conjunction with Halfsies to cure the party
Finally, Urchin may use Downpour, which deals four powerful magical hits scattered across your party. Note that Urchin will only use Cloud Sky and Downpour two times each throughout the course of the battle. As long as you play it safe, this battle isn’t too difficult.
Focus on Defaulting to build up BP and eventually have your Bishop cast Holy Night to restore HP while Defaulting. For offence, the Wizard’s Dart/Mist ( not Frost), Charioteer’s Trample and Fencer’s Wolf Fang/Goring Aurochs will serve you well.
Ba’als i and iv first appeared as Nemeses in Bravely Default.

 Sign up
No Comments